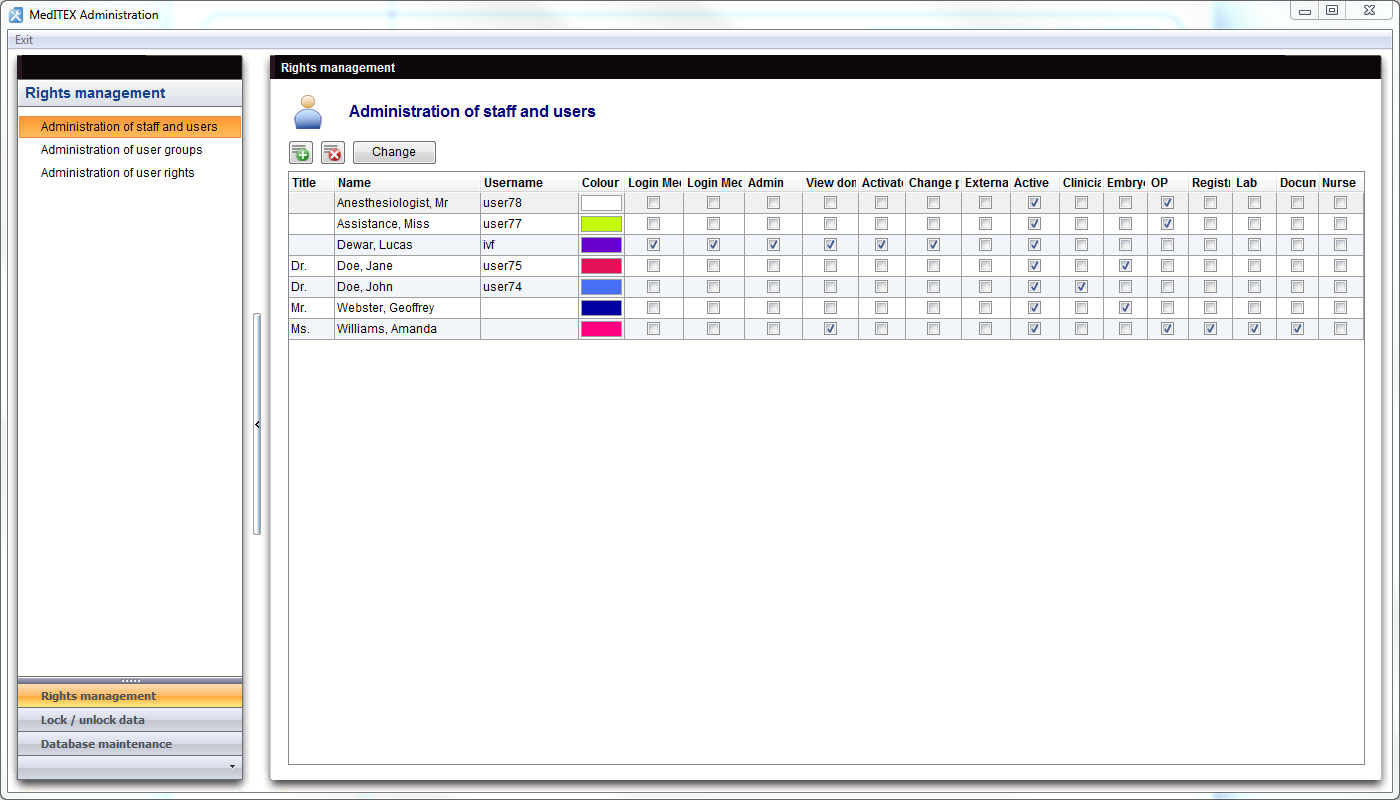
Gestione staff e utenti
From MedITEX - Wiki
| Line 7: | Line 7: | ||
</table> | </table> | ||
<p> </p> | <p> </p> | ||
| − | <h2> | + | <h2>Pulsanti</h2> |
| − | <p> | + | <p>I pulsanti circondati dai puntini blu hanno funzionalità particolari. Cliccaci sopra per avere maggiori informazioni. </p> |
<table style="margin-left: auto; margin-right: auto;" border="0" width="415" height="57"> | <table style="margin-left: auto; margin-right: auto;" border="0" width="415" height="57"> | ||
<tbody> | <tbody> | ||
<tr> | <tr> | ||
<td style="text-align: center;"><a href="/index.php?title=Administration_of_staff_and_users#Enter_new_person_.2F_Change"><img style="display: block; margin-left: auto; margin-right: auto; border: 2px dotted blue;" src="/images/Plus.png" alt="" /></a></td> | <td style="text-align: center;"><a href="/index.php?title=Administration_of_staff_and_users#Enter_new_person_.2F_Change"><img style="display: block; margin-left: auto; margin-right: auto; border: 2px dotted blue;" src="/images/Plus.png" alt="" /></a></td> | ||
| − | <td style="text-align: justify;"><strong> | + | <td style="text-align: justify;"><strong>Nuovo utente:</strong> cliccare qui per aggiungere un nuovo utente alla lista. <br /></td> |
</tr> | </tr> | ||
<tr> | <tr> | ||
<td style="text-align: center;"><img src="/images/DeleteX.png" alt="" width="26" height="24" /></td> | <td style="text-align: center;"><img src="/images/DeleteX.png" alt="" width="26" height="24" /></td> | ||
| − | <td style="text-align: justify;"><strong> | + | <td style="text-align: justify;"><strong>Cancella utente:</strong> cliccare qui per cancellare l'utente selezionato dalla lista. E' richiesta una conferma per effettuare l'operazione.<br /></td> |
</tr> | </tr> | ||
<tr> | <tr> | ||
<td style="text-align: center;"><a href="/index.php?title=Administration_of_staff_and_users#Enter_new_person_.2F_Change"><img style="display: block; margin-left: auto; margin-right: auto; border: 2px dotted blue;" src="/images/ChangeButton.png" alt="" width="86" height="27" /></a></td> | <td style="text-align: center;"><a href="/index.php?title=Administration_of_staff_and_users#Enter_new_person_.2F_Change"><img style="display: block; margin-left: auto; margin-right: auto; border: 2px dotted blue;" src="/images/ChangeButton.png" alt="" width="86" height="27" /></a></td> | ||
| − | <td style="text-align: justify;"><strong> | + | <td style="text-align: justify;"><strong>Modifica utente:</strong> cliccare qui per modificare le informazioni relative all'utente selezionato.<br /></td> |
</tr> | </tr> | ||
</tbody> | </tbody> | ||
</table> | </table> | ||
<p> </p> | <p> </p> | ||
| − | <h2> | + | <h2>Inserimento nuovo utente / Cambia</h2> |
| − | <p> | + | <p>Facendo doppio click sulla freccina a sinistra della lista, cliccando su "Nuovo utente" o su "Cambia" si aprirà una finestra da cui è possibile aggiungere o modificare informazioni sugli utenti. </p> |
| − | + | <h3>Pulsanti</h3> | |
| − | <h3> | + | |
<table style="margin-left: auto; margin-right: auto;" border="0" width="415" height="57"> | <table style="margin-left: auto; margin-right: auto;" border="0" width="415" height="57"> | ||
<tbody> | <tbody> | ||
<tr> | <tr> | ||
<td style="text-align: center;"><img src="/images/ChooseColour.png" alt="" width="150" height="28" /></td> | <td style="text-align: center;"><img src="/images/ChooseColour.png" alt="" width="150" height="28" /></td> | ||
| − | <td style="text-align: justify;"><strong> | + | <td style="text-align: justify;"><strong>Scegli colore: </strong>per aggiungere o cambiare l'etichetta di quell'utente.<br /></td> |
</tr> | </tr> | ||
<tr> | <tr> | ||
<td style="text-align: center;"><img src="/images/ChangePassword.png" alt="" width="231" height="30" /></td> | <td style="text-align: center;"><img src="/images/ChangePassword.png" alt="" width="231" height="30" /></td> | ||
| − | <td style="text-align: justify;"><strong> | + | <td style="text-align: justify;"><strong>Modifica password:</strong> questo pulsante è selezionabile solo se sono state mofidicate informazioni dell'utente. <br /></td> |
</tr> | </tr> | ||
<tr> | <tr> | ||
<td style="text-align: center;"><img style="display: block; margin-left: auto; margin-right: auto;" src="/images/EnterUsernameAndPAssword.png" alt="" width="232" height="29" /></td> | <td style="text-align: center;"><img style="display: block; margin-left: auto; margin-right: auto;" src="/images/EnterUsernameAndPAssword.png" alt="" width="232" height="29" /></td> | ||
| − | <td style="text-align: justify;"><strong> | + | <td style="text-align: justify;"><strong>Inserisci nome utente e password:</strong> q<span>uesto pulsante è selezionabile solo se è stato aggiunto un nuovo utente.</span></td> |
</tr> | </tr> | ||
</tbody> | </tbody> | ||
| Line 55: | Line 54: | ||
<tr> | <tr> | ||
<td> | <td> | ||
| − | <p><strong> | + | <p><strong>Nome utente:</strong> visualizza il nome utente durante la modifica di una persona. Se si aggiunge una nuova persona, questo campo sarà vuoto.</p> |
<p><strong>Show in colour:</strong> this is the colour that will be displayed for this user throughout all MedITEX programs.</p> | <p><strong>Show in colour:</strong> this is the colour that will be displayed for this user throughout all MedITEX programs.</p> | ||
<p><strong>Program language: </strong>language displayed to this user when MedITEX tools are started.</p> | <p><strong>Program language: </strong>language displayed to this user when MedITEX tools are started.</p> | ||
Revision as of 14:36, 6 April 2016
 |
Contents |
Pulsanti
I pulsanti circondati dai puntini blu hanno funzionalità particolari. Cliccaci sopra per avere maggiori informazioni.
| <a href="/index.php?title=Administration_of_staff_and_users#Enter_new_person_.2F_Change"><img style="display: block; margin-left: auto; margin-right: auto; border: 2px dotted blue;" src="/images/Plus.png" alt="" /></a> | Nuovo utente: cliccare qui per aggiungere un nuovo utente alla lista. |
| <img src="/images/DeleteX.png" alt="" width="26" height="24" /> | Cancella utente: cliccare qui per cancellare l'utente selezionato dalla lista. E' richiesta una conferma per effettuare l'operazione. |
| <a href="/index.php?title=Administration_of_staff_and_users#Enter_new_person_.2F_Change"><img style="display: block; margin-left: auto; margin-right: auto; border: 2px dotted blue;" src="/images/ChangeButton.png" alt="" width="86" height="27" /></a> | Modifica utente: cliccare qui per modificare le informazioni relative all'utente selezionato. |
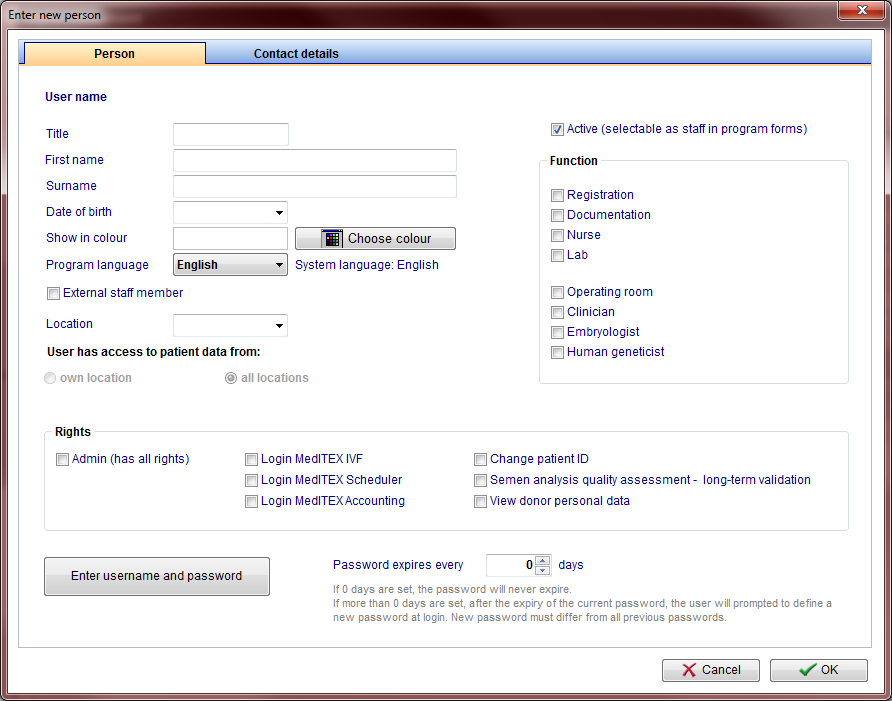
Inserimento nuovo utente / Cambia
Facendo doppio click sulla freccina a sinistra della lista, cliccando su "Nuovo utente" o su "Cambia" si aprirà una finestra da cui è possibile aggiungere o modificare informazioni sugli utenti.
Pulsanti
| <img src="/images/ChooseColour.png" alt="" width="150" height="28" /> | Scegli colore: per aggiungere o cambiare l'etichetta di quell'utente. |
| <img src="/images/ChangePassword.png" alt="" width="231" height="30" /> | Modifica password: questo pulsante è selezionabile solo se sono state mofidicate informazioni dell'utente. |
| <img style="display: block; margin-left: auto; margin-right: auto;" src="/images/EnterUsernameAndPAssword.png" alt="" width="232" height="29" /> | Inserisci nome utente e password: questo pulsante è selezionabile solo se è stato aggiunto un nuovo utente. |
Tabs
 |
|
Nome utente: visualizza il nome utente durante la modifica di una persona. Se si aggiunge una nuova persona, questo campo sarà vuoto. Show in colour: this is the colour that will be displayed for this user throughout all MedITEX programs. Program language: language displayed to this user when MedITEX tools are started. External staff member: select this box for external members working for the clinic. Location: in case of multiple locations, this setting identify which one this user is allocated to. Leave if blank if this user should be visible in all locations. User has access to patient data from: in case of multiple locations, allows users to see patient data from all locations, not only to the one he/she is allocated to. Active: this check box allows this person to be selectable throughout program forms. For example: if Dr. Johnson does not have this box checked, he will not be able to be selected for a treatment. Function: type of work done by this person. Rights: these are the permissions of this person. |
| <img src="/images/NewPersonContacts.png" alt="" width="540" height="682" /> |
| Contact information about this person. |
| <img style="display: block; margin-left: auto; margin-right: auto;" src="/images/howto48.png" alt="" width="48" height="48" /> | If you would like to get more information, please follow <a href="/index.php?title=MedITEX_Administration_how_to">this link</a> and check our How to page. |
| <a href="/index.php?title=MedITEX_Administration_manual">Back to MedITEX Administration manual </a> |
<a href="#top">Back to top</a> |