First Steps Before Using MedITEX
From MedITEX - Wiki
Contents |
Personnel Organization
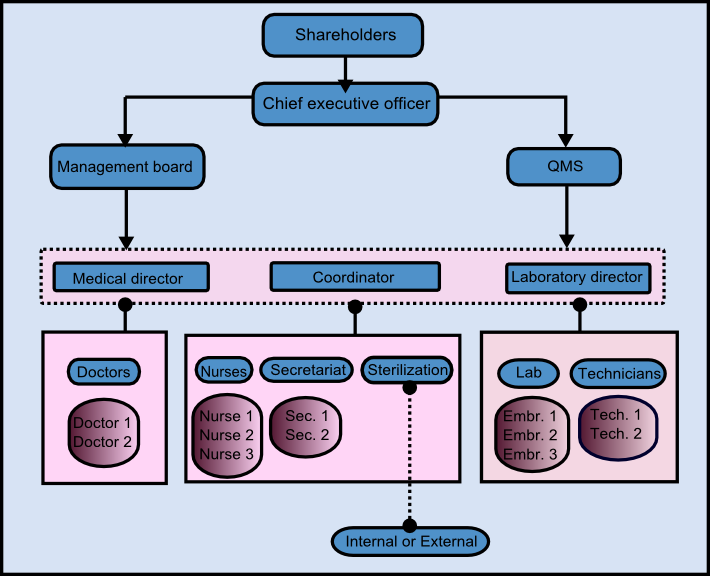
In an IVF clinic you have different groups of personnel like doctors, physicians, embryologists, nurses, secretaries... All of them are dealing with information and documents, but each group will need to work with a different access to MedITEX software solutions because of various levels of responsibilities.
To ensure that these different levels of permissions will not be exceeded, each user needs unique login data and special defined rights.
The secretaries for example, speak with the patient the first time by registration or a telephone call. They document the privat informations about the patient. Later the doctor adds the results of the examination. The laboratory staff has no possibilities to change clinical information, just to complete the missing data.
The hospital workflow differs in each clinic. It is important to know about these internal processes and their command structure before using MedITEX software solutions, so assigning rights is getting much more easier.
This image shows a typical IVF clinic:
Technical Requirements
Before the installation beginns, it is needfully that your IT admins prepare all the necessary hardware (servers and clients) and ensure fast and reliable network connections.
For guarantee this, please assign one responsible person who will get in contact with us.
3 Steps of Installation Process
The installation process is divided in 3 steps : Preparation, Installation and Setup of satellite location.
1. Step: Preparation
- We need a physical or virtual server with Win Server OS(2003+) installed and running
- Internal and VPN connections to the server should be ensured and prepared
- Remote access over internet to the server should be possible
These tasks should be performed by your IT responsible, whom our support member will provide with information and support.
2. Step: Installation
In order to begin with the installation (step 2) it is absolutely necessary that the requirements from the step 1 are fulfilled before.
After the server is prepared, our team will access it remotely and test if everything is ready for the installation.
During the installation we will need constant support from your IT responsible, and a possibility to consult a medical specialist from your team who knows all the staff and their roles, medical procedures performed, and other special details which our support member will have to configure in MedITEX.
3. Step: Setup of satellite location
Setup of MedITEX access from satellite clinic to central data server, locally in satellite clinic.
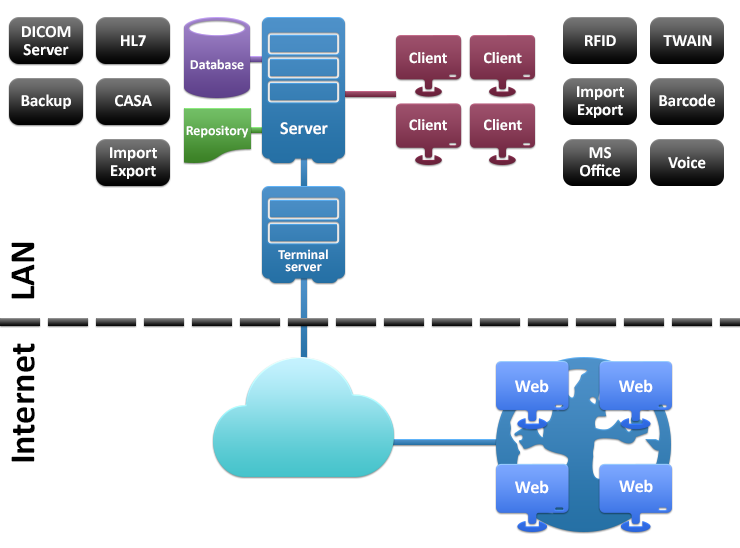
MedITEX Software Technical Specification - Overview
 |
Server (mimimum requirement) 1. OS: Windows Server 2000, 2003 Recommended: Win Server 2008 |
 |
Database Firebird SQL Server 2.x
|
 |
File based repository; Sharing of file space for all clients All documents, pictures and common settings are stored here |
 |
Backup Service Schedules and create Backups of Database and Repository |
 |
Minimum hardware requirement: 1. OS: Windows 2000, XP, Vista, 7 |
 |
MS Office Integration All letters based on MS Word tamplates. Min required MS Office 2003 |
 |
TWAIN TWAIN is used for Importing Patient phots, Ultrasound Images |
 |
Voice Record and Play Voice Messages; Using standard Windows equipment |
 |
Terminal Server Connection (minimum requirement)
|
| Back to top |