Examples mexAPI
From MedITEX - Wiki
| (70 intermediate revisions by one user not shown) | |||
| Line 1: | Line 1: | ||
| − | <p>On this page you get more | + | <p>On this page you get <strong>more information about using mexAPI</strong>. Here you can get <strong>examples </strong>for all functions of the program.</p> |
<p> </p> | <p> </p> | ||
<h2>Commands</h2> | <h2>Commands</h2> | ||
| + | <table border="0"> | ||
| + | <tbody> | ||
| + | <tr> | ||
| + | <td>[[Image:ApiCommands1.png|none|740px|thumb|left|link=http://wiki.meditex-software.com/images/ApiCommands1.png| ]]</td> | ||
| + | </tr> | ||
| + | </tbody> | ||
| + | </table> | ||
| + | <p> </p> | ||
<ul> | <ul> | ||
</ul> | </ul> | ||
<h3><span class="toctext">ExportCSVData</span></h3> | <h3><span class="toctext">ExportCSVData</span></h3> | ||
| + | <table border="0"> | ||
| + | <tbody> | ||
| + | <tr> | ||
| + | <td> </td> | ||
| + | </tr> | ||
| + | </tbody> | ||
| + | </table> | ||
<p> </p> | <p> </p> | ||
<ul> | <ul> | ||
| Line 11: | Line 26: | ||
<ul> | <ul> | ||
</ul> | </ul> | ||
| − | |||
<table style="float: right;" border="0"> | <table style="float: right;" border="0"> | ||
<tbody> | <tbody> | ||
| Line 19: | Line 33: | ||
</tbody> | </tbody> | ||
</table> | </table> | ||
| + | <p> </p> | ||
<p> </p> | <p> </p> | ||
<p> </p> | <p> </p> | ||
<h3>SaveData</h3> | <h3>SaveData</h3> | ||
| + | <table border="0"> | ||
| + | <tbody> | ||
| + | <tr> | ||
| + | <td> </td> | ||
| + | </tr> | ||
| + | </tbody> | ||
| + | </table> | ||
<p> </p> | <p> </p> | ||
<p> </p> | <p> </p> | ||
| Line 35: | Line 57: | ||
<p> </p> | <p> </p> | ||
<h3>GetData</h3> | <h3>GetData</h3> | ||
| + | <table border="0"> | ||
| + | <tbody> | ||
| + | <tr> | ||
| + | <td> </td> | ||
| + | </tr> | ||
| + | </tbody> | ||
| + | </table> | ||
<p> </p> | <p> </p> | ||
<table style="float: right;" border="0"> | <table style="float: right;" border="0"> | ||
| Line 44: | Line 73: | ||
</table> | </table> | ||
<p> </p> | <p> </p> | ||
| − | |||
| − | |||
| − | |||
<p> </p> | <p> </p> | ||
<p> </p> | <p> </p> | ||
<p> </p> | <p> </p> | ||
| + | <h3>GetLanguageCode</h3> | ||
| + | <p>If you click the function <strong>GetLanguageCode </strong>the empty field will be filled.</p> | ||
| + | <table border="0"> | ||
| + | <tbody> | ||
| + | <tr> | ||
| + | <td>[[Image:GetLanguageCode.png|none|740px|thumb|left|link=http://wiki.meditex-software.com/images/GetLanguageCode.png| ]]</td> | ||
| + | </tr> | ||
| + | </tbody> | ||
| + | </table> | ||
| + | <p>The <strong>language code</strong> of your database will be shown. RDA_EN = English, RDA_DE = German, ...</p> | ||
<table style="float: right;" border="0"> | <table style="float: right;" border="0"> | ||
<tbody> | <tbody> | ||
| Line 59: | Line 95: | ||
<p> </p> | <p> </p> | ||
<p> </p> | <p> </p> | ||
| − | |||
<p> </p> | <p> </p> | ||
| + | <h3>GetExpertData</h3> | ||
| + | <table border="0"> | ||
| + | <tbody> | ||
| + | <tr> | ||
| + | <td> </td> | ||
| + | </tr> | ||
| + | </tbody> | ||
| + | </table> | ||
<p> </p> | <p> </p> | ||
<table style="float: right;" border="0"> | <table style="float: right;" border="0"> | ||
| Line 70: | Line 113: | ||
</tbody> | </tbody> | ||
</table> | </table> | ||
| − | |||
<p> </p> | <p> </p> | ||
<p> </p> | <p> </p> | ||
| Line 76: | Line 118: | ||
<p> </p> | <p> </p> | ||
<h2>Patient</h2> | <h2>Patient</h2> | ||
| + | <table border="0"> | ||
| + | <tbody> | ||
| + | <tr> | ||
| + | <td>[[Image:ApiPatient.png|none|740px|thumb|left|link=http://wiki.meditex-software.com/images/ApiPatient.png| ]]</td> | ||
| + | </tr> | ||
| + | </tbody> | ||
| + | </table> | ||
| + | <p> </p> | ||
<ul> | <ul> | ||
</ul> | </ul> | ||
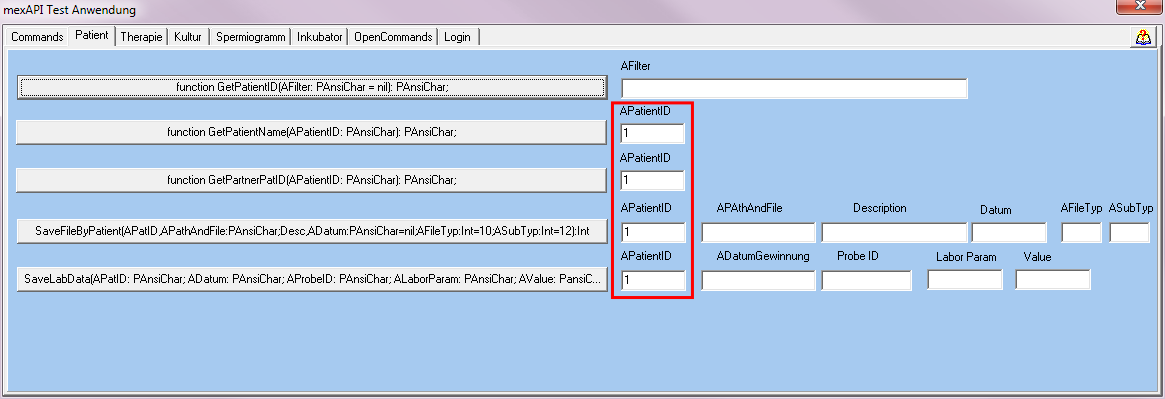
<h3><span class="toctext">GetPatientID</span></h3> | <h3><span class="toctext">GetPatientID</span></h3> | ||
| + | <p>After calling the function <strong>GetPatientID</strong> the following window opens:</p> | ||
| + | <table border="0"> | ||
| + | <tbody> | ||
| + | <tr> | ||
| + | <td style="text-align: center;"><img src="/images/GetPatientID1.png" alt="" width="550" height="379" /></td> | ||
| + | <td> | ||
| + | <p>In this window you can <strong>search the patient</strong>. You can search by surname, date of birth or patient ID. You can also open the list and search there.</p> | ||
<p> </p> | <p> </p> | ||
| − | <p> | + | <p>If you have found the correct name, choose it with a double click on it.</p> |
| + | <p>The window will <strong>close automatically </strong>and <strong>show you the associated patient ID</strong>.</p> | ||
| + | <p>For the example we take the patient <strong>Jane DEMO</strong> with the <strong>patient ID 1</strong>.</p> | ||
| + | </td> | ||
| + | </tr> | ||
| + | <tr> | ||
| + | <td style="text-align: center;" colspan="2">[[Image:GetPatientID.png|none|740px|thumb|left|link=http://wiki.meditex-software.com/images/GetPatientID.png| ]]</td> | ||
| + | </tr> | ||
| + | </tbody> | ||
| + | </table> | ||
| + | <p>After this step you can work with the other functions. At each place where the patient ID is needed in the mexAPI, the field is filled automatically.</p> | ||
<table style="float: right;" border="0"> | <table style="float: right;" border="0"> | ||
<tbody> | <tbody> | ||
| Line 88: | Line 155: | ||
</tbody> | </tbody> | ||
</table> | </table> | ||
| + | <p> </p> | ||
<p> </p> | <p> </p> | ||
<p> </p> | <p> </p> | ||
| Line 94: | Line 162: | ||
</ul> | </ul> | ||
<h3><span class="toctext">GetPatientName</span></h3> | <h3><span class="toctext">GetPatientName</span></h3> | ||
| − | <p> </p> | + | <p>With this function, you can <strong>get the name of a patient</strong>. </p> |
| − | < | + | <table border="0"> |
| + | <tbody> | ||
| + | <tr> | ||
| + | <td style="text-align: center;"><img src="/images/GetPatientName.png" alt="" width="105" height="118" /></td> | ||
| + | <td>If you call the function <strong>GetPatientName</strong>, the name of the patient with the patient ID 1 will be displayed in a new window: <strong>Jane DEMO</strong>.<br /></td> | ||
| + | </tr> | ||
| + | </tbody> | ||
| + | </table> | ||
<table style="float: right;" border="0"> | <table style="float: right;" border="0"> | ||
<tbody> | <tbody> | ||
| Line 103: | Line 178: | ||
</tbody> | </tbody> | ||
</table> | </table> | ||
| + | <p> </p> | ||
| + | <p> </p> | ||
<p> </p> | <p> </p> | ||
<p> </p> | <p> </p> | ||
| Line 108: | Line 185: | ||
</ul> | </ul> | ||
<h3><span class="toctext">GetPartnerPatID</span></h3> | <h3><span class="toctext">GetPartnerPatID</span></h3> | ||
| − | <p> | + | <p>With this function, you can get the ID of the <strong>patients' partner</strong>.</p> |
| − | <p> | + | <table border="0"> |
| + | <tbody> | ||
| + | <tr> | ||
| + | <td>[[Image:GetPartnerPatID.png|none|740px|thumb|left|link=http://wiki.meditex-software.com/images/GetPartnerPatID.png| ]]</td> | ||
| + | </tr> | ||
| + | </tbody> | ||
| + | </table> | ||
| + | <p>After activating the function GetPartnerID, the program jumps to the partner of the patient and <strong>shows the partner</strong> as the real patient.</p> | ||
<table style="float: right;" border="0"> | <table style="float: right;" border="0"> | ||
<tbody> | <tbody> | ||
| Line 117: | Line 201: | ||
</tbody> | </tbody> | ||
</table> | </table> | ||
| + | <p> </p> | ||
<p> </p> | <p> </p> | ||
<p> </p> | <p> </p> | ||
| Line 124: | Line 209: | ||
</ul> | </ul> | ||
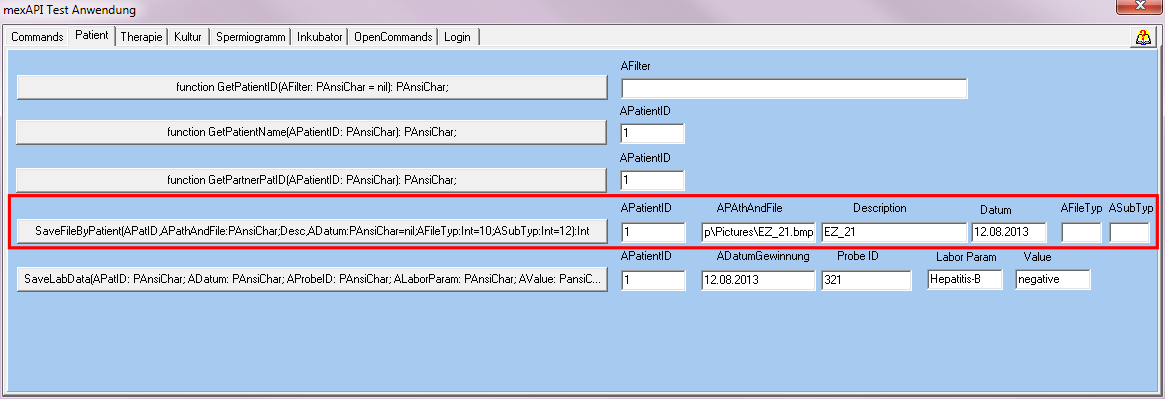
<h3><span class="toctext">SaveFileByPatient</span></h3> | <h3><span class="toctext">SaveFileByPatient</span></h3> | ||
| − | <p> | + | <table border="0"> |
| − | <p> | + | <tbody> |
| + | <tr> | ||
| + | <td>[[Image:SaveFileByPatient.png|none|740px|thumb|left|link=http://wiki.meditex-software.com/images/SaveFileByPatient.png| ]]</td> | ||
| + | </tr> | ||
| + | </tbody> | ||
| + | </table> | ||
| + | <p>With the function <strong>SaveFileByPatient</strong>, you can save files of a patient in the associated file storage folder.</p> | ||
| + | <p>Necessary parameters are the correct <strong>patient ID</strong> and the full <strong>file path</strong>.</p> | ||
<table style="float: right;" border="0"> | <table style="float: right;" border="0"> | ||
<tbody> | <tbody> | ||
| Line 133: | Line 225: | ||
</tbody> | </tbody> | ||
</table> | </table> | ||
| + | <p> </p> | ||
| + | <p> </p> | ||
<p> </p> | <p> </p> | ||
<p> </p> | <p> </p> | ||
| Line 138: | Line 232: | ||
</ul> | </ul> | ||
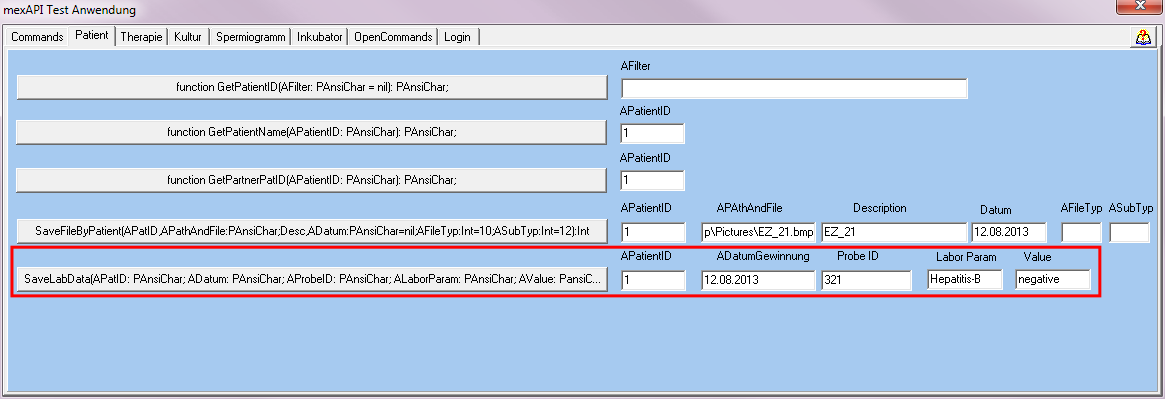
<h3><span class="toctext">SaveLabData</span></h3> | <h3><span class="toctext">SaveLabData</span></h3> | ||
| − | <p> | + | <table border="0"> |
| + | <tbody> | ||
| + | <tr> | ||
| + | <td>[[Image:SaveLabData.png|none|740px|thumb|left|link=http://wiki.meditex-software.com/images/SaveLabData.png| ]]</td> | ||
| + | </tr> | ||
| + | </tbody> | ||
| + | </table> | ||
| + | <p>Via this function you can <strong>save lab data</strong> manually. Enter the required data and values and save it at the <strong>laboratory area</strong> in MedITEX IVF.</p> | ||
<p> </p> | <p> </p> | ||
<table style="float: right;" border="0"> | <table style="float: right;" border="0"> | ||
| Line 147: | Line 248: | ||
</tbody> | </tbody> | ||
</table> | </table> | ||
| + | <p> </p> | ||
| + | <p> </p> | ||
<p> </p> | <p> </p> | ||
<p> </p> | <p> </p> | ||
| Line 152: | Line 255: | ||
</ul> | </ul> | ||
<h3><span class="toctext">SavePatientImage</span></h3> | <h3><span class="toctext">SavePatientImage</span></h3> | ||
| + | <table border="0"> | ||
| + | <tbody> | ||
| + | <tr> | ||
| + | <td><br /></td> | ||
| + | </tr> | ||
| + | </tbody> | ||
| + | </table> | ||
<p> </p> | <p> </p> | ||
<p> </p> | <p> </p> | ||
| Line 164: | Line 274: | ||
<ul> | <ul> | ||
</ul> | </ul> | ||
| + | <p> </p> | ||
<p> </p> | <p> </p> | ||
<p> </p> | <p> </p> | ||
<h2><br /><span class="toctext">Therapie - Cycle</span></h2> | <h2><br /><span class="toctext">Therapie - Cycle</span></h2> | ||
| + | <table border="0"> | ||
| + | <tbody> | ||
| + | <tr> | ||
| + | <td>[[Image:ApiTherapie.png|none|740px|thumb|left|link=http://wiki.meditex-software.com/images/ApiTherapie.png| ]]</td> | ||
| + | </tr> | ||
| + | </tbody> | ||
| + | </table> | ||
| + | <p><span class="toctext"><br /></span></p> | ||
<ul> | <ul> | ||
</ul> | </ul> | ||
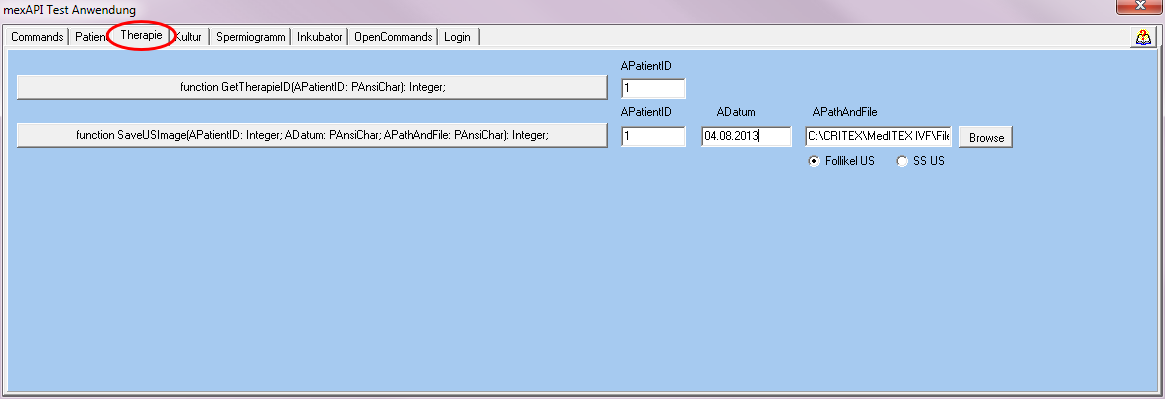
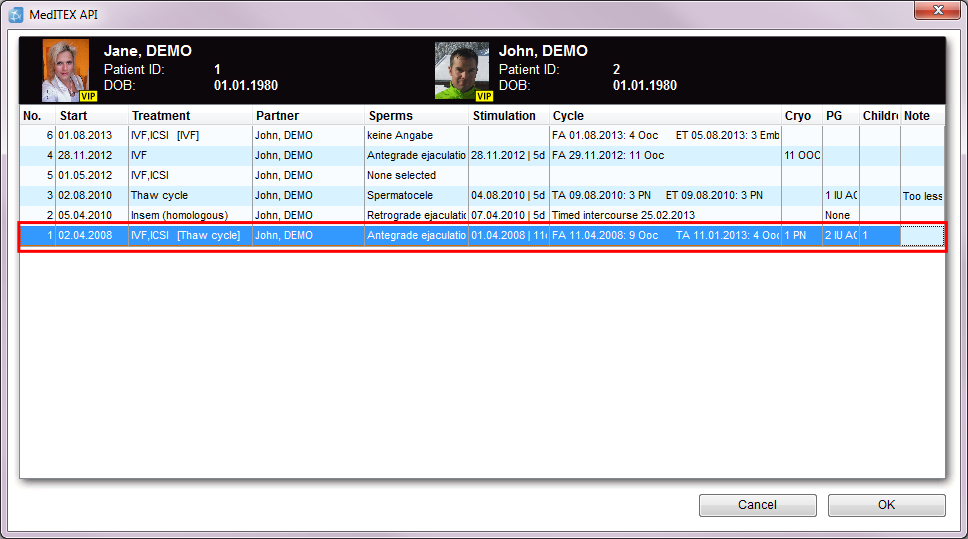
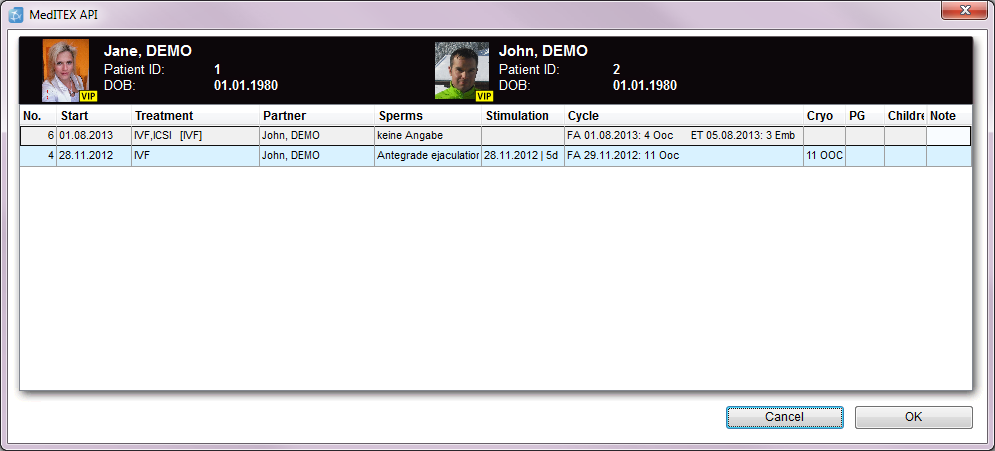
<h3><span class="toctext">GetTherapieID</span></h3> | <h3><span class="toctext">GetTherapieID</span></h3> | ||
| − | <p> | + | <p>This function allows you to <strong>see all cycles</strong> of the transferred patient.</p> |
| + | <table border="0"> | ||
| + | <tbody> | ||
| + | <tr> | ||
| + | <td>[[Image:GetTherapieID.png|none|740px|thumb|left|link=http://wiki.meditex-software.com/images/GetTherapieID.png| ]]</td> | ||
| + | </tr> | ||
| + | </tbody> | ||
| + | </table> | ||
| + | <p>After this function has been called, <strong>a window opens</strong>. This window is showing <strong>all cycles</strong> from the transferred patient. Choose the wished cycle.</p> | ||
| + | <p>The chosen <strong>ID will be added</strong> in all tabs where the Therapie ID is necessary.</p> | ||
<table style="float: right;" border="0"> | <table style="float: right;" border="0"> | ||
<tbody> | <tbody> | ||
| Line 178: | Line 306: | ||
</tbody> | </tbody> | ||
</table> | </table> | ||
| + | <p> </p> | ||
<p> </p> | <p> </p> | ||
<p> </p> | <p> </p> | ||
| Line 183: | Line 312: | ||
</ul> | </ul> | ||
<h3><span class="toctext">GetTherapieIDEx</span></h3> | <h3><span class="toctext">GetTherapieIDEx</span></h3> | ||
| + | <table border="0"> | ||
| + | <tbody> | ||
| + | <tr> | ||
| + | <td><br /></td> | ||
| + | </tr> | ||
| + | </tbody> | ||
| + | </table> | ||
<p> </p> | <p> </p> | ||
<p> </p> | <p> </p> | ||
| Line 192: | Line 328: | ||
</tbody> | </tbody> | ||
</table> | </table> | ||
| + | <p> </p> | ||
| + | <p> </p> | ||
<p> </p> | <p> </p> | ||
<p> </p> | <p> </p> | ||
| Line 199: | Line 337: | ||
<ul> | <ul> | ||
</ul> | </ul> | ||
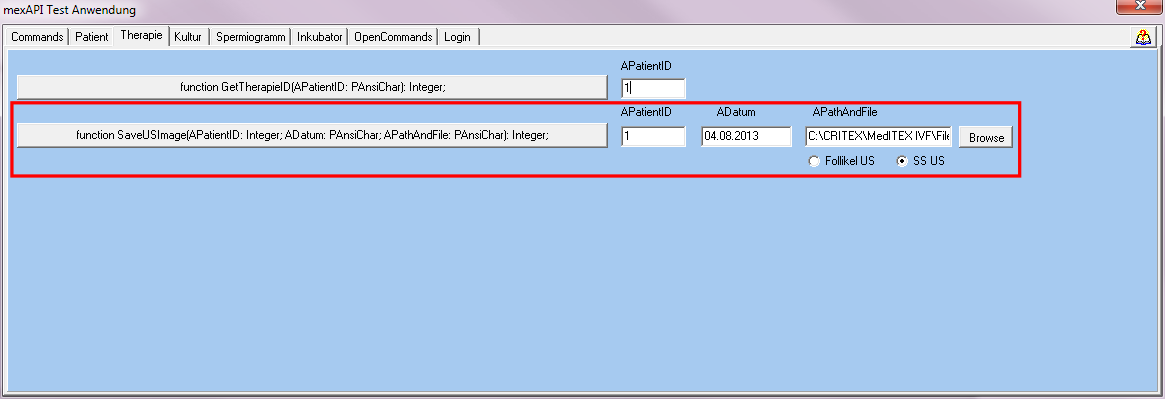
| − | <p> | + | <p>After calling this function you can <strong>choose the cycle</strong>, the Ultrasound image should be added.</p> |
| − | <p> | + | <table border="0"> |
| − | < | + | <tbody> |
| + | <tr> | ||
| + | <td>[[Image:SaveUSImage2.png|none|740px|thumb|left|link=http://wiki.meditex-software.com/images/SaveUSImage2.png| ]]</td> | ||
| + | </tr> | ||
| + | <tr> | ||
| + | <td>[[Image:SaveUSImage.png|none|740px|thumb|left|link=http://wiki.meditex-software.com/images/SaveUSImage.png| ]]</td> | ||
| + | </tr> | ||
| + | </tbody> | ||
| + | </table> | ||
| + | <p>In the first field you see the <strong>patient ID</strong>. Next you have to <strong>add the date of recording</strong>, the <strong>path and file</strong> of the picture. For the path and file you can use the <strong>browse button</strong> on the right. Go to the storage where your picture was saved, select the file and click on open. Choose one of the boxes beneath. At the end call the <strong>function button</strong>. Your US Image will be saved at the<strong> file storage</strong> of the patient. You can also see it in your <strong>cycle overview</strong> in MedITEX IVF.</p> | ||
| + | <table border="0"> | ||
| + | <tbody> | ||
| + | <tr> | ||
| + | <td style="text-align: center;"><img src="/images/SaveUSImage1.png" alt="" width="487" height="262" /></td> | ||
| + | </tr> | ||
| + | </tbody> | ||
| + | </table> | ||
<table style="float: right;" border="0"> | <table style="float: right;" border="0"> | ||
<tbody> | <tbody> | ||
| Line 210: | Line 364: | ||
</tbody> | </tbody> | ||
</table> | </table> | ||
| + | <p> </p> | ||
<p> </p> | <p> </p> | ||
<p> </p> | <p> </p> | ||
| Line 216: | Line 371: | ||
<ul> | <ul> | ||
</ul> | </ul> | ||
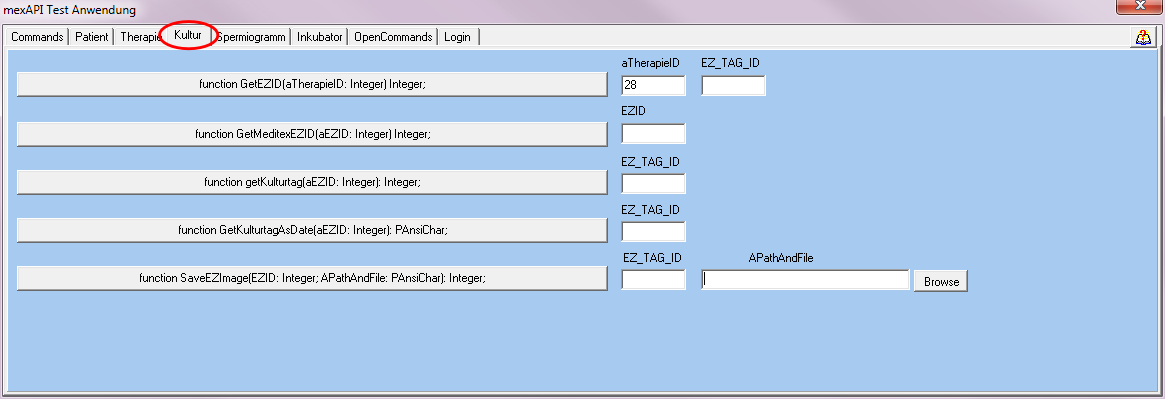
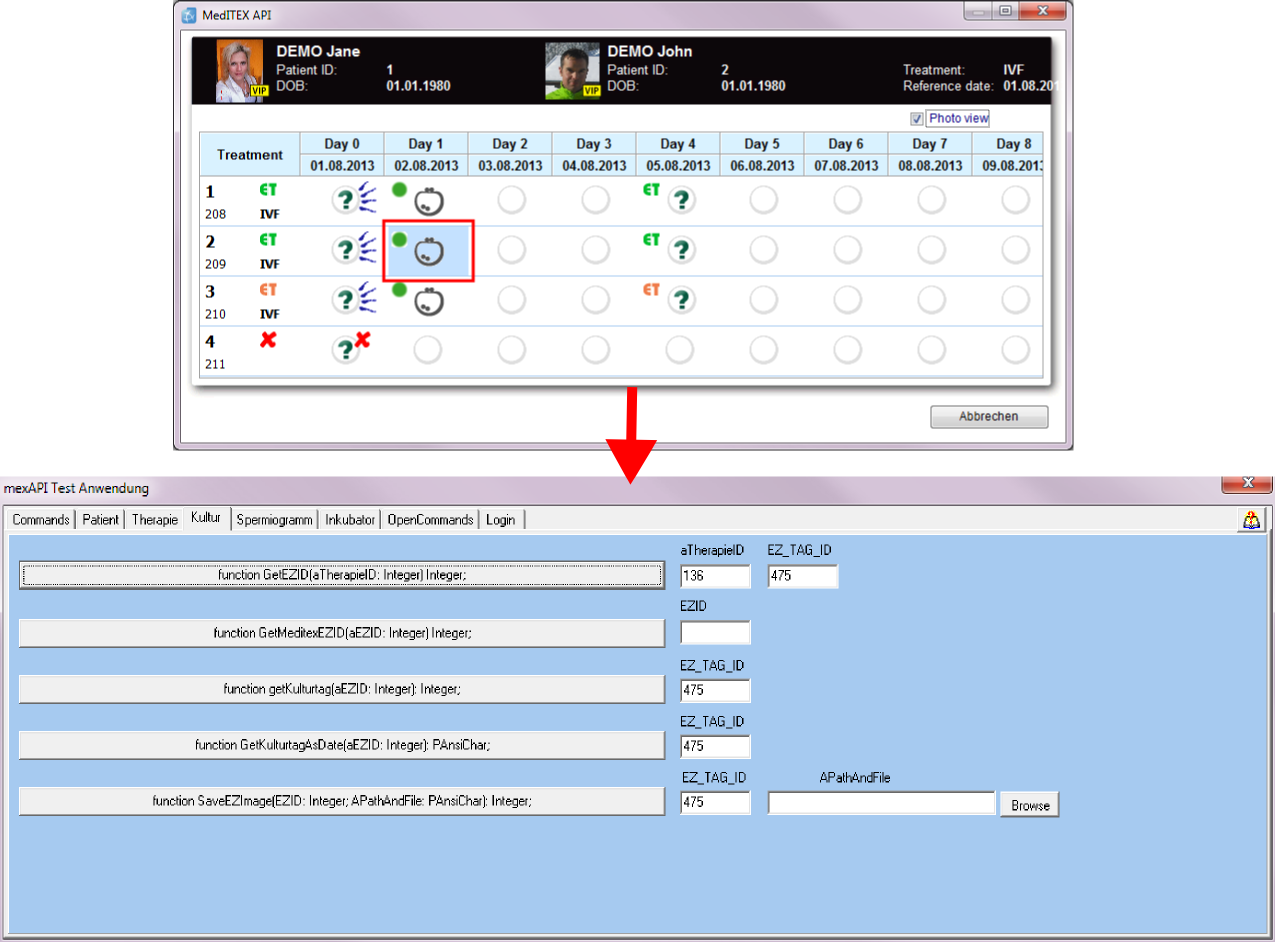
| − | < | + | <p>The therapie (cycle) ID is necessary for using the <strong>culture tab</strong>. You can get it with the function getTherapieID in the therapie tab.</p> |
| + | <table style="margin-left: auto; margin-right: auto;" border="0"> | ||
| + | <tbody> | ||
| + | <tr> | ||
| + | <td>[[Image:ApiCulture.png|none|740px|thumb|left|link=http://wiki.meditex-software.com/images/ApiCulture.png| ]]</td> | ||
| + | </tr> | ||
| + | </tbody> | ||
| + | </table> | ||
<p> </p> | <p> </p> | ||
| + | <h3><span class="toctext">GetEZID</span></h3> | ||
| + | <p>If you click the function <strong>GetEZID</strong>, a<strong> graphical culture view</strong> opens. In this window you can <strong>select the wished oocyte</strong> with a double click.</p> | ||
| + | <table style="margin-left: auto; margin-right: auto;" border="0"> | ||
| + | <tbody> | ||
| + | <tr> | ||
| + | <td>[[Image:GetEZID2.png|none|740px|thumb|left|link=http://wiki.meditex-software.com/images/GetEZID2.png| ]]</td> | ||
| + | </tr> | ||
| + | </tbody> | ||
| + | </table> | ||
| + | <p>Then the fields of the culture tab will be filled with informations. You can get the TherapieID with the function GetTherapieID in the Therapie tab.</p> | ||
<table style="float: right;" border="0"> | <table style="float: right;" border="0"> | ||
<tbody> | <tbody> | ||
| Line 225: | Line 397: | ||
</tbody> | </tbody> | ||
</table> | </table> | ||
| + | <p> </p> | ||
| + | <p> </p> | ||
| + | <p> </p> | ||
<p> </p> | <p> </p> | ||
<p> </p> | <p> </p> | ||
| Line 230: | Line 405: | ||
</ul> | </ul> | ||
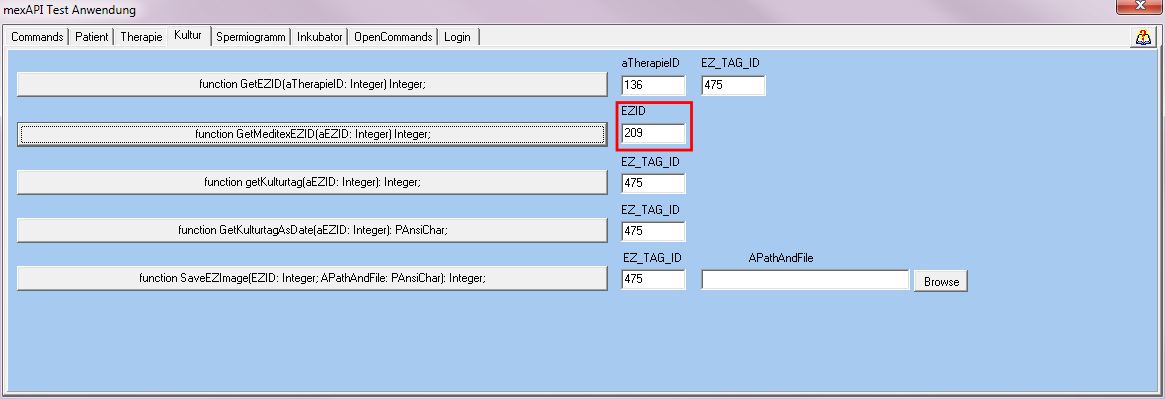
<h3><span class="toctext">GetMeditexEZID</span></h3> | <h3><span class="toctext">GetMeditexEZID</span></h3> | ||
| − | <p> | + | <p>To get the<strong> Meditex EZID</strong> you have to click the function GetMeditexEZID.</p> |
| − | <p>< | + | <table style="margin-left: auto; margin-right: auto;" border="0"> |
| + | <tbody> | ||
| + | <tr> | ||
| + | <td>[[Image:GetMeditexEZID.png|none|740px|thumb|left|link=http://wiki.meditex-software.com/images/GetMeditexEZID.png| ]]</td> | ||
| + | </tr> | ||
| + | </tbody> | ||
| + | </table> | ||
<table style="float: right;" border="0"> | <table style="float: right;" border="0"> | ||
<tbody> | <tbody> | ||
| Line 239: | Line 420: | ||
</tbody> | </tbody> | ||
</table> | </table> | ||
| + | <p> </p> | ||
| + | <p> </p> | ||
<p> </p> | <p> </p> | ||
<p> </p> | <p> </p> | ||
| Line 244: | Line 427: | ||
</ul> | </ul> | ||
<h3><span class="toctext">GetKulturtag</span></h3> | <h3><span class="toctext">GetKulturtag</span></h3> | ||
| − | <p> | + | <p>This field is <strong>automatically filled</strong> if you select a oocyte at the <strong>function GetEZID</strong>.</p> |
| − | <p> | + | <table style="margin-left: auto; margin-right: auto;" border="0"> |
| + | <tbody> | ||
| + | <tr> | ||
| + | <td>[[Image:GetEZID1.png|none|740px|thumb|left|link=http://wiki.meditex-software.com/images/GetEZID1.png| ]]</td> | ||
| + | </tr> | ||
| + | </tbody> | ||
| + | </table> | ||
<table style="float: right;" border="0"> | <table style="float: right;" border="0"> | ||
<tbody> | <tbody> | ||
| Line 253: | Line 442: | ||
</tbody> | </tbody> | ||
</table> | </table> | ||
| + | <p> </p> | ||
| + | <p> </p> | ||
<p> </p> | <p> </p> | ||
<p> </p> | <p> </p> | ||
| Line 258: | Line 449: | ||
</ul> | </ul> | ||
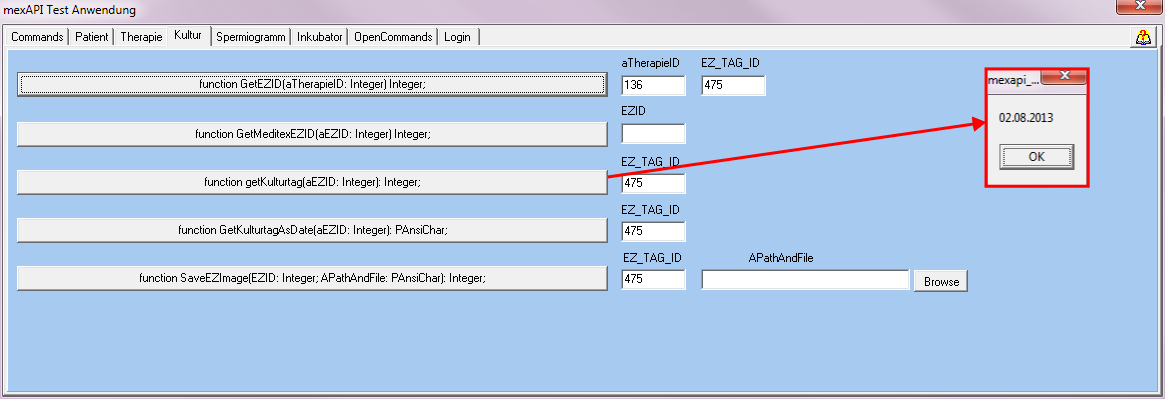
<h3><span class="toctext">GetKulturtagAsDate</span></h3> | <h3><span class="toctext">GetKulturtagAsDate</span></h3> | ||
| − | <p> | + | <p>If you click this function you get the <strong>culture date</strong> in a separate window.</p> |
| − | <p> | + | <table style="margin-left: auto; margin-right: auto;" border="0"> |
| − | < | + | <tbody> |
| + | <tr> | ||
| + | <td>[[Image:GetKulturTag.png|none|740px|thumb|left|link=http://wiki.meditex-software.com/images/GetKulturTag.png| ]]</td> | ||
| + | </tr> | ||
| + | </tbody> | ||
| + | </table> | ||
<table style="float: right;" border="0"> | <table style="float: right;" border="0"> | ||
<tbody> | <tbody> | ||
| Line 269: | Line 465: | ||
</table> | </table> | ||
<p> </p> | <p> </p> | ||
| − | |||
| − | |||
| − | |||
<p> </p> | <p> </p> | ||
<p> </p> | <p> </p> | ||
<p> </p> | <p> </p> | ||
| + | <ul> | ||
| + | </ul> | ||
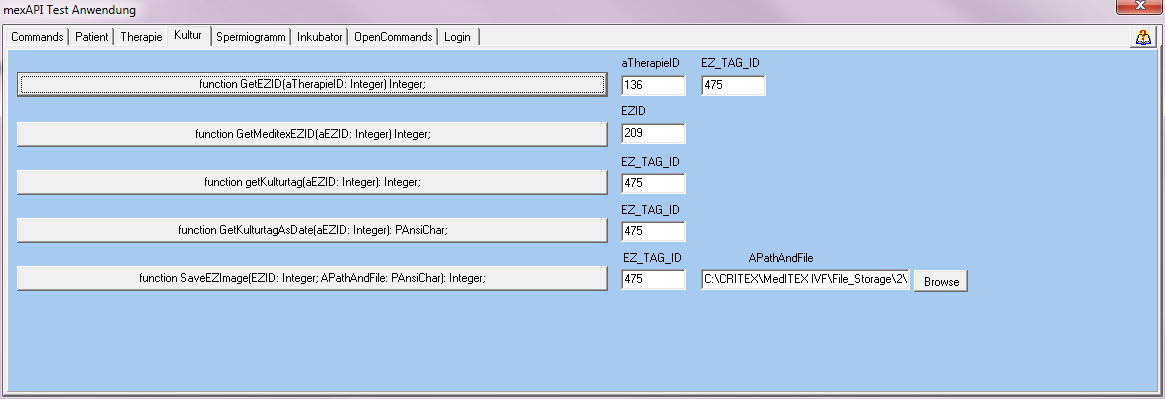
| + | <h3><span class="toctext">SaveEZImage</span></h3> | ||
| + | <p>With this function you can <strong>save oocyte images</strong> in a wished cycle directly at the <strong>selected culture day</strong>.</p> | ||
| + | <table style="margin-left: auto; margin-right: auto;" border="0"> | ||
| + | <tbody> | ||
| + | <tr> | ||
| + | <td>[[Image:GetEZID1.png|none|740px|thumb|left|link=http://wiki.meditex-software.com/images/GetEZID1.png| ]]</td> | ||
| + | </tr> | ||
| + | </tbody> | ||
| + | </table> | ||
| + | <p>In the following window you can see the <strong>saved picture</strong> directly in the <strong>graphical culture of MedITEX IVF</strong>.</p> | ||
| + | <table border="0"> | ||
| + | <tbody> | ||
| + | <tr> | ||
| + | <td style="text-align: center;"><img src="/images/SaveUSImage3.png" alt="" width="381" height="280" /></td> | ||
| + | </tr> | ||
| + | </tbody> | ||
| + | </table> | ||
| + | <ul> | ||
| + | </ul> | ||
<table style="float: right;" border="0"> | <table style="float: right;" border="0"> | ||
<tbody> | <tbody> | ||
| Line 283: | Line 497: | ||
</tbody> | </tbody> | ||
</table> | </table> | ||
| − | < | + | <p> </p> |
| − | </ | + | <p> </p> |
<p> </p> | <p> </p> | ||
<p> </p> | <p> </p> | ||
| Line 292: | Line 506: | ||
</ul> | </ul> | ||
<h3><span class="toctext">GetNewSpermiogrammID</span></h3> | <h3><span class="toctext">GetNewSpermiogrammID</span></h3> | ||
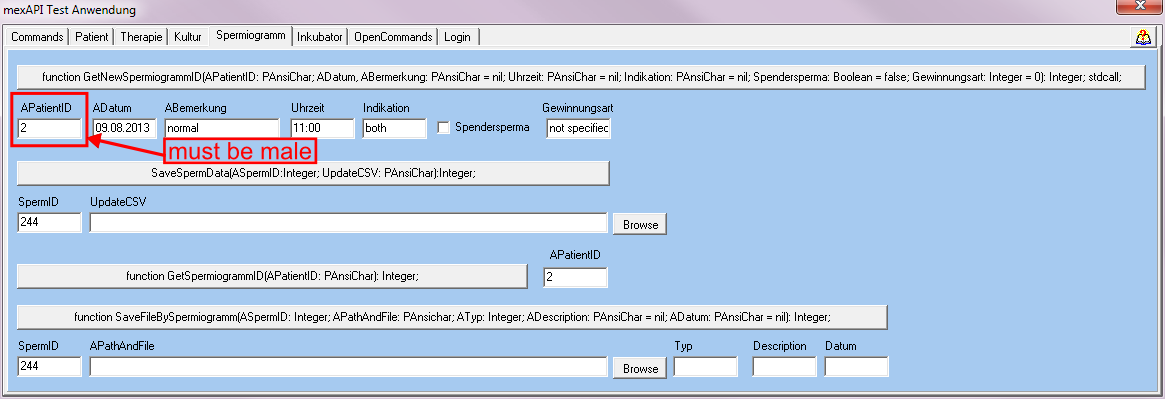
| − | <p> | + | <p>The condition for using the semen analysis tab is that the <strong>patient ID</strong> has a <strong>male owner</strong>.</p> |
| + | <p>Is this condition true, the program generate a <strong>new Sperm ID</strong> and you can enter all the other information.</p> | ||
| + | <table border="0"> | ||
| + | <tbody> | ||
| + | <tr> | ||
| + | <td>[[Image:GetNewSpermiogrammID1.png|none|740px|thumb|left|link=http://wiki.meditex-software.com/images/GetNewSpermiogrammID1.png| ]]</td> | ||
| + | </tr> | ||
| + | </tbody> | ||
| + | </table> | ||
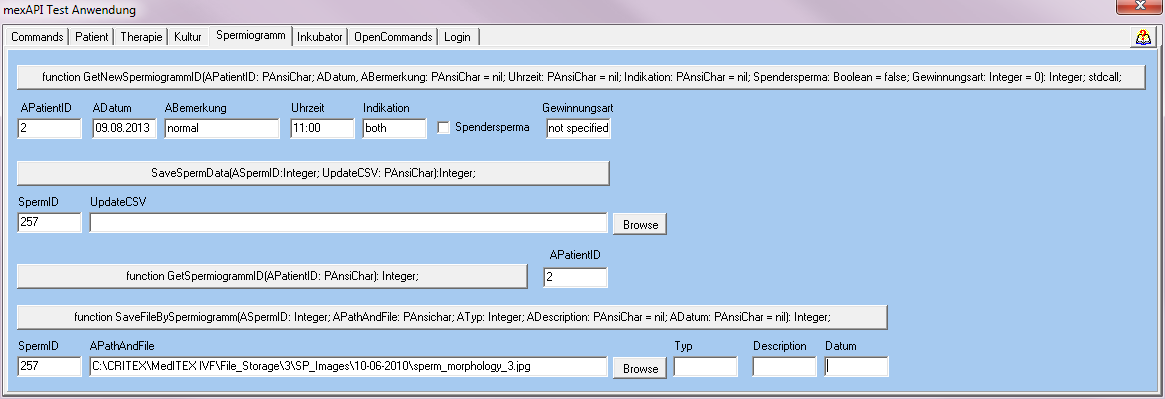
| + | <p>In the following window you can see the <strong>saved data</strong> directly in the <strong>semen analysis of MedITEX IVF</strong>.</p> | ||
| + | <table border="0"> | ||
| + | <tbody> | ||
| + | <tr> | ||
| + | <td style="text-align: center;"><img src="/images/GetNewSpermiogrammID2.png" alt="" /></td> | ||
| + | </tr> | ||
| + | </tbody> | ||
| + | </table> | ||
<table style="float: right;" border="0"> | <table style="float: right;" border="0"> | ||
<tbody> | <tbody> | ||
<tr> | <tr> | ||
| − | <td style="text-align: right;"><a href="/index.php?title=MedITEX_API_manual#GetNewSpermiogrammID"><span>Back to the function </span></ | + | <td style="text-align: right;"><a href="/index.php?title=MedITEX_API_manual#GetNewSpermiogrammID"><span>Back to the function </span><span class="toctext">GetNewSpermiogrammID</span></a><span class="toctext"> </span><span> </span><span class="toctext"> </span></td> |
</tr> | </tr> | ||
</tbody> | </tbody> | ||
</table> | </table> | ||
| + | <p> </p> | ||
| + | <p> </p> | ||
<p> </p> | <p> </p> | ||
<p> </p> | <p> </p> | ||
| Line 305: | Line 537: | ||
</ul> | </ul> | ||
<h3><span class="toctext">SaveSpermData</span></h3> | <h3><span class="toctext">SaveSpermData</span></h3> | ||
| + | <table border="0"> | ||
| + | <tbody> | ||
| + | <tr> | ||
| + | <td></td> | ||
| + | </tr> | ||
| + | </tbody> | ||
| + | </table> | ||
<p> </p> | <p> </p> | ||
<p> </p> | <p> </p> | ||
| Line 314: | Line 553: | ||
</tbody> | </tbody> | ||
</table> | </table> | ||
| + | <p> </p> | ||
| + | <p> </p> | ||
<p> </p> | <p> </p> | ||
<p> </p> | <p> </p> | ||
| Line 319: | Line 560: | ||
</ul> | </ul> | ||
<h3><span class="toctext">GetSpermiogrammID</span></h3> | <h3><span class="toctext">GetSpermiogrammID</span></h3> | ||
| − | < | + | <table border="0" width="10" height="24"> |
| − | <p> | + | <tbody> |
| + | <tr> | ||
| + | <td>[[Image:GetSpermiogrammID.png|none|740px|thumb|left|link=http://wiki.meditex-software.com/images/GetSpermiogrammID.png| ]]</td> | ||
| + | </tr> | ||
| + | </tbody> | ||
| + | </table> | ||
| + | <p>With this function you can choose an existing semen analysis and <strong>get the associated semen analysis ID</strong>.</p> | ||
<table style="float: right;" border="0"> | <table style="float: right;" border="0"> | ||
<tbody> | <tbody> | ||
| Line 328: | Line 575: | ||
</tbody> | </tbody> | ||
</table> | </table> | ||
| + | <p> </p> | ||
| + | <p> </p> | ||
<p> </p> | <p> </p> | ||
<p> </p> | <p> </p> | ||
| Line 335: | Line 584: | ||
<ul> | <ul> | ||
</ul> | </ul> | ||
| − | <p> | + | <table border="0"> |
| + | <tbody> | ||
| + | <tr> | ||
| + | <td>[[Image:SaveFileBySpermiogramm.png|none|740px|thumb|left|link=http://wiki.meditex-software.com/images/SaveFileBySpermiogramm.png| ]]</td> | ||
| + | </tr> | ||
| + | </tbody> | ||
| + | </table> | ||
| + | <p>Enter the<strong> file path </strong>of the document and it will be saved in the right folder.</p> | ||
<table style="float: right;" border="0"> | <table style="float: right;" border="0"> | ||
<tbody> | <tbody> | ||
| Line 347: | Line 603: | ||
<p> </p> | <p> </p> | ||
<p> </p> | <p> </p> | ||
| − | |||
<p> </p> | <p> </p> | ||
| + | <p> </p> | ||
| + | <h2><span class="toctext">Inkubator - Incubator</span></h2> | ||
| + | <table border="0"> | ||
| + | <tbody> | ||
| + | <tr> | ||
| + | <td>[[Image:SaveFileToIncubator.png|none|740px|thumb|left|link=http://wiki.meditex-software.com/images/SaveFileToIncubator.png| ]]</td> | ||
| + | </tr> | ||
| + | </tbody> | ||
| + | </table> | ||
| + | <p><span class="toctext"><br /></span></p> | ||
<ul> | <ul> | ||
</ul> | </ul> | ||
| − | <h3><span class="toctext">GetInkubatorID</span>< | + | <h3><span class="toctext">GetInkubatorID</span></h3> |
| − | < | + | <table border="0"> |
| − | <p> | + | <tbody> |
| + | <tr> | ||
| + | <td>[[Image:GetIncubator.png|none|740px|thumb|left|link=http://wiki.meditex-software.com/images/GetIncubator.png| ]]</td> | ||
| + | </tr> | ||
| + | </tbody> | ||
| + | </table> | ||
| + | <p>If you click the function <strong>getIncubatorID</strong>, a window with a <strong>list of registrated incubators</strong> opens. Select one incubator and you can find the associated Id in the main window subsequently.</p> | ||
<table style="float: right;" border="0"> | <table style="float: right;" border="0"> | ||
<tbody> | <tbody> | ||
| Line 361: | Line 632: | ||
</tbody> | </tbody> | ||
</table> | </table> | ||
| + | <p> </p> | ||
| + | <p> </p> | ||
<p> </p> | <p> </p> | ||
<p> </p> | <p> </p> | ||
| Line 366: | Line 639: | ||
<ul> | <ul> | ||
</ul> | </ul> | ||
| − | < | + | <table border="0"> |
| − | < | + | <tbody> |
| − | <p> | + | <tr> |
| + | <td>[[Image:SaveFileToIncubator.png|none|740px|thumb|left|link=http://wiki.meditex-software.com/images/SaveFileToIncubator.png| ]]</td> | ||
| + | </tr> | ||
| + | </tbody> | ||
| + | </table> | ||
| + | <p>With this function you can<strong> save data</strong> to the <strong>associated incubator</strong>. Enter the file path and the date.</p> | ||
<table style="float: right;" border="0"> | <table style="float: right;" border="0"> | ||
<tbody> | <tbody> | ||
| Line 379: | Line 657: | ||
<p> </p> | <p> </p> | ||
<p> </p> | <p> </p> | ||
| − | |||
| − | |||
<p> </p> | <p> </p> | ||
<p> </p> | <p> </p> | ||
| + | <p> </p> | ||
| + | <h2><span class="toctext">OpenCommands</span></h2> | ||
| + | <p>In this tab you can <strong>open some views out of MedITEX IVF</strong>.</p> | ||
| + | <table style="margin-left: auto; margin-right: auto;" border="0"> | ||
| + | <tbody> | ||
| + | <tr> | ||
| + | <td>[[Image:OpenCommands1.png|none|740px|thumb|left|link=http://wiki.meditex-software.com/images/OpenCommands1.png| ]]</td> | ||
| + | </tr> | ||
| + | </tbody> | ||
| + | </table> | ||
| + | <p>You can get the PatientID with the function GetPatientID in the Patient tab and the TherapieID with the function GetTherapieID in the Therapie tab.</p> | ||
| + | <p> </p> | ||
| + | <h3><span class="toctext">OpenPatientCryoOverview</span></h3> | ||
| + | <p>Opens the <strong>oocyte and embryo cryo storage</strong> for a <strong>female </strong>patient.</p> | ||
| + | <table style="margin-left: auto; margin-right: auto;" border="0"> | ||
| + | <tbody> | ||
| + | <tr> | ||
| + | <td>[[Image:OpenPatientCryoOverview.png|none|740px|thumb|left|link=http://wiki.meditex-software.com/images/OpenPatientCryoOverview.png| ]]</td> | ||
| + | </tr> | ||
| + | </tbody> | ||
| + | </table> | ||
| + | <p> </p> | ||
| + | <p>Opens the<strong> sperm cryo storage</strong> for a <strong>male </strong>patient.</p> | ||
| + | <table style="margin-left: auto; margin-right: auto;" border="0"> | ||
| + | <tbody> | ||
| + | <tr> | ||
| + | <td>[[Image:OpenPatientCryoOverviewSperm.png|none|740px|thumb|left|link=http://wiki.meditex-software.com/images/OpenPatientCryoOverviewSperm.png| ]]</td> | ||
| + | </tr> | ||
| + | </tbody> | ||
| + | </table> | ||
<table style="float: right;" border="0"> | <table style="float: right;" border="0"> | ||
<tbody> | <tbody> | ||
| Line 392: | Line 698: | ||
<p> </p> | <p> </p> | ||
<p> </p> | <p> </p> | ||
| − | |||
<p> </p> | <p> </p> | ||
<p> </p> | <p> </p> | ||
| + | <h3><span class="toctext">OpenPatientOverview</span></h3> | ||
| + | <table style="margin-left: auto; margin-right: auto;" border="0"> | ||
| + | <tbody> | ||
| + | <tr> | ||
| + | <td>[[Image:OpenPatientOverview.png|none|740px|thumb|left|link=http://wiki.meditex-software.com/images/OpenPatientOverview.png| ]]</td> | ||
| + | </tr> | ||
| + | </tbody> | ||
| + | </table> | ||
<table style="float: right;" border="0"> | <table style="float: right;" border="0"> | ||
<tbody> | <tbody> | ||
| Line 404: | Line 717: | ||
<p> </p> | <p> </p> | ||
<p> </p> | <p> </p> | ||
| − | |||
<p> </p> | <p> </p> | ||
<p> </p> | <p> </p> | ||
| + | <h3><span class="toctext">OpenTherapieOverview</span></h3> | ||
| + | <table style="margin-left: auto; margin-right: auto;" border="0"> | ||
| + | <tbody> | ||
| + | <tr> | ||
| + | <td>[[Image:OpenTherapieOvervie.png|none|740px|thumb|left|link=http://wiki.meditex-software.com/images/OpenTherapieOvervie.png| ]]</td> | ||
| + | </tr> | ||
| + | </tbody> | ||
| + | </table> | ||
<table style="float: right;" border="0"> | <table style="float: right;" border="0"> | ||
<tbody> | <tbody> | ||
| Line 417: | Line 737: | ||
<p> </p> | <p> </p> | ||
<p> </p> | <p> </p> | ||
| − | <h3><span class="toctext">OpenEizellOverview</span>< | + | <p> </p> |
| + | <h3><span class="toctext">OpenEizellOverview</span></h3> | ||
| + | <p> </p> | ||
<p> </p> | <p> </p> | ||
<p> </p> | <p> </p> | ||
| Line 429: | Line 751: | ||
<p> </p> | <p> </p> | ||
<p> </p> | <p> </p> | ||
| − | |||
<p> </p> | <p> </p> | ||
<p> </p> | <p> </p> | ||
| + | <h3><span class="toctext">GetAblageDateien</span></h3> | ||
| + | <table style="margin-left: auto; margin-right: auto;" border="0"> | ||
| + | <tbody> | ||
| + | <tr> | ||
| + | <td>[[Image:GetAblageDateien.png|none|740px|thumb|left|link=http://wiki.meditex-software.com/images/GetAblageDateien.png| ]]</td> | ||
| + | </tr> | ||
| + | </tbody> | ||
| + | </table> | ||
<table style="float: right;" border="0"> | <table style="float: right;" border="0"> | ||
<tbody> | <tbody> | ||
<tr> | <tr> | ||
| − | <td style="text-align: right;"><span>Back to the function </span><span class="toctext">GetAblageDateien</span><span> </span></td> | + | <td style="text-align: right;" colspan="5"><a href="/index.php?title=MedITEX_API_manual#GetAblageDateien"><span>Back to the function </span><span class="toctext">GetAblageDateien</span></a><span> </span><span> </span></td> |
</tr> | </tr> | ||
</tbody> | </tbody> | ||
</table> | </table> | ||
<p> </p> | <p> </p> | ||
| + | <p> </p> | ||
| + | <p> </p> | ||
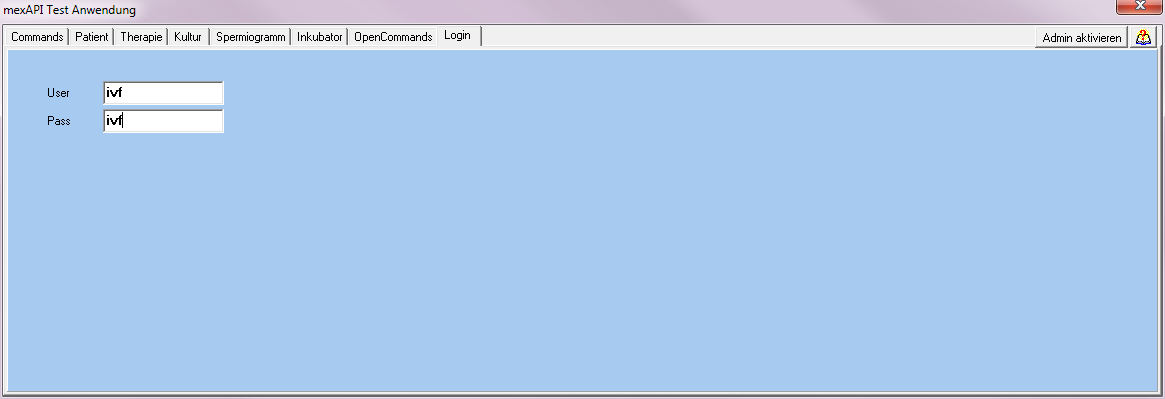
| + | <h2>Login</h2> | ||
| + | <table style="margin-left: auto; margin-right: auto;" border="0"> | ||
| + | <tbody> | ||
| + | <tr> | ||
| + | <td>[[Image:ApiLogin.png|none|740px|thumb|left|link=http://wiki.meditex-software.com/images/ApiLogin.png| ]]</td> | ||
| + | </tr> | ||
| + | </tbody> | ||
| + | </table> | ||
| + | <p>If you want to work with MedITEX API, first you have to<strong> enter your username and password</strong> at the tab Login. You can <strong>not </strong>work without a registered name and password.</p> | ||
<p> </p> | <p> </p> | ||
<table style="float: right;" border="0"> | <table style="float: right;" border="0"> | ||
<tbody> | <tbody> | ||
<tr> | <tr> | ||
| − | <td style="text-align: right;"><span><a href="/index.php?title=MedITEX_API_manual">Back to MexAPI manual</a></span></td> | + | <td style="text-align: right;"><span> </span><a href="/index.php?title=MedITEX_API_manual">Back to MexAPI manual</a></td> |
| + | <td style="text-align: right;"><span><a href="/index.php?title=MedITEX_API_manual#Login">Back to the Login tab </a></span></td> | ||
<td style="text-align: right;"><a href="#top">Back to top</a></td> | <td style="text-align: right;"><a href="#top">Back to top</a></td> | ||
</tr> | </tr> | ||
</tbody> | </tbody> | ||
</table> | </table> | ||
Latest revision as of 10:27, 13 August 2013
On this page you get more information about using mexAPI. Here you can get examples for all functions of the program.
Contents |
Commands
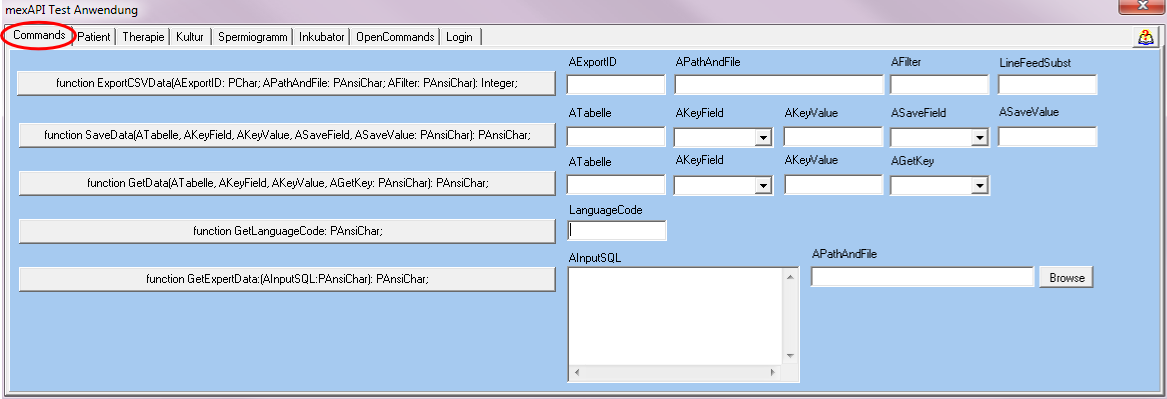 |
ExportCSVData
| <a href="/index.php?title=MedITEX_API_manual#ExportCSVData">Back to the function ExportCSVData</a> |
SaveData
| <a href="/index.php?title=MedITEX_API_manual#SaveData">Back to the function SaveData</a> |
GetData
| <a href="/index.php?title=MedITEX_API_manual#GetData">Back to the function GetData</a> |
GetLanguageCode
If you click the function GetLanguageCode the empty field will be filled.
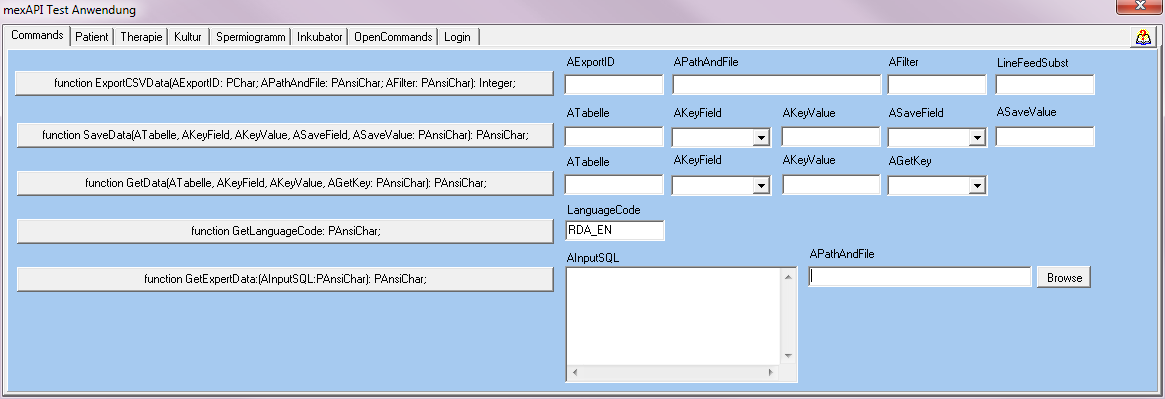 |
The language code of your database will be shown. RDA_EN = English, RDA_DE = German, ...
| <a href="/index.php?title=MedITEX_API_manual#GetLanguageCode">Back to the function GetLanguageCode</a> |
GetExpertData
| <a href="/index.php?title=MedITEX_API_manual#GetExpertData">Back to the function GetExpertData</a> |
<a href="#top">Back to top</a> |
Patient
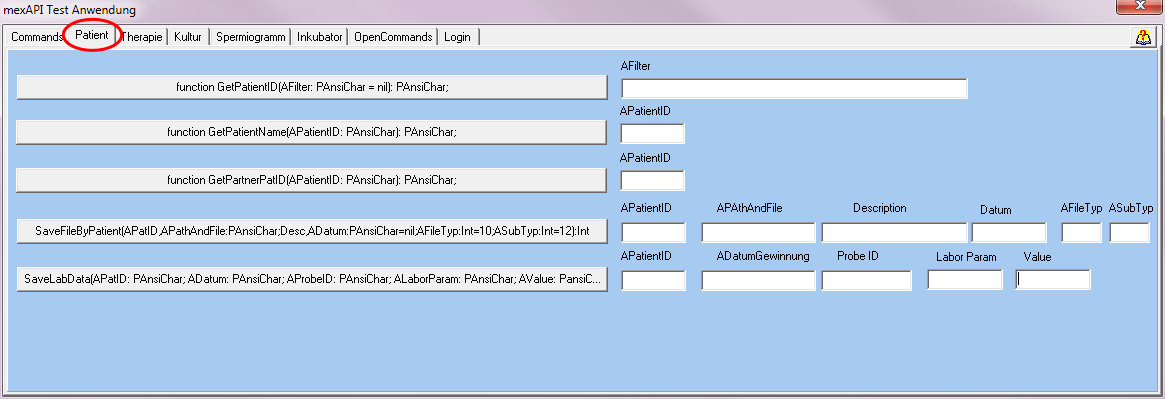 |
GetPatientID
After calling the function GetPatientID the following window opens:
| <img src="/images/GetPatientID1.png" alt="" width="550" height="379" /> |
In this window you can search the patient. You can search by surname, date of birth or patient ID. You can also open the list and search there.
If you have found the correct name, choose it with a double click on it. The window will close automatically and show you the associated patient ID. For the example we take the patient Jane DEMO with the patient ID 1. |
 |
|
After this step you can work with the other functions. At each place where the patient ID is needed in the mexAPI, the field is filled automatically.
| <a href="/index.php?title=MedITEX_API_manual#GetPatientID">Back to the function GetPatientID</a> |
GetPatientName
With this function, you can get the name of a patient.
| <img src="/images/GetPatientName.png" alt="" width="105" height="118" /> | If you call the function GetPatientName, the name of the patient with the patient ID 1 will be displayed in a new window: Jane DEMO. |
| <a href="/index.php?title=MedITEX_API_manual#GetPatientName">Back to the function GetPatientName</a> |
GetPartnerPatID
With this function, you can get the ID of the patients' partner.
 |
After activating the function GetPartnerID, the program jumps to the partner of the patient and shows the partner as the real patient.
| <a href="/index.php?title=MedITEX_API_manual#GetPartnerPatID">Back to the function GetPartnerPatID</a> |
SaveFileByPatient
 |
With the function SaveFileByPatient, you can save files of a patient in the associated file storage folder.
Necessary parameters are the correct patient ID and the full file path.
| <a href="/index.php?title=MedITEX_API_manual#SaveFileByPatient">Back to the function SaveFileByPatient</a> |
SaveLabData
 |
Via this function you can save lab data manually. Enter the required data and values and save it at the laboratory area in MedITEX IVF.
| <a href="/index.php?title=MedITEX_API_manual#SaveLabData">Back to the function SaveFileByPatient</a> |
SavePatientImage
| <a href="/index.php?title=MedITEX_API_manual#SavePatientImage">Back to the function SavePatientImage</a> |
<a href="#top">Back to top</a> |
Therapie - Cycle
 |
GetTherapieID
This function allows you to see all cycles of the transferred patient.
 |
After this function has been called, a window opens. This window is showing all cycles from the transferred patient. Choose the wished cycle.
The chosen ID will be added in all tabs where the Therapie ID is necessary.
| <a href="/index.php?title=MedITEX_API_manual#GetTherapieID">Back to the function GetTherapieID</a> |
GetTherapieIDEx
| <a href="/index.php?title=MedITEX_API_manual#GetTherapieIDEx">Back to the function GetTherapieIDEx</a> |
SaveUSImage
After calling this function you can choose the cycle, the Ultrasound image should be added.
 |
 |
In the first field you see the patient ID. Next you have to add the date of recording, the path and file of the picture. For the path and file you can use the browse button on the right. Go to the storage where your picture was saved, select the file and click on open. Choose one of the boxes beneath. At the end call the function button. Your US Image will be saved at the file storage of the patient. You can also see it in your cycle overview in MedITEX IVF.
| <img src="/images/SaveUSImage1.png" alt="" width="487" height="262" /> |
| <a href="/index.php?title=MedITEX_API_manual#SaveUSImage">Back to the function SaveUSImage</a> | <a href="#top">Back to top</a> |
Kultur - Culture
The therapie (cycle) ID is necessary for using the culture tab. You can get it with the function getTherapieID in the therapie tab.
 |
GetEZID
If you click the function GetEZID, a graphical culture view opens. In this window you can select the wished oocyte with a double click.
 |
Then the fields of the culture tab will be filled with informations. You can get the TherapieID with the function GetTherapieID in the Therapie tab.
| <a href="/index.php?title=MedITEX_API_manual#GetEZID">Back to the function GetEZID </a> |
GetMeditexEZID
To get the Meditex EZID you have to click the function GetMeditexEZID.
 |
| <a href="/index.php?title=MedITEX_API_manual#GetMeditexEZID">Back to the function GetMeditexEZID</a> |
GetKulturtag
This field is automatically filled if you select a oocyte at the function GetEZID.
 |
| <a href="/index.php?title=MedITEX_API_manual#GetKulturtag">Back to the function GetKulturtag</a> |
GetKulturtagAsDate
If you click this function you get the culture date in a separate window.
 |
| <a href="/index.php?title=MedITEX_API_manual#GetKulturtagAsDate">Back to the function GetKulturtagAsDate</a> |
SaveEZImage
With this function you can save oocyte images in a wished cycle directly at the selected culture day.
| |
In the following window you can see the saved picture directly in the graphical culture of MedITEX IVF.
| <img src="/images/SaveUSImage3.png" alt="" width="381" height="280" /> |
| <a href="/index.php?title=MedITEX_API_manual#SaveEZImage">Back to the function SaveEZImage </a> |
<a href="#top">Back to top</a> |
Spermiogramm - Semen analysis
GetNewSpermiogrammID
The condition for using the semen analysis tab is that the patient ID has a male owner.
Is this condition true, the program generate a new Sperm ID and you can enter all the other information.
 |
In the following window you can see the saved data directly in the semen analysis of MedITEX IVF.
| <img src="/images/GetNewSpermiogrammID2.png" alt="" /> |
| <a href="/index.php?title=MedITEX_API_manual#GetNewSpermiogrammID">Back to the function GetNewSpermiogrammID</a> |
SaveSpermData
| <a href="/index.php?title=MedITEX_API_manual#SaveSpermData">Back to the function SaveSpermData</a> |
GetSpermiogrammID
 |
With this function you can choose an existing semen analysis and get the associated semen analysis ID.
| <a href="/index.php?title=MedITEX_API_manual#GetSpermiogrammID">Back to the function GetSpermiogrammID</a> |
SaveFileBySpermiogramm
 |
Enter the file path of the document and it will be saved in the right folder.
| <a href="/index.php?title=MedITEX_API_manual#SaveFileBySpermiogramm">Back to the function SaveFileBySpermiogramm</a> | <a href="#top">Back to top</a> |
Inkubator - Incubator
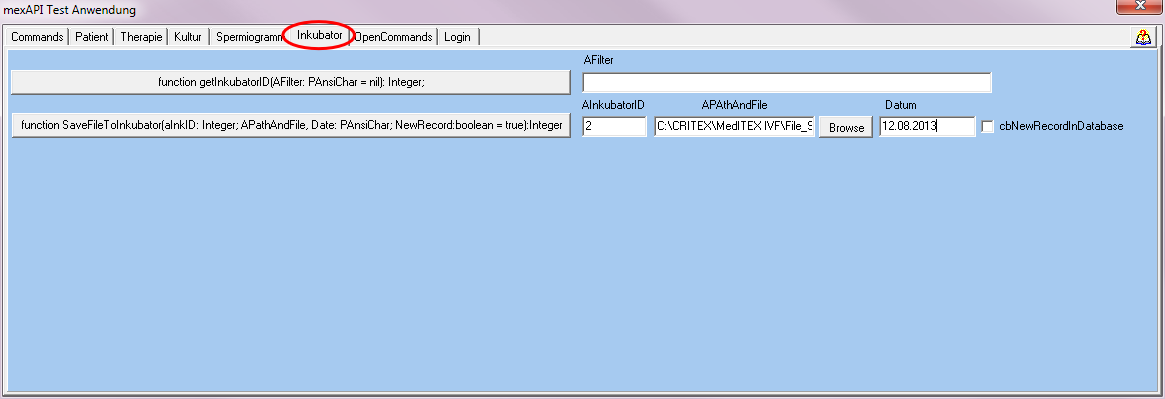 |
GetInkubatorID
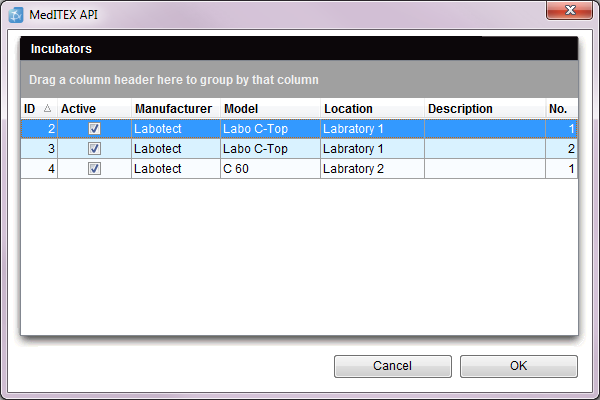 |
If you click the function getIncubatorID, a window with a list of registrated incubators opens. Select one incubator and you can find the associated Id in the main window subsequently.
| <a href="/index.php?title=MedITEX_API_manual#GetInkubatorID">Back to the function GetInkubatorID </a> |
SaveFileToInkubator
| |
With this function you can save data to the associated incubator. Enter the file path and the date.
| <a href="/index.php?title=MedITEX_API_manual#SaveFileToInkubator">Back to the function SaveFileToInkubator </a> |
<a href="#top">Back to top</a> |
OpenCommands
In this tab you can open some views out of MedITEX IVF.
 |
You can get the PatientID with the function GetPatientID in the Patient tab and the TherapieID with the function GetTherapieID in the Therapie tab.
OpenPatientCryoOverview
Opens the oocyte and embryo cryo storage for a female patient.
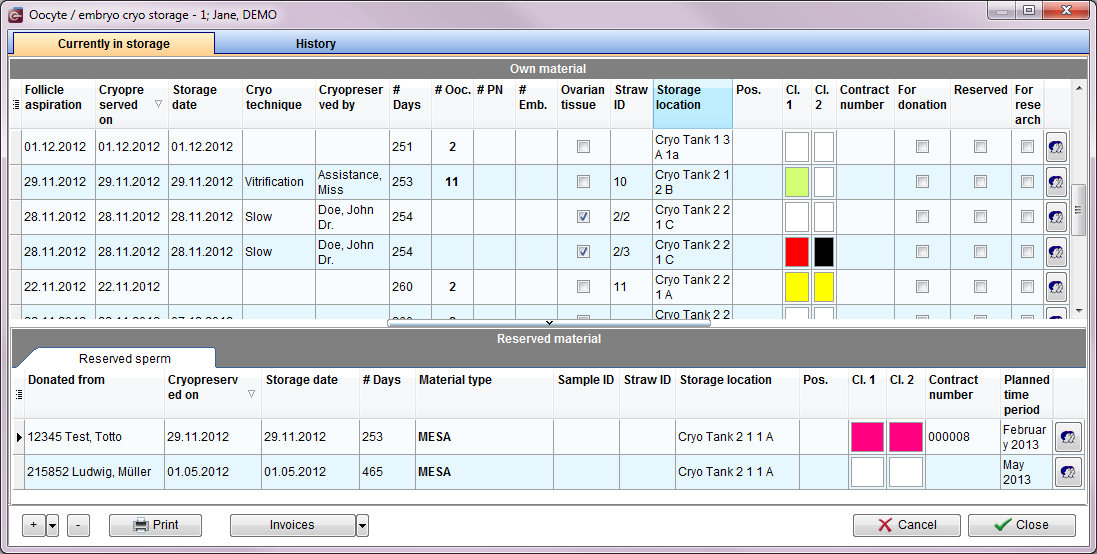 |
Opens the sperm cryo storage for a male patient.
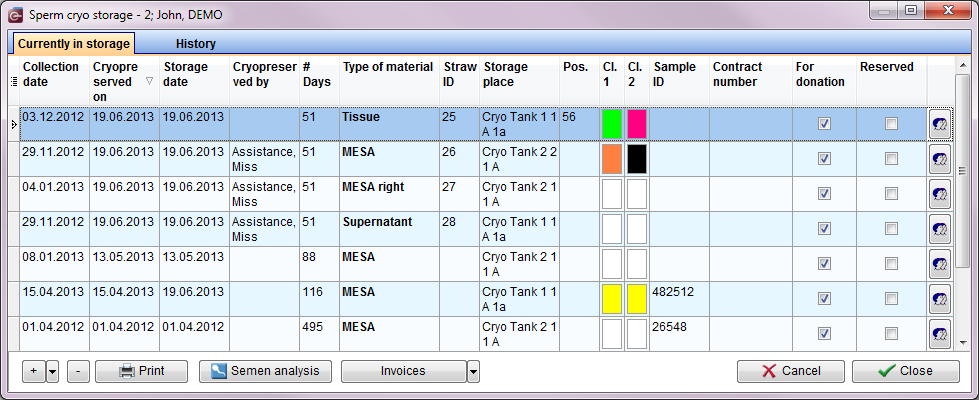 |
| <a href="/index.php?title=MedITEX_API_manual#OpenPatientCryoOverview">Back to the function OpenPatientCryoOverview </a> |
OpenPatientOverview
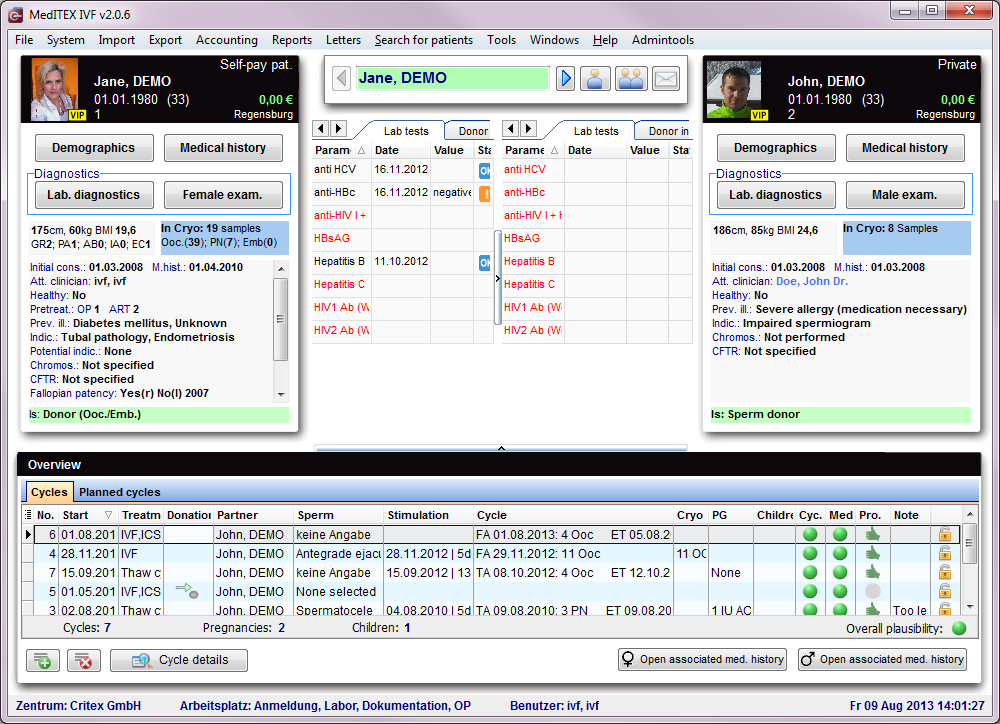 |
| <a href="/index.php?title=MedITEX_API_manual#OpenPatientOverview">Back to the function OpenPatientOverview</a> |
OpenTherapieOverview
 |
| <a href="/index.php?title=MedITEX_API_manual#OpenTherapieOverview">Back to the function OpenTherapieOverview </a> |
OpenEizellOverview
| <a href="/index.php?title=MedITEX_API_manual#OpenEizellOverview">Back to the function OpenEizellOverview </a> |
GetAblageDateien
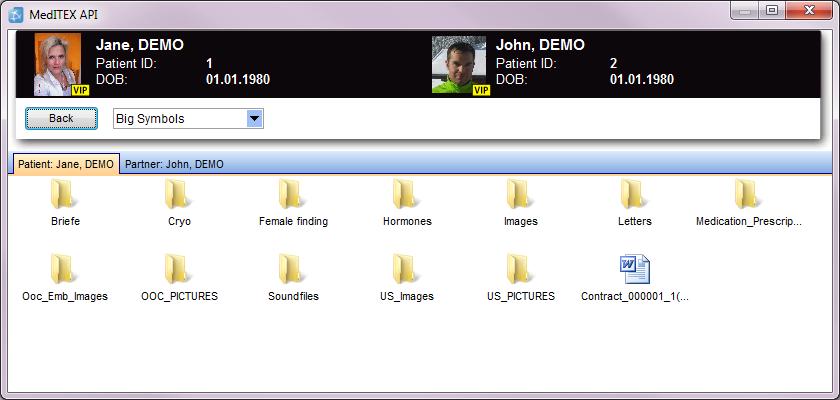 |
| <a href="/index.php?title=MedITEX_API_manual#GetAblageDateien">Back to the function GetAblageDateien</a> |
Login
 |
If you want to work with MedITEX API, first you have to enter your username and password at the tab Login. You can not work without a registered name and password.
| <a href="/index.php?title=MedITEX_API_manual">Back to MexAPI manual</a> | <a href="/index.php?title=MedITEX_API_manual#Login">Back to the Login tab </a> | <a href="#top">Back to top</a> |