Donazioni
From MedITEX - Wiki
| Line 76: | Line 76: | ||
<p> </p> | <p> </p> | ||
<h2>Aprire la sezione Donazione</h2> | <h2>Aprire la sezione Donazione</h2> | ||
| − | <p style="text-align: justify;">Nel caso il paziente sia donatore o necessiti di donazione l'informazione comparirà nella finestra di informazione nella pagina principale relativa al paziente nell'area verde. Quest'area è accessibile anche da <a href="/index.php?title=Demographics"><strong> | + | <p style="text-align: justify;">Nel caso il paziente sia donatore o necessiti di donazione l'informazione comparirà nella <strong>finestra di informazione nella pagina principale</strong> relativa al paziente nell'area verde. Quest'area è accessibile anche da <a href="/index.php?title=Demographics"><strong>Anagrafica</strong></a>.</p> |
| − | <p style="text-align: justify;"> | + | <p style="text-align: justify;">Cliccare sull'area verde per impostare le informazioni donazione per quel paziente.</p> |
<table style="margin-left: auto; margin-right: auto;" border="0" width="10" height="24"> | <table style="margin-left: auto; margin-right: auto;" border="0" width="10" height="24"> | ||
<tbody> | <tbody> | ||
| Line 85: | Line 85: | ||
</tbody> | </tbody> | ||
</table> | </table> | ||
| − | <p> | + | <p>Le informazioni vengono visualizzate nella pagina principale relativa al paziente/coppia:</p> |
<table style="margin-left: auto; margin-right: auto;" border="0"> | <table style="margin-left: auto; margin-right: auto;" border="0"> | ||
<tbody> | <tbody> | ||
| Line 94: | Line 94: | ||
</table> | </table> | ||
<p> </p> | <p> </p> | ||
| − | <h2> | + | <h2>Configurazione</h2> |
<table border="0"> | <table border="0"> | ||
<tbody> | <tbody> | ||
<tr> | <tr> | ||
<td><a href="/index.php?title=MedITEX_IVF_Settings#Donation_.2F_surrogate_motherhood"><img style="display: block; margin-left: auto; margin-right: auto;" src="/images/plus48.png" alt="" width="48" height="48" /></a></td> | <td><a href="/index.php?title=MedITEX_IVF_Settings#Donation_.2F_surrogate_motherhood"><img style="display: block; margin-left: auto; margin-right: auto;" src="/images/plus48.png" alt="" width="48" height="48" /></a></td> | ||
| − | <td><a href="/index.php?title=MedITEX_IVF_Settings#Donation_.2F_surrogate_motherhood"> | + | <td><a href="/index.php?title=MedITEX_IVF_Settings#Donation_.2F_surrogate_motherhood">Cliccare qui</a> per sapere come configurare la <strong>Donazione e la Maternità in surroga</strong>.</td> |
</tr> | </tr> | ||
</tbody> | </tbody> | ||
</table> | </table> | ||
<p> </p> | <p> </p> | ||
| − | <h2> | + | <h2>Match</h2> |
| − | <p style="text-align: justify;">In MedITEX IVF, | + | <p style="text-align: justify;">In MedITEX IVF, le donazioni si creano mediante il collegamento tra pazienti e terapie. Per completare una procedura di donazione è necessario prima impostare come visto prima, se il paziente è donatore o necessita donazione. Successivamente, è necessario collegare i pazienti e i loro rispettivi cicli. </p> |
<p style="text-align: justify;">This task is accomplished by <strong>Matcher</strong>. An interface that helps you create cycles and link patients.</p> | <p style="text-align: justify;">This task is accomplished by <strong>Matcher</strong>. An interface that helps you create cycles and link patients.</p> | ||
<table border="0"> | <table border="0"> | ||
| Line 116: | Line 116: | ||
</table> | </table> | ||
<p> </p> | <p> </p> | ||
| − | <h2> | + | <h2>Tracciabilità cellula</h2> |
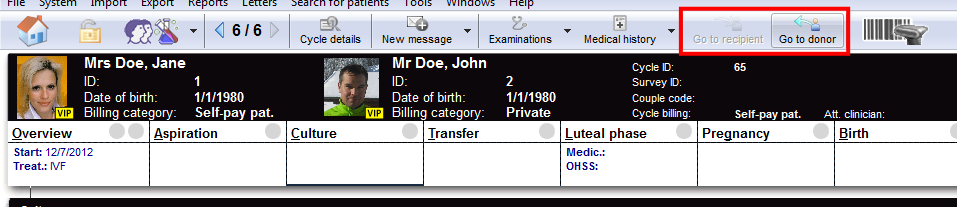
<p style="text-align: justify;">After the donation has been completed, we can open the cycle of the recipient/donor and continue cultivation. You can switch between cycles with the buttons from the image below. If a patient has more than one recipient/donor you will be asked to whom you want to switch.</p> | <p style="text-align: justify;">After the donation has been completed, we can open the cycle of the recipient/donor and continue cultivation. You can switch between cycles with the buttons from the image below. If a patient has more than one recipient/donor you will be asked to whom you want to switch.</p> | ||
<table style="margin-left: auto; margin-right: auto;" border="0"> | <table style="margin-left: auto; margin-right: auto;" border="0"> | ||
| Line 140: | Line 140: | ||
</table> | </table> | ||
<p> </p> | <p> </p> | ||
| − | <h2> | + | <h2>Come fare...</h2> |
<table border="0"> | <table border="0"> | ||
<tbody> | <tbody> | ||
<tr> | <tr> | ||
| − | <td><img src="/images/howto48.png" alt="" width="48" height="48" /></td> | + | <td><strong><img src="/images/howto48.png" alt="" width="48" height="48" /></strong></td> |
| − | <td> | + | <td>Se si vuole sapere come effettuare una donazione, cliccare su <a href="/index.php?title=MedITEX_IVF_how_to#Donations">questo link</a> per accedere alla pagina<strong> Come fare...</strong></td> |
</tr> | </tr> | ||
</tbody> | </tbody> | ||
| Line 152: | Line 152: | ||
<tbody> | <tbody> | ||
<tr> | <tr> | ||
| − | <td style="text-align: right;"><a href="/index.php?title=MedITEX_IVF_manual"> | + | <td style="text-align: right;"><a href="/index.php?title=MedITEX_IVF_manual">Torna al manuale di MedITEX IVF</a></td> |
| − | <td style="text-align: right;"><a href="#top"> | + | <td style="text-align: right;"><a href="#top">Inizio Pagina</a></td> |
</tr> | </tr> | ||
</tbody> | </tbody> | ||
</table> | </table> | ||
Revision as of 12:31, 20 April 2016
 |
|
|
Questa serie di funzionalità in MedITEX IVF permette le donazioni di materiale e i trattamenti di madre in surroga. Le donazioni sono effettuate tra due o più pazienti. Il paziente che fornisce il materiale (ovociti, embrioni, etc.) è chiamato Donatore e il paziente che riceve il materiale è detto Ricevente. |
Contents |
Buttons
| <img src="/images/AnonymID.pn.png" alt="" width="26" height="24" /> | Impostare la data corrente. |
| <a href="/index.php?title=Search_for_suitable_patient"><img style="border: 2px dotted blue;" src="/images/Plus.png" alt="" width="23" height="23" /></a> | Creare una nuova prenotazione: creare una nuova prenotazione nel caso in cui siano selezionate le opzioni <a href="/index.php?title=Search_for_suitable_patient">La persona è:</a> e <a href="/index.php?title=Search_for_suitable_patient">La persona necessita:</a>. |
| <img src="/images/DeleteX.png" alt="" width="26" height="24" /> | Cancellare una prenotazione: cancellare una prenotazione selezionata dalla lista. |
Tab
Informazioni persona e prenotazioni
| <img src="/images/DonationW4.png" alt="" width="765" height="117" /> |
|
| <img src="/images/DonationW2.png" alt="" width="400" height="171" /> |
Prenotazioni attuali: questa tab mostra una lista di tutte le prenotazioni fatte per il paziente. E' possibile aggiungere una nuova prenotazione cliccando sul pulsante con il "+" verde e cancellarla utilizzando il pulsante con la "x" rossa. |
| <img src="/images/DonationW3.png" alt="" width="400" height="171" /> | Storico: mostra una lista delle donazioni già concluse. Cliccare sul piccolo "+" all'inizio della riga per vedere i dettagli relativi al materiale donato. |
| <img src="/images/DonationW9.png" alt="" width="576" height="65" /> |
Dettagli: mostra i dettagli relativi alla donazione selezionata. E' possibile aprire la maschera di inserimento dati con maggiori informazioni di uno straw con un doppio click. |
Caratteristiche personali
| <img src="/images/DonationW5.png" alt="" width="765" height="124" /> |
- Caratteristiche fisiche: in questa tab, è possibile inserire le caratteristiche fisiche del paziente, come il gruppo sanguigno, l'altezza, il colore dei capelli, etc.
- Caratteristiche psicologiche: questa tab contiene le caratteristiche psicologiche del paziente. E' possibile inserire le caratteristiche caratteriali, le attitudini e le abilità del paziente.
- Caratteristiche sociali e altro: mostra le caratteristiche come l'orientamento religioso o sessuale, se è un fumatore o se consuma alcool, etc.
Aprire la sezione Donazione
Nel caso il paziente sia donatore o necessiti di donazione l'informazione comparirà nella finestra di informazione nella pagina principale relativa al paziente nell'area verde. Quest'area è accessibile anche da <a href="/index.php?title=Demographics">Anagrafica</a>.
Cliccare sull'area verde per impostare le informazioni donazione per quel paziente.
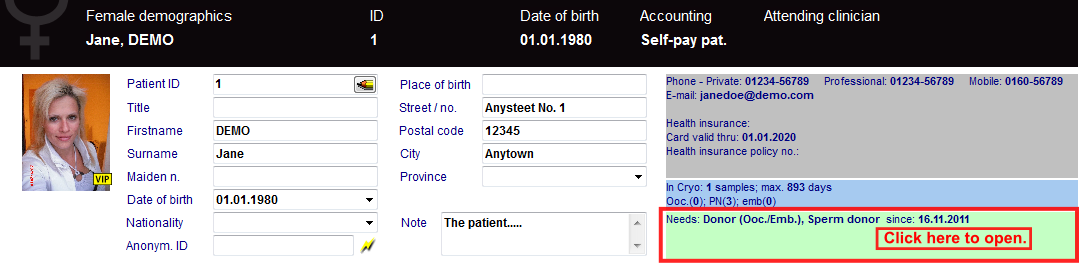 |
Le informazioni vengono visualizzate nella pagina principale relativa al paziente/coppia:
| <img src="/images/MainDonorRed.png" alt="" width="250" height="299" /> |
Configurazione
| <a href="/index.php?title=MedITEX_IVF_Settings#Donation_.2F_surrogate_motherhood"><img style="display: block; margin-left: auto; margin-right: auto;" src="/images/plus48.png" alt="" width="48" height="48" /></a> | <a href="/index.php?title=MedITEX_IVF_Settings#Donation_.2F_surrogate_motherhood">Cliccare qui</a> per sapere come configurare la Donazione e la Maternità in surroga. |
Match
In MedITEX IVF, le donazioni si creano mediante il collegamento tra pazienti e terapie. Per completare una procedura di donazione è necessario prima impostare come visto prima, se il paziente è donatore o necessita donazione. Successivamente, è necessario collegare i pazienti e i loro rispettivi cicli.
This task is accomplished by Matcher. An interface that helps you create cycles and link patients.
| <img src="/images/MatcherButton.png" alt="" width="53" height="39" /> | This button opens Matcher and helps you through the necessary steps. It can have different functionalities depending on how much of the donation process has been completed. For example, if a patient do not have a donation cycle created, Matcher will first of all help you creating it, otherwise it will only link cycles. Therefore, Matcher works as a smart button that verifies the necessary steps to successfully perform a donation. |
Tracciabilità cellula
After the donation has been completed, we can open the cycle of the recipient/donor and continue cultivation. You can switch between cycles with the buttons from the image below. If a patient has more than one recipient/donor you will be asked to whom you want to switch.
 |
Another easy way of tracking donated cells is by using a special function. Select the oocyte/embryo you wish to track, right-click it and select Cell tracking. The cell you have selected will be shown in the cycle of the recipient/donor.
This feature is only available if the donation was performed from the Graphical Representation.
|
|
Come fare...
| <img src="/images/howto48.png" alt="" width="48" height="48" /> | Se si vuole sapere come effettuare una donazione, cliccare su <a href="/index.php?title=MedITEX_IVF_how_to#Donations">questo link</a> per accedere alla pagina Come fare... |
| <a href="/index.php?title=MedITEX_IVF_manual">Torna al manuale di MedITEX IVF</a> | <a href="#top">Inizio Pagina</a> |