Donazioni
From MedITEX - Wiki
| Line 21: | Line 21: | ||
<tr> | <tr> | ||
<td><a href="/index.php?title=Search_for_suitable_patient"><img style="border: 2px dotted blue;" src="/images/Plus.png" alt="" width="23" height="23" /></a></td> | <td><a href="/index.php?title=Search_for_suitable_patient"><img style="border: 2px dotted blue;" src="/images/Plus.png" alt="" width="23" height="23" /></a></td> | ||
| − | <td style="text-align: justify;"><strong>Creare una nuova prenotazione: </strong>creare una nuova prenotazione nel caso in cui siano selezionate le opzioni | + | <td style="text-align: justify;"><strong>Creare una nuova prenotazione: </strong>creare una nuova prenotazione nel caso in cui siano selezionate le opzioni <strong><a href="/index.php?title=Search_for_suitable_patient"><span style="text-decoration: underline;">La persona è:</span></a> </strong>e <a href="/index.php?title=Search_for_suitable_patient"><strong><span style="text-decoration: underline;">La persona necessita:</span></strong></a>.</td> |
</tr> | </tr> | ||
<tr> | <tr> | ||
<td><img src="/images/DeleteX.png" alt="" width="26" height="24" /></td> | <td><img src="/images/DeleteX.png" alt="" width="26" height="24" /></td> | ||
| − | <td><strong> | + | <td><strong>Cancellare una prenotazione</strong>: cancellare una prenotazione selezionata dalla lista.</td> |
</tr> | </tr> | ||
</tbody> | </tbody> | ||
</table> | </table> | ||
<p> </p> | <p> </p> | ||
| − | <h2> | + | <h2>Tab</h2> |
| − | <h3> | + | <h3>Informazioni persona e prenotazioni</h3> |
<table style="margin-left: auto; margin-right: auto;" border="0"> | <table style="margin-left: auto; margin-right: auto;" border="0"> | ||
<tbody> | <tbody> | ||
| Line 40: | Line 40: | ||
<td><img src="/images/DonationW2.png" alt="" width="400" height="171" /></td> | <td><img src="/images/DonationW2.png" alt="" width="400" height="171" /></td> | ||
<td> | <td> | ||
| − | <p style="text-align: justify;"><strong> | + | <p style="text-align: justify;"><strong>Prenotazioni attuali</strong>: questa tab mostra una lista di tutte le prenotazioni fatte per il paziente. E' possibile aggiungere una nuova prenotazione cliccando sul pulsante con il "+" verde e cancellarla utilizzando il pulsante con la "x" rossa. </p> |
</td> | </td> | ||
</tr> | </tr> | ||
<tr> | <tr> | ||
<td><img src="/images/DonationW3.png" alt="" width="400" height="171" /></td> | <td><img src="/images/DonationW3.png" alt="" width="400" height="171" /></td> | ||
| − | <td style="text-align: justify;"><strong> | + | <td style="text-align: justify;"><strong>Storico</strong>: mostra una lista delle donazioni già concluse. Cliccare sul piccolo "<strong>+</strong>" all'inizio della riga per vedere i <strong>dettagli </strong>relativi al materiale donato. </td> |
</tr> | </tr> | ||
<tr> | <tr> | ||
<td><img src="/images/DonationW9.png" alt="" width="576" height="65" /></td> | <td><img src="/images/DonationW9.png" alt="" width="576" height="65" /></td> | ||
<td style="text-align: justify;"> | <td style="text-align: justify;"> | ||
| − | <p><strong> | + | <p><strong>Dettagli:</strong> mostra i dettagli relativi alla donazione selezionata.</p> |
| − | <p> | + | <p>E' possibile aprire la maschera di inserimento dati con maggiori informazioni di uno straw con un doppio click.<strong><br /></strong></p> |
</td> | </td> | ||
</tr> | </tr> | ||
| Line 57: | Line 57: | ||
</table> | </table> | ||
<p> </p> | <p> </p> | ||
| − | <h3> | + | <h3>Caratteristiche personali</h3> |
<table style="margin-left: auto; margin-right: auto;" border="0"> | <table style="margin-left: auto; margin-right: auto;" border="0"> | ||
<tbody> | <tbody> | ||
| Line 66: | Line 66: | ||
</table> | </table> | ||
<ul> | <ul> | ||
| − | <li style="text-align: justify;"><strong> | + | <li style="text-align: justify;"><strong>Caratteristiche fisiche</strong>: in questa tab, è possibile inserire le caratteristiche fisiche del paziente, come il gruppo sanguigno, l'altezza, il colore dei capelli, etc. </li> |
</ul> | </ul> | ||
<ul style="text-align: justify;"> | <ul style="text-align: justify;"> | ||
| − | <li><strong> | + | <li><strong>Caratteristiche psicologiche</strong>: questa tab contiene le caratteristiche psicologiche del paziente. E' possibile inserire le caratteristiche caratteriali, le attitudini e le abilità del paziente.</li> |
</ul> | </ul> | ||
<ul> | <ul> | ||
| − | <li style="text-align: justify;"><strong> | + | <li style="text-align: justify;"><strong>Caratteristiche sociali e altro</strong>: mostra le caratteristiche come l'orientamento religioso o sessuale, se è un fumatore o se consuma alcool, etc.</li> |
</ul> | </ul> | ||
<p> </p> | <p> </p> | ||
| − | <h2> | + | <h2>Aprire la sezione Donazione</h2> |
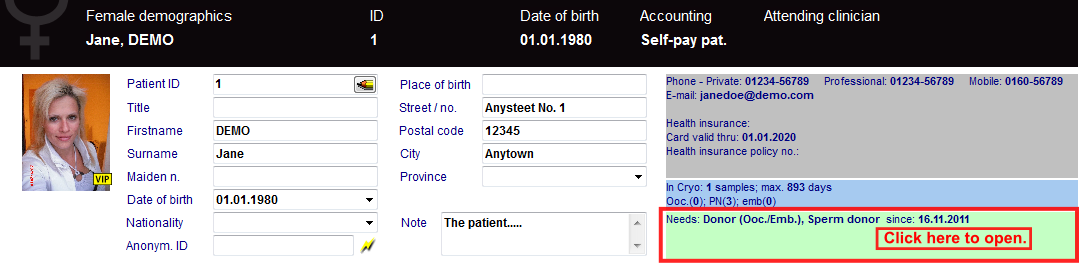
| − | <p style="text-align: justify;"> | + | <p style="text-align: justify;">Nel caso il paziente sia donatore o necessiti di donazione l'informazione comparirà nella finestra di informazione nella pagina principale relativa al paziente nell'area verde. Quest'area è accessibile anche da <a href="/index.php?title=Demographics"><strong>Demographics</strong></a>.</p> |
<p style="text-align: justify;">Click on the green area to set donation for this patient.</p> | <p style="text-align: justify;">Click on the green area to set donation for this patient.</p> | ||
<table style="margin-left: auto; margin-right: auto;" border="0" width="10" height="24"> | <table style="margin-left: auto; margin-right: auto;" border="0" width="10" height="24"> | ||
Revision as of 12:20, 20 April 2016
 |
|
|
Questa serie di funzionalità in MedITEX IVF permette le donazioni di materiale e i trattamenti di madre in surroga. Le donazioni sono effettuate tra due o più pazienti. Il paziente che fornisce il materiale (ovociti, embrioni, etc.) è chiamato Donatore e il paziente che riceve il materiale è detto Ricevente. |
Contents |
Buttons
| <img src="/images/AnonymID.pn.png" alt="" width="26" height="24" /> | Impostare la data corrente. |
| <a href="/index.php?title=Search_for_suitable_patient"><img style="border: 2px dotted blue;" src="/images/Plus.png" alt="" width="23" height="23" /></a> | Creare una nuova prenotazione: creare una nuova prenotazione nel caso in cui siano selezionate le opzioni <a href="/index.php?title=Search_for_suitable_patient">La persona è:</a> e <a href="/index.php?title=Search_for_suitable_patient">La persona necessita:</a>. |
| <img src="/images/DeleteX.png" alt="" width="26" height="24" /> | Cancellare una prenotazione: cancellare una prenotazione selezionata dalla lista. |
Tab
Informazioni persona e prenotazioni
| <img src="/images/DonationW4.png" alt="" width="765" height="117" /> |
|
| <img src="/images/DonationW2.png" alt="" width="400" height="171" /> |
Prenotazioni attuali: questa tab mostra una lista di tutte le prenotazioni fatte per il paziente. E' possibile aggiungere una nuova prenotazione cliccando sul pulsante con il "+" verde e cancellarla utilizzando il pulsante con la "x" rossa. |
| <img src="/images/DonationW3.png" alt="" width="400" height="171" /> | Storico: mostra una lista delle donazioni già concluse. Cliccare sul piccolo "+" all'inizio della riga per vedere i dettagli relativi al materiale donato. |
| <img src="/images/DonationW9.png" alt="" width="576" height="65" /> |
Dettagli: mostra i dettagli relativi alla donazione selezionata. E' possibile aprire la maschera di inserimento dati con maggiori informazioni di uno straw con un doppio click. |
Caratteristiche personali
| <img src="/images/DonationW5.png" alt="" width="765" height="124" /> |
- Caratteristiche fisiche: in questa tab, è possibile inserire le caratteristiche fisiche del paziente, come il gruppo sanguigno, l'altezza, il colore dei capelli, etc.
- Caratteristiche psicologiche: questa tab contiene le caratteristiche psicologiche del paziente. E' possibile inserire le caratteristiche caratteriali, le attitudini e le abilità del paziente.
- Caratteristiche sociali e altro: mostra le caratteristiche come l'orientamento religioso o sessuale, se è un fumatore o se consuma alcool, etc.
Aprire la sezione Donazione
Nel caso il paziente sia donatore o necessiti di donazione l'informazione comparirà nella finestra di informazione nella pagina principale relativa al paziente nell'area verde. Quest'area è accessibile anche da <a href="/index.php?title=Demographics">Demographics</a>.
Click on the green area to set donation for this patient.
 |
After donation properties have been set, this information will also be displayed on the main window.
| <img src="/images/MainDonorRed.png" alt="" width="250" height="299" /> |
Configuration
| <a href="/index.php?title=MedITEX_IVF_Settings#Donation_.2F_surrogate_motherhood"><img style="display: block; margin-left: auto; margin-right: auto;" src="/images/plus48.png" alt="" width="48" height="48" /></a> | <a href="/index.php?title=MedITEX_IVF_Settings#Donation_.2F_surrogate_motherhood">Click here</a> to know how to configure Donation and Surrogate motherhood. |
Matcher
In MedITEX IVF, donation is performed by linking patients and cycles. In order to have a donation procedure completed, we need first to set the properties described above for each patient. Secondly, we need to link those patients and their respective cycles.
This task is accomplished by Matcher. An interface that helps you create cycles and link patients.
| <img src="/images/MatcherButton.png" alt="" width="53" height="39" /> | This button opens Matcher and helps you through the necessary steps. It can have different functionalities depending on how much of the donation process has been completed. For example, if a patient do not have a donation cycle created, Matcher will first of all help you creating it, otherwise it will only link cycles. Therefore, Matcher works as a smart button that verifies the necessary steps to successfully perform a donation. |
Cell tracking
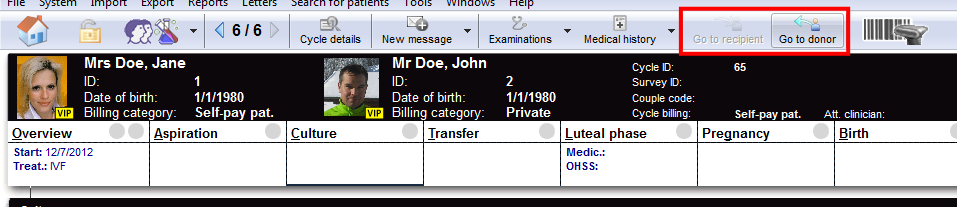
After the donation has been completed, we can open the cycle of the recipient/donor and continue cultivation. You can switch between cycles with the buttons from the image below. If a patient has more than one recipient/donor you will be asked to whom you want to switch.
 |
Another easy way of tracking donated cells is by using a special function. Select the oocyte/embryo you wish to track, right-click it and select Cell tracking. The cell you have selected will be shown in the cycle of the recipient/donor.
This feature is only available if the donation was performed from the Graphical Representation.
|
|
How to
| <img src="/images/howto48.png" alt="" width="48" height="48" /> | If you would like to know how to perform donations, please follow <a href="/index.php?title=MedITEX_IVF_how_to#Donations">this link</a> and check our How to page. |
| <a href="/index.php?title=MedITEX_IVF_manual">Back to the MedITEX IVF menu </a> | <a href="#top">Back to top</a> |