Diagnostica Lab. Maschile
From MedITEX - Wiki
(Difference between revisions)
| Line 26: | Line 26: | ||
</tr> | </tr> | ||
<tr> | <tr> | ||
| − | <td><span style="font-size: small;"><a href="/index.php?title=Documenting_a_new_sample#Documenting_a_semen_analysis"><img style="display: block; margin-left: auto; margin-right: auto; border: 2px dotted blue;" src="/images/ | + | <td><span style="font-size: small;"><a href="/index.php?title=Documenting_a_new_sample#Documenting_a_semen_analysis"><img style="display: block; margin-left: auto; margin-right: auto; border: 2px dotted blue;" src="/images/Diagn.Lab_F_2_IT.png" alt="" width="117" height="40" /></a></span></td> |
<td><strong>New sample:</strong> click on this icon to document a new sample.</td> | <td><strong>New sample:</strong> click on this icon to document a new sample.</td> | ||
</tr> | </tr> | ||
<tr> | <tr> | ||
| − | <td><span style="font-size: small;"><a href="/index.php?title=Documenting_a_new_sample#Documenting_a_new_multiple_entry"><img style="display: block; margin-left: auto; margin-right: auto; border: 2px dotted blue;" src="/images/ | + | <td><span style="font-size: small;"><a href="/index.php?title=Documenting_a_new_sample#Documenting_a_new_multiple_entry"><img style="display: block; margin-left: auto; margin-right: auto; border: 2px dotted blue;" src="/images/Diagn.Lab_F_3_IT.png" alt="" width="112" height="38" /></a></span></td> |
<td><strong>Multiple entry:</strong> click on this icon to document many new samples at a time.</td> | <td><strong>Multiple entry:</strong> click on this icon to document many new samples at a time.</td> | ||
</tr> | </tr> | ||
<tr> | <tr> | ||
| − | <td><a href="/index.php?title=Laboratory_order"><img style="display: block; margin-left: auto; margin-right: auto; border: 2px dotted blue;" src="/images/ | + | <td><a href="/index.php?title=Laboratory_order"><img style="display: block; margin-left: auto; margin-right: auto; border: 2px dotted blue;" src="/images/Diagn.Lab_F_4_IT.png" alt="" width="102" height="41" /></a></td> |
<td><strong>Lab order: </strong>here you can appoint / send laboratory orders.</td> | <td><strong>Lab order: </strong>here you can appoint / send laboratory orders.</td> | ||
</tr> | </tr> | ||
<tr> | <tr> | ||
| − | <td><span style="font-size: small;"><a href="/index.php?title=Statistics"><img style="display: block; margin-left: auto; margin-right: auto; border: 2px dotted blue;" src="/images/ | + | <td><span style="font-size: small;"><a href="/index.php?title=Statistics"><img style="display: block; margin-left: auto; margin-right: auto; border: 2px dotted blue;" src="/images/Diagn.Lab_F_5_IT.png" alt="" width="68" height="40" /></a></span></td> |
<td><strong>Statistics:</strong> click on this icon to create a graphical representation of lab values.</td> | <td><strong>Statistics:</strong> click on this icon to create a graphical representation of lab values.</td> | ||
</tr> | </tr> | ||
<tr> | <tr> | ||
| − | <td><span style="font-size: small;"><img style="display: block; margin-left: auto; margin-right: auto;" src="/images/ | + | <td><span style="font-size: small;"><img style="display: block; margin-left: auto; margin-right: auto;" src="/images/Anamnesi_6_IT.png" alt="" width="70" height="42" /></span></td> |
<td><strong>Print:</strong> click on this icon to print the list of lab samples.</td> | <td><strong>Print:</strong> click on this icon to print the list of lab samples.</td> | ||
</tr> | </tr> | ||
<tr> | <tr> | ||
| − | <td><img style="display: block; margin-left: auto; margin-right: auto;" src="/images/ | + | <td><img style="display: block; margin-left: auto; margin-right: auto;" src="/images/Anagrafica_7_IT.png" alt="" width="90" height="44" /></td> |
<td><strong>New message: </strong>click on this button to send a message to the patient. This message can be an SMS, an email or a web portal message.</td> | <td><strong>New message: </strong>click on this button to send a message to the patient. This message can be an SMS, an email or a web portal message.</td> | ||
</tr> | </tr> | ||
<tr> | <tr> | ||
| − | <td><a href="/index.php?title=Lab_diagnostics_female"><span style="font-size: small;"><img style="display: block; margin-left: auto; margin-right: auto; border: 2px dotted blue;" src="/images/ | + | <td><a href="/index.php?title=Lab_diagnostics_female"><span style="font-size: small;"><img style="display: block; margin-left: auto; margin-right: auto; border: 2px dotted blue;" src="/images/Anagrafica_8bis_IT.png" alt="" width="78" height="40" /></span></a></td> |
<td><strong>Go to partner:</strong> click here to go to the partner's Lab diagnostics.</td> | <td><strong>Go to partner:</strong> click here to go to the partner's Lab diagnostics.</td> | ||
</tr> | </tr> | ||
| Line 66: | Line 66: | ||
<tbody> | <tbody> | ||
<tr> | <tr> | ||
| − | <td><img style="display: block; margin-left: auto; margin-right: auto;" src="/images/ | + | <td><img style="display: block; margin-left: auto; margin-right: auto;" src="/images/Anamnesi_3_IT.png" alt="" width="247" height="37" /></td> |
<td>Here you can add the date of initial consultation.</td> | <td>Here you can add the date of initial consultation.</td> | ||
</tr> | </tr> | ||
Revision as of 12:10, 18 April 2016
Nella sezione Diagnostica Laboratorio, è possibile inserire tutti i risultati di laboratorio del paziente. Questo include ormoni, chimica-clinica e sierologia, genetica, microbiologia e spermiogrammi.
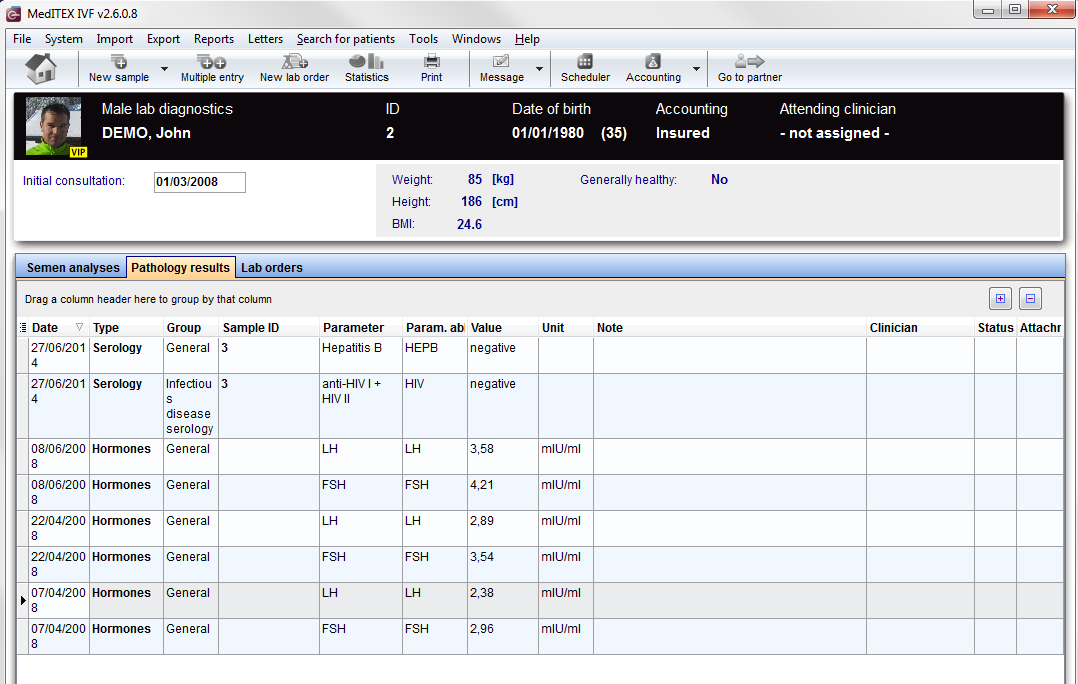 |
La pagina della Diagnostica di laboratorio è divisa in due parti principali:
- La parte sopra contiene un riassunto delle gravidanze precedenti e alcuni dati antropometrici.
- La sezione della parte bassa contiene un lista degli esami di laboratorio eseguiti nella tab "Valori lab" e una lista degli spermiogrammi eseguiti nella tab "Spermiogrammi".
- Tutti i valori di laboratorio possono essere visualizzati nella tab Diagn. Lab della pagina principale (ordinati per data). I loro rispettivi status sono visibili nella parte destra dell'overview.
- Le voci nell'overview possono essere ordinate o filtrate cliccando sull'intestazione della colonna per cui si vuole ordinare, possono anche essere raggruppate trascinando in alto la colonna per la quale si intende fare il raggruppamento. Queste modifiche saranno salvate e comunque nulla viene perso.
- Tutte le voci possono essere modificare ancora facendo doppio click sulla riga corrispondente, ed è possibile cancellarle selezionando quella che si vuole cancellare e premendo Canc sulla tastiera.
Pulsanti
I pulsanti circondati da puntini blu in questa Wiki hanno funzionalità speciali. Cliccare sopra per avere maggiori informazioni su quella particolare sezione del programma.
| <a href="/index.php?title=MedITEX_IVF_manual"><img style="display: block; margin-left: auto; margin-right: auto; border: 2px dotted blue;" src="/images/homeico.jpg" alt="" /></a> | Home button: click on this icon to go to the starting window. |
| <a href="/index.php?title=Documenting_a_new_sample#Documenting_a_semen_analysis"><img style="display: block; margin-left: auto; margin-right: auto; border: 2px dotted blue;" src="/images/Diagn.Lab_F_2_IT.png" alt="" width="117" height="40" /></a> | New sample: click on this icon to document a new sample. |
| <a href="/index.php?title=Documenting_a_new_sample#Documenting_a_new_multiple_entry"><img style="display: block; margin-left: auto; margin-right: auto; border: 2px dotted blue;" src="/images/Diagn.Lab_F_3_IT.png" alt="" width="112" height="38" /></a> | Multiple entry: click on this icon to document many new samples at a time. |
| <a href="/index.php?title=Laboratory_order"><img style="display: block; margin-left: auto; margin-right: auto; border: 2px dotted blue;" src="/images/Diagn.Lab_F_4_IT.png" alt="" width="102" height="41" /></a> | Lab order: here you can appoint / send laboratory orders. |
| <a href="/index.php?title=Statistics"><img style="display: block; margin-left: auto; margin-right: auto; border: 2px dotted blue;" src="/images/Diagn.Lab_F_5_IT.png" alt="" width="68" height="40" /></a> | Statistics: click on this icon to create a graphical representation of lab values. |
| <img style="display: block; margin-left: auto; margin-right: auto;" src="/images/Anamnesi_6_IT.png" alt="" width="70" height="42" /> | Print: click on this icon to print the list of lab samples. |
| <img style="display: block; margin-left: auto; margin-right: auto;" src="/images/Anagrafica_7_IT.png" alt="" width="90" height="44" /> | New message: click on this button to send a message to the patient. This message can be an SMS, an email or a web portal message. |
| <a href="/index.php?title=Lab_diagnostics_female"><img style="display: block; margin-left: auto; margin-right: auto; border: 2px dotted blue;" src="/images/Anagrafica_8bis_IT.png" alt="" width="78" height="40" /></a> | Go to partner: click here to go to the partner's Lab diagnostics. |
| <img style="display: block; margin-left: auto; margin-right: auto;" src="/images/PM.png" alt="" /> |
with these two buttons you can decide how much rows you see in the list. (Expand all rows, Collapse all rows) |
Clickable areas
| <img style="display: block; margin-left: auto; margin-right: auto;" src="/images/Anamnesi_3_IT.png" alt="" width="247" height="37" /> | Here you can add the date of initial consultation. |
| <img src="/images/AreaNon.png" alt="" width="360" height="74" /> | It is no clickable area. You can see informations about the physique of the patient. |
Lists
|
<a href="/images/LabList.png"><img class="thumbimage" src="/images/LabList.png" alt="LabList.png" width="740" height="152" /></a>
<a class="internal" title="Enlarge" href="/index.php?title=File:LabList.png"><img src="/skins/common/images/magnify-clip.png" alt="" width="15" height="11" /></a>
|
- Date: date of the analisys.
- Type: area of the lab value like Hormones, Serology, Clinical chemistry, Genetics or Microbiology.
- Sample ID: ID of the single lab sample.
- Parameter: shortname of the parameter.
- Value: result value of the laboratory sample.
- Unit: default units for the parameter
- Note: add here important notes.
- Description: add a description here.
- Status: lab results that are particularly important, clinically relevant or that still need to be modified can be given the satus Abnormal.
- Attachment: contract or other documents about the lab value.
| <a href="/index.php?title=MedITEX_IVF_manual">Back to the MedITEX IVF menu </a> | <a href="#top">Back to top</a> |