Cycle Overview
From MedITEX - Wiki
| Line 8: | Line 8: | ||
</tbody> | </tbody> | ||
</table> | </table> | ||
| − | <p> | + | <p> </p> |
<p>The cycle <strong>Overview</strong> window is your "cockpit". In this mask you can find all important items and reach sub-sections with only one click.</p> | <p>The cycle <strong>Overview</strong> window is your "cockpit". In this mask you can find all important items and reach sub-sections with only one click.</p> | ||
<p>Enter the complete medication in the cycle overview. With this information, <strong>MedITEX IVF</strong> will calculate the first and last stimulation day for the <strong>DIR</strong>, the stimulation protocol, trigger shot and luteal phase support and more.</p> | <p>Enter the complete medication in the cycle overview. With this information, <strong>MedITEX IVF</strong> will calculate the first and last stimulation day for the <strong>DIR</strong>, the stimulation protocol, trigger shot and luteal phase support and more.</p> | ||
| Line 19: | Line 19: | ||
</tbody> | </tbody> | ||
</table> | </table> | ||
| − | |||
<p> </p> | <p> </p> | ||
<h2>Top section</h2> | <h2>Top section</h2> | ||
| Line 127: | Line 126: | ||
</table> | </table> | ||
<p> </p> | <p> </p> | ||
| − | <p>In order to administrate a single medication on several days, do the following:<strong> </strong></p> | + | <p>In order to administrate a single medication on several days, do the following:</p> |
| + | <p><strong>Method 1:</strong></p> | ||
| + | <ul> | ||
| + | <li>Select a cell;</li> | ||
| + | <li>Click again and enter a numeric value;</li> | ||
| + | <li>Click on a different cell to save the changes.</li> | ||
| + | </ul> | ||
| + | <table style="margin-left: auto; margin-right: auto;" border="0"> | ||
| + | <tbody> | ||
| + | <tr> | ||
| + | <td><img src="/images/hint48.png" alt="" width="48" height="48" /></td> | ||
| + | <td>This is not a <strong>double-click</strong>. If you double-click a medication, you will be asked to lock the cell.</td> | ||
| + | </tr> | ||
| + | </tbody> | ||
| + | </table> | ||
| + | <p> </p> | ||
| + | <p><strong>Method 2:</strong></p> | ||
| + | <ul> | ||
| + | <li>Select a cell;</li> | ||
| + | <li>Press <strong>CTRL-C</strong>;</li> | ||
| + | <li>Select another cell;</li> | ||
| + | <li>Press <strong>CTRL-V</strong>;</li> | ||
| + | </ul> | ||
| + | <p><strong><br /></strong></p> | ||
| + | <p><strong>Method 3:<br /></strong></p> | ||
<ul> | <ul> | ||
<li>Enter the dosage for the desired drug in the designated date;</li> | <li>Enter the dosage for the desired drug in the designated date;</li> | ||
| Line 133: | Line 156: | ||
<li>Click on the last date when that drug should be administrated.</li> | <li>Click on the last date when that drug should be administrated.</li> | ||
</ul> | </ul> | ||
| + | <table style="margin-left: auto; margin-right: auto;" border="0"> | ||
| + | <tbody> | ||
| + | <tr> | ||
| + | <td><img src="/images/CTRLMedication.png" alt="" width="350" height="329" /></td> | ||
| + | </tr> | ||
| + | </tbody> | ||
| + | </table> | ||
| + | <p> </p> | ||
| + | <p><strong>Method 4:</strong></p> | ||
| + | <ul> | ||
| + | <li>Select one cell;</li> | ||
| + | <li>Hold <strong>Shift </strong>and with the <strong>right </strong>or <strong>left </strong>arrows, select the remaining cells;</li> | ||
| + | <li>Press <strong>CTRL-</strong><strong>C</strong>;</li> | ||
| + | <li>Select another cell to paste;</li> | ||
| + | <li>Press <strong>CTRL-V</strong>.</li> | ||
| + | </ul> | ||
| + | <p>Pay close attention to the number of cells that were selected with this method.</p> | ||
| + | <table style="margin-left: auto; margin-right: auto;" border="0"> | ||
| + | <tbody> | ||
| + | <tr> | ||
| + | <td><img src="/images/ShiftMedication.png" alt="" /></td> | ||
| + | </tr> | ||
| + | </tbody> | ||
| + | </table> | ||
<p> </p> | <p> </p> | ||
<table style="margin-left: auto; margin-right: auto;" border="0"> | <table style="margin-left: auto; margin-right: auto;" border="0"> | ||
| Line 138: | Line 185: | ||
<tr> | <tr> | ||
<td><a href="/index.php?title=MedITEX_IVF_how_to#Cycle"><img src="/images/howto48.png" alt="" width="48" height="48" /></a></td> | <td><a href="/index.php?title=MedITEX_IVF_how_to#Cycle"><img src="/images/howto48.png" alt="" width="48" height="48" /></a></td> | ||
| − | <td> | + | <td><a href="/index.php?title=MedITEX_IVF_how_to#Cycle">Click here</a> for more informations about the usage of drugs.</td> |
</tr> | </tr> | ||
</tbody> | </tbody> | ||
| Line 144: | Line 191: | ||
<p> </p> | <p> </p> | ||
<h3>Hormones</h3> | <h3>Hormones</h3> | ||
| − | <table border="0"> | + | <table style="margin-left: auto; margin-right: auto;" border="0"> |
<tbody> | <tbody> | ||
<tr> | <tr> | ||
| Line 151: | Line 198: | ||
</tbody> | </tbody> | ||
</table> | </table> | ||
| − | <p | + | <p> </p> |
| − | <p> | + | <p>In order to enter hormone values for a patient, <strong>double-click </strong>the respective cell in in the hormone area.</p> |
| − | <table border="0"> | + | <table style="margin-left: auto; margin-right: auto;" border="0"> |
<tbody> | <tbody> | ||
<tr> | <tr> | ||
| Line 160: | Line 207: | ||
</tbody> | </tbody> | ||
</table> | </table> | ||
| − | <p>The window<strong> | + | <p> </p> |
| − | <table border="0"> | + | <p>The window<strong> Lab values</strong> will open:</p> |
| + | <table style="margin-left: auto; margin-right: auto;" border="0"> | ||
<tbody> | <tbody> | ||
<tr> | <tr> | ||
| Line 168: | Line 216: | ||
</tbody> | </tbody> | ||
</table> | </table> | ||
| − | <p> | + | <p> </p> |
| − | <p>Add further data if needed and close the window by pressing the<strong> | + | <p>From this window, you can enter all information regarding hormones for the corresponding days.</p> |
| + | <p>The list of hormones being displayed here cannot change. If you wish to document other hormones, you must do it from the <a href="/index.php?title=Lab_diagnostics_female"><strong>Female lab. diagnostics</strong></a>. The entries for these 5 hormones will automatically be exported to the patient's lab. diagnostics.</p> | ||
| + | <p>Add further data if needed and close the window by pressing the<strong> OK </strong>button.</p> | ||
| + | <p>Another way of entering values for hormones here in the <strong>Overview </strong>tab, is similar to</p> | ||
<p> </p> | <p> </p> | ||
<table border="0"> | <table border="0"> | ||
| Line 176: | Line 227: | ||
<td><img src="/images/hint48.png" alt="" width="48" height="48" /></td> | <td><img src="/images/hint48.png" alt="" width="48" height="48" /></td> | ||
<td> | <td> | ||
| − | <p>If MedITEX IVF can use an active lab data import interface in your center, the respective values will also be displayed in the cycle overview.<strong> </strong><strong> </strong></p> | + | <p>If <strong>MedITEX IVF</strong> can use an active lab data import interface in your center, the respective values will also be displayed in the cycle overview.<strong> </strong><strong> </strong></p> |
</td> | </td> | ||
</tr> | </tr> | ||
Revision as of 17:52, 12 March 2013
 |
The cycle Overview window is your "cockpit". In this mask you can find all important items and reach sub-sections with only one click.
Enter the complete medication in the cycle overview. With this information, MedITEX IVF will calculate the first and last stimulation day for the DIR, the stimulation protocol, trigger shot and luteal phase support and more.
| <img src="/images/hint48.png" alt="" width="48" height="48" /> | Go to the <a href="/index.php?title=MedITEX_IVF_Settings#Presentation_options">settings </a>for changing the interface of the calendar. |
Contents |
Top section
| <a href="/index.php?title=Cycle_Details"><img style="border: 2px dotted blue;" src="/images/CycleOverviewSummary.png" alt="" width="757" height="137" /></a> |
The top section of the Cycle overview displays important information about this cycle, such as, type of treatment, number of embryos planned, etc.
The left section displays information contained in the Cycle details and if you click on this section, <a href="/index.php?title=Cycle_Details">Cycle details</a> will open.
The right section contains information that is retrieved from the cycle in course, for example, it displays, the date of the last menstrual period, the date of the triggering and the medication used, etc.
| <img src="/images/hint48.png" alt="" width="48" height="48" /> | One important information about this section is the use of brackets []. Information displayed inside brackets represent what procedure took place. For example, from the image above, the treatment that was planned when creating this cycle was IVF,ICSI and, right next to it, the brackets information shows that what was planned actually happened. Another example is the Pl. sperm collection that initially, was Antegrade ejaculation but in fact, Electrostimulation was used. |
Bottom section
The bottom section of the Overview tab presents the calendar with the action taken on each day. Entries in the calendar are devided in 5 groups:
| <img src="/images/BottomPart.png" alt="" /> |
|
Events
 |
|
| <img src="/images/EventRightClick.png" alt="" width="235" height="109" /> |
Right-click the respective day in the row Events to set or reposition the event. |
The Events row shows important events such as the first day of the last menstrual period, follicle aspiration, transfer, or clinical pregnancy. MedITEX IVF will generate this information automatically according to user entries in the corresponding cycle areas.
| <a href="/index.php?title=How_to_set_events_in_a_cycle%3F"><img src="/images/howto48.png" alt="" width="48" height="48" /></a> | Click <a href="/index.php?title=How_to_set_events_in_a_cycle%3F">here</a>, for more informations about the usage of events. |
Medication
 |
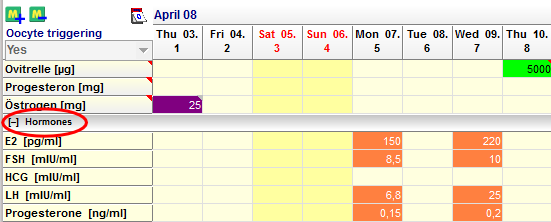
At the medication area, you can see all given drugs listed by day and dosage.
MedITEX IVF provides you with a list of all main drugs that are used in reproductive-medical treatments. Additional drugs can be individually defined in the <a href="/index.php?title=MedITEX_IVF_Settings#Drugs">system settings</a>.
| <img src="/images/M+.png" alt="" width="530" height="329" /> |
|
In order to administrate a single medication on several days, do the following:
Method 1:
- Select a cell;
- Click again and enter a numeric value;
- Click on a different cell to save the changes.
| <img src="/images/hint48.png" alt="" width="48" height="48" /> | This is not a double-click. If you double-click a medication, you will be asked to lock the cell. |
Method 2:
- Select a cell;
- Press CTRL-C;
- Select another cell;
- Press CTRL-V;
Method 3:
- Enter the dosage for the desired drug in the designated date;
- Press and hold CTRL on your keyboard;
- Click on the last date when that drug should be administrated.
| <img src="/images/CTRLMedication.png" alt="" width="350" height="329" /> |
Method 4:
- Select one cell;
- Hold Shift and with the right or left arrows, select the remaining cells;
- Press CTRL-C;
- Select another cell to paste;
- Press CTRL-V.
Pay close attention to the number of cells that were selected with this method.
| <img src="/images/ShiftMedication.png" alt="" /> |
| <a href="/index.php?title=MedITEX_IVF_how_to#Cycle"><img src="/images/howto48.png" alt="" width="48" height="48" /></a> | <a href="/index.php?title=MedITEX_IVF_how_to#Cycle">Click here</a> for more informations about the usage of drugs. |
Hormones
 |
In order to enter hormone values for a patient, double-click the respective cell in in the hormone area.
 |
The window Lab values will open:
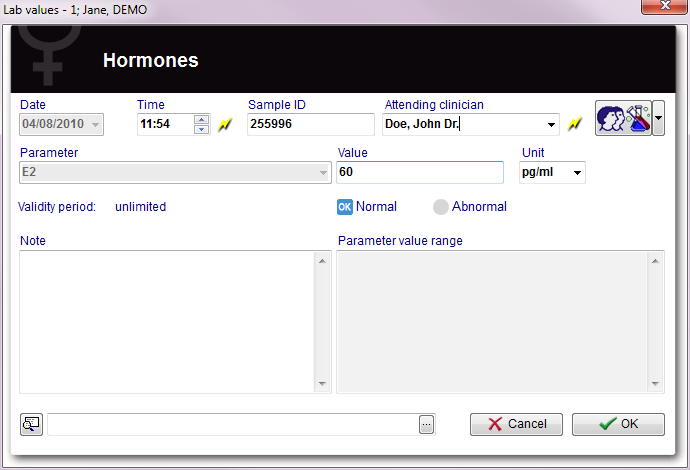 |
From this window, you can enter all information regarding hormones for the corresponding days.
The list of hormones being displayed here cannot change. If you wish to document other hormones, you must do it from the <a href="/index.php?title=Lab_diagnostics_female">Female lab. diagnostics</a>. The entries for these 5 hormones will automatically be exported to the patient's lab. diagnostics.
Add further data if needed and close the window by pressing the OK button.
Another way of entering values for hormones here in the Overview tab, is similar to
| <img src="/images/hint48.png" alt="" width="48" height="48" /> |
If MedITEX IVF can use an active lab data import interface in your center, the respective values will also be displayed in the cycle overview. |
Ultrasound
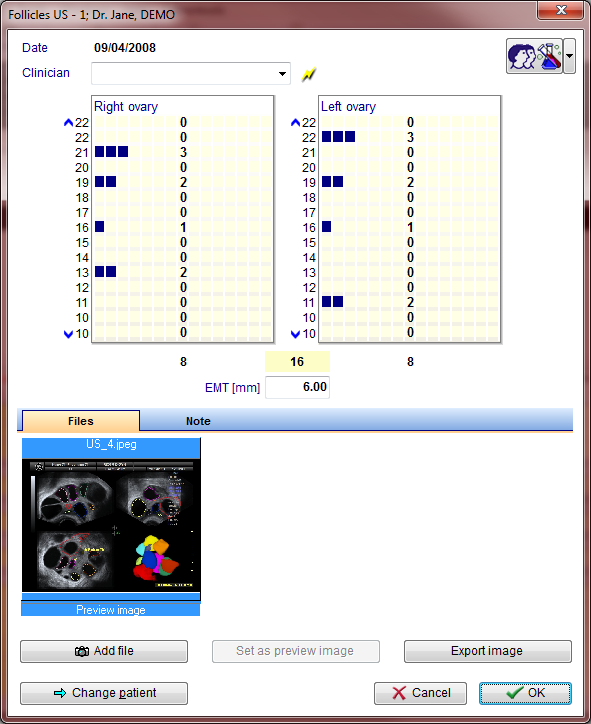 |
In the lower area of the cycle overview "Ultrasound" and “Follicle US" you can enter pictures, folliculometric data and the endometrial thickness exact to the day.
| <img src="/images/hint48.png" alt="" width="48" height="48" /> |
You can add a random number of pictures to the ultrasound results. |
| <a href="/index.php?title=How_to_enter_ultrasound_data_in_a_cycle%3F"><img src="/images/howto48.png" alt="" width="48" height="48" /></a> |
Click <a href="/index.php?title=How_to_enter_ultrasound_data_in_a_cycle%3F">here </a>to get more informatien about entering US data. |
| <a href="/index.php?title=MedITEX_IVF_manual">Back to the MedITEX IVF menu </a> | <a href="/index.php?title=Cycles">Back to the cycles</a> | <a href="#top">Back to top</a> |