Cryo storage
From MedITEX - Wiki
Back to MedITEX IVF Manual home page
 |
Click on this icon to access the QM field section related to this area | ||
|
|
Click on this icon to freeze a new sample
Click on this icon to thaw a sample |
||
| Above oocyte/embryo cryostorage, below sperm cryostorage |
|||
 |
|
Click on this icon to print the list of current cryostorage content | |
| Click on this icon to open the spermiogram related to the selected sample |
|||
|
Click on this icon to open the status of the invoices related to the selected sample. By clicking on the right arrow will be possible to choose if open the invoices' status or the contract window |
Contents |
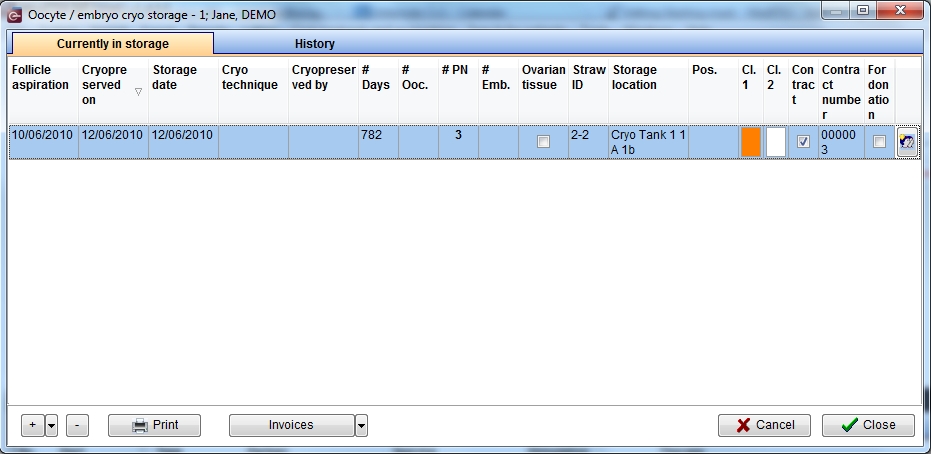
Freezing a oocyte/embryo sample
By clicking on the "+" icon it is possible to freeze a new sample. When the right black arrow on the "+" icon is clicked one more option is provided: to use the same values of the selected sample.
In each case the following window will pop up:

Explaination of the fields/icons:
- Follicle aspiration: date of the follicle aspiration
- Date of freezing: date of the freezing of the sample
- Storage date: date of the storage of the sample (this is useful when a sample comes from another center)
- Cryopreserved by: operator that carried out the freezing
- Cryo technique: technique used to freeze the material. Techniques may be added and/or modified in the related system table.
- Straw ID: ID assigned to the straw. If
 is clicked an ID number will be automatically assigned
 - # Straws: number of straws containing the same amount of material
- Patient ID: patient ID
- Partner ID: partner ID
- Clinic of origin: external center where the material comes from. To select a center double click in the blank field.
- Contract exists: if a contract is linked to the sample the box is checked
- Contract: by clicking on the right arrow of the field it is possible to link an existing cryocontract to the sample. By clicking on
 the link will be removed. Click on this icon
  to open the contract window
  : Click on this icon to access the QM field section related to this area or on the right arrow to block the QM fields or to see the change log.
 : Click on the arrows to scroll up/down the samples stored for the selected patient
- Material: number of oocytes/PN/embryos stored in the straws
- Preserv. using cryostorage: if the box is cecked the straws will be stored in a location present in the clinic. See below how to choose a location in the cryo storage
- Position: additional field to keep information related to the position of the sample
- Colour: colours to be chosen according the colours of the used straws
- Colture info: if the material was frozen in the colture section it is possible, by double clicking on the icons, to see the information related to the day of colture when the selected material was frozen
- Change patient: by clicking on this icon it is possible to freeze a new sample for any selected patient. It is also possible to skip to the latest frozen material for any selected patient by clicking on the right black arrow and selecting the relevant option
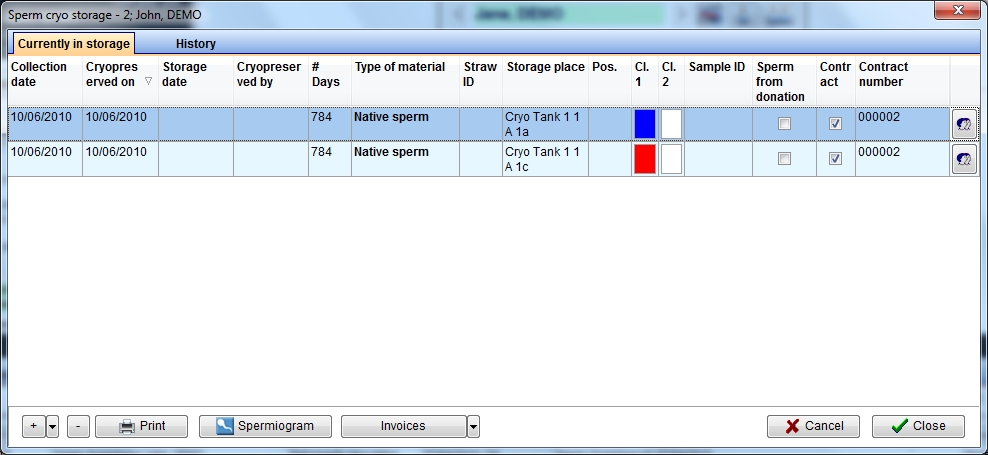
Freezing a sperm sample
By clicking on the "+" icon it is possible to freeze a new sample. When the right black arrow on the "+" icon is clicked one more option is provided: to use the same values of the selected sample.
In each case the following window will pop up:
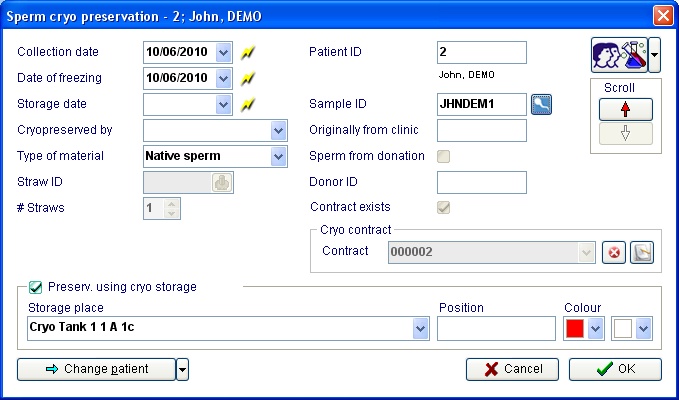
Explaination of the fields/icons:
- Collection date: date of the sperm collection
- Date of freezing: date of the freezing of the sample
- Storage date: date of the storage of the sample (this is useful when a sample comes from another center)
- Cryopreserved by: operator that carried out the freezing
- Type of material: type of the stored material.
- Straw ID: ID assigned to the straw. If is clicked an ID number will be automatically assigned
- # Straws: number of straws containing the same amount of material
- Patient ID: patient ID
- Sample ID: sample ID. By clicking on the icon
 the relevant spemiogram will open.
 - Originally from clinic: external center where the material comes from. To select a center double click in the blank field.
- Sperm from donation: if the box is checked the sample is from donation
- Donor ID: ID code of the donor of the sample
- Contract exists: if a contract is linked to the sample the box is checked
- Contract: by clicking on the right arrow of the field it is possible to link an existing cryocontract to the sample. By clicking on the link will be removed. Click on this icon to open the contract window
- : Click on this icon to access the QM field section related to this area or on the right arrow to block the QM fields or to see the change log.
- : Click on the arrows to scroll up/down the samples stored for the selected patient
- Preserv. using cryostorage: if the box is cecked the straws will be stored in a location present in the clinic. See below how to choose a location in the cryo storage
- Position: additional field to keep information related to the position of the sample
- Colour: colours to be chosen according the colours of the used straws
- Change patient: by clicking on this icon it is possible to freeze a new sample for any selected patient. It is also possible to skip to the latest frozen material for any selected patient by clicking on the right black arrow and selecting the relevant option
Choosing a location in the cryo storage
When the arrow at the rigtht of the field "Storage place" is clicked the following window will open:
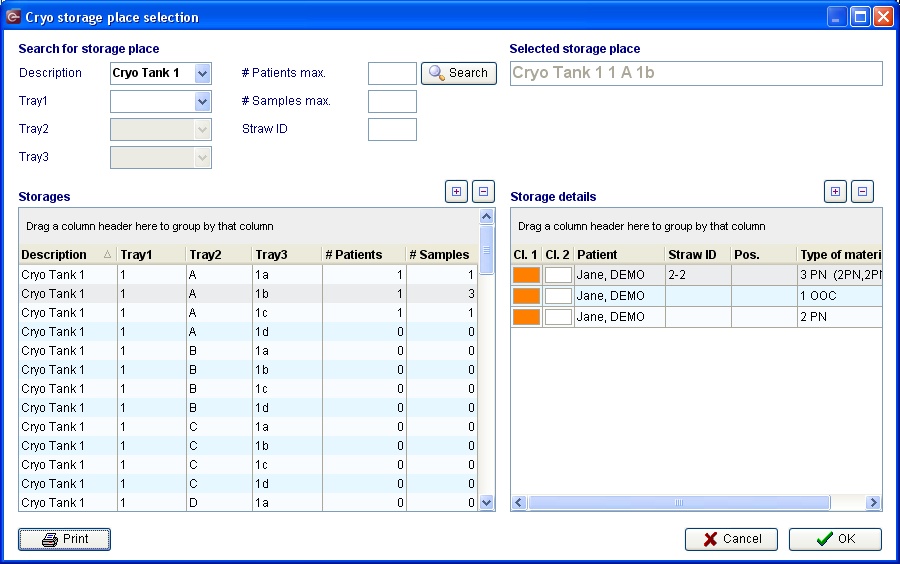
The fastest way to choose a position is to select it in the Storages list and press ok.When a position is selected in the storage details will be shown the samples just stored in that position with the information related to the colours, patient, ID, position and type of material contained in each straw.
It is also possible to select a position with certain features, for example using the drop down menus in the "Search for storaging place":
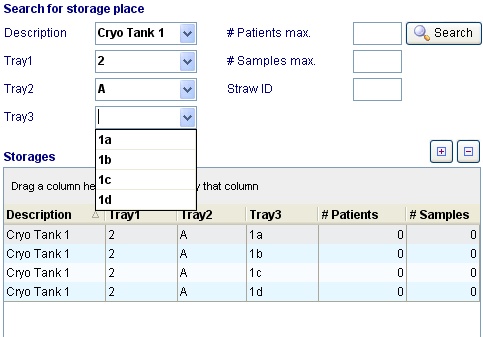
or searching:
- for the first position containing samples from a given max number of patients (eg. a position that contains samples from maximum two different patients),
- for the first position containing a maximum number of samples
- for the position that contains a straw with a given ID
Finally, clicking on the print icon, it is possible to print the list of all the materials coontained in the cryo storage for the selected patient.
Note: the "architecture" of the cryo storage may be customized in the Cryo storage section in the settings
Thawing a sample
By clicking on the "-" icon it is possible to thaw the selected sample. The following window will open:
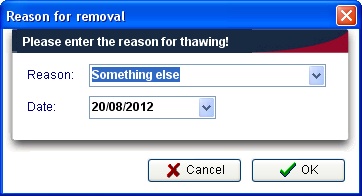
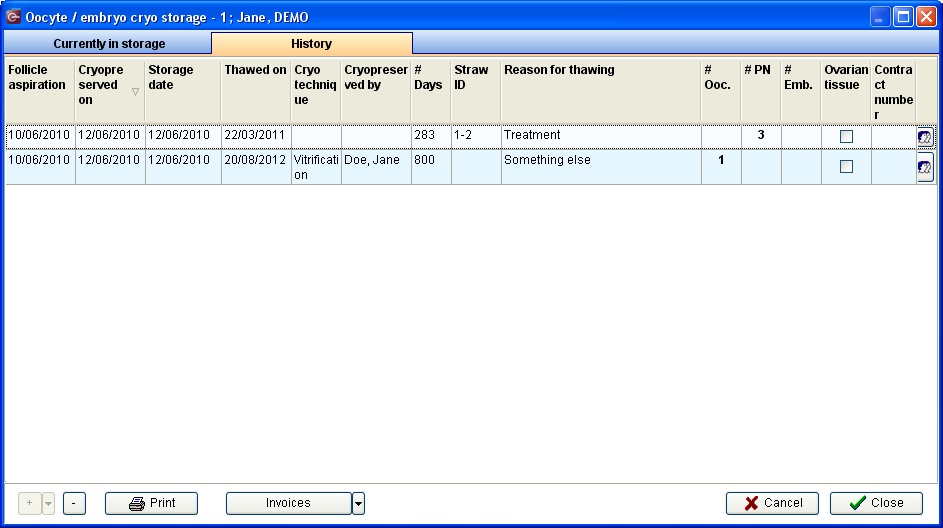
Just select the reason of thawing, the thawing date and confirm. The sample will be removed from the cryostorage and it will appear in the history section:
Note: if the reason selected is "Mistakenly documented" the sample won't appear in the history section
Cryostorage overview
In order to have an overview of all the materials stored in the cryo storage just select cryostorage overview in the system menu: 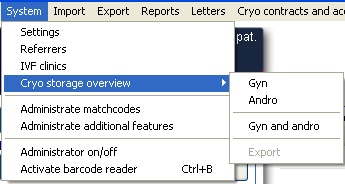
By selecting "Gyn" or "Andro" will be shown only the tank that are dedicated only to oocytes/embryo or sperm. If a tank is dedicated to both materials it will be shown either in the gyn or andro.
To select all the tank choose Gyn and andro.
Once made the choice will be opened the same window seen in the "Choosing a location in the cryo storage" paragraph. The only difference is that when the printing icon is clicked the user will be able to print a list related to all the patient that have material in the cryostorage.
Note: to dedicate a tank to Gyn, Andro or both material access the Cryo storage section in the settings.