Create a new entry in medical history
From MedITEX - Wiki
| Line 3: | Line 3: | ||
<tr> | <tr> | ||
<td><img src="/images/newentry2.png" alt="" width="144" height="125" /></td> | <td><img src="/images/newentry2.png" alt="" width="144" height="125" /></td> | ||
| − | <td>In order to <strong>create a new Medical History</strong>, <strong>Note </strong> | + | <td>In order to <strong>create a new Medical History</strong>, <strong>Note</strong>, <strong>Attention Message </strong>or <strong>Clinic diary</strong> click on the <strong>arrow </strong>at the right of the<strong> New entry</strong> icon and choose the option desired.</td> |
</tr> | </tr> | ||
</tbody> | </tbody> | ||
| Line 18: | Line 18: | ||
</table> | </table> | ||
<p style="text-align: justify;"> </p> | <p style="text-align: justify;"> </p> | ||
| − | <p style="text-align: justify;"><strong> | + | <p style="text-align: justify;"><strong>Explanation of the fields/icons:</strong></p> |
<ul style="text-align: justify;"> | <ul style="text-align: justify;"> | ||
<li><strong>Date:</strong> date of the registration of the document. If the lightning icon is clicked will be selected the current date.</li> | <li><strong>Date:</strong> date of the registration of the document. If the lightning icon is clicked will be selected the current date.</li> | ||
| Line 25: | Line 25: | ||
<li><strong>Browse: </strong>clicking on the arrows will scroll the documents archived upwards or downwards</li> | <li><strong>Browse: </strong>clicking on the arrows will scroll the documents archived upwards or downwards</li> | ||
<li><strong>Text area:</strong> a <strong>"WordPad"</strong> like tool that can be used to input a text.</li> | <li><strong>Text area:</strong> a <strong>"WordPad"</strong> like tool that can be used to input a text.</li> | ||
| − | <li><strong>Container for pictures and documents: </strong>pictures and files can be easily linked to the document by dragging and dropping them into the blue box. Then they can be opened | + | <li><strong>Container for pictures and documents: </strong>pictures and files can be easily linked to the document by dragging and dropping them into the blue box. Then, they can be opened by double clicking on the icon.</li> |
<li><strong>Open patient directory:</strong> opens the directory that contains all the files related to the patient</li> | <li><strong>Open patient directory:</strong> opens the directory that contains all the files related to the patient</li> | ||
<li><strong>Add document:</strong> allows to browse the directories and to add a single document</li> | <li><strong>Add document:</strong> allows to browse the directories and to add a single document</li> | ||
| Line 34: | Line 34: | ||
<li>You can <strong>assign </strong>notes / attention messages <strong>to any patient</strong>. These are <strong>free text entries</strong> to which you can add date, status (normal/abnormal), name of the editor and a file attachment.</li> | <li>You can <strong>assign </strong>notes / attention messages <strong>to any patient</strong>. These are <strong>free text entries</strong> to which you can add date, status (normal/abnormal), name of the editor and a file attachment.</li> | ||
<li>Notes / attention messages that are <strong>particularly important</strong>, clinically relevant or have to be edited still can be given the <strong>status "abnormal"</strong>.</li> | <li>Notes / attention messages that are <strong>particularly important</strong>, clinically relevant or have to be edited still can be given the <strong>status "abnormal"</strong>.</li> | ||
| − | <li>In the <strong>overview </strong>of the main window <strong> | + | <li>In the <strong>overview </strong>of the main window <strong>Medical history</strong> all notes / attention messages will be displayed (sorted by date). Their <strong>respective statuses</strong> can be seen on the <strong>right side of the overview</strong>.</li> |
<li>Entries in the overview can be sorted or filtered by clicking the column headers. They can also be grouped by dragging them to the desired position. The changes will be saved and will not be lost.</li> | <li>Entries in the overview can be sorted or filtered by clicking the column headers. They can also be grouped by dragging them to the desired position. The changes will be saved and will not be lost.</li> | ||
<li>Notes / attention messages can be <strong>edited again</strong> by <strong>double-clicking them</strong>. You can <strong>delete </strong>a note by <strong>selecting it</strong> and pressing the <strong>Delete key</strong> on your keyboard.</li> | <li>Notes / attention messages can be <strong>edited again</strong> by <strong>double-clicking them</strong>. You can <strong>delete </strong>a note by <strong>selecting it</strong> and pressing the <strong>Delete key</strong> on your keyboard.</li> | ||
| Line 82: | Line 82: | ||
</table> | </table> | ||
<ul> | <ul> | ||
| − | + | <li>The fields with <strong>red backgrounds</strong> have to be filled as a requirement.</li> | |
| − | <li>The fields with | + | |
| − | + | ||
<li>From this page it is possible to access to the <strong>previous pregnancies section</strong> and to to the <strong>examination section</strong>.</li> | <li>From this page it is possible to access to the <strong>previous pregnancies section</strong> and to to the <strong>examination section</strong>.</li> | ||
| − | <li>When all the data you need to document are | + | <li>When all the data you need to document are inserted just press <strong>OK</strong>.</li> |
| − | <li>If | + | <li>If at least one previous <strong>Medical History </strong>exists, the system will ask if the user wants to <strong>retrieve data</strong> from the most recent <strong>Medical History</strong>.</li> |
| − | <li>If the date of the new Medical History is empty or | + | <li>If the date of the new <strong>Medical History</strong> is left empty or is prior to the date of an existing <strong>Medical History</strong>, the system will ask if the date of the <strong>Initial consultation</strong> should be updated to the date of this new <strong>Medical History</strong>.</li> |
</ul> | </ul> | ||
<p style="text-align: justify;"> </p> | <p style="text-align: justify;"> </p> | ||
<h4 style="text-align: justify;">Documenting previous pregnancies</h4> | <h4 style="text-align: justify;">Documenting previous pregnancies</h4> | ||
| − | <p style="text-align: justify;">Clicking on the "Gravida: | + | <p style="text-align: justify;">Clicking on the "<strong>Gravida: Para:</strong>" area, the following window:</p> |
| − | <table border="0"> | + | <table style="margin-left: auto; margin-right: auto;" border="0"> |
<tbody> | <tbody> | ||
<tr> | <tr> | ||
| Line 101: | Line 99: | ||
</table> | </table> | ||
<ul> | <ul> | ||
| − | <li>In | + | <li>In this new window, you will see a <strong>list of all pregnancies</strong> assigned to this <strong>Medical History</strong>. </li> |
| − | <li>To document a pregnancy just click on the button <strong> | + | <li>To document a pregnancy just click on the button <strong>New</strong>. </li> |
| − | <li>If you want to edit a pregnancy, <strong> | + | <li>If you want to edit a pregnancy, <strong>double click</strong> it.</li> |
| − | <li>It is also possible to <strong>remove </strong>a | + | <li>It is also possible to <strong>remove </strong>a mistakenly documented pregnancy. Select it and click on <strong>Delete</strong>.</li> |
</ul> | </ul> | ||
| − | <p style="text-align: justify;"><strong> | + | <table style="margin-left: auto; margin-right: auto;" border="0"> |
| + | <tbody> | ||
| + | <tr> | ||
| + | <td><img src="/images/hint48.png" alt="" width="48" height="48" /></td> | ||
| + | <td><strong>Previous pregnancies </strong>information is only editable if you open this window from inside a <strong>Medical history</strong>.</td> | ||
| + | </tr> | ||
| + | </tbody> | ||
| + | </table> | ||
| + | <p> </p> | ||
| + | <p style="text-align: justify;">If the<strong> Medical history entries are correct</strong>, a <span style="color: #339966;">green </span>circle will appear on the right side in the column <strong>Status</strong>. Otherwise, a <span style="color: #ff0000;">red </span><strong>warning </strong>symbol will appear. Put the mouse over the red circle to check the incorrect information.</p> | ||
| + | <h4 style="text-align: justify;"></h4> | ||
<h4 style="text-align: justify;">Documenting examination findings</h4> | <h4 style="text-align: justify;">Documenting examination findings</h4> | ||
| − | <p style="text-align: justify;">It is possible to <strong>link examination findings to a Medical History</strong> | + | <p style="text-align: justify;">It is possible to <strong>link examination findings </strong>to a<strong> Medical History</strong>. In order to do that, click on the button <strong>Examination</strong> located at the bottom of the <strong>Medical history</strong> window. The following window will open:</p> |
| − | <table border="0" width="10" height="24"> | + | <table style="margin-left: auto; margin-right: auto;" border="0" width="10" height="24"> |
<tbody> | <tbody> | ||
<tr> | <tr> | ||
| Line 117: | Line 125: | ||
</table> | </table> | ||
<p style="text-align: justify;"> </p> | <p style="text-align: justify;"> </p> | ||
| − | <p style="text-align: justify;">In the examination section it is possible to <strong>document several | + | <p style="text-align: justify;">In the examination section it is possible to <strong>document several exams</strong>. If you want to <strong>import data from an existing examination</strong>, select the desired examination and press the <strong>Copy data</strong> button. When all the data you need to document are inserted, press <strong>OK</strong>.</p> |
<p style="text-align: justify;"> </p> | <p style="text-align: justify;"> </p> | ||
<h3 style="text-align: justify;">Creating a male Medical History</h3> | <h3 style="text-align: justify;">Creating a male Medical History</h3> | ||
| − | <p style="text-align: justify;">If <strong> | + | <p style="text-align: justify;">If <strong>Medical History </strong>is selected when the selected patient is a man the following window will open:</p> |
<table style="margin-left: auto; margin-right: auto;" border="0"> | <table style="margin-left: auto; margin-right: auto;" border="0"> | ||
<tbody> | <tbody> | ||
| Line 133: | Line 141: | ||
<tr> | <tr> | ||
<td><a href="/index.php?title=Free_/_QM_fields"><img style="display: block; margin-left: auto; margin-right: auto; border: 2px dotted blue;" src="/images/QMButton.png" alt="" width="73" height="41" /></a></td> | <td><a href="/index.php?title=Free_/_QM_fields"><img style="display: block; margin-left: auto; margin-right: auto; border: 2px dotted blue;" src="/images/QMButton.png" alt="" width="73" height="41" /></a></td> | ||
| − | <td style="text-align: justify;">Access the <strong>QM field</strong> section related to this area or click on the right arrow to block the QM fields or to see the change log. | + | <td style="text-align: justify;">Access the <strong>QM field</strong> section related to this area or click on the right arrow to block the QM fields or to see the change log.</td> |
</tr> | </tr> | ||
<tr> | <tr> | ||
<td><a href="/index.php?title=Documenting_a_new_sample#Documenting_a_semen_analysis"><img style="display: block; margin-left: auto; margin-right: auto; border: 2px dotted blue;" src="/images/Semen1.png" alt="" /></a></td> | <td><a href="/index.php?title=Documenting_a_new_sample#Documenting_a_semen_analysis"><img style="display: block; margin-left: auto; margin-right: auto; border: 2px dotted blue;" src="/images/Semen1.png" alt="" /></a></td> | ||
<td style="text-align: justify;"> | <td style="text-align: justify;"> | ||
| − | <p>A maximum of two basis semen analysis can be assigned to each | + | <p>A maximum of two basis semen analysis can be assigned to each <strong>Medical history</strong>. There are two ways to do this:</p> |
| − | <p>Double click on the empty field or press the lightning icon to create a new semen analysis and link it to the Medical History.</p> | + | <p><strong>Double click</strong> on the empty field or press the lightning icon to create a new semen analysis and link it to the <strong>Medical History</strong>.</p> |
| − | <p>Click | + | <p>Click on <strong>Sperm concentration</strong> if no semen analysis is available.</p> |
</td> | </td> | ||
</tr> | </tr> | ||
| Line 146: | Line 154: | ||
</table> | </table> | ||
<ul> | <ul> | ||
| − | + | <li>The fields with <strong>red backgrounds</strong> have to be filled as a requirement.</li> | |
| − | <li>The fields with | + | <li>When all the data you need to document are inserted, press <strong>OK</strong>.</li> |
| − | <li>When all the data you need to document are | + | <li>If at least one previous <strong>Medical History </strong>exists, the system will ask if the user wants to <strong>retrieve data</strong> from the most recent <strong>Medical History</strong>.</li> |
| − | + | <li>If the date of the new <strong>Medical History</strong> is left empty or is prior to the date of an existing <strong>Medical History</strong>, the system will ask if the date of the <strong>Initial consultation</strong> should be updated to the date of this new <strong>Medical History</strong>.</li> | |
| − | <li>If | + | |
| − | <li>If the date of the new Medical History is empty or | + | |
</ul> | </ul> | ||
<p style="text-align: justify;"><strong> </strong></p> | <p style="text-align: justify;"><strong> </strong></p> | ||
| − | <p><strong>If the | + | <p><strong></strong>If the<strong> Medical history entries are correct</strong>, a <span style="color: #339966;">green </span>circle will appear on the right side in the column <strong>Status</strong>. Otherwise, a <span style="color: #ff0000;">red </span><strong>warning </strong>symbol will appear. Put the mouse over the red circle to check the incorrect information.</p> |
<p> </p> | <p> </p> | ||
<h2>Clinic diary</h2> | <h2>Clinic diary</h2> | ||
Revision as of 13:45, 29 January 2013
| <img src="/images/newentry2.png" alt="" width="144" height="125" /> | In order to create a new Medical History, Note, Attention Message or Clinic diary click on the arrow at the right of the New entry icon and choose the option desired. |
Contents |
Creating a Note or an Attention message
When Attention or Note are selected the following window will open (the only difference will be the title area):
 |
Explanation of the fields/icons:
- Date: date of the registration of the document. If the lightning icon is clicked will be selected the current date.
- By: author of the document or of the notes
- QM: QM field icon can be used to access the QM fields associated to this document
- Browse: clicking on the arrows will scroll the documents archived upwards or downwards
- Text area: a "WordPad" like tool that can be used to input a text.
- Container for pictures and documents: pictures and files can be easily linked to the document by dragging and dropping them into the blue box. Then, they can be opened by double clicking on the icon.
- Open patient directory: opens the directory that contains all the files related to the patient
- Add document: allows to browse the directories and to add a single document
- Open document: always to open the document added.
- You can assign notes / attention messages to any patient. These are free text entries to which you can add date, status (normal/abnormal), name of the editor and a file attachment.
- Notes / attention messages that are particularly important, clinically relevant or have to be edited still can be given the status "abnormal".
- In the overview of the main window Medical history all notes / attention messages will be displayed (sorted by date). Their respective statuses can be seen on the right side of the overview.
- Entries in the overview can be sorted or filtered by clicking the column headers. They can also be grouped by dragging them to the desired position. The changes will be saved and will not be lost.
- Notes / attention messages can be edited again by double-clicking them. You can delete a note by selecting it and pressing the Delete key on your keyboard.
| <img src="/images/Messages1.png" alt="" width="380" height="91" /> |
By clicking on OK the Note/Attention message will be created and published in the main page. Attention messages will be in red whilst note will be in black. |
Creating a Medical History
When Medical History is selected a window will open.
There are two different windows, one for the female patient the other for the male patient.
Creating a female Medical History
If Medical History is selected when the selected patient is a woman the following window will open:
 |
| <a href="/index.php?title=Free_/_QM_fields"><img style="display: block; margin-left: auto; margin-right: auto; border: 2px dotted blue;" src="/images/QMButton.png" alt="" width="73" height="41" /></a> | Access the QM field section related to this area or click on the right arrow to block the QM fields or to see the change log. |
| <a href="/index.php?title=Create_a_new_entry_in_medical_history#Documenting_previous_pregnancies"><img style="display: block; margin-left: auto; margin-right: auto; border: 2px dotted blue;" src="/images/GravidaParaRed.png" alt="" width="321" height="32" /></a> | Document previous pregnancies outcome. |
| <a href="/index.php?title=Create_a_new_entry_in_medical_history#Documenting_examination_findings"><img style="display: block; margin-left: auto; margin-right: auto; border: 2px dotted blue;" src="/images/Exam.png" alt="" /></a> | Document examinations findings related to the Medical History. |
- The fields with red backgrounds have to be filled as a requirement.
- From this page it is possible to access to the previous pregnancies section and to to the examination section.
- When all the data you need to document are inserted just press OK.
- If at least one previous Medical History exists, the system will ask if the user wants to retrieve data from the most recent Medical History.
- If the date of the new Medical History is left empty or is prior to the date of an existing Medical History, the system will ask if the date of the Initial consultation should be updated to the date of this new Medical History.
Documenting previous pregnancies
Clicking on the "Gravida: Para:" area, the following window:
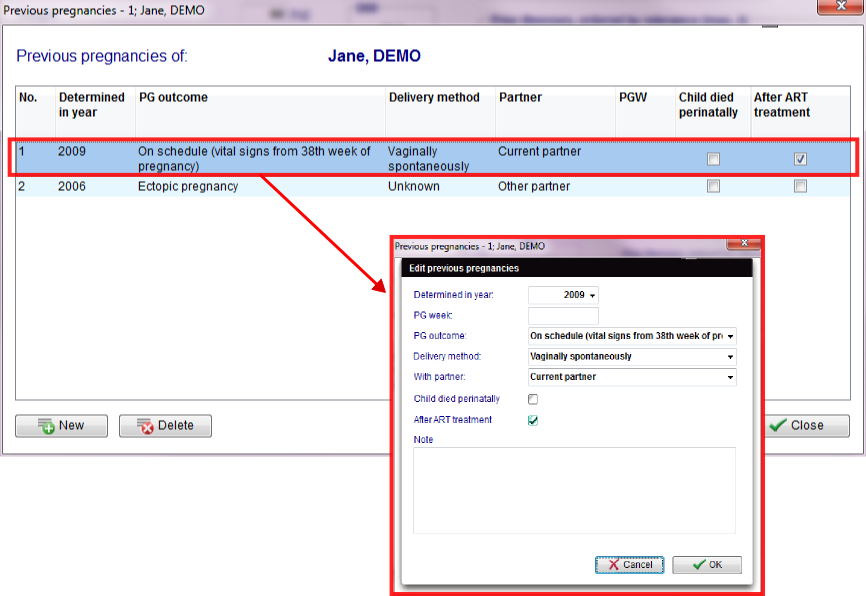 |
- In this new window, you will see a list of all pregnancies assigned to this Medical History.
- To document a pregnancy just click on the button New.
- If you want to edit a pregnancy, double click it.
- It is also possible to remove a mistakenly documented pregnancy. Select it and click on Delete.
| <img src="/images/hint48.png" alt="" width="48" height="48" /> | Previous pregnancies information is only editable if you open this window from inside a Medical history. |
If the Medical history entries are correct, a green circle will appear on the right side in the column Status. Otherwise, a red warning symbol will appear. Put the mouse over the red circle to check the incorrect information.
Documenting examination findings
It is possible to link examination findings to a Medical History. In order to do that, click on the button Examination located at the bottom of the Medical history window. The following window will open:
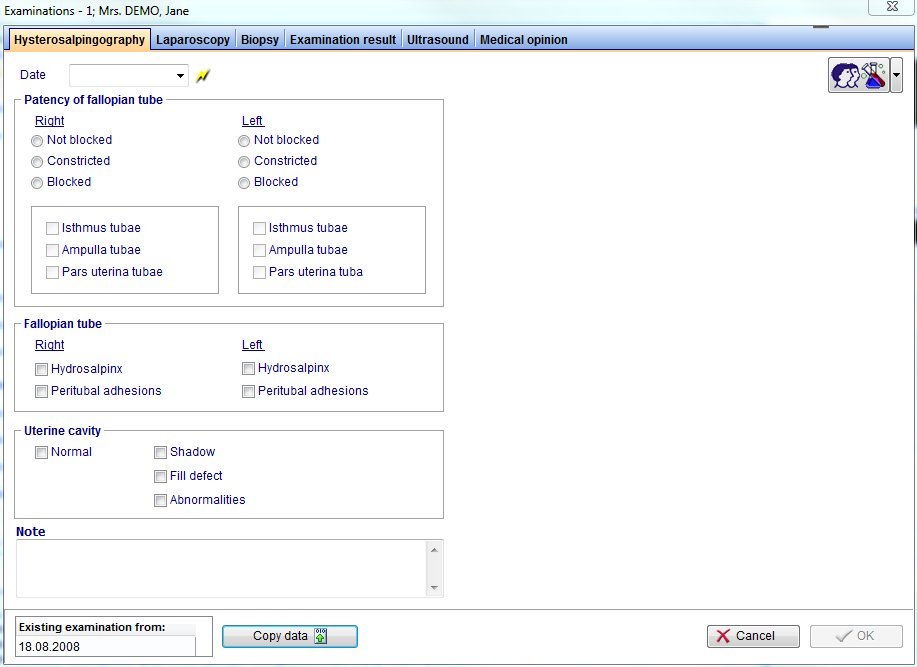 |
In the examination section it is possible to document several exams. If you want to import data from an existing examination, select the desired examination and press the Copy data button. When all the data you need to document are inserted, press OK.
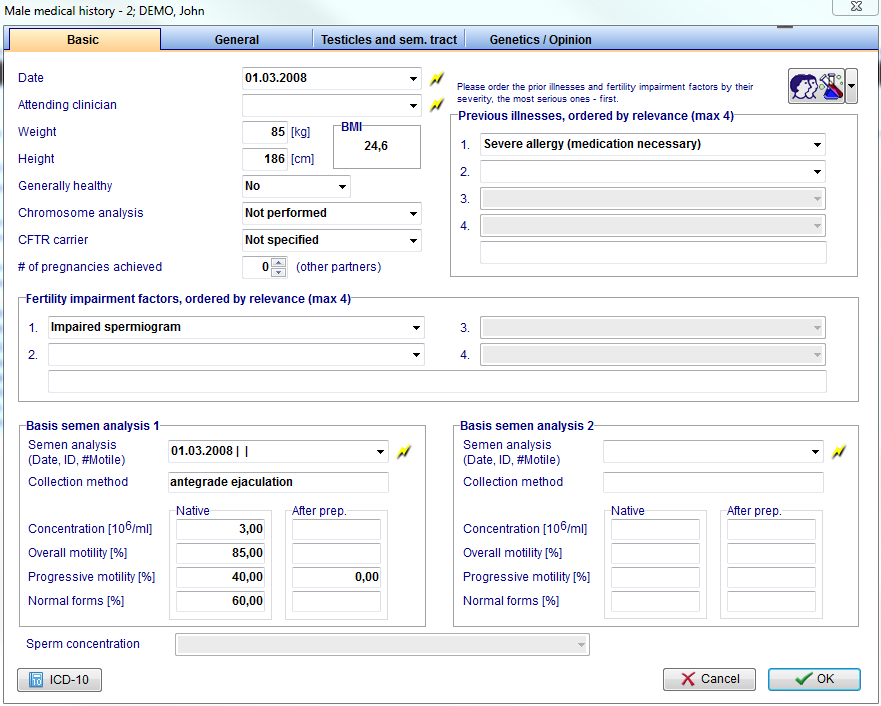
Creating a male Medical History
If Medical History is selected when the selected patient is a man the following window will open:
 |
| <a href="/index.php?title=Free_/_QM_fields"><img style="display: block; margin-left: auto; margin-right: auto; border: 2px dotted blue;" src="/images/QMButton.png" alt="" width="73" height="41" /></a> | Access the QM field section related to this area or click on the right arrow to block the QM fields or to see the change log. |
| <a href="/index.php?title=Documenting_a_new_sample#Documenting_a_semen_analysis"><img style="display: block; margin-left: auto; margin-right: auto; border: 2px dotted blue;" src="/images/Semen1.png" alt="" /></a> |
A maximum of two basis semen analysis can be assigned to each Medical history. There are two ways to do this: Double click on the empty field or press the lightning icon to create a new semen analysis and link it to the Medical History. Click on Sperm concentration if no semen analysis is available. |
- The fields with red backgrounds have to be filled as a requirement.
- When all the data you need to document are inserted, press OK.
- If at least one previous Medical History exists, the system will ask if the user wants to retrieve data from the most recent Medical History.
- If the date of the new Medical History is left empty or is prior to the date of an existing Medical History, the system will ask if the date of the Initial consultation should be updated to the date of this new Medical History.
If the Medical history entries are correct, a green circle will appear on the right side in the column Status. Otherwise, a red warning symbol will appear. Put the mouse over the red circle to check the incorrect information.
Clinic diary
| <a href="/index.php?title=MedITEX_IVF_manual">Back to the MedITEX IVF menu </a> | <a href="#top">Back to top</a> |