Create a new entry in demographics
From MedITEX - Wiki
| Line 71: | Line 71: | ||
<li>The <strong>path </strong>to the standard file storage folder can be changed in the settings in the section <a href="/index.php?title=MedITEX_IVF_Settings#General"><strong>System</strong></a>.</li> | <li>The <strong>path </strong>to the standard file storage folder can be changed in the settings in the section <a href="/index.php?title=MedITEX_IVF_Settings#General"><strong>System</strong></a>.</li> | ||
<li>All created documents will be displayed on the <a href="/index.php?title=Demographics#Administration_of_documents"><strong>Demographics</strong></a> screen in tabular form, sorted by entry date.</li> | <li>All created documents will be displayed on the <a href="/index.php?title=Demographics#Administration_of_documents"><strong>Demographics</strong></a> screen in tabular form, sorted by entry date.</li> | ||
| − | <li><strong>Alternatively:</strong> Press the <a href="/index.php?title=Free_/_QM_fields"><strong>QM-button</strong></a> to add staff, material, times or free fields. (You need to <strong>define QM domains in the <a href="/index.php?title=MedITEX_IVF_Settings#Free_.2F_QM_fields">settings</a></strong | + | <li><strong>Alternatively:</strong> Press the <a href="/index.php?title=Free_/_QM_fields"><strong>QM-button</strong></a> to add staff, material, times or free fields. (You need to <strong>define QM domains in the <a href="/index.php?title=MedITEX_IVF_Settings#Free_.2F_QM_fields">settings</a></strong> before you can use them.)</li> |
</ul> | </ul> | ||
| + | <table border="0"> | ||
| + | <tbody> | ||
| + | <tr> | ||
| + | <td style="text-align: center;"><img src="/images/adminListDemo.png" alt="" width="154" height="118" /><br /></td> | ||
| + | <td> | ||
| + | <p>On a patient <strong>Demographic </strong>page, clicking on <strong>New entry</strong> will be possible to add new documents to this patient profile.</p> | ||
| + | <p>The list could be <strong>extended indefinitely</strong>. You can add entry types at the <a href="/index.php?title=MedITEX_IVF_Settings#System_tables">system tables in the settings</a>.</p> | ||
| + | <p>To edit the <strong>entries </strong>of <strong>patient demographics<br /></strong></p> | ||
| + | <ul> | ||
| + | <li>click on the menu item <strong>System -> Configuration</strong><strong> / administration</strong><strong> -> Settings -> System -> System tables</strong> or</li> | ||
| + | </ul> | ||
| + | <ul> | ||
| + | <li>click on the button <strong>Demographics -> New entry -> Administrate entries</strong>.</li> | ||
| + | </ul> | ||
| + | </td> | ||
| + | </tr> | ||
| + | </tbody> | ||
| + | </table> | ||
| + | <p> </p> | ||
<table style="float: right;" border="0"> | <table style="float: right;" border="0"> | ||
<tbody> | <tbody> | ||
Revision as of 15:06, 19 June 2013
| <img src="/images/adminListDemo.png" alt="" width="154" height="118" /> |
On a patient Demographic page, clicking on New entry will be possible to add new documents to this patient profile. The list could be extended indefinitely. You can add entry types at the <a href="/index.php?title=MedITEX_IVF_Settings#System_tables">system tables in the settings</a>. To edit the entries of patient demographics
|
Contents |
Cryo contract
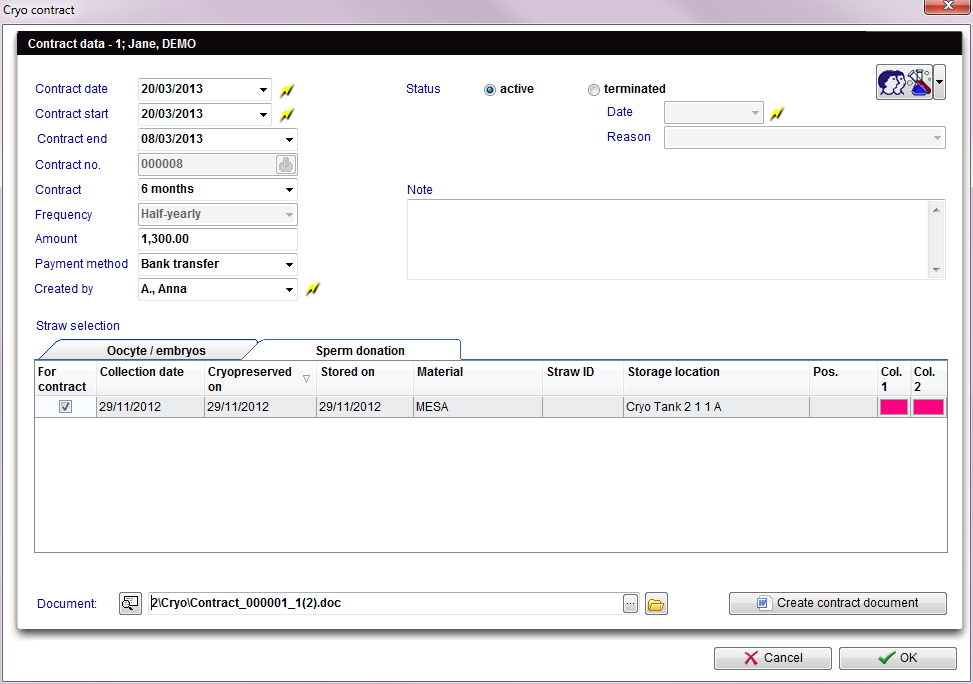 |
Explanation of the fields:
Contract date: date of contract signature.
Contract start: date of the specified contract start.
Contract no.: identification number of the contract.
Contract: duration of the contract.
Frequency: billing cycle.
Amount: predefined contract amount per billing cycle.
Payment method: choice of payment.
Created by: creator of the contract document.
Status: status of the contract. If it is current or already finished.
Note: space for notes.
Straw selection: list of available Straws of the selected patient. Put a check mark in the column "For contract" to assign this Straw to the contract.
Document: add an existing document.
Create contract document: creating a new contract document.
| <img src="/images/plus48.png" alt="" width="48" height="48" /> |
<a href="/index.php?title=How_to_create_a_new_cryo_contract%3F">Click here</a> to read more about adding new Cryo contracts. <a href="/index.php?title=MedITEX_IVF_Settings#Cryo_contracts_and_accounting">Click here</a> to know how to configure Cryo contracts and accounting. <a href="/index.php?title=Cryo_contracts_and_accounting">Click here </a>to get an overview about Cryo contracts and accounting. |
Document storage, Refferer, System table
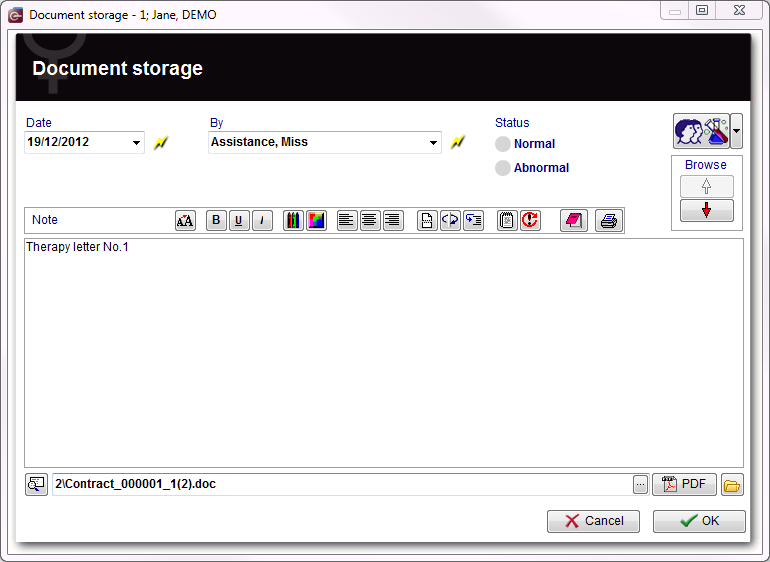 |
Create a new document. It will be saved with the type: document storage.
- After pressing the file symbol, the corresponding file will open in the accounting standard program.
- The selected fields will be copied in the standard file storage folder of MediTEX IVF and stored in a sub folder named after the patient ID.
- The path to the standard file storage folder can be changed in the settings in the section <a href="/index.php?title=MedITEX_IVF_Settings#General">System</a>.
- All created documents will be displayed on the <a href="/index.php?title=Demographics#Administration_of_documents">Demographics</a> screen in tabular form, sorted by entry date.
- Alternatively: Press the <a href="/index.php?title=Free_/_QM_fields">QM-button</a> to add staff, material, times or free fields. (You need to define QM domains in the <a href="/index.php?title=MedITEX_IVF_Settings#Free_.2F_QM_fields">settings</a> before you can use them.)
| <img src="/images/adminListDemo.png" alt="" width="154" height="118" /> |
On a patient Demographic page, clicking on New entry will be possible to add new documents to this patient profile. The list could be extended indefinitely. You can add entry types at the <a href="/index.php?title=MedITEX_IVF_Settings#System_tables">system tables in the settings</a>. To edit the entries of patient demographics
|
| <a href="/index.php?title=MedITEX_IVF_manual">Back to the MedITEX IVF menu </a> | <a href="#top">Back to top</a> |