Come utilizzare un campo QM di tipo Materiale?
From MedITEX - Wiki
| (2 intermediate revisions by one user not shown) | |||
| Line 1: | Line 1: | ||
| − | <p> | + | <p><span>Per inserire un nuovo </span><strong>Campo QM</strong><span> cliccare su </span><strong>Sistema -> Configurazione/Amministrazione -> Impostazioni -> Campi liberi/QM</strong><strong>.</strong></p> |
| − | < | + | <p>In questo esempio creeremo ed utilizzeremo un nuovo Campo QM di tipo Materiale chiamato "Guanti".</p> |
| − | <p> | + | |
<table border="0"> | <table border="0"> | ||
<tbody> | <tbody> | ||
<tr> | <tr> | ||
<td><img style="display: block; margin-left: auto; margin-right: auto;" src="/images/Plus.png" alt="" width="23" height="23" /></td> | <td><img style="display: block; margin-left: auto; margin-right: auto;" src="/images/Plus.png" alt="" width="23" height="23" /></td> | ||
| − | <td> | + | <td>Per inserire un nuovo <strong>Campo QM</strong> premere questo pulsante.</td> |
</tr> | </tr> | ||
</tbody> | </tbody> | ||
| Line 13: | Line 12: | ||
<tbody> | <tbody> | ||
<tr> | <tr> | ||
| − | <td>[[Image: | + | <td>[[Image:Come_QM_9_IT.png|none|740px|thumb|left|link=http://wiki.meditex-software.com/images/Come_QM_9_IT.png| ]]</td> |
</tr> | </tr> | ||
</tbody> | </tbody> | ||
</table> | </table> | ||
<p> </p> | <p> </p> | ||
| − | <p> | + | <p>Il prossimo passo è asseganare al campo gli articoli.</p> |
| − | <p> | + | <p>Selezionare nella colonna di destra, chiamata "Tutti i Campi QM", il campo appena creato, cliccare sul <strong>pulsante giallo</strong> alla sua destra e assegnare gli aritcoli che potranno essere associati al campo. Per far questo selezionare gli articoli dalla colonna di sinistra e premendo la freccia a destra copiarli nella colonna, <strong>Articoli Associati,</strong> a destra.</p> |
<table style="margin-left: auto; margin-right: auto;" border="0"> | <table style="margin-left: auto; margin-right: auto;" border="0"> | ||
<tbody> | <tbody> | ||
<tr> | <tr> | ||
| − | <td>[[Image: | + | <td>[[Image:Come_QM_10_IT.png|none|740px|thumb|left|link=http://wiki.meditex-software.com/images/Come_QM_10_IT.png| ]]</td> |
</tr> | </tr> | ||
</tbody> | </tbody> | ||
</table> | </table> | ||
<p> </p> | <p> </p> | ||
| − | <p> | + | <p>A questo punto il campo QM andrà associato alla sezione di MedITEX in cui potra essere utilizzato. Nel nostro esempio il campo "Guanti" andrà associato alla sezione "PICK UP". </p> |
| − | <p> | + | <p>Nella colonna di destra selezionare il campo desiderato e copiarlo nella colonna di sinistra premendo la freccia a sinistra.</p> |
<table style="margin-left: auto; margin-right: auto;" border="0"> | <table style="margin-left: auto; margin-right: auto;" border="0"> | ||
<tbody> | <tbody> | ||
<tr> | <tr> | ||
| − | <td>[[Image: | + | <td>[[Image:Come_QM_11_IT.png|none|740px|thumb|left|link=http://wiki.meditex-software.com/images/Come_QM_11_IT.png| ]]</td> |
</tr> | </tr> | ||
</tbody> | </tbody> | ||
</table> | </table> | ||
<p> </p> | <p> </p> | ||
| − | <p> | + | <p>Ora dobbiamo documentare, per un particolare ciclo, il lotto di Guanti ulilizzati durante il Pick Up. Per far questo selezionare la tab "Pick Up" del ciclo desiderato e premere il <strong>pulsante Campi QM</strong>.</p> |
| − | <p> | + | <p>Per attivare la finestra appena aperta premere sul pulsante al centro della finestra stessa.</p> |
<table style="margin-left: auto; margin-right: auto;" border="0"> | <table style="margin-left: auto; margin-right: auto;" border="0"> | ||
<tbody> | <tbody> | ||
<tr> | <tr> | ||
| − | <td>[[Image: | + | <td>[[Image:Come_QM_12_IT.png|none|740px|thumb|left|link=http://wiki.meditex-software.com/images/Come_QM_12_IT.png| ]]</td> |
</tr> | </tr> | ||
</tbody> | </tbody> | ||
</table> | </table> | ||
<p> </p> | <p> </p> | ||
| − | <p> | + | <p>Scegliere il lotto utilizzato premendo sulla freccia alla destra del campo <strong>valore.</strong></p> |
<table style="margin-left: auto; margin-right: auto;" border="0"> | <table style="margin-left: auto; margin-right: auto;" border="0"> | ||
<tbody> | <tbody> | ||
<tr> | <tr> | ||
| − | <td>[[Image: | + | <td>[[Image:Come_QM_13_IT.png|none|740px|thumb|left|link=http://wiki.meditex-software.com/images/Come_QM_13_IT.png| ]]</td> |
</tr> | </tr> | ||
</tbody> | </tbody> | ||
</table> | </table> | ||
<p> </p> | <p> </p> | ||
| − | <table border="0"> | + | <table style="margin-left: auto; margin-right: auto;" border="0"> |
<tbody> | <tbody> | ||
<tr> | <tr> | ||
| − | <td>In | + | <td>In ogni sezione, se Campi QM sono stati documentati, il pulsante cambierà icona:</td> |
<td><img src="/images/QMIconContent.png" alt="" width="88" height="35" /></td> | <td><img src="/images/QMIconContent.png" alt="" width="88" height="35" /></td> | ||
</tr> | </tr> | ||
| Line 68: | Line 67: | ||
<tbody> | <tbody> | ||
<tr> | <tr> | ||
| − | <td>[[Image: | + | <td>[[Image:Come_QM_14_IT.png|none|740px|thumb|left|link=http://wiki.meditex-software.com/images/Come_QM_14_IT.png| ]]</td> |
</tr> | </tr> | ||
</tbody> | </tbody> | ||
| Line 76: | Line 75: | ||
<tbody> | <tbody> | ||
<tr> | <tr> | ||
| − | <td style="text-align: right;"><a href="/index.php?title= | + | <td style="text-align: right;"><a href="/index.php?title=MedITEX_IVF_come_fare">Torna a Come Fare</a></td> |
| − | <td style="text-align: right;"><a href="#top"> | + | <td style="text-align: right;"><a href="#top">Inizio pagina</a></td> |
</tr> | </tr> | ||
</tbody> | </tbody> | ||
</table> | </table> | ||
Latest revision as of 16:30, 3 May 2016
Per inserire un nuovo Campo QM cliccare su Sistema -> Configurazione/Amministrazione -> Impostazioni -> Campi liberi/QM.
In questo esempio creeremo ed utilizzeremo un nuovo Campo QM di tipo Materiale chiamato "Guanti".
| <img style="display: block; margin-left: auto; margin-right: auto;" src="/images/Plus.png" alt="" width="23" height="23" /> | Per inserire un nuovo Campo QM premere questo pulsante. |
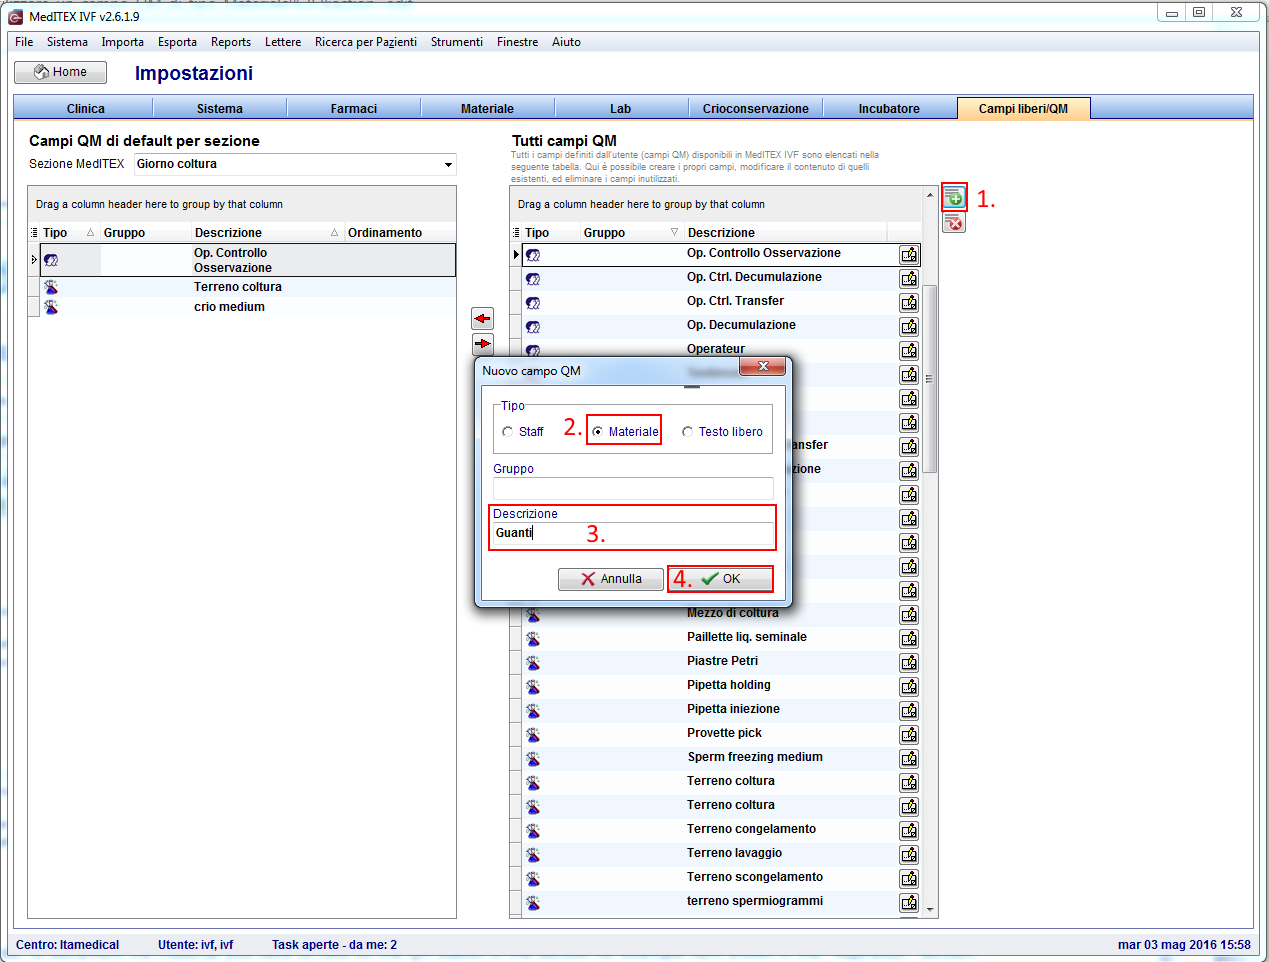 |
Il prossimo passo è asseganare al campo gli articoli.
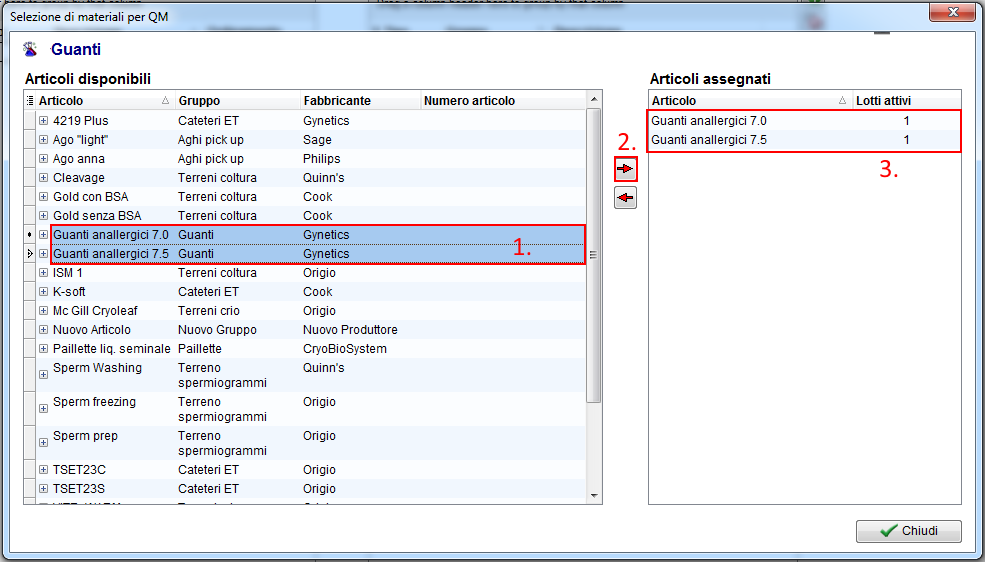
Selezionare nella colonna di destra, chiamata "Tutti i Campi QM", il campo appena creato, cliccare sul pulsante giallo alla sua destra e assegnare gli aritcoli che potranno essere associati al campo. Per far questo selezionare gli articoli dalla colonna di sinistra e premendo la freccia a destra copiarli nella colonna, Articoli Associati, a destra.
 |
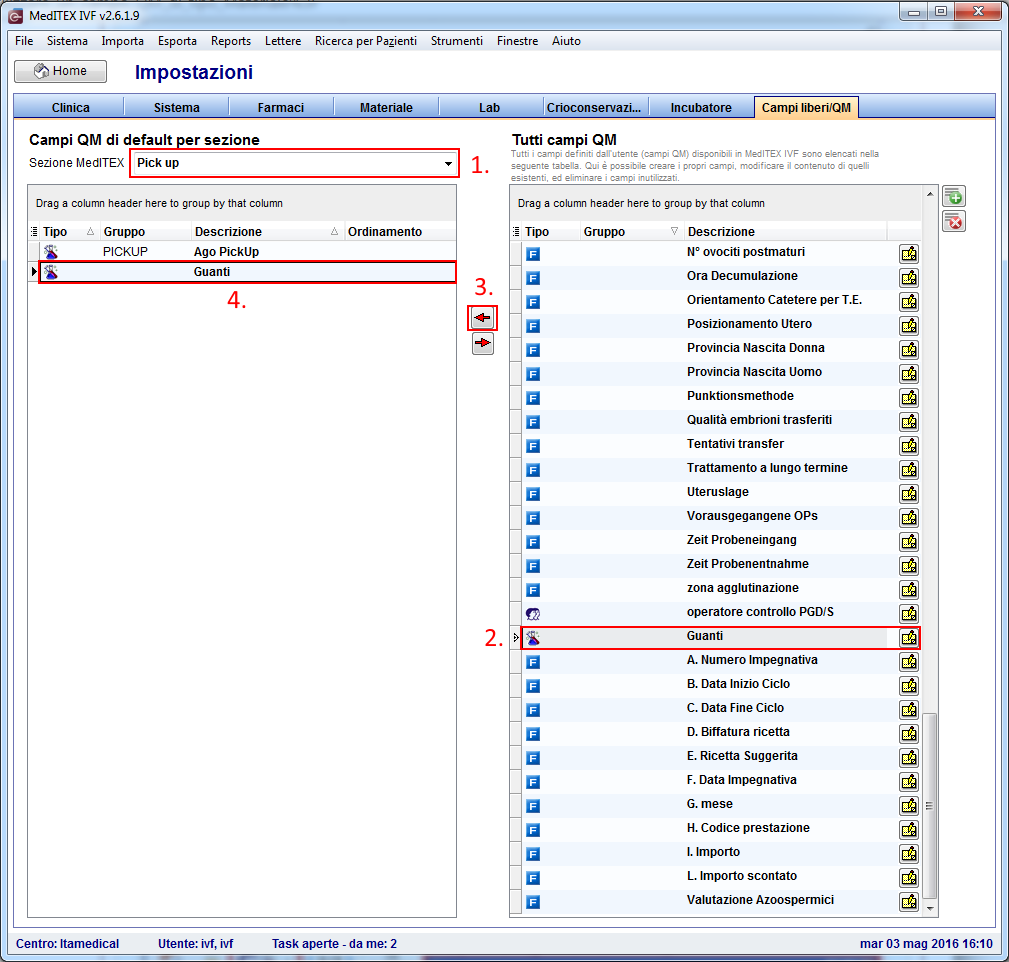
A questo punto il campo QM andrà associato alla sezione di MedITEX in cui potra essere utilizzato. Nel nostro esempio il campo "Guanti" andrà associato alla sezione "PICK UP".
Nella colonna di destra selezionare il campo desiderato e copiarlo nella colonna di sinistra premendo la freccia a sinistra.
 |
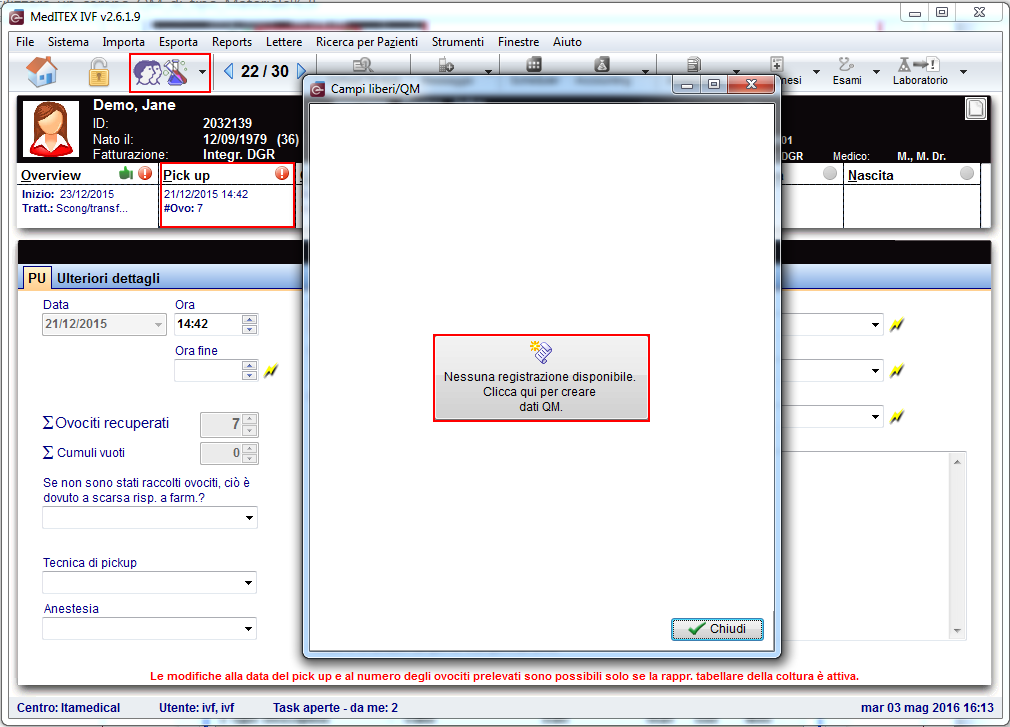
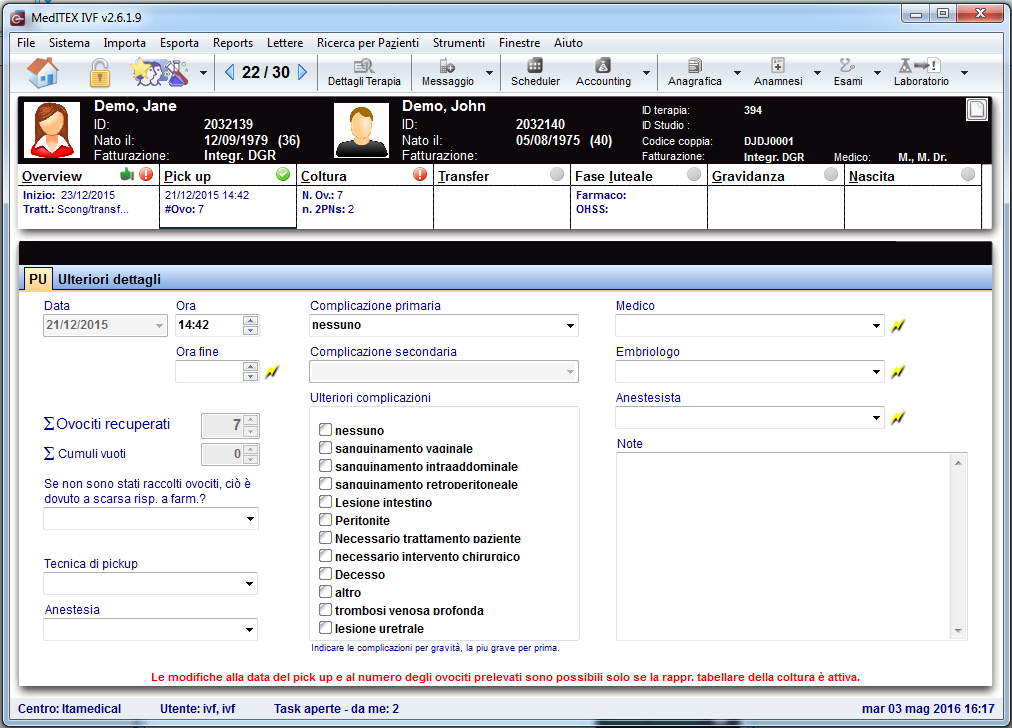
Ora dobbiamo documentare, per un particolare ciclo, il lotto di Guanti ulilizzati durante il Pick Up. Per far questo selezionare la tab "Pick Up" del ciclo desiderato e premere il pulsante Campi QM.
Per attivare la finestra appena aperta premere sul pulsante al centro della finestra stessa.
 |
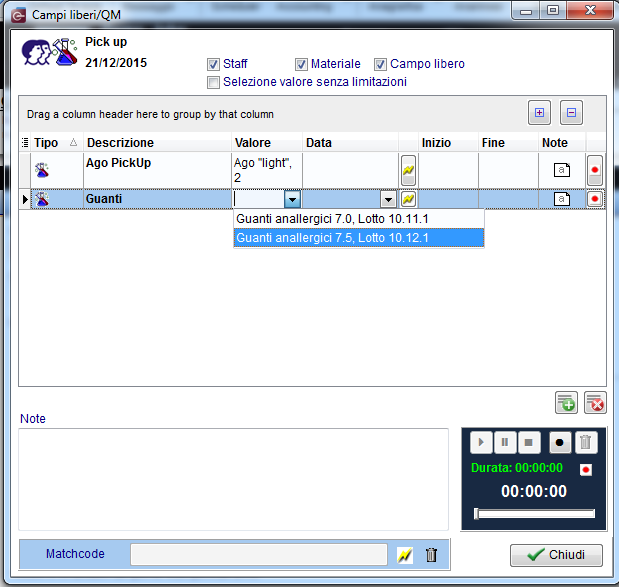
Scegliere il lotto utilizzato premendo sulla freccia alla destra del campo valore.
 |
| In ogni sezione, se Campi QM sono stati documentati, il pulsante cambierà icona: | <img src="/images/QMIconContent.png" alt="" width="88" height="35" /> |
 |
| <a href="/index.php?title=MedITEX_IVF_come_fare">Torna a Come Fare</a> | <a href="#top">Inizio pagina</a> |