Come stampare le lettere?
From MedITEX - Wiki
| (10 intermediate revisions by one user not shown) | |||
| Line 1: | Line 1: | ||
| − | <p>In <strong>MedITEX IVF</strong> | + | <p>In <strong>MedITEX IVF</strong> è possibile stamapre lettere individuali per ciascun paziente/coppia, o lettere seriali per quanti pazienti è necessario.</p> |
| − | <p> | + | <p>Di seguito sono spiegate le operazioni da fare.</p> |
<p> </p> | <p> </p> | ||
| − | <h2> | + | <h2>Lettere individuali</h2> |
| − | <p> | + | <p>Dopo aver creato delle lettere utilizzando <strong>Report editor</strong> e averle salvate per utilizzarle in futuro all'interno di <strong>MedITEX IVF</strong>, è possibile stamparle utilizzando l'opzione <strong>Lettere</strong> nella barra dei menù:</p> |
<table style="margin-left: auto; margin-right: auto;" border="0"> | <table style="margin-left: auto; margin-right: auto;" border="0"> | ||
<tbody> | <tbody> | ||
<tr> | <tr> | ||
<td><a href="/index.php?title=How_to_create_a_new_query%3F"><img src="/images/howto48.png" alt="" width="48" height="48" /></a></td> | <td><a href="/index.php?title=How_to_create_a_new_query%3F"><img src="/images/howto48.png" alt="" width="48" height="48" /></a></td> | ||
| − | <td><a href="/index.php?title= | + | <td><a href="/index.php?title=Come_creare_una_nuova_query%3F">Cliccare qui</a> per ulteriori informazioni su come creare lettere.</td> |
</tr> | </tr> | ||
<tr> | <tr> | ||
<td><a href="/index.php?title=Result_management"><img src="/images/plus48.png" alt="" width="48" height="48" /></a></td> | <td><a href="/index.php?title=Result_management"><img src="/images/plus48.png" alt="" width="48" height="48" /></a></td> | ||
| − | <td><a href="/index.php?title= | + | <td><a href="/index.php?title=Gestione_risultati">Cliccare qui</a> per avere ulteriori informazioni su come personalizzare le proprie lettere.</td> |
</tr> | </tr> | ||
</tbody> | </tbody> | ||
</table> | </table> | ||
<p> </p> | <p> </p> | ||
| − | <p> | + | <p>Lettere create in <strong>Report editor</strong> vanno assegnate ad una sezione specifica di <strong>MedITEX IVF</strong> (spiegazione <a href="/index.php?title=Gestione_risultati#Utilizzare_una_lettera_come_template_standard">qui</a>).</p> |
| − | <p> | + | <p>Per questo esempio utilizzeremo lettere d'<strong>Amministrazione</strong>.</p> |
<table style="margin-left: auto; margin-right: auto;" border="0"> | <table style="margin-left: auto; margin-right: auto;" border="0"> | ||
<tbody> | <tbody> | ||
<tr> | <tr> | ||
| − | <td> | + | <td colspan="2"> |
<ul> | <ul> | ||
| − | <li> | + | <li>Dopo aver asegnato la lettera all sezione <strong>Amministrazione</strong>, selezionare il paziente per il quale stampare la lettera.</li> |
</ul> | </ul> | ||
<ul> | <ul> | ||
| − | <li> | + | <li>Aprire l'<strong>Anagrafica</strong>.</li> |
</ul> | </ul> | ||
<ul> | <ul> | ||
| − | <li> | + | <li>Selezionare <strong>Lettere </strong>dala barra dei menù</li> |
</ul> | </ul> | ||
</td> | </td> | ||
</tr> | </tr> | ||
<tr> | <tr> | ||
| − | <td><img style="display: block; margin-left: auto; margin-right: auto;" src="/images/ | + | <td><img style="display: block; margin-left: auto; margin-right: auto;" src="/images/Come_stampare_lettere_1_IT.png" alt="" width="312" height="343" /></td> |
| − | + | ||
| − | + | ||
<td> | <td> | ||
<ul> | <ul> | ||
| − | <li> | + | <li>Cliccare sul sotto-menù <strong>lettere Amministrazione</strong>.</li> |
</ul> | </ul> | ||
<ul> | <ul> | ||
| − | <li> | + | <li>Selezionare la lettera desiderata.</li> |
</ul> | </ul> | ||
<ul> | <ul> | ||
| − | <li><strong>Microsoft Word</strong> | + | <li><strong>Microsoft Word</strong> si aprirà per permettere la modifica della lettera, se necessario.</li> |
</ul> | </ul> | ||
<ul> | <ul> | ||
| − | <li> | + | <li>Stampare la lettera da <strong>Microsoft Word</strong>.</li> |
</ul> | </ul> | ||
</td> | </td> | ||
| Line 60: | Line 58: | ||
<tr> | <tr> | ||
<td><img src="/images/hint48.png" alt="" width="48" height="48" /></td> | <td><img src="/images/hint48.png" alt="" width="48" height="48" /></td> | ||
| − | <td> | + | <td>Le lettere possono essere associate ad una sola sezione di <strong>MedITEX IVF</strong>, solamente la prima volta o dopo eventuali modifiche alla query.</td> |
</tr> | </tr> | ||
</tbody> | </tbody> | ||
</table> | </table> | ||
<p> </p> | <p> </p> | ||
| − | <h2> | + | <h2>Lettere seriali</h2> |
| − | <p> | + | <p>Le Lettere seriali possono essere stampate solamente da <strong>Report editor</strong>.</p> |
| − | <p> | + | <p>Per aprire <strong>Report editor</strong>, cliccare su <strong>Reports -> Report editor </strong>nella barra dei menù.</p> |
<table style="margin-left: auto; margin-right: auto;" border="0"> | <table style="margin-left: auto; margin-right: auto;" border="0"> | ||
<tbody> | <tbody> | ||
<tr> | <tr> | ||
| − | <td colspan="2"><img style="display: block; margin-left: auto; margin-right: auto;" src="/images/ | + | <td colspan="2"><img style="display: block; margin-left: auto; margin-right: auto;" src="/images/Report_Editor_1_IT.png" alt="" width="462" height="288" /></td> |
</tr> | </tr> | ||
</tbody> | </tbody> | ||
</table> | </table> | ||
| − | <p>& | + | <p>Come prima cosa è necessario aprire ed eseguire la query desiderata.</p> |
| − | + | ||
| − | + | ||
<table style="margin-left: auto; margin-right: auto;" border="0"> | <table style="margin-left: auto; margin-right: auto;" border="0"> | ||
<tbody> | <tbody> | ||
<tr> | <tr> | ||
<td><a href="/index.php?title=How_to_load_a_query%3F"><img src="/images/howto48.png" alt="" width="48" height="48" /></a></td> | <td><a href="/index.php?title=How_to_load_a_query%3F"><img src="/images/howto48.png" alt="" width="48" height="48" /></a></td> | ||
| − | <td><a href="/index.php?title= | + | <td><a href="/index.php?title=Come_caricare_una_query%3F">Cliccare qui</a> per ulteriori informazioni su come caricare una query.</td> |
</tr> | </tr> | ||
</tbody> | </tbody> | ||
</table> | </table> | ||
<p> </p> | <p> </p> | ||
| − | <p> | + | <p>Dopo aver caricato ed eseguito la query la tab dei<strong> Risultati</strong> si aprirà.</p> |
<table style="margin-left: auto; margin-right: auto;" border="0"> | <table style="margin-left: auto; margin-right: auto;" border="0"> | ||
<tbody> | <tbody> | ||
<tr> | <tr> | ||
<td><a href="/index.php?title=Result_management"><img src="/images/plus48.png" alt="" width="48" height="48" /></a></td> | <td><a href="/index.php?title=Result_management"><img src="/images/plus48.png" alt="" width="48" height="48" /></a></td> | ||
| − | <td><a href="/index.php?title= | + | <td><a href="/index.php?title=Gestione_risultati">Cliccare qui</a> per ulteriori informazioni sulla <strong>gestione dei risultati</strong> di una query.<br /></td> |
</tr> | </tr> | ||
</tbody> | </tbody> | ||
| Line 102: | Line 98: | ||
<td> | <td> | ||
<ul> | <ul> | ||
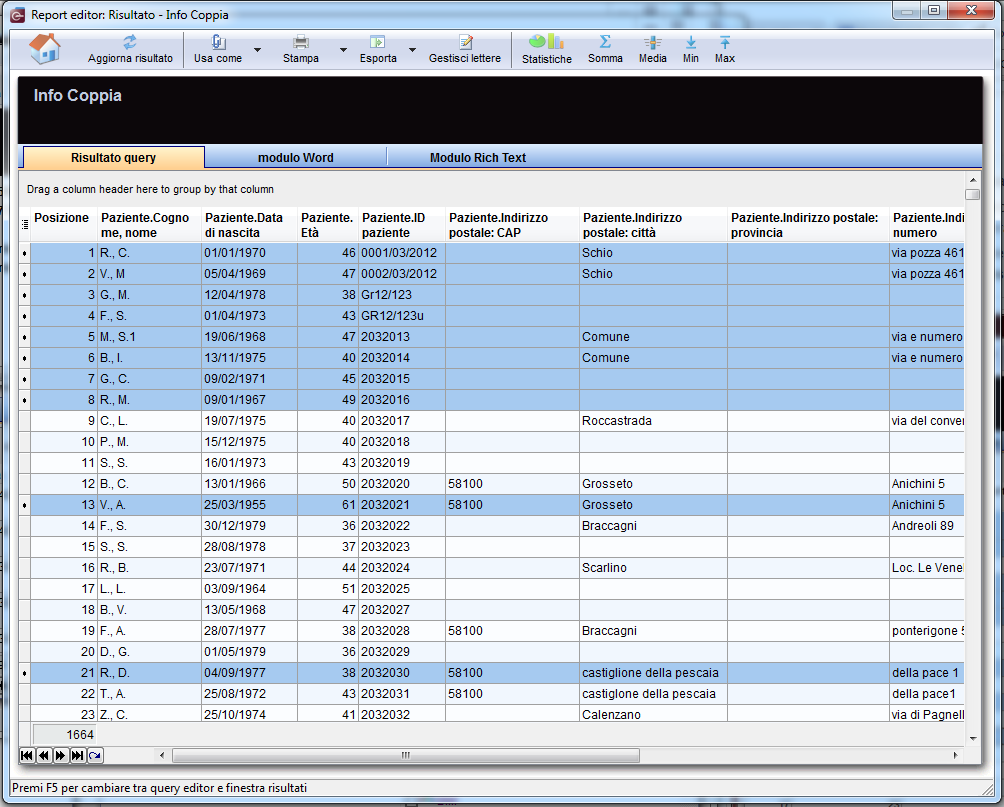
| − | <li> | + | <li>Nella <strong>tabella dei risultati</strong>, sarà necessario selezionare tutte le lettere da stampare.</li> |
| − | + | ||
| − | + | ||
| − | + | ||
</ul> | </ul> | ||
<ul> | <ul> | ||
| − | <li> | + | <li>Ogni singola riga della tabella corrisponderà ad una lettera. Quindi se, come nell'immagine seguente, tutte le righe vengono selezionate, il numero di lettere che verranno stampate sarà.</li> |
</ul> | </ul> | ||
<ul> | <ul> | ||
| − | <li> | + | <li>Per selezionare<strong> righe consecutive</strong>, premere il tasto <strong>Maiusc</strong> nella tastiera e cliccare sulla prima e ultima riga da selezionare, mentre per selezionare <strong>righe non consecutive</strong> premere <strong>Ctrl</strong> nella tastiera e cliccare sulle righe da stampare.</li> |
</ul> | </ul> | ||
</td> | </td> | ||
</tr> | </tr> | ||
<tr> | <tr> | ||
| − | <td>[[Image: | + | <td>[[Image:Come_stampare_lettere_2_IT.png|none|740px|thumb|left|link=http://wiki.meditex-software.com/images/Come_stampare_lettere_2_IT.png| ]]</td> |
</tr> | </tr> | ||
<tr> | <tr> | ||
<td> | <td> | ||
<ul> | <ul> | ||
| − | <li> | + | <li>Dopo aver selezionato tutte le righe necessarie, spostarsi sulla tab <strong>WOMOD</strong>.</li> |
</ul> | </ul> | ||
<ul> | <ul> | ||
| − | <li> | + | <li>Qui cliccare sulla freccia alla destra del pulsante stampa e selezionare Stampa lettere in serie.</li> |
</ul> | </ul> | ||
<ul> | <ul> | ||
| − | <li> | + | <li>Le lettere verranno salvate in <strong>File storage</strong> nella diectory di ogni singolo paziente e verranno immediatamente stampate. Questa volta, <strong>Microsoft Word </strong>non si aprirà.</li> |
</ul> | </ul> | ||
</td> | </td> | ||
</tr> | </tr> | ||
<tr> | <tr> | ||
| − | <td><img style="display: block; margin-left: auto; margin-right: auto;" src="/images/ | + | <td><img style="display: block; margin-left: auto; margin-right: auto;" src="/images/Come_stampare_lettere_3_IT.png" alt="" width="750" height="230" /></td> |
</tr> | </tr> | ||
</tbody> | </tbody> | ||
| Line 139: | Line 132: | ||
<tbody> | <tbody> | ||
<tr> | <tr> | ||
| − | <td style="text-align: right;"><a href="/index.php?title= | + | <td style="text-align: right;"><a href="/index.php?title=MedITEX_IVF_come_fare">Torna a Come fare</a></td> |
| − | <td style="text-align: right;"><a href="#top"> | + | <td style="text-align: right;"><a href="#top">Inizio pagina</a></td> |
</tr> | </tr> | ||
</tbody> | </tbody> | ||
</table> | </table> | ||
Latest revision as of 15:20, 26 April 2016
In MedITEX IVF è possibile stamapre lettere individuali per ciascun paziente/coppia, o lettere seriali per quanti pazienti è necessario.
Di seguito sono spiegate le operazioni da fare.
Lettere individuali
Dopo aver creato delle lettere utilizzando Report editor e averle salvate per utilizzarle in futuro all'interno di MedITEX IVF, è possibile stamparle utilizzando l'opzione Lettere nella barra dei menù:
| <a href="/index.php?title=How_to_create_a_new_query%3F"><img src="/images/howto48.png" alt="" width="48" height="48" /></a> | <a href="/index.php?title=Come_creare_una_nuova_query%3F">Cliccare qui</a> per ulteriori informazioni su come creare lettere. |
| <a href="/index.php?title=Result_management"><img src="/images/plus48.png" alt="" width="48" height="48" /></a> | <a href="/index.php?title=Gestione_risultati">Cliccare qui</a> per avere ulteriori informazioni su come personalizzare le proprie lettere. |
Lettere create in Report editor vanno assegnate ad una sezione specifica di MedITEX IVF (spiegazione <a href="/index.php?title=Gestione_risultati#Utilizzare_una_lettera_come_template_standard">qui</a>).
Per questo esempio utilizzeremo lettere d'Amministrazione.
|
|
| <img style="display: block; margin-left: auto; margin-right: auto;" src="/images/Come_stampare_lettere_1_IT.png" alt="" width="312" height="343" /> |
|
| <img src="/images/hint48.png" alt="" width="48" height="48" /> | Le lettere possono essere associate ad una sola sezione di MedITEX IVF, solamente la prima volta o dopo eventuali modifiche alla query. |
Lettere seriali
Le Lettere seriali possono essere stampate solamente da Report editor.
Per aprire Report editor, cliccare su Reports -> Report editor nella barra dei menù.
| <img style="display: block; margin-left: auto; margin-right: auto;" src="/images/Report_Editor_1_IT.png" alt="" width="462" height="288" /> |
Come prima cosa è necessario aprire ed eseguire la query desiderata.
| <a href="/index.php?title=How_to_load_a_query%3F"><img src="/images/howto48.png" alt="" width="48" height="48" /></a> | <a href="/index.php?title=Come_caricare_una_query%3F">Cliccare qui</a> per ulteriori informazioni su come caricare una query. |
Dopo aver caricato ed eseguito la query la tab dei Risultati si aprirà.
| <a href="/index.php?title=Result_management"><img src="/images/plus48.png" alt="" width="48" height="48" /></a> | <a href="/index.php?title=Gestione_risultati">Cliccare qui</a> per ulteriori informazioni sulla gestione dei risultati di una query. |
|
 |
|
| <img style="display: block; margin-left: auto; margin-right: auto;" src="/images/Come_stampare_lettere_3_IT.png" alt="" width="750" height="230" /> |
| <a href="/index.php?title=MedITEX_IVF_come_fare">Torna a Come fare</a> | <a href="#top">Inizio pagina</a> |