Come selezionare un appuntamento proposto?
From MedITEX - Wiki
| Line 4: | Line 4: | ||
<tbody> | <tbody> | ||
<tr> | <tr> | ||
| − | <td><img src="/images/fig69_ita. | + | <td><img src="/images/fig69_ita.jpg" alt="" width="313" height="118" /></td> |
</tr> | </tr> | ||
</tbody> | </tbody> | ||
| Line 10: | Line 10: | ||
<p class="ListParagraphCxSpMedio" style="text-align: center;"> </p> | <p class="ListParagraphCxSpMedio" style="text-align: center;"> </p> | ||
<p class="ListParagraphCxSpMedio" style="text-align: justify;">La creazione automatica degli appuntamenti proposti è possibile per il PickUp, l'inseminazione, il transfer, ed altre procedure importanti. Se sono state definite ed attivate le apposite regole nelle impostazioni di sistema di <strong>MedITEX IVF</strong>, l'evento corrispondente darà luogo alla proposta di un appuntamento in Scheduler, a meno che la data non sia passata.</p> | <p class="ListParagraphCxSpMedio" style="text-align: justify;">La creazione automatica degli appuntamenti proposti è possibile per il PickUp, l'inseminazione, il transfer, ed altre procedure importanti. Se sono state definite ed attivate le apposite regole nelle impostazioni di sistema di <strong>MedITEX IVF</strong>, l'evento corrispondente darà luogo alla proposta di un appuntamento in Scheduler, a meno che la data non sia passata.</p> | ||
| − | <p class="ListParagraphCxSpMedio" style="text-align: justify;">Tutti gli appuntamenti proposti possono essere visti in <strong>MedITEX Scheduler</strong> nel <strong>Menu -> Appuntamenti -> | + | <p class="ListParagraphCxSpMedio" style="text-align: justify;">Tutti gli appuntamenti proposti possono essere visti in <strong>MedITEX Scheduler</strong> nel <strong>Menu -> Appuntamenti -> Appuntamenti proposti</strong>.</p> |
<table style="margin-left: auto; margin-right: auto;" border="0"> | <table style="margin-left: auto; margin-right: auto;" border="0"> | ||
<tbody> | <tbody> | ||
<tr> | <tr> | ||
<td> | <td> | ||
| − | <p>[[Image: | + | <p>[[Image:fig70_ita.png|none|740px|thumb|left|link=http://wiki.meditex-software.com/images/fig70_ita.png| ]]</p> |
</td> | </td> | ||
</tr> | </tr> | ||
Revision as of 18:19, 13 February 2013
In scheduler
| <img src="/images/fig69_ita.jpg" alt="" width="313" height="118" /> |
La creazione automatica degli appuntamenti proposti è possibile per il PickUp, l'inseminazione, il transfer, ed altre procedure importanti. Se sono state definite ed attivate le apposite regole nelle impostazioni di sistema di MedITEX IVF, l'evento corrispondente darà luogo alla proposta di un appuntamento in Scheduler, a meno che la data non sia passata.
Tutti gli appuntamenti proposti possono essere visti in MedITEX Scheduler nel Menu -> Appuntamenti -> Appuntamenti proposti.
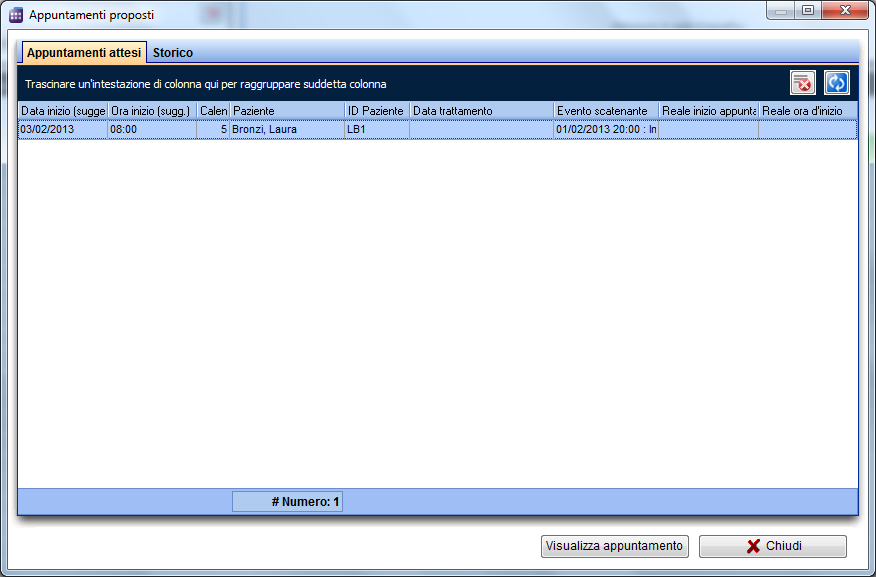 |
By double-clicking on a cell (or by clicking on the button Take over appointment), the appointment input mask will be opened with the proposed data - patient, treatment, appointment start – already filled out, if no active appointment already exists. User can now edit the appointment data and save it, thus creating a valid active appointment. The corresponding proposed appointment will automatically be transferred into the tab-sheet History, with the information about the beginning of the generated appointment. By double-clicking the line with the proposed appointment to which an active appointment already exists (e.g. has already been generated), the "real" appointment will be opened.
If the date or time of the triggering event in MedITEX IVF has changed, the corresponding appointment will be automatically transferred back to the tab-sheet Proposed appointments, and marked in red (only if the corresponding "real" appointment is still in some time in the future). This way, the user can immediately react in case the event planning changes.
 |
Setting up MedITEX IVF
To use the automatic generation of appointment proposals the function has to be activated in MedITEX IVF.
In System settings -> System -> Interfaces -> MedITEX Scheduler you will find a list of certain events, which trigger the automatic generation of appointment proposals.
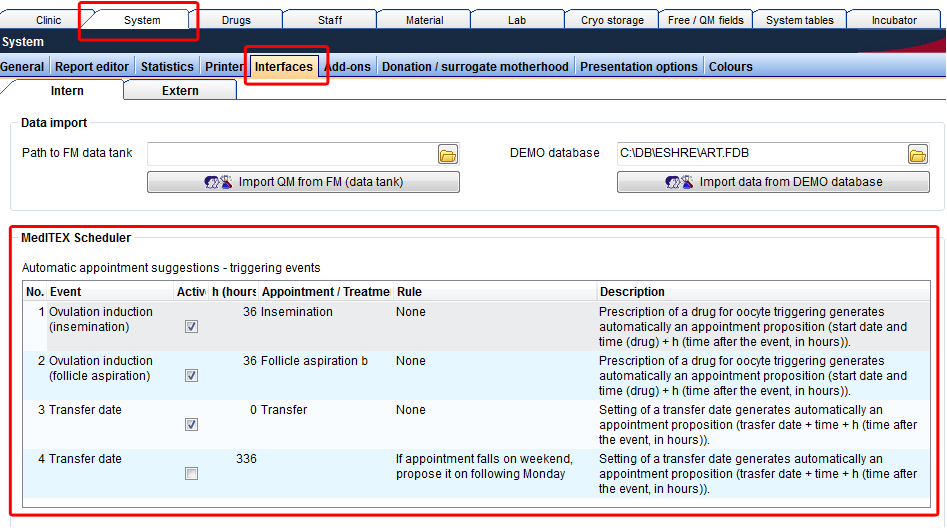 |
This way, it is possible to define appointment proposals for insemination, aspiration, transfer, or pregnancy test. If an event is triggered, an appointment proposal will appear in MedITEX Scheduler, with the patient name, estimated appointment date and time, and treatment. The administration of an oocyte-triggering drug, for example, will generate an appointment proposal for oocyte aspiration, which should take place 36 hours after the drug administration. In another example, the setting of a transfer date in MedITEX IVF in the future will generate a transfer appointment proposal in MedITEX Scheduler.
The user can change the following settings for each of predefined events:
- Active: Defines if an event triggers an appointment or not.
- h (time after the event): Defines the start of the appointment, in hours, after the date and time of the triggering event.
- Appointment / Treatment: All treatments defined in Scheduler can be chosen here.
- Rule: An additional condition for the start time of the proposed appointment.
| <a href="/index.php?title=MedITEX_Scheduler_come...">Torna a MedITEX Scheduler come...</a> | <a href="#top">Torna in alto</a> |