Come personalizzare il Riassunto del ciclo?
From MedITEX - Wiki
| Line 2: | Line 2: | ||
<p>__TOC__</p> | <p>__TOC__</p> | ||
<p style="text-align: justify;"> </p> | <p style="text-align: justify;"> </p> | ||
| − | <p style="text-align: justify;"> | + | <p style="text-align: justify;"><span>Per generare il riassunto del ciclo cliccare su </span><strong>Reports -> Riassunto Terapia</strong><span> nella barra dei menù.</span></p> |
<table style="margin-left: auto; margin-right: auto;" border="0"> | <table style="margin-left: auto; margin-right: auto;" border="0"> | ||
<tbody> | <tbody> | ||
<tr> | <tr> | ||
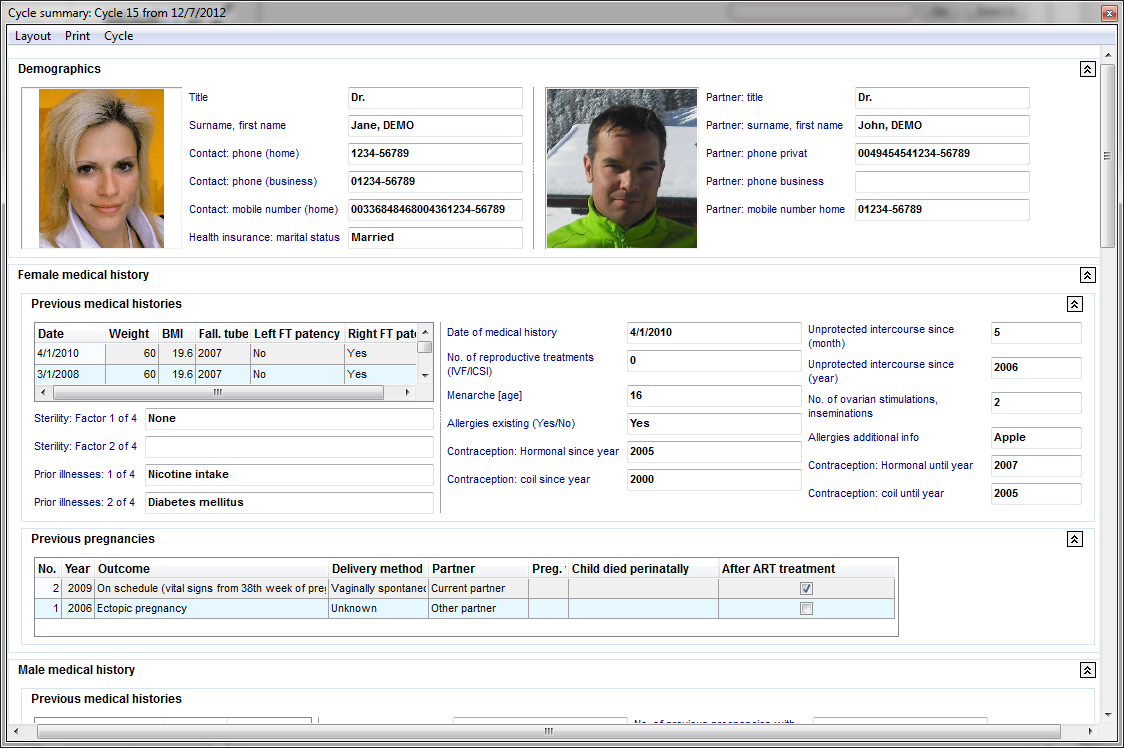
| − | <td>[[Image:CS1.png|none|750px|thumb|left|link=http://wiki.meditex-software.com/images/CS1.png|<strong> </strong> | + | <td>[[Image:CS1.png|none|750px|thumb|left|link=http://wiki.meditex-software.com/images/CS1.png|<strong> </strong>Riassunto Ciclo. In questa finestra è possibile solo visualizzare i dati.]]</td> |
</tr> | </tr> | ||
</tbody> | </tbody> | ||
</table> | </table> | ||
<p style="text-align: justify;"> </p> | <p style="text-align: justify;"> </p> | ||
| − | <h3 style="text-align: justify;"><br /> | + | <h3 style="text-align: justify;"><br />Funzionalità utili</h3> |
<table border="0"> | <table border="0"> | ||
<tbody> | <tbody> | ||
<tr> | <tr> | ||
<td style="text-align: center;"><img src="/images/CS90.png" alt="" width="435" height="161" /></td> | <td style="text-align: center;"><img src="/images/CS90.png" alt="" width="435" height="161" /></td> | ||
| − | <td style="text-align: | + | <td style="text-align: left;"> |
| − | <p> | + | <p>L'unica modifica possibile in questa finestra è l'<strong>ordinamento/filtraggio</strong> delle tabelle attraverso la freccia alla destra dell'intestazione della colonna desiderata.</p> |
</td> | </td> | ||
</tr> | </tr> | ||
<tr> | <tr> | ||
<td style="text-align: center;"><img src="/images/CS91.png" alt="" width="500" height="206" /><br /></td> | <td style="text-align: center;"><img src="/images/CS91.png" alt="" width="500" height="206" /><br /></td> | ||
| − | <td style="text-align: justify;"> | + | <td style="text-align: justify;">Utilizzando i pulsanti <img src="/images/CS2.png" alt="" width="16" height="16" /> (Collassa) e <img src="/images/CS3.png" alt="" /> (Espandi) sarà possibile nacondere o visualizzare le varie sezioni del riassunto.</td> |
</tr> | </tr> | ||
</tbody> | </tbody> | ||
| Line 28: | Line 28: | ||
<p> </p> | <p> </p> | ||
<p> </p> | <p> </p> | ||
| − | <p> | + | <p>Dal menù <strong>Layout</strong>, sarà possibile <strong>personalizzare, salvare, caricare</strong> o <strong>resettare </strong>il layout.</p> |
| − | <p> | + | <p> </p> |
| − | < | + | <h3>Come personalizzare il layout</h3> |
| + | <p>Cliccando su Personalizza Layout la finestra di personalizzazione si aprirà.</p> | ||
<table style="margin-left: auto; margin-right: auto;" border="0"> | <table style="margin-left: auto; margin-right: auto;" border="0"> | ||
<tbody> | <tbody> | ||
| Line 39: | Line 40: | ||
</table> | </table> | ||
<p> </p> | <p> </p> | ||
| − | <h3> | + | <h3><span style="font-size: 10px;">Sarà possibile scegliere due visualizzazioni</span><span style="font-size: 10px;">:</span></h3> |
| − | < | + | |
<ul> | <ul> | ||
| − | <li> | + | <li>la <strong>window view</strong> con due finestre affiancate.</li> |
</ul> | </ul> | ||
<ul> | <ul> | ||
| − | <li> | + | <li>la <strong>tabbed view</strong> con due tab separate.</li> |
</ul> | </ul> | ||
| − | <p> | + | <p>Per passare da una visualizzazione all'altra selezionare la casella nell'angolo in basso a sinistra.</p> |
<table border="0"> | <table border="0"> | ||
<tbody> | <tbody> | ||
| Line 56: | Line 56: | ||
</tbody> | </tbody> | ||
</table> | </table> | ||
| − | <p><strong>In | + | <p><strong>In entrambe le visualizzazioni si possono distinguere due sezioni:</strong></p> |
<ul> | <ul> | ||
| − | <li>Layout | + | <li>Albero di Layout</li> |
| − | <li> | + | <li>Elementi disponibili</li> |
</ul> | </ul> | ||
<p> </p> | <p> </p> | ||
| − | <h4>Layout | + | <h4>Albero di Layout</h4> |
| − | <p> | + | <p>Questa sezione contiene tutti gli <strong>elementi presenti nella finestra principale del riassunto</strong>, sottoforma di albero logico.</p> |
| − | <p><strong> | + | <p><strong>Selezionando un titolo dalla finestra di personalizzazione </strong>(con un click) il <strong>campo associato verrà selezionato nella finestra principale, e viceversa.</strong></p> |
| − | <p> | + | <p>Questafunzionalità rende la ricerca dei campi da modificare molto più veloce e semplice.</p> |
<p> </p> | <p> </p> | ||
| − | <h4> | + | <h4>Elementi disponibili</h4> |
| − | <p> | + | <p>Questa sezione contiene tutti gli elementi al momento<strong> non utilizzati nella finestra principale del riassunto.</strong></p> |
| − | <p> | + | <p>Se è necessario <strong>aggiungere elementi</strong> all'albero di layout, è sufficiente <strong>trascinarli</strong> nella posizione corretta.</p> |
| − | <p> | + | <p>Per eliminare elementi dall'albero di layout vale la stessa regola (trascinare il campo da sinistra a destra). La lista degli elementi disponibili si ordinerà automaticamente in ordine alfabetico.</p> |
<p> </p> | <p> </p> | ||
| − | <h4> | + | <h4>Pulsanti</h4> |
<table style="margin-left: auto; margin-right: auto;" border="0"> | <table style="margin-left: auto; margin-right: auto;" border="0"> | ||
<tbody> | <tbody> | ||
<tr> | <tr> | ||
| − | <td><img | + | <td><img src="/images/CS7.png" alt="" width="15" height="13" /></td> |
| − | <td | + | <td><strong>Indietro</strong>: Elimina le ultime modifiche<br /></td> |
</tr> | </tr> | ||
<tr> | <tr> | ||
| − | <td><img | + | <td><img src="/images/CS8.png" alt="" width="15" height="13" /></td> |
| − | <td><strong> | + | <td><strong>Avanti</strong>: Reimposta le ultime modifiche.<br /></td> |
</tr> | </tr> | ||
<tr> | <tr> | ||
| − | <td><img | + | <td><img src="/images/CS9.png" alt="" width="16" height="16" /></td> |
| − | <td><strong> | + | <td><strong>Salva Layout</strong>: Salvare il layout dopo la modifica.<br /></td> |
</tr> | </tr> | ||
<tr> | <tr> | ||
| − | <td><img | + | <td><img src="/images/CS10.png" alt="" width="16" height="16" /></td> |
| − | <td><strong> | + | <td><strong>Ripristina Layout</strong>: Dopo aver salvato il layout modificato, è possibile ripristinare il precedente cliccando su quasto pulsante.<br /></td> |
</tr> | </tr> | ||
<tr> | <tr> | ||
| − | <td><img | + | <td><img src="/images/CS12.png" alt="" width="16" height="16" /></td> |
| − | <td><strong> | + | <td><strong>Collassa</strong>: Nasconde l'albero gerarchico.<br /></td> |
</tr> | </tr> | ||
<tr> | <tr> | ||
| − | <td><img | + | <td><img src="/images/CS11.png" alt="" width="16" height="16" /></td> |
| − | <td><strong> | + | <td><strong>Espandi</strong>: Mostra l'albero gerarchico<br /></td> |
</tr> | </tr> | ||
<tr> | <tr> | ||
| − | <td><img | + | <td><img src="/images/CS13.png" alt="" width="16" height="16" /></td> |
| − | <td><strong> | + | <td><strong>Elimina</strong>: Questo pulsante è attivo solamente se sono stati creati nuovi gruppi o elementi ausuliari. Elimina i nuovi gruppi/elementi.<br /></td> |
</tr> | </tr> | ||
<tr> | <tr> | ||
| − | <td><img | + | <td><img src="/images/CS15.png" alt="" width="16" height="16" /></td> |
| − | <td><strong> | + | <td><strong>Aggiungi Gruppo</strong>: Aggiungi nuovo gruppo. L'utilizzo di questa feature non è consigliato. Usare i gruppi esistenti.<br /></td> |
</tr> | </tr> | ||
<tr> | <tr> | ||
| − | <td><img | + | <td><img src="/images/CS14.png" alt="" width="16" height="16" /></td> |
| − | <td><strong> | + | <td><strong>Aggiungi Elemento ausiliario</strong>: Aggiungi nuovo elemento. L'utilizzo di questa feature non è consigliato. Usare gli elementi esistenti.<br /></td> |
</tr> | </tr> | ||
<tr> | <tr> | ||
| − | <td><img | + | <td><img src="/images/CS16.png" alt="" width="23" height="20" /></td> |
| − | <td><strong> | + | <td><strong>Visualizza albero/ lista</strong>: Cambia la visualizzazione degli <strong>elementi disponibili</strong>.<br /><br /></td> |
</tr> | </tr> | ||
</tbody> | </tbody> | ||
</table> | </table> | ||
<p> </p> | <p> </p> | ||
| − | <h3 style="text-align: justify;"> | + | <h3 style="text-align: justify;">Descrizioni dettagliate</h3> |
<table border="0"> | <table border="0"> | ||
<tbody> | <tbody> | ||
| Line 124: | Line 124: | ||
<td><img style="display: block; margin-left: auto; margin-right: auto;" src="/images/plus48.png" alt="" width="48" height="48" /></td> | <td><img style="display: block; margin-left: auto; margin-right: auto;" src="/images/plus48.png" alt="" width="48" height="48" /></td> | ||
<td> | <td> | ||
| − | <p><a href="/index.php?title=How to change the size of fields / areas?"> | + | <p><a href="/index.php?title=How to change the size of fields / areas?">Come cambiare la misura di un campo o di un area?</a></p> |
| − | <p><a href="/index.php?title=How to add an item / field to the cycle summary?"> | + | <p><a href="/index.php?title=How to add an item / field to the cycle summary?"><a href="/index.php?title=Come_aggiungere_una_voce/campo_al_Riassunto_del_ciclo%3F">Come aggiungere una voce/campo al Riassunto del ciclo?</a></a></p> |
| − | <p><a href="/index.php?title=How to delete an item / field from the cycle summary?"> | + | <p><a href="/index.php?title=How to delete an item / field from the cycle summary?">Come cancellare una voce /campo al Riassunto del ciclo?</a></p> |
| − | <p><a href="/index.php?title=How to change the position of an item?"> | + | <p><a href="/index.php?title=How to change the position of an item?">Come cambiare la posizione di una voce?</a></p> |
</td> | </td> | ||
</tr> | </tr> | ||
| Line 136: | Line 136: | ||
<tbody> | <tbody> | ||
<tr> | <tr> | ||
| − | <td style="text-align: right;"><a href="/index.php?title= | + | <td style="text-align: right;"><a href="/index.php?title=MedITEX_IVF_come_fare">Torna a Come Fare</a></td> |
| − | <td style="text-align: right;"><a href="#top"> | + | <td style="text-align: right;"><a href="#top">Inizio pagina</a></td> |
</tr> | </tr> | ||
</tbody> | </tbody> | ||
</table> | </table> | ||
<p><span class="mw-headline"><br /></span></p> | <p><span class="mw-headline"><br /></span></p> | ||
Revision as of 15:33, 2 May 2016
Contents |
Per generare il riassunto del ciclo cliccare su Reports -> Riassunto Terapia nella barra dei menù.
 |
Funzionalità utili
| <img src="/images/CS90.png" alt="" width="435" height="161" /> |
L'unica modifica possibile in questa finestra è l'ordinamento/filtraggio delle tabelle attraverso la freccia alla destra dell'intestazione della colonna desiderata. |
| <img src="/images/CS91.png" alt="" width="500" height="206" /> |
Utilizzando i pulsanti <img src="/images/CS2.png" alt="" width="16" height="16" /> (Collassa) e <img src="/images/CS3.png" alt="" /> (Espandi) sarà possibile nacondere o visualizzare le varie sezioni del riassunto. |
Dal menù Layout, sarà possibile personalizzare, salvare, caricare o resettare il layout.
Come personalizzare il layout
Cliccando su Personalizza Layout la finestra di personalizzazione si aprirà.
| <img src="/images/CS411.png" alt="" width="304" height="149" /> |
Sarà possibile scegliere due visualizzazioni:
- la window view con due finestre affiancate.
- la tabbed view con due tab separate.
Per passare da una visualizzazione all'altra selezionare la casella nell'angolo in basso a sinistra.
| <img style="display: block; margin-left: auto; margin-right: auto;" src="/images/CS51.png" alt="" width="350" /> | <img style="display: block; margin-left: auto; margin-right: auto;" src="/images/CS6.png" alt="" width="350" height="375" /> |
In entrambe le visualizzazioni si possono distinguere due sezioni:
- Albero di Layout
- Elementi disponibili
Albero di Layout
Questa sezione contiene tutti gli elementi presenti nella finestra principale del riassunto, sottoforma di albero logico.
Selezionando un titolo dalla finestra di personalizzazione (con un click) il campo associato verrà selezionato nella finestra principale, e viceversa.
Questafunzionalità rende la ricerca dei campi da modificare molto più veloce e semplice.
Elementi disponibili
Questa sezione contiene tutti gli elementi al momento non utilizzati nella finestra principale del riassunto.
Se è necessario aggiungere elementi all'albero di layout, è sufficiente trascinarli nella posizione corretta.
Per eliminare elementi dall'albero di layout vale la stessa regola (trascinare il campo da sinistra a destra). La lista degli elementi disponibili si ordinerà automaticamente in ordine alfabetico.
Pulsanti
| <img src="/images/CS7.png" alt="" width="15" height="13" /> | Indietro: Elimina le ultime modifiche |
| <img src="/images/CS8.png" alt="" width="15" height="13" /> | Avanti: Reimposta le ultime modifiche. |
| <img src="/images/CS9.png" alt="" width="16" height="16" /> | Salva Layout: Salvare il layout dopo la modifica. |
| <img src="/images/CS10.png" alt="" width="16" height="16" /> | Ripristina Layout: Dopo aver salvato il layout modificato, è possibile ripristinare il precedente cliccando su quasto pulsante. |
| <img src="/images/CS12.png" alt="" width="16" height="16" /> | Collassa: Nasconde l'albero gerarchico. |
| <img src="/images/CS11.png" alt="" width="16" height="16" /> | Espandi: Mostra l'albero gerarchico |
| <img src="/images/CS13.png" alt="" width="16" height="16" /> | Elimina: Questo pulsante è attivo solamente se sono stati creati nuovi gruppi o elementi ausuliari. Elimina i nuovi gruppi/elementi. |
| <img src="/images/CS15.png" alt="" width="16" height="16" /> | Aggiungi Gruppo: Aggiungi nuovo gruppo. L'utilizzo di questa feature non è consigliato. Usare i gruppi esistenti. |
| <img src="/images/CS14.png" alt="" width="16" height="16" /> | Aggiungi Elemento ausiliario: Aggiungi nuovo elemento. L'utilizzo di questa feature non è consigliato. Usare gli elementi esistenti. |
| <img src="/images/CS16.png" alt="" width="23" height="20" /> | Visualizza albero/ lista: Cambia la visualizzazione degli elementi disponibili. |
Descrizioni dettagliate
| <img style="display: block; margin-left: auto; margin-right: auto;" src="/images/plus48.png" alt="" width="48" height="48" /> |
<a href="/index.php?title=How to change the size of fields / areas?">Come cambiare la misura di un campo o di un area?</a> <a href="/index.php?title=How to add an item / field to the cycle summary?"><a href="/index.php?title=Come_aggiungere_una_voce/campo_al_Riassunto_del_ciclo%3F">Come aggiungere una voce/campo al Riassunto del ciclo?</a></a> <a href="/index.php?title=How to delete an item / field from the cycle summary?">Come cancellare una voce /campo al Riassunto del ciclo?</a> <a href="/index.php?title=How to change the position of an item?">Come cambiare la posizione di una voce?</a> |
| <a href="/index.php?title=MedITEX_IVF_come_fare">Torna a Come Fare</a> | <a href="#top">Inizio pagina</a> |