Come ordinare gli appuntamenti per risorsa?
From MedITEX - Wiki
| Line 1: | Line 1: | ||
| − | <p> | + | <p>Fare click su <strong>Lista appunt. / stampa</strong> in alto a sinistra della pagina principale per aprire una lista di tutti gli appuntamenti a partire dalla data corrente.</p> |
<table style="margin-left: auto; margin-right: auto;" border="0" width="125" height="24"> | <table style="margin-left: auto; margin-right: auto;" border="0" width="125" height="24"> | ||
<tbody> | <tbody> | ||
<tr> | <tr> | ||
| − | <td><img src="/images/ | + | <td><img src="/images/fig56_ita.png" alt="" width="251" height="132" /></td> |
| − | <td><img src="/images/ | + | <td><img src="/images/fig57_ita.png" alt="" width="353" height="165" /></td> |
</tr> | </tr> | ||
</tbody> | </tbody> | ||
</table> | </table> | ||
<p style="text-align: justify;"> </p> | <p style="text-align: justify;"> </p> | ||
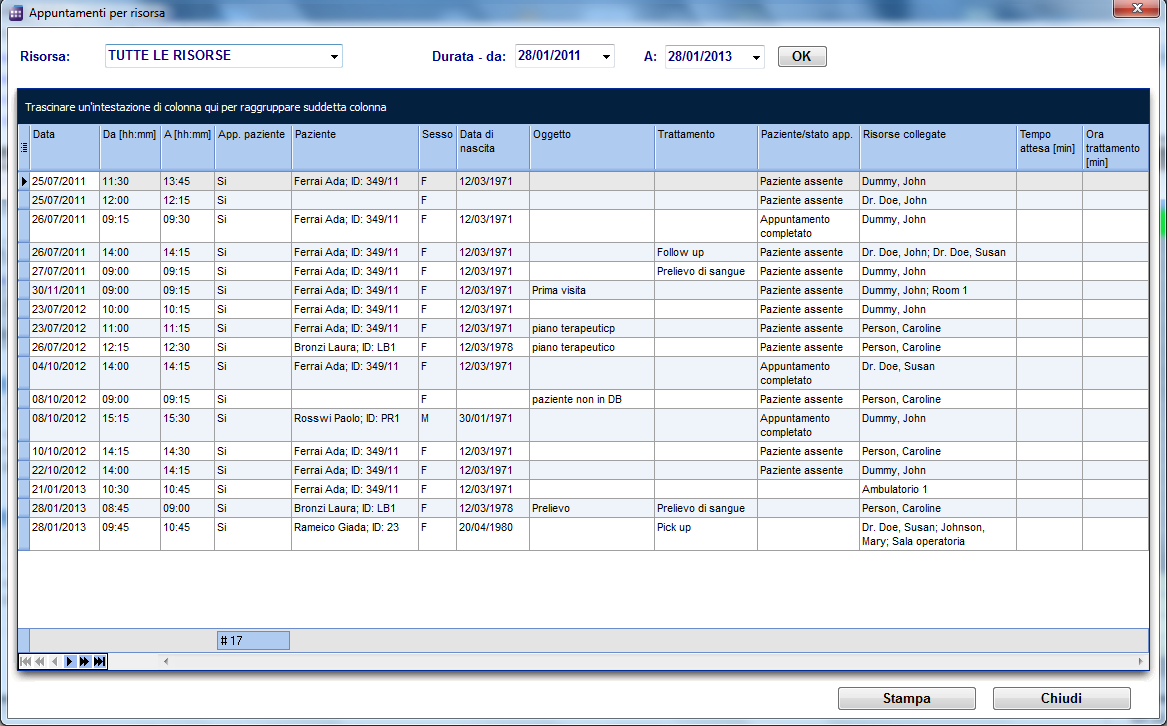
| − | <p style="text-align: justify;"> | + | <p style="text-align: justify;">Di default la lista degli appuntamenti è visualizzata per tutte le risorse, ma è anche possibile filtrare gli appuntamenti per risorsa. E' possibile anche decidere il lasso di tempo.</p> |
<table style="margin-left: auto; margin-right: auto;" border="0"> | <table style="margin-left: auto; margin-right: auto;" border="0"> | ||
<tbody> | <tbody> | ||
<tr> | <tr> | ||
| − | <td>[[Image: | + | <td>[[Image:fig58_ita.png|none|740px|thumb|left|link=http://wiki.meditex-software.com/images/fig58_ita.png]]</td> |
</tr> | </tr> | ||
</tbody> | </tbody> | ||
</table> | </table> | ||
<p style="text-align: justify;"> </p> | <p style="text-align: justify;"> </p> | ||
| − | <p style="text-align: justify;"> | + | <p style="text-align: justify;">Attraverso la prima colonna è possibile nascondere o mostrare le altre colonne. Per fare ciò è sufficiente premere l'intestazione della colonna e selezionare le colonne che si desidera vedere.</p> |
<table style="margin-left: auto; margin-right: auto;" border="0" width="576" height="297"> | <table style="margin-left: auto; margin-right: auto;" border="0" width="576" height="297"> | ||
<tbody> | <tbody> | ||
<tr> | <tr> | ||
<td> | <td> | ||
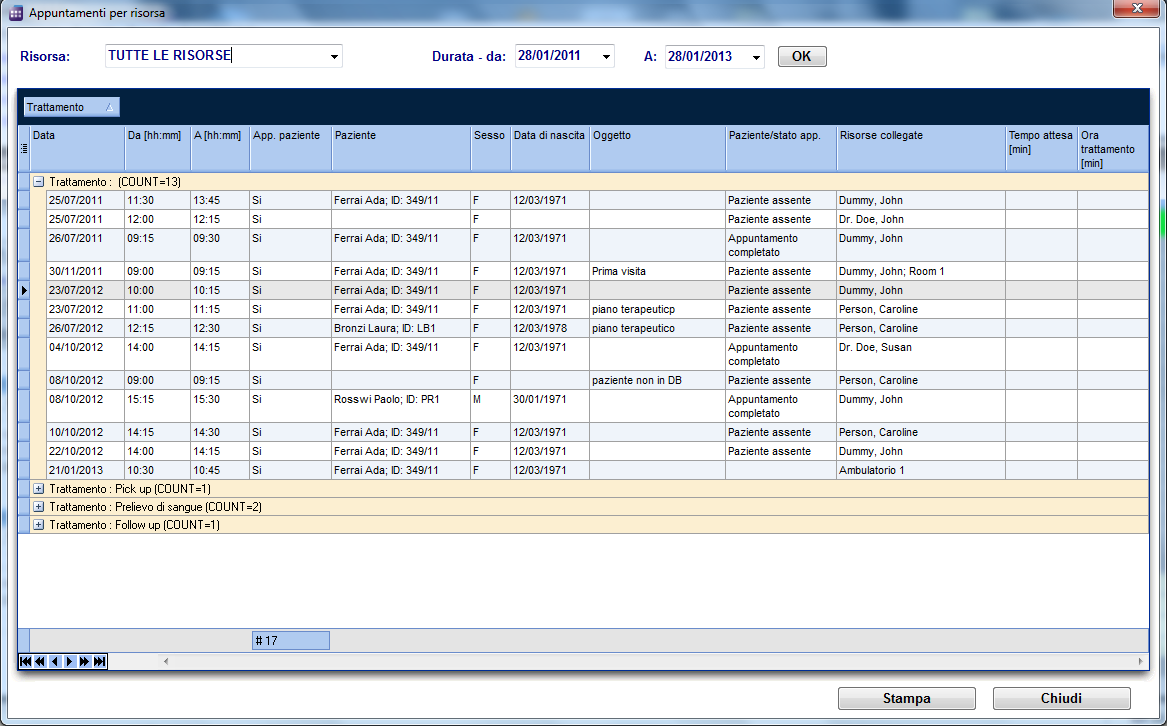
| − | <p style="text-align: justify;"> | + | <p style="text-align: justify;">I valori mostrati in ciascuna colonna possono essere ordinati premendo l'intestazione della colonna. E' possibile anche raggruppare i contenuti della tabella trascinando le intestazioni delle colonna nell'area blu scura in alto. Ad esempio: se volete vedere quanti appuntamenti sono stati pianificati per uno specifico trattamento, trascinate la colonna <strong>Trattamento</strong> nell'area blu scura e tutti gli appuntamenti saranno raggruppati per trattamento. Ciascuna intestazione del gruppo contiene adesso il trattamento ed il numero di appuntamenti.</p> |
</td> | </td> | ||
| − | <td><img src="/images/ | + | <td><img src="/images/fig59_ita.png" alt="" width="319" height="324" /></td> |
</tr> | </tr> | ||
</tbody> | </tbody> | ||
| Line 33: | Line 33: | ||
<tbody> | <tbody> | ||
<tr> | <tr> | ||
| − | <td>[[Image: | + | <td>[[Image:fig60_ita.png|none|740px|thumb|left|link=http://wiki.meditex-software.com/images/fig60_ita.png]]</td> |
</tr> | </tr> | ||
</tbody> | </tbody> | ||
</table> | </table> | ||
| − | <p style="text-align: justify;"> | + | <p style="text-align: justify;">Utilizzare il tasto <strong>Stampa</strong> in basso a destra per stampare la lista da voi definita.</p> |
| − | <p style="text-align: justify;"> | + | <p style="text-align: justify;">Facendo <strong>doppio-click</strong> su di una riga, si aprirà l'appuntamento nell'editor appuntamenti.</p> |
<table border="0"> | <table border="0"> | ||
<tbody> | <tbody> | ||
<tr> | <tr> | ||
<td><img src="/images/plus48.png" alt="" width="48" height="48" /></td> | <td><img src="/images/plus48.png" alt="" width="48" height="48" /></td> | ||
| − | <td><span lang="en"><span> | + | <td><span lang="en"><span>Per maggiori informazioni sulla gestione delle liste fare <a href="/index.php?title=Benvenuti_in_MedITEX_Scheduler#Gestire_le_liste">click qui</a>.</span></span></td> |
</tr> | </tr> | ||
</tbody> | </tbody> | ||
Latest revision as of 14:55, 20 February 2013
Fare click su Lista appunt. / stampa in alto a sinistra della pagina principale per aprire una lista di tutti gli appuntamenti a partire dalla data corrente.
| <img src="/images/fig56_ita.png" alt="" width="251" height="132" /> | <img src="/images/fig57_ita.png" alt="" width="353" height="165" /> |
Di default la lista degli appuntamenti è visualizzata per tutte le risorse, ma è anche possibile filtrare gli appuntamenti per risorsa. E' possibile anche decidere il lasso di tempo.
 |
Attraverso la prima colonna è possibile nascondere o mostrare le altre colonne. Per fare ciò è sufficiente premere l'intestazione della colonna e selezionare le colonne che si desidera vedere.
|
I valori mostrati in ciascuna colonna possono essere ordinati premendo l'intestazione della colonna. E' possibile anche raggruppare i contenuti della tabella trascinando le intestazioni delle colonna nell'area blu scura in alto. Ad esempio: se volete vedere quanti appuntamenti sono stati pianificati per uno specifico trattamento, trascinate la colonna Trattamento nell'area blu scura e tutti gli appuntamenti saranno raggruppati per trattamento. Ciascuna intestazione del gruppo contiene adesso il trattamento ed il numero di appuntamenti. |
<img src="/images/fig59_ita.png" alt="" width="319" height="324" /> |
 |
Utilizzare il tasto Stampa in basso a destra per stampare la lista da voi definita.
Facendo doppio-click su di una riga, si aprirà l'appuntamento nell'editor appuntamenti.
| <img src="/images/plus48.png" alt="" width="48" height="48" /> | Per maggiori informazioni sulla gestione delle liste fare <a href="/index.php?title=Benvenuti_in_MedITEX_Scheduler#Gestire_le_liste">click qui</a>. |
| <a href="/index.php?title=MedITEX_Scheduler_come...">Torna a MedITEX Scheduler come...</a> | <a href="#top">Torna in alto</a> |