Come fare per rendere un paziente un donatore?
From MedITEX - Wiki
| Line 1: | Line 1: | ||
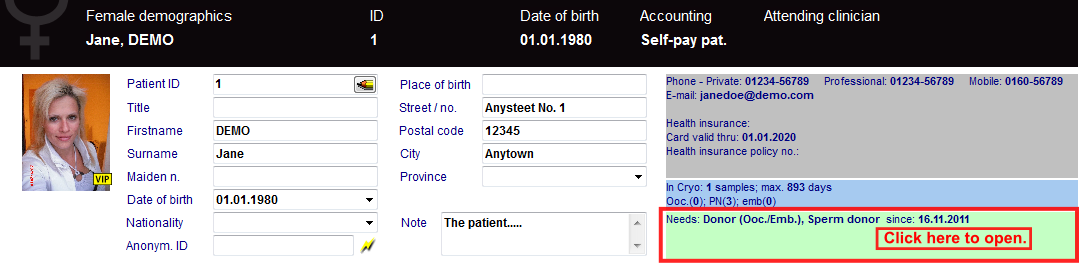
| − | <p> | + | <p>Cliccare su <strong>Anagrafica</strong> (femminile o maschile) e fare doppio click sul riquadro verde aull destra dello schermo. </p> |
<table style="margin-left: auto; margin-right: auto;" border="0"> | <table style="margin-left: auto; margin-right: auto;" border="0"> | ||
<tbody> | <tbody> | ||
| Line 8: | Line 8: | ||
</table> | </table> | ||
<p> </p> | <p> </p> | ||
| − | <h2> | + | <h2>Donatrice</h2> |
| − | <p> | + | <p>Nella finestra <strong>Informazioni persona e donatrice</strong> è necessario selezionare lnella sezione <span style="text-decoration: underline;"><strong>La persona è:</strong></span><strong> Donatrice (Ovo/Emb.).</strong></p> |
<table style="margin-left: auto; margin-right: auto;" border="0"> | <table style="margin-left: auto; margin-right: auto;" border="0"> | ||
<tbody> | <tbody> | ||
| Line 18: | Line 18: | ||
</table> | </table> | ||
<p> </p> | <p> </p> | ||
| − | <h2> | + | <h2>Donatore</h2> |
| − | <p> | + | <p>Nella finestra <strong>Informazioni persona e donatrice</strong> è necessario selezionare lnella sezione <span><strong><span style="text-decoration: underline;">La persona è</span>: Donatore Sperma </strong>(unica opzione). </span></p> |
<table style="margin-left: auto; margin-right: auto;" border="0"> | <table style="margin-left: auto; margin-right: auto;" border="0"> | ||
<tbody> | <tbody> | ||
| Line 29: | Line 29: | ||
<p> </p> | <p> </p> | ||
<p> </p> | <p> </p> | ||
| − | <h2> | + | <h2>Campi relativi ad una nuova donazione</h2> |
| − | <p> | + | <p>I seguenti campi devono essere gestiti e completati dopo aver selezionato l'opzione Donatore/Donatrice. </p> |
<table border="0"> | <table border="0"> | ||
<tbody> | <tbody> | ||
| Line 36: | Line 36: | ||
<td><img style="display: block; margin-left: auto; margin-right: auto;" src="/images/MainDonorRed.png" alt="" width="250" height="299" /></td> | <td><img style="display: block; margin-left: auto; margin-right: auto;" src="/images/MainDonorRed.png" alt="" width="250" height="299" /></td> | ||
<td> | <td> | ||
| − | <p><strong> | + | <p><strong>Pagina principale:</strong></p> |
| − | <p style="text-align: justify;"> | + | <p style="text-align: justify;">Dopo aver selezionato l'opzione Donatrice questa informazione viene visualizzata nella <strong>pagina principale del paziente</strong>. </p> |
</td> | </td> | ||
</tr> | </tr> | ||
| Line 43: | Line 43: | ||
<td><img src="/images/ForDonation.png" alt="" width="550" height="404" /></td> | <td><img src="/images/ForDonation.png" alt="" width="550" height="404" /></td> | ||
<td> | <td> | ||
| − | <p><strong> | + | <p style="text-align: justify;"><strong>Maschera di input della Crioconservazione:</strong></p> |
| − | <p> | + | <p style="text-align: justify;">Dopo aver impostato la paziente <strong>come donatrice</strong> è possibile impostare l'opzione <strong>"Per donazione"</strong> nella finestra della crioconservazione di ovociti/embrioni. </p> |
</td> | </td> | ||
</tr> | </tr> | ||
| Line 53: | Line 53: | ||
<tbody> | <tbody> | ||
<tr> | <tr> | ||
| − | <td style="text-align: right;"><a href="/index.php?title= | + | <td style="text-align: right;"><a href="/index.php?title=MedITEX_IVF_come_fare">Torna a Come fare...</a></td> |
| − | <td style="text-align: right;"><a href="#top"> | + | <td style="text-align: right;"><a href="#top">Inizio Pagina</a></td> |
</tr> | </tr> | ||
</tbody> | </tbody> | ||
</table> | </table> | ||
Revision as of 09:48, 2 May 2016
Cliccare su Anagrafica (femminile o maschile) e fare doppio click sul riquadro verde aull destra dello schermo.
 |
Donatrice
Nella finestra Informazioni persona e donatrice è necessario selezionare lnella sezione La persona è: Donatrice (Ovo/Emb.).
| <img src="/images/PandDInfo1.1Red.png" alt="" width="612" height="184" /> |
Donatore
Nella finestra Informazioni persona e donatrice è necessario selezionare lnella sezione La persona è: Donatore Sperma (unica opzione).
| <img src="/images/PandDInfo1.2Red.png" alt="" width="584" height="55" /> |
Campi relativi ad una nuova donazione
I seguenti campi devono essere gestiti e completati dopo aver selezionato l'opzione Donatore/Donatrice.
| <img style="display: block; margin-left: auto; margin-right: auto;" src="/images/MainDonorRed.png" alt="" width="250" height="299" /> |
Pagina principale: Dopo aver selezionato l'opzione Donatrice questa informazione viene visualizzata nella pagina principale del paziente. |
| <img src="/images/ForDonation.png" alt="" width="550" height="404" /> |
Maschera di input della Crioconservazione: Dopo aver impostato la paziente come donatrice è possibile impostare l'opzione "Per donazione" nella finestra della crioconservazione di ovociti/embrioni. |
| <a href="/index.php?title=MedITEX_IVF_come_fare">Torna a Come fare...</a> | <a href="#top">Inizio Pagina</a> |