Come creare un nuovo contratto crio?
From MedITEX - Wiki
| Line 1: | Line 1: | ||
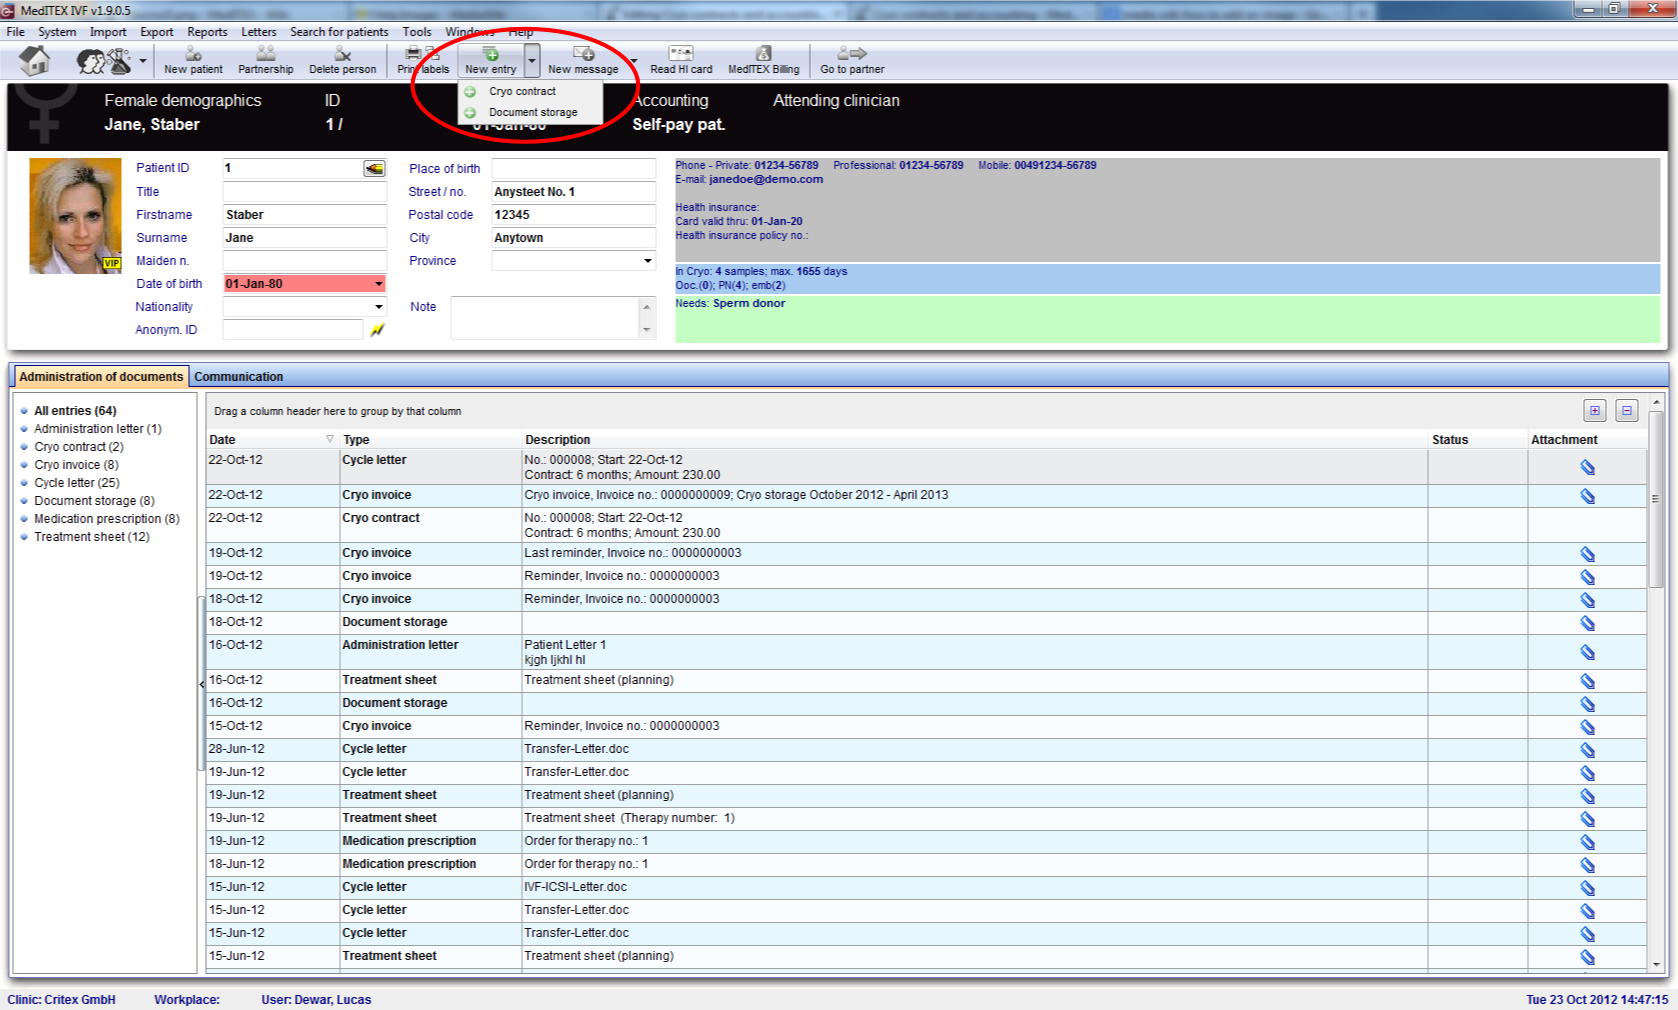
| − | <p> | + | <p>Un nuovo contratto crio può essere creato dalla sezione <strong>Anagrafica</strong> del paziente. Per crearlo cliccare nella freccina accanto all'icona<strong> "Nuovo elemento"</strong>. Dal menù a tendina selezionare <strong>"Contratto crio"</strong>.</p> |
<table style="margin-left: auto; margin-right: auto;" border="0"> | <table style="margin-left: auto; margin-right: auto;" border="0"> | ||
<tbody> | <tbody> | ||
| Line 8: | Line 8: | ||
</table> | </table> | ||
<p> </p> | <p> </p> | ||
| − | <p> | + | <p>Da questa nuova finestra, <strong>inserire tutte le informazioni </strong>e <strong>selezionare i campioni</strong> di materiale che devono essere assegnate al quel contratto. </p> |
<table style="margin-left: auto; margin-right: auto;" border="0"> | <table style="margin-left: auto; margin-right: auto;" border="0"> | ||
<tbody> | <tbody> | ||
| Line 17: | Line 17: | ||
</table> | </table> | ||
<p> </p> | <p> </p> | ||
| − | <p><strong> | + | <p><strong>Selezionare il documento </strong>che verrà usato come contratto, nella parte bassa della pagina o cliccare su "<strong>Crea contratto</strong>" per autogenerare il contratto con i dati inseriti. </p> |
| − | <p> | + | <p>Cliccare <strong>OK</strong> per salvare.</p> |
<p> </p> | <p> </p> | ||
| − | <p><strong> | + | <p><strong>Spiegazione dei campi/icone: </strong></p> |
<ul> | <ul> | ||
<li><strong>Contract date:</strong> date of creation of the contract.</li> | <li><strong>Contract date:</strong> date of creation of the contract.</li> | ||
| Line 43: | Line 43: | ||
<td><img src="/images/plus48.png" alt="" width="48" height="48" /></td> | <td><img src="/images/plus48.png" alt="" width="48" height="48" /></td> | ||
<td> | <td> | ||
| − | <p> | + | <p>E' possibile modificare le opzioni per <strong>Metodo di pagamento</strong> e<strong> Motivi interruzione contratto </strong>nelle Impostazioni nella sezione <a href="/index.php?title=MedITEX_IVF_Impostazioni#Tabelle_di_sistema">Tabelle di Sistema</a>.</p> |
</td> | </td> | ||
</tr> | </tr> | ||
| Line 51: | Line 51: | ||
<tbody> | <tbody> | ||
<tr> | <tr> | ||
| − | <td style="text-align: right;"><a href="/index.php?title= | + | <td style="text-align: right;"><a href="/index.php?title=MedITEX_IVF_come_fare">Torna a Come fare...</a></td> |
| − | <td style="text-align: right;"><a href="#top"> | + | <td style="text-align: right;"><a href="#top">Inizio Pagina</a></td> |
</tr> | </tr> | ||
</tbody> | </tbody> | ||
</table> | </table> | ||
Revision as of 16:50, 26 April 2016
Un nuovo contratto crio può essere creato dalla sezione Anagrafica del paziente. Per crearlo cliccare nella freccina accanto all'icona "Nuovo elemento". Dal menù a tendina selezionare "Contratto crio".
 |
Da questa nuova finestra, inserire tutte le informazioni e selezionare i campioni di materiale che devono essere assegnate al quel contratto.
 |
Selezionare il documento che verrà usato come contratto, nella parte bassa della pagina o cliccare su "Crea contratto" per autogenerare il contratto con i dati inseriti.
Cliccare OK per salvare.
Spiegazione dei campi/icone:
- Contract date: date of creation of the contract.
- Contract start: date when the contract start being valid.
- Contract no.: number of the contract. It can be auto generated pressing the button <img src="/images/strawID.jpg" alt="File:strawID.jpg" width="21" height="19" />.
- Contract: coverage (in months) of the contract.
- Frequency: how often the contract has to be update.
- Amount: cost of the contract.
- Payment method: method for paying the invoice generated after the contract.
- Created by: person that created the contract.
- Status: current situation of the contract. This can be active or terminated. Active contracts are still valid and in case a contract has expired, all straws are thawed or for some other reason the contract is not necessary, a contract can have its status terminated.
- Date: date when the contract was terminated. This field is only activated when terminated status is checked.
- Reason: reason for terminating the contract. This field is only activated when terminated status is checked.
- Note: blank space left for unusual situations where it is necessary to have information documented.
- Straw selection: list of straws cryopreserved for the selected patient.
- Document: selection of file to be used as a template for the contract.
| <img src="/images/plus48.png" alt="" width="48" height="48" /> |
E' possibile modificare le opzioni per Metodo di pagamento e Motivi interruzione contratto nelle Impostazioni nella sezione <a href="/index.php?title=MedITEX_IVF_Impostazioni#Tabelle_di_sistema">Tabelle di Sistema</a>. |
| <a href="/index.php?title=MedITEX_IVF_come_fare">Torna a Come fare...</a> | <a href="#top">Inizio Pagina</a> |