Come creare un'informazione giornaliera?
From MedITEX - Wiki
(Difference between revisions)
| Line 1: | Line 1: | ||
| − | <p> | + | <p>Per aggiungere nuove informazioni (messaggi importanti ecc.) ad un dato giorno, selezionare il collegamento <strong>Messaggi del giorno</strong>, situato in alto a sinistra nella pagina principale nell’area dei collegamenti di supporto<span id="result_box" lang="en"><span>.</span></span></p> |
<table border="0"> | <table border="0"> | ||
<tbody> | <tbody> | ||
<tr> | <tr> | ||
| − | <td>[[Image: | + | <td>[[Image:dayInfoNewRed3_ita.png|none|740px|thumb|left|link=http://wiki.meditex-software.com/images/dayInfoNewRed3_ita.png| ]]</td> |
</tr> | </tr> | ||
</tbody> | </tbody> | ||
</table> | </table> | ||
<ul> | <ul> | ||
| − | <li> | + | <li>Una volta aperta la nuova finestra premere il tasto<strong> Nuovo messaggio</strong>. Verrà aggiunta una riga vuota.</li> |
</ul> | </ul> | ||
| + | <p>Scegliere una data e riempire la casella di testo con le informazioni desiderate<span id="result_box" lang="en"><span>.</span></span></p> | ||
<ul> | <ul> | ||
| − | |||
</ul> | </ul> | ||
<table border="0"> | <table border="0"> | ||
<tbody> | <tbody> | ||
<tr> | <tr> | ||
| − | <td>[[Image: | + | <td>[[Image:dayInfoNew1_ita.png|none|740px|thumb|left|link=http://wiki.meditex-software.com/images/dayInfoNew1_ita.png| ]]</td> |
</tr> | </tr> | ||
</tbody> | </tbody> | ||
</table> | </table> | ||
<ul> | <ul> | ||
| − | <li> | + | <li>Se lo desiderate è possibile filtrare le date e/o le informazioni.</li> |
| − | <li> | + | <li>Premendo la freccia accanto all’intestazione della colonna è possibile filtrare il contenuto della tabella per le informazioni contenute nella riga.</li> |
</ul> | </ul> | ||
| + | <p> </p> | ||
<table border="0"> | <table border="0"> | ||
<tbody> | <tbody> | ||
<tr> | <tr> | ||
| − | <td>[[Image: | + | <td>[[Image:dayInfoNew4Red_ita.png|none|740px|thumb|left|link=http://wiki.meditex-software.com/images/dayInfoNew4Red_ita.png| ]]</td> |
</tr> | </tr> | ||
</tbody> | </tbody> | ||
</table> | </table> | ||
<ul> | <ul> | ||
| − | <li><span id="result_box" lang="en"><span class="hps"> | + | <li><span id="result_box" lang="en"><span class="hps"> </span><span> </span></span>Una volta salvato, il messaggio appare il giorno stabilito nella finestra principale<span id="result_box" lang="en"><span>.</span></span></li> |
</ul> | </ul> | ||
<table border="0"> | <table border="0"> | ||
<tbody> | <tbody> | ||
<tr> | <tr> | ||
| − | <td>[[Image: | + | <td>[[Image:dayInfoNewRed2_ita.png|none|740px|thumb|left|link=http://wiki.meditex-software.com/images/dayInfoNewRed2_ita.png| ]]</td> |
</tr> | </tr> | ||
</tbody> | </tbody> | ||
Latest revision as of 19:29, 11 February 2013
Per aggiungere nuove informazioni (messaggi importanti ecc.) ad un dato giorno, selezionare il collegamento Messaggi del giorno, situato in alto a sinistra nella pagina principale nell’area dei collegamenti di supporto.
 |
- Una volta aperta la nuova finestra premere il tasto Nuovo messaggio. Verrà aggiunta una riga vuota.
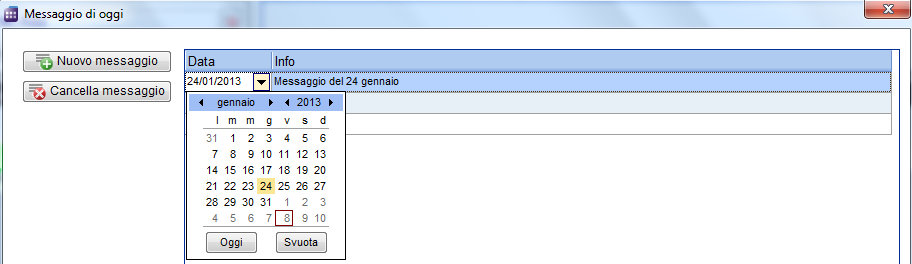
Scegliere una data e riempire la casella di testo con le informazioni desiderate.
 |
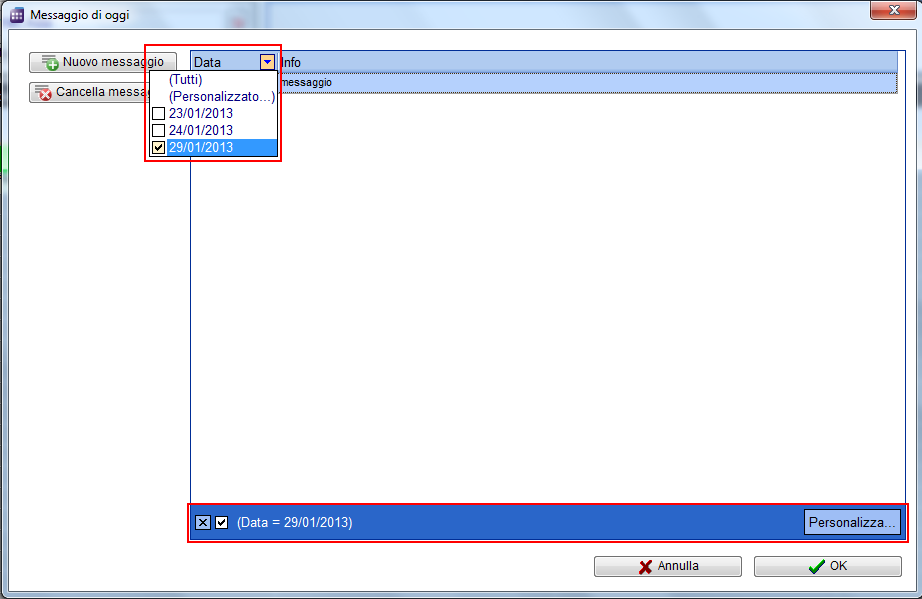
- Se lo desiderate è possibile filtrare le date e/o le informazioni.
- Premendo la freccia accanto all’intestazione della colonna è possibile filtrare il contenuto della tabella per le informazioni contenute nella riga.
 |
- Una volta salvato, il messaggio appare il giorno stabilito nella finestra principale.
 |
| <a href="/index.php?title=MedITEX_Scheduler_come...">Torna a MedITEX Scheduler come...</a> | <a href="#top">Torna in alto</a> |