Come creare ed utilizzare un blocco di testo?
From MedITEX - Wiki
| Line 17: | Line 17: | ||
</table> | </table> | ||
<p style="text-align: justify;">Tutti i blocchi di testo che possono essere usati in un determinato campo Note sono elencati nella parte più alta della finestra. Nella parte bassa è possibile trovare dei pulsanti che permettono l'inserimento di blocchi di testo selezionati, la creazione di nuovi blocchi e la modifica di quelli esistenti. </p> | <p style="text-align: justify;">Tutti i blocchi di testo che possono essere usati in un determinato campo Note sono elencati nella parte più alta della finestra. Nella parte bassa è possibile trovare dei pulsanti che permettono l'inserimento di blocchi di testo selezionati, la creazione di nuovi blocchi e la modifica di quelli esistenti. </p> | ||
| − | < | + | <h3><span>Pulsanti</span></h3> |
<table border="0"> | <table border="0"> | ||
<tbody> | <tbody> | ||
| Line 44: | Line 44: | ||
<p> </p> | <p> </p> | ||
<h2>Creare un nuovo blocco di testo</h2> | <h2>Creare un nuovo blocco di testo</h2> | ||
| − | <p> | + | <p>Il pulsante per la creazione di un nuovo blocco di testo offre due possibilità per farlo (cliccare sulla freccia alla destra del pulsante):</p> |
<table border="0" align="center"> | <table border="0" align="center"> | ||
<tbody> | <tbody> | ||
| Line 53: | Line 53: | ||
</table> | </table> | ||
<p> </p> | <p> </p> | ||
| − | <p> | + | <p>Se si seleziona la prima opzione "crea nuovo testo" (o Ins nella tastiera del computer) si aprirà la seguente finestra: </p> |
<table style="margin-left: auto; margin-right: auto;" border="0" width="46" height="24"> | <table style="margin-left: auto; margin-right: auto;" border="0" width="46" height="24"> | ||
<tbody> | <tbody> | ||
| Line 62: | Line 62: | ||
</table> | </table> | ||
<p> </p> | <p> </p> | ||
| − | <p> | + | <p>La sezione nella parte bassa della finestra è utilizzata per creare nuovi blocchi di testo.</p> |
<table border="0" align="center"> | <table border="0" align="center"> | ||
<tbody> | <tbody> | ||
| Line 71: | Line 71: | ||
<tr> | <tr> | ||
<td><img style="display: block; margin-left: auto; margin-right: auto;" src="/images/Blocchi_testo_9_IT.png" alt="" width="227" height="65" /></td> | <td><img style="display: block; margin-left: auto; margin-right: auto;" src="/images/Blocchi_testo_9_IT.png" alt="" width="227" height="65" /></td> | ||
| − | <td><strong> | + | <td><strong>Contenuto </strong>del nuovo blocco di testo.</td> |
</tr> | </tr> | ||
<tr> | <tr> | ||
<td><img style="display: block; margin-left: auto; margin-right: auto;" src="/images/Blocchi_testo_10_IT.png" alt="" width="210" height="35" /></td> | <td><img style="display: block; margin-left: auto; margin-right: auto;" src="/images/Blocchi_testo_10_IT.png" alt="" width="210" height="35" /></td> | ||
<td> | <td> | ||
| − | <p | + | <p style="text-align: justify;"><strong>Testo generale per tutte le sezioni: </strong>selezionare questa opzione se si desidera definire questo blocco di testo come generale. Se il testo è generale significa che può essere utilizzato in tutti i campi Note del programma altrimenti il blocco può essere utilizzato solo nel campo Note dove è stato creato. </p> |
| − | + | ||
</td> | </td> | ||
</tr> | </tr> | ||
<tr> | <tr> | ||
<td><img style="display: block; margin-left: auto; margin-right: auto;" src="/images/Blocchi_testo_11_IT.png" alt="" width="132" height="31" /></td> | <td><img style="display: block; margin-left: auto; margin-right: auto;" src="/images/Blocchi_testo_11_IT.png" alt="" width="132" height="31" /></td> | ||
| − | <td><strong> | + | <td><strong>Cancellare </strong>l'operazione. </td> |
</tr> | </tr> | ||
<tr> | <tr> | ||
<td><img style="display: block; margin-left: auto; margin-right: auto;" src="/images/Blocchi_testo_12_IT.png" alt="" width="130" height="33" /></td> | <td><img style="display: block; margin-left: auto; margin-right: auto;" src="/images/Blocchi_testo_12_IT.png" alt="" width="130" height="33" /></td> | ||
| − | <td><strong> | + | <td><strong>Salvare </strong>il blocco di testo.</td> |
</tr> | </tr> | ||
</tbody> | </tbody> | ||
</table> | </table> | ||
<p> </p> | <p> </p> | ||
| − | <p> | + | <p>Se si desidera <strong>creare un nuovo blocco di testo come copia di uno già esistente</strong>, selezionare il blocco che si esidera copiare e scegliere l' opzione <strong>Crea copia di un testo</strong> selezionato dal menù a tendina dell'icona con il "+" verde (o premere <strong>Ctrl+C</strong> dalla tastiera). Si aprirà la seguente finestra: </p> |
<table style="margin-left: auto; margin-right: auto;" border="0" width="46" height="24"> | <table style="margin-left: auto; margin-right: auto;" border="0" width="46" height="24"> | ||
<tbody> | <tbody> | ||
| Line 99: | Line 98: | ||
</tbody> | </tbody> | ||
</table> | </table> | ||
| − | <p | + | <p style="text-align: justify;">Inizialmente, il nome, il contenuto del nuovo blocco e l'eventuale opzione di testo generale saranno identici a quelli relativi al blocco selezionato già esistente (quello di cui abbiamo creato una copia) ma tutti campi possono essere modificati. </p> |
| − | + | <p>E' anche possibile creare un nuovo blocco di testo usando una parte di un testo già esistente. Per farlo selezionare la parte del testo che si vuole copiare, premete tasto destro e scegliere l'opzione <strong><a href="#top">Save text as new text block.</a> </strong>The following window will open:</p> | |
| − | <p> | + | |
<table style="margin-left: auto; margin-right: auto;" border="0" width="46" height="24"> | <table style="margin-left: auto; margin-right: auto;" border="0" width="46" height="24"> | ||
<tbody> | <tbody> | ||
Revision as of 16:15, 3 May 2016
I blocchi di testo danno la possibilità di utilizzare dei testi predefiniti in tutti i campi note di MedITEX IVF e di MedITEX Scheduler.
Facendo tasto destro in un campo Note si aprirà un menù a tendina che contiene due opzioni relative ai blocchi d testo:
| <img src="/images/Blocchi_testo_1_IT.png" alt="" width="314" height="265" /> |
Se si clicca sull'opzione Testo, si aprirà la seguente finestra:
| <img src="/images/Blocchi_testo_2_IT.png" alt="" width="580" height="688" /> |
Tutti i blocchi di testo che possono essere usati in un determinato campo Note sono elencati nella parte più alta della finestra. Nella parte bassa è possibile trovare dei pulsanti che permettono l'inserimento di blocchi di testo selezionati, la creazione di nuovi blocchi e la modifica di quelli esistenti.
Pulsanti
| <img style="display: block; margin-left: auto; margin-right: auto;" src="/images/TBButtonNew.png" alt="" width="55" height="31" /> | Creare un nuovo blocco di testo |
| <img style="display: block; margin-left: auto; margin-right: auto;" src="/images/TBButtonDelete.png" alt="" width="35" height="31" /> | Cancellare un blocco selezionato |
| <img src="/images/Blocchi_testo_3_IT.png" alt="" width="133" height="35" /> |
Modificare un blocco selezionato |
| <img src="/images/Blocchi_testo_4_IT.png" alt="" width="126" height="35" /> | Chiudere la finestra |
| <img src="/images/Blocchi_testo_5_IT.png" alt="" width="145" height="36" /> | Inserire il blocco di testo selezionato |
Creare un nuovo blocco di testo
Il pulsante per la creazione di un nuovo blocco di testo offre due possibilità per farlo (cliccare sulla freccia alla destra del pulsante):
| <img src="/images/Blocchi_testo_6_IT.png" alt="" width="281" height="76" /> |
Se si seleziona la prima opzione "crea nuovo testo" (o Ins nella tastiera del computer) si aprirà la seguente finestra:
| <img src="/images/Blocchi_testo_7_IT.png" alt="" width="576" height="688" /> |
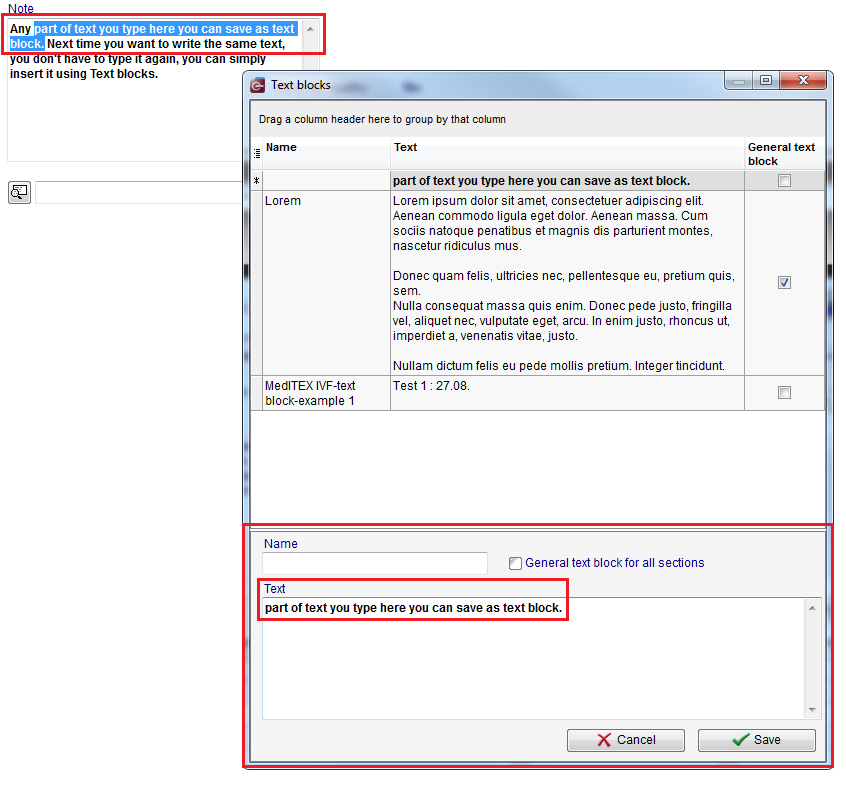
La sezione nella parte bassa della finestra è utilizzata per creare nuovi blocchi di testo.
| <img style="display: block; margin-left: auto; margin-right: auto;" src="/images/Blocchi_testo_8_IT.png" alt="" width="247" height="43" /> | Nome del nuovo blocco di testo. |
| <img style="display: block; margin-left: auto; margin-right: auto;" src="/images/Blocchi_testo_9_IT.png" alt="" width="227" height="65" /> | Contenuto del nuovo blocco di testo. |
| <img style="display: block; margin-left: auto; margin-right: auto;" src="/images/Blocchi_testo_10_IT.png" alt="" width="210" height="35" /> |
Testo generale per tutte le sezioni: selezionare questa opzione se si desidera definire questo blocco di testo come generale. Se il testo è generale significa che può essere utilizzato in tutti i campi Note del programma altrimenti il blocco può essere utilizzato solo nel campo Note dove è stato creato. |
| <img style="display: block; margin-left: auto; margin-right: auto;" src="/images/Blocchi_testo_11_IT.png" alt="" width="132" height="31" /> | Cancellare l'operazione. |
| <img style="display: block; margin-left: auto; margin-right: auto;" src="/images/Blocchi_testo_12_IT.png" alt="" width="130" height="33" /> | Salvare il blocco di testo. |
Se si desidera creare un nuovo blocco di testo come copia di uno già esistente, selezionare il blocco che si esidera copiare e scegliere l' opzione Crea copia di un testo selezionato dal menù a tendina dell'icona con il "+" verde (o premere Ctrl+C dalla tastiera). Si aprirà la seguente finestra:
| <img src="/images/Blocchi_testo_13_IT.png" alt="" width="575" height="693" /> |
Inizialmente, il nome, il contenuto del nuovo blocco e l'eventuale opzione di testo generale saranno identici a quelli relativi al blocco selezionato già esistente (quello di cui abbiamo creato una copia) ma tutti campi possono essere modificati.
E' anche possibile creare un nuovo blocco di testo usando una parte di un testo già esistente. Per farlo selezionare la parte del testo che si vuole copiare, premete tasto destro e scegliere l'opzione <a href="#top">Save text as new text block.</a> The following window will open:
 |
| <img src="/images/hint48.png" alt="" width="48" height="48" /> |
Remember to define the text block as General text block if you want to use it in all sections of MedITEX. |
Inserire blocco di testo
To insert a text block in the text you are typing, choose the position were you want to insert it, press right-click, choose the option Text blocks from the drop-down menu, select the text block you want to insert and click on the button Insert:
 |
| <a href="/index.php?title=MedITEX_IVF_how_to">Back to How to</a> | <a href="#top">Back to top</a> |