Come configurare le voci?
From MedITEX - Wiki
| (10 intermediate revisions by one user not shown) | |||
| Line 1: | Line 1: | ||
| − | <p>< | + | <p>Per modificare le <strong>Impostazioni </strong>dei <strong>Campi QM</strong> cliccare su <strong>Sistema -> Configurazione/Amministrazione -> Impostazioni -> Campi liberi/QM</strong><strong>.</strong></p> |
| − | <table | + | <table border="0"> |
<tbody> | <tbody> | ||
<tr> | <tr> | ||
| − | <td | + | <td>[[Image:Impostazioni_59_IT.png|none|740px|thumb|left|link=http://wiki.meditex-software.com/images/Impostazioni_59_IT.png| ]]<br /></td> |
</tr> | </tr> | ||
</tbody> | </tbody> | ||
</table> | </table> | ||
<p>__TOC__</p> | <p>__TOC__</p> | ||
| − | <h2>Staff | + | <h2>Selezione Staff</h2> |
<table style="margin-left: auto; margin-right: auto;" border="0"> | <table style="margin-left: auto; margin-right: auto;" border="0"> | ||
<tbody> | <tbody> | ||
<tr> | <tr> | ||
<td><img style="display: block; margin-left: auto; margin-right: auto;" src="/images/QMEdit.png" alt="" width="24" height="23" /></td> | <td><img style="display: block; margin-left: auto; margin-right: auto;" src="/images/QMEdit.png" alt="" width="24" height="23" /></td> | ||
| − | <td> | + | <td>Premere questo pulsante per<strong> aggiungere </strong>o<strong> modificare</strong> membri dello staff al campo QM.</td> |
</tr> | </tr> | ||
</tbody> | </tbody> | ||
| Line 20: | Line 20: | ||
<tbody> | <tbody> | ||
<tr> | <tr> | ||
| − | <td>[[Image: | + | <td>[[Image:Come_QM_1_IT.png|none|740px|thumb|left|link=http://wiki.meditex-software.com/images/Come_QM_1_IT.png| ]]</td> |
</tr> | </tr> | ||
</tbody> | </tbody> | ||
</table> | </table> | ||
<p style="text-align: justify;"> </p> | <p style="text-align: justify;"> </p> | ||
| − | <p style="text-align: justify;">In | + | <p style="text-align: justify;">In questa finestra si troveranno tutti i menbri dello staff inseriti in <strong><a href="/index.php?title=Come_aggiungere_una_persona_in_MedITEX_Administration%3F">MedITEX Administration</a></strong>.</p> |
<ol> | <ol> | ||
| − | <li style="text-align: justify;"> | + | <li style="text-align: justify;">Nella colonna di sisnistra, <strong>Staff disponibile</strong>, selezionare uno o più nomi (CTRL o Maiusc).</li> |
| − | <li style="text-align: justify;"><strong> | + | <li style="text-align: justify;"><strong>Premere la freccia a destra</strong></li> |
| − | <li style="text-align: justify;"> | + | <li style="text-align: justify;">I nomi selezionati saranno copiati nella colonna di destra, <strong>Staff Assegnato</strong>. </li> |
| − | + | </ol> | |
| − | </ol | + | |
| − | + | ||
<table border="0"> | <table border="0"> | ||
<tbody> | <tbody> | ||
<tr> | <tr> | ||
| − | <td><img src="/images/ | + | <td><img src="/images/Come_QM_2_IT.png" alt="" width="25" height="25" /></td> |
| − | <td | + | <td> |
| + | <p>Per <strong>eliminare</strong> un membro dello staff dal campo QM, selezionarlo dalla lista nella sezione <strong>Staff Assegnato</strong> e premere la freccia a sinistra. Se un membro dello staff è già stato assegnato ad un Campo QM in un ciclo, non può essere eliminato dalla lista <strong>Staff Assegnato</strong>.</p> | ||
| + | </td> | ||
</tr> | </tr> | ||
</tbody> | </tbody> | ||
</table> | </table> | ||
<p> </p> | <p> </p> | ||
| − | < | + | <ol> </ol> |
| − | + | <h2>Selezione materiale</h2> | |
| − | + | ||
| − | + | ||
| − | + | ||
| − | + | ||
| − | + | ||
| − | <h2> | + | |
| − | + | ||
<table style="margin-left: auto; margin-right: auto;" border="0"> | <table style="margin-left: auto; margin-right: auto;" border="0"> | ||
<tbody> | <tbody> | ||
<tr> | <tr> | ||
<td><img style="display: block; margin-left: auto; margin-right: auto;" src="/images/QMEdit.png" alt="" width="24" height="23" /></td> | <td><img style="display: block; margin-left: auto; margin-right: auto;" src="/images/QMEdit.png" alt="" width="24" height="23" /></td> | ||
| − | <td style="text-align: justify;"> | + | <td style="text-align: justify;">Premere questo pulsante per<strong> aggiungere </strong>o<strong> modificare</strong> materiali al campo QM.<br /></td> |
</tr> | </tr> | ||
</tbody> | </tbody> | ||
| Line 62: | Line 55: | ||
<tbody> | <tbody> | ||
<tr> | <tr> | ||
| − | <td>[[Image: | + | <td>[[Image:Come_QM_3_IT.png|none|740px|thumb|left|link=http://wiki.meditex-software.com/images/Come_QM_3_IT.png| ]]</td> |
</tr> | </tr> | ||
</tbody> | </tbody> | ||
</table> | </table> | ||
<p style="text-align: justify;"> </p> | <p style="text-align: justify;"> </p> | ||
| − | <p | + | <p>In questa finestra si troveranno tutti gli articoli utilizzabili inseriti nelle <strong><a href="/index.php?title=MedITEX_IVF_Impostazioni#Materiali">impostazioni</a></strong>.</p> |
<ol> | <ol> | ||
| − | <li | + | <li>Nella colonna di sisnistra, <strong>Articoli disponibili</strong>, selezionare uno o più articoli (CTRL o Maiusc).</li> |
| − | <li | + | <li><strong>Premere la freccia a destra</strong></li> |
| − | <li | + | <li>Gli articoli selezionati saranno copiati nella colonna di destra, <strong>Articoli Assegnati</strong>. </li> |
| − | + | </ol> | |
| − | </ol | + | |
| − | + | ||
<table border="0"> | <table border="0"> | ||
<tbody> | <tbody> | ||
<tr> | <tr> | ||
| − | <td><img src="/images/ | + | <td><img src="/images/Come_QM_2_IT.png" alt="" width="25" height="25" /> </td> |
| − | <td | + | <td>Per<strong> eliminare </strong>un articolo dal campo QM, selezionarlo dalla lista nella sezione <strong>Articoli Assegnati</strong> e premere la freccia a sinistra.<br />Se un articolo, o relativo lotto, è già stato assegnato ad un Campo QM in un ciclo, non può essere eliminato dalla lista<strong> Articoli Assegnati</strong>. </td> |
</tr> | </tr> | ||
</tbody> | </tbody> | ||
</table> | </table> | ||
<p> </p> | <p> </p> | ||
| − | < | + | <h2><span style="font-size: medium;">Assegnare valori</span></h2> |
| − | < | + | |
| − | + | ||
| − | + | ||
| − | + | ||
| − | + | ||
| − | + | ||
| − | + | ||
| − | + | ||
<table style="margin-left: auto; margin-right: auto;" border="0"> | <table style="margin-left: auto; margin-right: auto;" border="0"> | ||
<tbody> | <tbody> | ||
<tr> | <tr> | ||
<td><img style="display: block; margin-left: auto; margin-right: auto;" src="/images/QMEdit.png" alt="" width="24" height="23" /></td> | <td><img style="display: block; margin-left: auto; margin-right: auto;" src="/images/QMEdit.png" alt="" width="24" height="23" /></td> | ||
| − | <td style="text-align: justify;"> | + | <td style="text-align: justify;"><span>Premere questo pulsante per</span><strong> aggiungere </strong><span>o</span><strong> modificare</strong><span> opzioni dal menù a tendina di un campo QM.</span><br /></td> |
</tr> | </tr> | ||
</tbody> | </tbody> | ||
| Line 104: | Line 87: | ||
<tbody> | <tbody> | ||
<tr> | <tr> | ||
| − | <td>[[Image: | + | <td>[[Image:Come_QM_4_IT.png|none|740px|thumb|left|link=http://wiki.meditex-software.com/images/Come_QM_4_IT.png| ]]</td> |
</tr> | </tr> | ||
</tbody> | </tbody> | ||
</table> | </table> | ||
| − | <p style="text-align: justify;"> | + | <p style="text-align: justify;">Inserire le opzioni desiderate (es: si o no, mai, a volte, etc.) separandole premendo <strong>Invio</strong>. Ogni riga sarà un'opzione del menù a tendina.</p> |
| − | + | ||
| − | + | ||
<ul> | <ul> | ||
| − | |||
| − | |||
</ul> | </ul> | ||
<table style="float: right;" border="0"> | <table style="float: right;" border="0"> | ||
<tbody> | <tbody> | ||
<tr> | <tr> | ||
| − | <td style="text-align: right;"><a href="/index.php?title= | + | <td style="text-align: right;"><a href="/index.php?title=Manuale_MedITEX">Torna a Come Fare</a></td> |
| − | <td style="text-align: right;"><a href="#top"> | + | <td style="text-align: right;"><a href="#top">Inizio pagina</a></td> |
</tr> | </tr> | ||
</tbody> | </tbody> | ||
</table> | </table> | ||
Latest revision as of 15:16, 3 May 2016
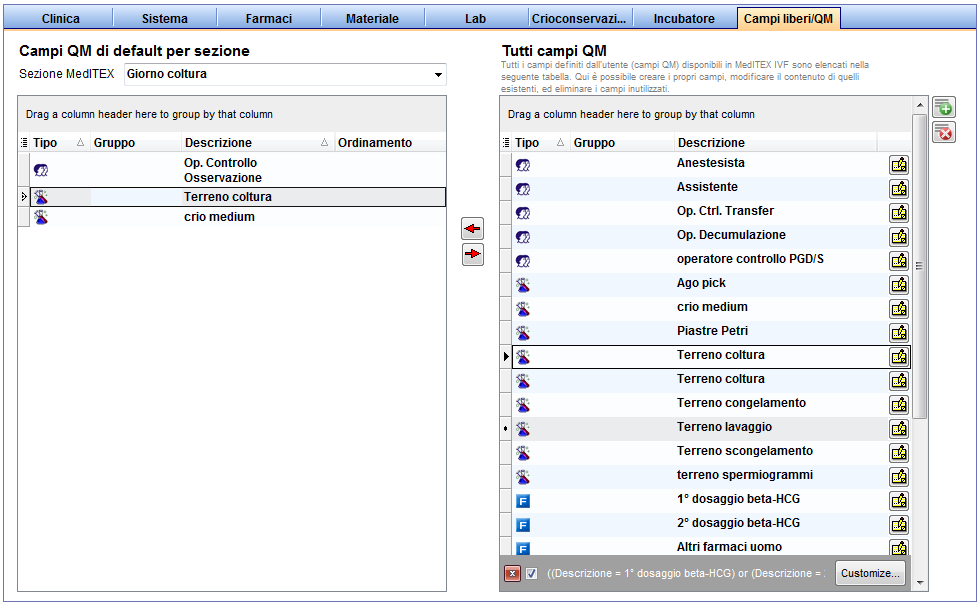
Per modificare le Impostazioni dei Campi QM cliccare su Sistema -> Configurazione/Amministrazione -> Impostazioni -> Campi liberi/QM.
 |
Contents |
Selezione Staff
| <img style="display: block; margin-left: auto; margin-right: auto;" src="/images/QMEdit.png" alt="" width="24" height="23" /> | Premere questo pulsante per aggiungere o modificare membri dello staff al campo QM. |
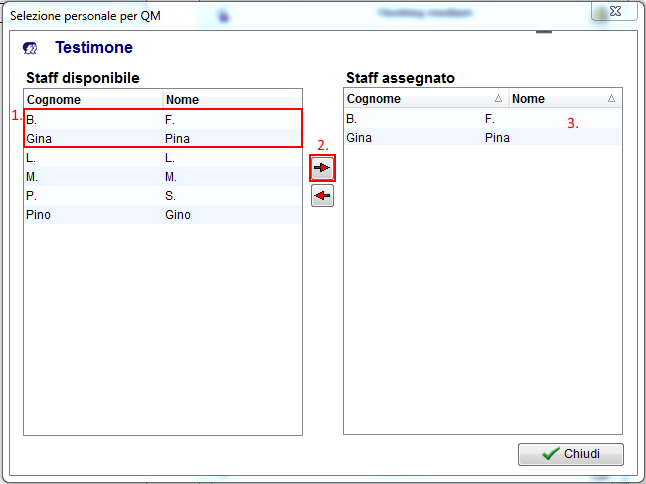 |
In questa finestra si troveranno tutti i menbri dello staff inseriti in <a href="/index.php?title=Come_aggiungere_una_persona_in_MedITEX_Administration%3F">MedITEX Administration</a>.
- Nella colonna di sisnistra, Staff disponibile, selezionare uno o più nomi (CTRL o Maiusc).
- Premere la freccia a destra
- I nomi selezionati saranno copiati nella colonna di destra, Staff Assegnato.
| <img src="/images/Come_QM_2_IT.png" alt="" width="25" height="25" /> |
Per eliminare un membro dello staff dal campo QM, selezionarlo dalla lista nella sezione Staff Assegnato e premere la freccia a sinistra. Se un membro dello staff è già stato assegnato ad un Campo QM in un ciclo, non può essere eliminato dalla lista Staff Assegnato. |
Selezione materiale
| <img style="display: block; margin-left: auto; margin-right: auto;" src="/images/QMEdit.png" alt="" width="24" height="23" /> | Premere questo pulsante per aggiungere o modificare materiali al campo QM. |
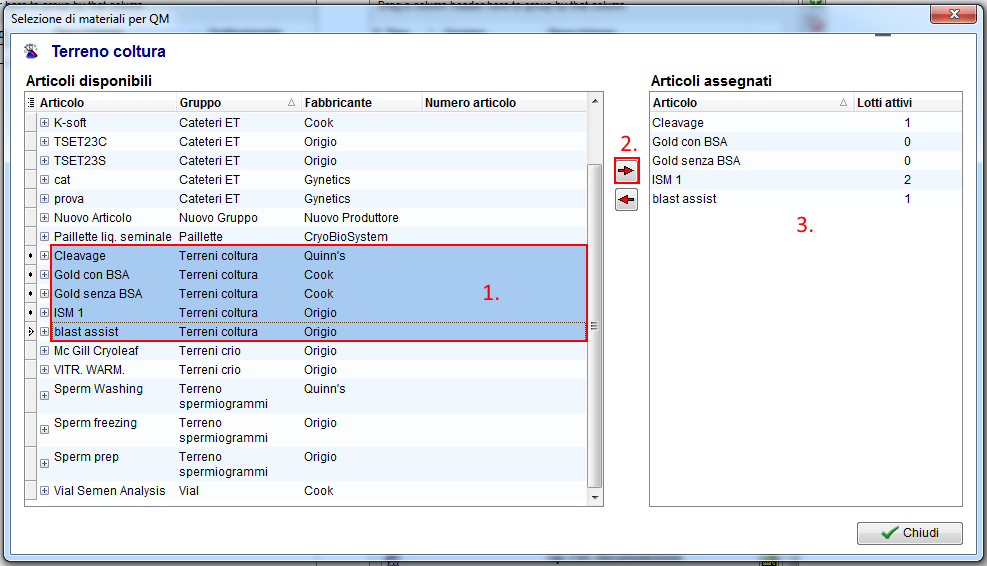 |
In questa finestra si troveranno tutti gli articoli utilizzabili inseriti nelle <a href="/index.php?title=MedITEX_IVF_Impostazioni#Materiali">impostazioni</a>.
- Nella colonna di sisnistra, Articoli disponibili, selezionare uno o più articoli (CTRL o Maiusc).
- Premere la freccia a destra
- Gli articoli selezionati saranno copiati nella colonna di destra, Articoli Assegnati.
| <img src="/images/Come_QM_2_IT.png" alt="" width="25" height="25" /> | Per eliminare un articolo dal campo QM, selezionarlo dalla lista nella sezione Articoli Assegnati e premere la freccia a sinistra. Se un articolo, o relativo lotto, è già stato assegnato ad un Campo QM in un ciclo, non può essere eliminato dalla lista Articoli Assegnati. |
Assegnare valori
| <img style="display: block; margin-left: auto; margin-right: auto;" src="/images/QMEdit.png" alt="" width="24" height="23" /> | Premere questo pulsante per aggiungere o modificare opzioni dal menù a tendina di un campo QM. |
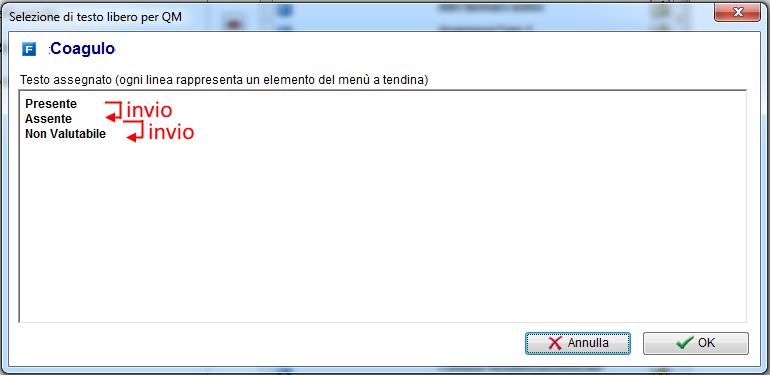 |
Inserire le opzioni desiderate (es: si o no, mai, a volte, etc.) separandole premendo Invio. Ogni riga sarà un'opzione del menù a tendina.
| <a href="/index.php?title=Manuale_MedITEX">Torna a Come Fare</a> | <a href="#top">Inizio pagina</a> |