Come aggiungere un nuovo paziente?
From MedITEX - Wiki
| Line 14: | Line 14: | ||
<tr> | <tr> | ||
<td> | <td> | ||
| − | <p>[[Image: | + | <p>[[Image:Patient_DataRed_ita.png|none|740px|thumb|left|link=http://wiki.meditex-software.com/images/Patient_DataRed_ita.png| ]]</p> |
</td> | </td> | ||
</tr> | </tr> | ||
| Line 23: | Line 23: | ||
<tbody> | <tbody> | ||
<tr> | <tr> | ||
| − | <td><img style="display: block; margin-left: auto; margin-right: auto;" src="/images/ | + | <td><img style="display: block; margin-left: auto; margin-right: auto;" src="/images/PatientMask_ita.png" alt="" width="553" height="196" /></td> |
<td> | <td> | ||
<p><strong>Personal data of the patient.</strong></p> | <p><strong>Personal data of the patient.</strong></p> | ||
| − | <p>A special field is the patient ID. It can be specified in the <a href="/index.php?title= | + | <p>A special field is the patient ID. It can be specified in the <a href="/index.php?title=Configurazione_di_MedITEX_Scheduler">settings</a> whether this is entered manually, or generated automatically according to certain rules.</p> |
</td> | </td> | ||
</tr> | </tr> | ||
<tr> | <tr> | ||
| − | <td><img style="display: block; margin-left: auto; margin-right: auto;" src="/images/ | + | <td><img style="display: block; margin-left: auto; margin-right: auto;" src="/images/Referrer_ita.png" alt="" width="553" height="199" /></td> |
<td> | <td> | ||
<p><strong>Referrer data and a possible notification order.</strong></p> | <p><strong>Referrer data and a possible notification order.</strong></p> | ||
Revision as of 18:21, 4 February 2013
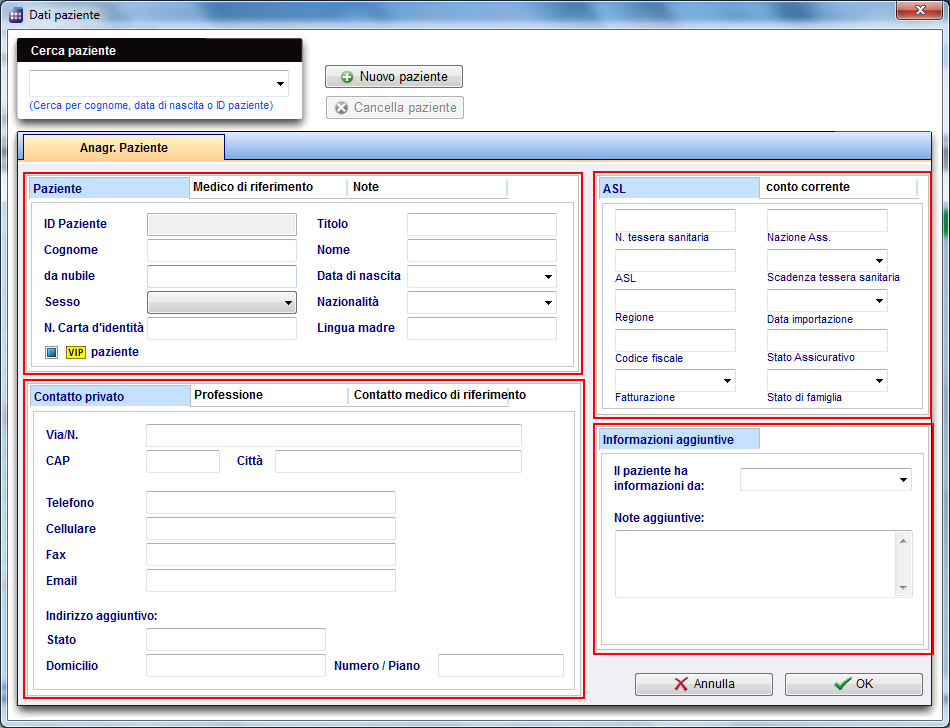
Per creare un nuovo paziente seguite questi passi :
Dalla barra di menu, aprire una maschera paziente vuota.
| <img style="display: block; margin-left: auto; margin-right: auto;" src="/images/Patients1Red_ita.png" alt="" /> |
E' possibile inserire immediatamente i dati.
Divideremo questa interfaccia in sezioni più piccole aventi funzionalità specifiche, al fine di spiegarne meglio il funzionamento.
 |
| <img style="display: block; margin-left: auto; margin-right: auto;" src="/images/PatientMask_ita.png" alt="" width="553" height="196" /> |
Personal data of the patient. A special field is the patient ID. It can be specified in the <a href="/index.php?title=Configurazione_di_MedITEX_Scheduler">settings</a> whether this is entered manually, or generated automatically according to certain rules. |
| <img style="display: block; margin-left: auto; margin-right: auto;" src="/images/Referrer_ita.png" alt="" width="553" height="199" /> |
Referrer data and a possible notification order. Here the consulting doctor will be added. In order to select a doctor, it must be in the Consulting doctors list in MEDITEX IVF. Place a checkmark if the consulting doctor should be notified. |
| <img style="display: block; margin-left: auto; margin-right: auto;" src="/images/NotesPatient.png" alt="" width="562" height="209" /> | Here, notes or important information are added. |
| <img style="display: block; margin-left: auto; margin-right: auto;" src="/images/ContactPrivate.png" alt="" width="551" height="306" /> | Personal contact data of the patient, like phone number, street, city, etc. |
| <img style="display: block; margin-left: auto; margin-right: auto;" src="/images/Professional.png" alt="" width="547" height="309" /> | Professional contact data. |
| <img style="display: block; margin-left: auto; margin-right: auto;" src="/images/ContactReferrer.png" alt="" width="552" height="197" /> |
Contact data of the consulting doctor. This information will be automatically supplemented by MedITEX IVF. |
| <img style="float: left;" src="/images/HealthInsurance.png" alt="" width="330" height="238" /> | Important data of the health insurance. |
| <img style="float: left;" src="/images/BankAccount.png" alt="" width="329" height="238" /> | Data of the bank account of the patient. |
| <img style="float: left;" src="/images/AdditionalInformation.png" alt="" width="330" height="220" /> | Additional informations. |
| <a href="/index.php?title=MedITEX_Scheduler_come...">Torna a MedITEX Scheduler come...</a> | <a href="#top">Torna in alto</a> |