Come aggiungere un nuovo criocontenitore nella Criobanca?
From MedITEX - Wiki
(Difference between revisions)
| (2 intermediate revisions by one user not shown) | |||
| Line 1: | Line 1: | ||
| − | <p> | + | <p>Nella barra dei menù cliccare su <strong>Sistema -> Configurazione /Amministrazione -> Impostazioni -> Crioconservazione</strong></p> |
<table style="margin-left: auto; margin-right: auto;" border="0"> | <table style="margin-left: auto; margin-right: auto;" border="0"> | ||
<tbody> | <tbody> | ||
<tr> | <tr> | ||
| − | <td>[[Image: | + | <td>[[Image:Impostazioni_53_IT.png|none|740px|thumb|left|link=http://wiki.meditex-software.com/images/Impostazioni_53_IT.png| ]]</td> |
</tr> | </tr> | ||
</tbody> | </tbody> | ||
| Line 12: | Line 12: | ||
<tr> | <tr> | ||
<td><img style="display: block; margin-left: auto; margin-right: auto;" src="/images/Plus.png" alt="" /></td> | <td><img style="display: block; margin-left: auto; margin-right: auto;" src="/images/Plus.png" alt="" /></td> | ||
| − | <td> | + | <td>Premere questo pulsante nella tabella sulla sinistra, per aggiungere un criocontenitore.<br /></td> |
</tr> | </tr> | ||
</tbody> | </tbody> | ||
| Line 20: | Line 20: | ||
<tbody> | <tbody> | ||
<tr> | <tr> | ||
| − | <td>[[Image: | + | <td>[[Image:Impostazioni_56_IT.png|none|740px|thumb|left|link=http://wiki.meditex-software.com/images/Impostazioni_56_IT.png| ]]</td> |
</tr> | </tr> | ||
</tbody> | </tbody> | ||
| Line 28: | Line 28: | ||
</ul> | </ul> | ||
<ul> | <ul> | ||
| − | <li> | + | <li>Inserire il nome dell'unità nel campo <strong>Descrizione</strong>.</li> |
</ul> | </ul> | ||
<ul> | <ul> | ||
| − | <li> | + | <li>Selezionare <strong>Gin, Andro</strong> o entrambi nella sezione <strong>Tipo</strong>, in base al tipo di materiale che verrà crioconservato in questa unità.</li> |
</ul> | </ul> | ||
<ul> | <ul> | ||
| − | <li> | + | <li>Inserire il numero massimo di campioni che potranno essere inseriti nell'<strong>ultimo livello</strong> di crioconservazione (il termine "livello di crioconservazione" rappresenta un livello nella struttura gerarchica della criobanca). nserire i livelli muovendosi da sinistra a destra- se la vostra criobanca è costituita da meno di 3 livelli gerarchici, lasciare l'ultima colonna di destra vuota, mai le colonne sulla sinistra.</li> |
| + | <li>Premere <span style="white-space: pre;"><img src="/images/Come_aggiungere_Crio_1_IT.PNG" alt="" width="49" height="32" /> </span>per salvare le informazioni inserite.</li> | ||
</ul> | </ul> | ||
<ul> | <ul> | ||
| − | <li> | + | <li>Infine Inserire/modificare/eliminare i componenti dei vari livelli <img src="/images/Come_aggiungere_Crio_2_IT.PNG" alt="" width="42" height="85" />.</li> |
</ul> | </ul> | ||
| − | < | + | <p> </p> |
| − | + | ||
| − | + | ||
| − | + | ||
| − | + | ||
| − | + | ||
| − | + | ||
| − | </ | + | |
<table style="float: right;" border="0"> | <table style="float: right;" border="0"> | ||
<tbody> | <tbody> | ||
<tr> | <tr> | ||
| − | <td style="text-align: right;"><a href="/index.php?title= | + | <td style="text-align: right;"><a href="/index.php?title=Manuale_MedITEX">Torna a Come fare</a></td> |
| − | <td style="text-align: right;"><a href="#top"> | + | <td style="text-align: right;"><a href="#top">Inizio pagina</a></td> |
</tr> | </tr> | ||
</tbody> | </tbody> | ||
</table> | </table> | ||
| + | <p> </p> | ||
| + | <p> </p> | ||
<p><span class="mw-headline"><br /></span></p> | <p><span class="mw-headline"><br /></span></p> | ||
Latest revision as of 12:22, 27 April 2016
Nella barra dei menù cliccare su Sistema -> Configurazione /Amministrazione -> Impostazioni -> Crioconservazione
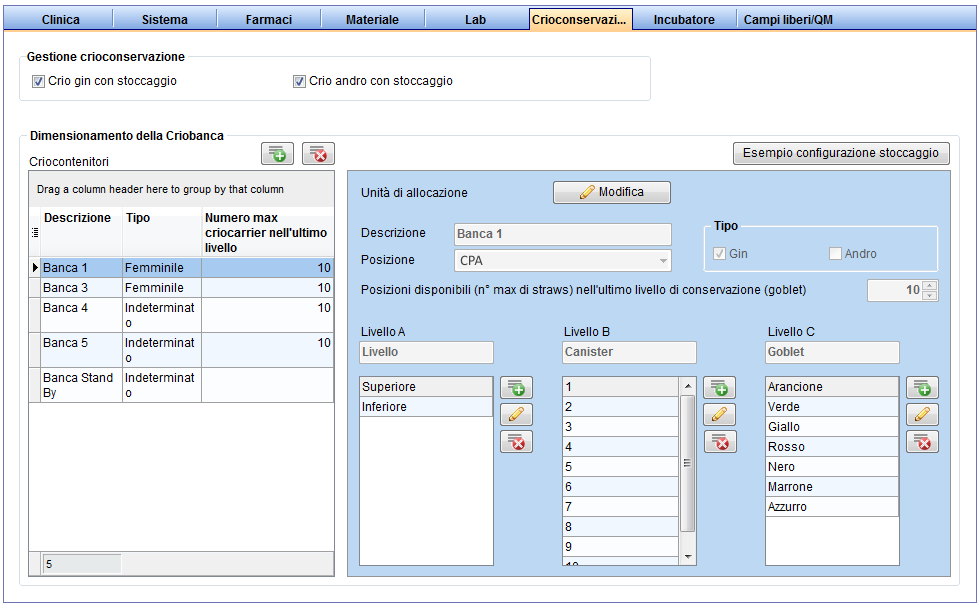 |
| <img style="display: block; margin-left: auto; margin-right: auto;" src="/images/Plus.png" alt="" /> | Premere questo pulsante nella tabella sulla sinistra, per aggiungere un criocontenitore. |
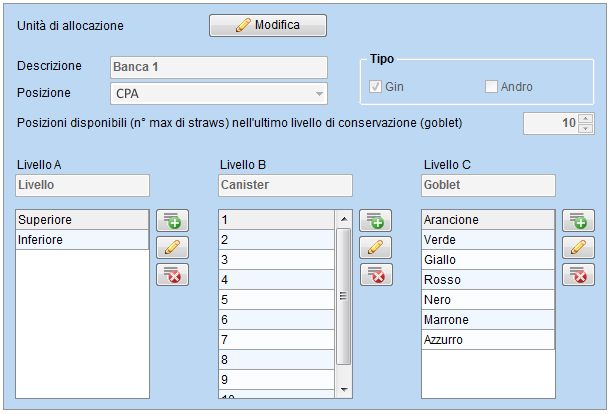 |
- Inserire il nome dell'unità nel campo Descrizione.
- Selezionare Gin, Andro o entrambi nella sezione Tipo, in base al tipo di materiale che verrà crioconservato in questa unità.
- Inserire il numero massimo di campioni che potranno essere inseriti nell'ultimo livello di crioconservazione (il termine "livello di crioconservazione" rappresenta un livello nella struttura gerarchica della criobanca). nserire i livelli muovendosi da sinistra a destra- se la vostra criobanca è costituita da meno di 3 livelli gerarchici, lasciare l'ultima colonna di destra vuota, mai le colonne sulla sinistra.
- Premere <img src="/images/Come_aggiungere_Crio_1_IT.PNG" alt="" width="49" height="32" /> per salvare le informazioni inserite.
- Infine Inserire/modificare/eliminare i componenti dei vari livelli <img src="/images/Come_aggiungere_Crio_2_IT.PNG" alt="" width="42" height="85" />.
| <a href="/index.php?title=Manuale_MedITEX">Torna a Come fare</a> | <a href="#top">Inizio pagina</a> |