Come aggiungere un nuovo appuntamento ad una lista di appuntamenti?
From MedITEX - Wiki
| Line 1: | Line 1: | ||
| − | <p><span id="result_box" lang="en"><span class="hps"> | + | <p>Ci sono due modi per inserire appuntamenti nella lista degli appuntamenti:<span id="result_box" lang="en"><span class="hps"> </span></span></p> |
<p><span lang="en"><span class="hps"><br /></span></span></p> | <p><span lang="en"><span class="hps"><br /></span></span></p> | ||
| − | <p><strong>1. | + | <p><strong>1. Lista degli appuntamenti di un paziente selezionato</strong></p> |
<table style="margin-left: auto; margin-right: auto;" border="0"> | <table style="margin-left: auto; margin-right: auto;" border="0"> | ||
<tbody> | <tbody> | ||
<tr> | <tr> | ||
| − | <td><img src="/images/ | + | <td><img src="/images/JohnRed_ita.png" alt="" width="322" height="145" /></td> |
</tr> | </tr> | ||
</tbody> | </tbody> | ||
</table> | </table> | ||
<p style="text-align: justify;"> </p> | <p style="text-align: justify;"> </p> | ||
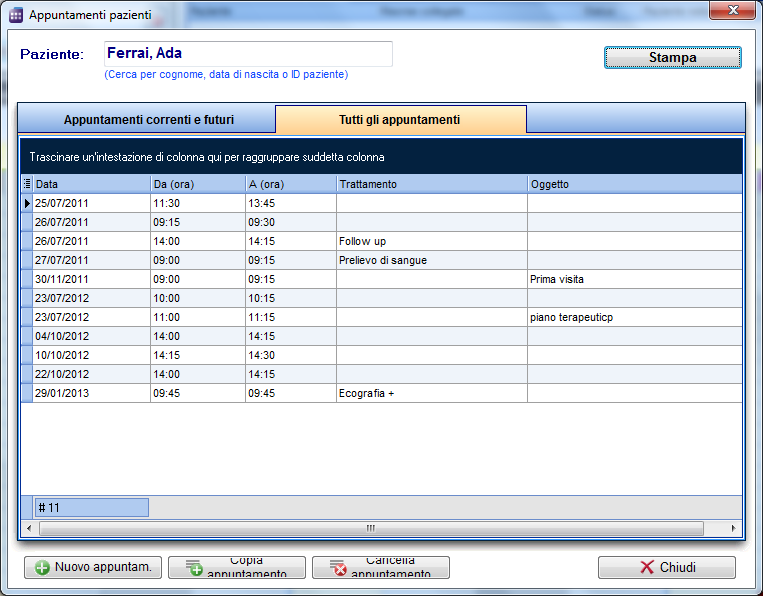
| − | <p style="text-align: justify;"> | + | <p style="text-align: justify;">Per vedere tutti gli appuntamenti di un paziente, utilizzare il tasto <strong>Lista appuntamenti </strong>sotto la barra di ricerca dei pazienti. Nella <strong>prima scheda </strong>sono mostrati tutti gli appuntamenti correnti e futuri del paziente slezionato. Nela scheda <strong>Tutti gli appuntamenti </strong>sarà disponibile una panoramica di tutti gli appuntamenti con questo paziente inclusi quelli passati. </p> |
<table style="margin-left: auto; margin-right: auto;" border="0"> | <table style="margin-left: auto; margin-right: auto;" border="0"> | ||
<tbody> | <tbody> | ||
<tr> | <tr> | ||
| − | <td>[[Image: | + | <td>[[Image:AppointmentsOfPatient_Current_ita.png|none|740px|thumb|left|link=http://wiki.meditex-software.com/images/AppointmentsOfPatient_Current_ita.png|Appuntamenti attuali e futuri]]</td> |
</tr> | </tr> | ||
</tbody> | </tbody> | ||
| Line 71: | Line 71: | ||
<table style="float: right;" border="0"> | <table style="float: right;" border="0"> | ||
<tbody> | <tbody> | ||
| − | <tr><td style="text-align: right;"><a href="/index.php?title=MedITEX_Scheduler_come...">Torna a MedITEX Scheduler come...</a></td> | + | <tr> |
| + | <td style="text-align: right;"><a href="/index.php?title=MedITEX_Scheduler_come...">Torna a MedITEX Scheduler come...</a></td> | ||
<td style="text-align: right;"><a href="#top">Torna in alto</a></td> | <td style="text-align: right;"><a href="#top">Torna in alto</a></td> | ||
</tr> | </tr> | ||
Revision as of 17:14, 5 February 2013
Ci sono due modi per inserire appuntamenti nella lista degli appuntamenti:
1. Lista degli appuntamenti di un paziente selezionato
| <img src="/images/JohnRed_ita.png" alt="" width="322" height="145" /> |
Per vedere tutti gli appuntamenti di un paziente, utilizzare il tasto Lista appuntamenti sotto la barra di ricerca dei pazienti. Nella prima scheda sono mostrati tutti gli appuntamenti correnti e futuri del paziente slezionato. Nela scheda Tutti gli appuntamenti sarà disponibile una panoramica di tutti gli appuntamenti con questo paziente inclusi quelli passati.
 |
From this window, you can open the appointment by simply double-clicking its row. You can delete appointments, create new, or copy existing ones.
Usually if you double click on a patient appointment, the appointment editor opens with all details on the right side of the Scheduler. But it is possible to change its settings so instead, the appointment list of current patient opens on a double-click. The advantage is that you get an overview of all appointments of this patient before you edit, delete or create a new appointment.
2. Appointment list by resource
| Click on Appointment list / print at the top left corner of the main window to open a list with all appointments from today. | |
| <img src="/images/fig56.png" alt="" width="259" height="139" /> | <img style="display: block; margin-left: auto; margin-right: auto;" src="/images/fig57.png" alt="" width="358" height="188" /> |
By default, the appointment list can be viewed for all resources, but you can also filter the appointments by certain resources. Additionally, the time period for the selection can also be adjusted.
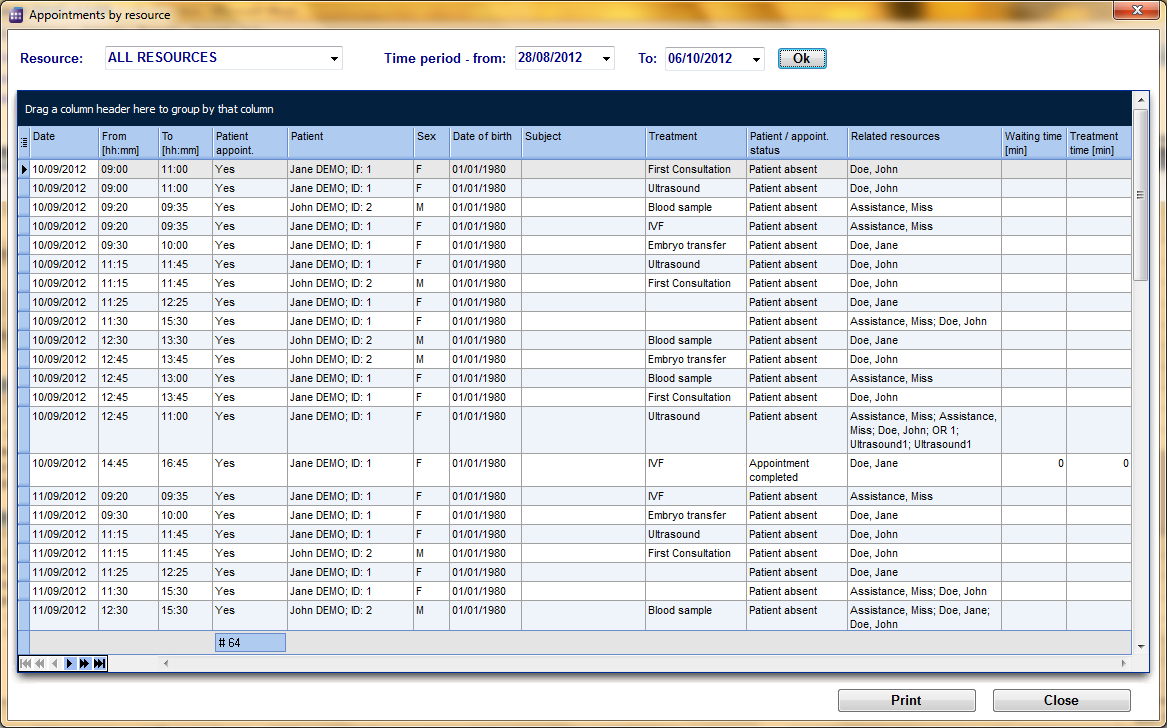 |
The first column gives you the opportunity to show or hide columns. Therefore, just click on the column header and check the boxes of the required columns that you want to see.
|
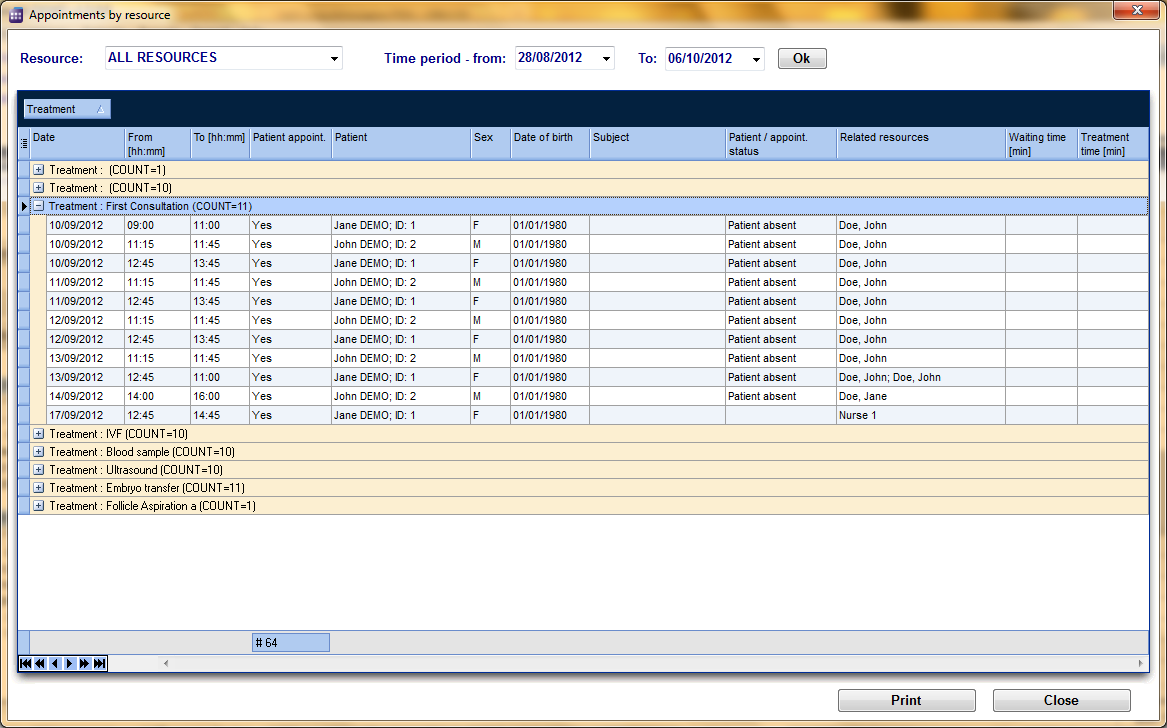
The values shown in each column can be sorted with a click on the column header. You can also group the table content by moving column headers into the dark blue area on the top. For example: you want to see how many appointments were scheduled with a specific treatment. You drag the column Treatment and drop it in the blue area, and all appointments will be grouped by treatment. Every header of the group now contains the treatment and the number of appointments. |
<img src="/images/fig59.png" alt="" width="285" height="288" /> |
 |
Use the button Print at the right bottom of the window in order to print the list as you have defined it.
By double-clicking a row, you open that appointment in the editor.
| <a href="/index.php?title=MedITEX_Scheduler_come...">Torna a MedITEX Scheduler come...</a> | <a href="#top">Torna in alto</a> |