Coltura
From MedITEX - Wiki
| Line 206: | Line 206: | ||
<p> </p> | <p> </p> | ||
<h3>Selezionare diversi ovociti/embrioni</h3> | <h3>Selezionare diversi ovociti/embrioni</h3> | ||
| − | <p style="text-align: justify;"> | + | <p style="text-align: justify;">Ci sono due modi per selezionare più di una cellula alla volta</p> |
<table style="margin-left: auto; margin-right: auto;" border="0"> | <table style="margin-left: auto; margin-right: auto;" border="0"> | ||
<tbody> | <tbody> | ||
| Line 213: | Line 213: | ||
<td> | <td> | ||
<ul> | <ul> | ||
| − | <li> | + | <li>Questa funzionalità può essere utilizzata per selezionare cellule nello stesso giorno di coltura.</li> |
| − | <li> | + | <li>Questa funzionalità permette di risparmiare molto tempo se si intende crioconservare o inserire lo stesso stadio a diverse cellule.</li> |
</ul> | </ul> | ||
</td> | </td> | ||
| Line 225: | Line 225: | ||
<tr> | <tr> | ||
<td><img src="/images/Oo2.png" alt="" /></td> | <td><img src="/images/Oo2.png" alt="" /></td> | ||
| − | <td style="text-align: justify;"> | + | <td style="text-align: justify;">Tenere premuto <strong>Ctrl nella tastiera</strong> e con il mouse selezionare diverse cellule nello stesso giorno.</td> |
</tr> | </tr> | ||
<tr> | <tr> | ||
<td><img src="/images/Oo1.png" alt="" /></td> | <td><img src="/images/Oo1.png" alt="" /></td> | ||
<td style="text-align: justify;"><ol> | <td style="text-align: justify;"><ol> | ||
| − | <li> | + | <li>Selezionare la prima cellula e tenere premuto il tasto <strong>Maiusc</strong>;</li> |
| − | <li> | + | <li>Selezionare l'ultima cellula;<strong> </strong></li> |
| − | <li> | + | <li>Tutte le cellule tra la prima e l'ultima verranno selezionate.</li> |
</ol></td> | </ol></td> | ||
</tr> | </tr> | ||
| Line 239: | Line 239: | ||
<p> </p> | <p> </p> | ||
<h3>Documentare ovociti/embrioni</h3> | <h3>Documentare ovociti/embrioni</h3> | ||
| − | <p> | + | <p>Nella rappresentazione grafica ci sono <strong>tre modi per modificare</strong> le informazioni delle cellule:</p> |
| − | <h4><strong>1.</strong> <strong> | + | <h4><strong>1.</strong> <strong>Pannello di destra</strong>.</h4> |
| − | <p> | + | <p>Questo è il modo più veloce per inserire i dati. Nella tabella è possibile vedere tutti i dati disponibili per le <strong>cellule selezionate </strong>e inserire/modificare a piacere semplicemente cambiando i campi desiderati.</p> |
| − | <p> | + | <p>Per modificare le informazioni inserite per ovociti/embrioni è sufficiente quindi selezionare la cellula dalla <strong>Rappresentazione Grafica </strong>e inserire le informazioni nel <strong>pannello di destra.</strong></p> |
| + | <p>Da questo pannello, selezionando più di una cellula alla volta utilizzando i tasti <strong>CTRL</strong> o <strong>Shift </strong>(le cellule devono appartenere allo stesso giorno di coltura), è possibile aggiungere le stesse informazioni a tutte le cellule selezionate, contemporaneamente.</p> | ||
<table style="margin-left: auto; margin-right: auto;" border="0"> | <table style="margin-left: auto; margin-right: auto;" border="0"> | ||
<tbody> | <tbody> | ||
| Line 255: | Line 256: | ||
<tr> | <tr> | ||
<td><a href="/index.php?title=Cycle_Culture#Select_several_oocytes_.2F_embryos"><img src="/images/hint48.png" alt="" width="48" height="48" /></a></td> | <td><a href="/index.php?title=Cycle_Culture#Select_several_oocytes_.2F_embryos"><img src="/images/hint48.png" alt="" width="48" height="48" /></a></td> | ||
| − | <td><a href="/index.php?title= | + | <td><a href="/index.php?title=Coltura#Selezionare_diversi_ovociti.2Fembrioni">Cliccare qui</a> per maggiorni informazioni su come selezionare più cellule.</td> |
</tr> | </tr> | ||
</tbody> | </tbody> | ||
</table> | </table> | ||
<p> </p> | <p> </p> | ||
| − | <h4><strong>2. | + | <h4><strong>2. Doppio-click</strong></h4> |
| − | <p><strong> | + | <p>Facendo <strong>doppio-click</strong> su una cellula sarà possibile inserire lo stadio della cellula, il punteggio, note, foto, informazioni riguardanti l'assisted hatching e l'incubatore.</p> |
| − | + | ||
<table style="margin-left: auto; margin-right: auto;" border="0"> | <table style="margin-left: auto; margin-right: auto;" border="0"> | ||
<tbody> | <tbody> | ||
| Line 275: | Line 275: | ||
<tr> | <tr> | ||
<td><img src="/images/howto48.png" alt="" width="48" height="48" /></td> | <td><img src="/images/howto48.png" alt="" width="48" height="48" /></td> | ||
| − | <td> | + | <td>Per maggiorni informazioni sulla Rappresentazione Grafica consultare il nostro <a href="/index.php?title=How_to_cultivate_oocytes_with_the_Graphical_representation_tab%3F">Come fare</a>.</td> |
</tr> | </tr> | ||
</tbody> | </tbody> | ||
</table> | </table> | ||
<p> </p> | <p> </p> | ||
| − | <h4><strong>3. | + | <h4><strong>3. Click tasto destro</strong></h4> |
| − | <p><strong> | + | <p>Cliccando sulla cellula desiderata con il <strong>tasto destro </strong>il menù a tendina rappresentato in figura si aprirà, qui potrete associare uno stadio alla cellula, crioconservarla, associare l'incubatore etc.</p> |
| − | + | ||
<table style="margin-left: auto; margin-right: auto;" border="0"> | <table style="margin-left: auto; margin-right: auto;" border="0"> | ||
<tbody> | <tbody> | ||
| Line 288: | Line 287: | ||
<td><img src="/images/graph6.png" alt="" /></td> | <td><img src="/images/graph6.png" alt="" /></td> | ||
<td> | <td> | ||
| − | <p><strong> | + | <p><strong>Tutti i cambiamenti</strong> effettuati qui verranno automaticamente inseriti nella <strong>rappresentazione tabellare</strong>! Tutavia controllare se qualche campo ha lo sfondo <strong>rosso </strong>e <strong>correggere</strong> le informazioni in modo da ottenere la somma corretta.</p> |
</td> | </td> | ||
</tr> | </tr> | ||
| Line 298: | Line 297: | ||
<tr> | <tr> | ||
<td><a href="/index.php?title=How_to_cultivate_oocytes_with_the_Graphical_representation_tab%3F"><img src="/images/howto48.png" alt="" width="48" height="48" /></a></td> | <td><a href="/index.php?title=How_to_cultivate_oocytes_with_the_Graphical_representation_tab%3F"><img src="/images/howto48.png" alt="" width="48" height="48" /></a></td> | ||
| − | <td><a href="/index.php?title=How_to_cultivate_oocytes_with_the_Graphical_representation_tab%3F"> | + | <td><a href="/index.php?title=How_to_cultivate_oocytes_with_the_Graphical_representation_tab%3F">Cliccare qui</a> per maggiori informazioni sulla <strong>Rappresentazione Grafica</strong>.</td> |
</tr> | </tr> | ||
</tbody> | </tbody> | ||
</table> | </table> | ||
<p> </p> | <p> </p> | ||
| − | <h3> | + | <h3>Stati delle cellule</h3> |
<table style="margin-left: auto; margin-right: auto;" border="0"> | <table style="margin-left: auto; margin-right: auto;" border="0"> | ||
<tbody> | <tbody> | ||
| Line 309: | Line 308: | ||
<td><img src="/images/o0.png" alt="" width="55" height="38" /></td> | <td><img src="/images/o0.png" alt="" width="55" height="38" /></td> | ||
<td> | <td> | ||
| − | <p><strong> | + | <p><strong>Sconosciuta</strong>:</p> |
| − | <p> | + | <p>Cellule per le quali nessuno stadio è stato associato.</p> |
</td> | </td> | ||
</tr> | </tr> | ||
| Line 316: | Line 315: | ||
<td><img src="/images/o1.png" alt="" /></td> | <td><img src="/images/o1.png" alt="" /></td> | ||
<td> | <td> | ||
| − | <p><strong> | + | <p><strong>Scartata</strong>:</p> |
| − | <p> | + | <p>Cellule scartate sono contrassegnate da una x rossa.</p> |
</td> | </td> | ||
</tr> | </tr> | ||
| Line 323: | Line 322: | ||
<td><img src="/images/o2.png" alt="" /></td> | <td><img src="/images/o2.png" alt="" /></td> | ||
<td> | <td> | ||
| − | <p><strong> | + | <p><strong>Crioconservata</strong>:<strong><br /></strong></p> |
| − | <p style="text-align: justify;"> | + | <p style="text-align: justify;">Cellule crioconservate sono contrassegnate da un fiocco di neve.</p> |
</td> | </td> | ||
</tr> | </tr> | ||
| Line 330: | Line 329: | ||
<td><img src="/images/thaw.PNG" alt="" width="55" height="38" /></td> | <td><img src="/images/thaw.PNG" alt="" width="55" height="38" /></td> | ||
<td> | <td> | ||
| − | <p><strong> | + | <p><strong>Scongelata:</strong></p> |
| − | <p> | + | <p>Cellule scongelate sono contrassegnate da un fiocco di neve sciolto.</p> |
</td> | </td> | ||
</tr> | </tr> | ||
| Line 337: | Line 336: | ||
<td><img src="/images/o3.png" alt="" /></td> | <td><img src="/images/o3.png" alt="" /></td> | ||
<td style="text-align: left;"> | <td style="text-align: left;"> | ||
| − | <p><strong> | + | <p><strong>Selezionata per transfer</strong>:</p> |
| − | <p> | + | <p>2PN selezionabili per il transfer sono contrassegnati da un cerchio verde. </p> |
</td> | </td> | ||
</tr> | </tr> | ||
| Line 344: | Line 343: | ||
<td><img src="/images/group.png" alt="" width="55" height="38" /></td> | <td><img src="/images/group.png" alt="" width="55" height="38" /></td> | ||
<td> | <td> | ||
| − | <p><strong> | + | <p><strong>Gruppi ovociti:</strong></p> |
| − | <p> | + | <p>Se sulla destra della cellula sono presenti delle linee colorate, la cellula fà parte di un gruppo di ovociti/embrioni.</p> |
</td> | </td> | ||
</tr> | </tr> | ||
| Line 351: | Line 350: | ||
<td><img src="/images/o4.png" alt="" /></td> | <td><img src="/images/o4.png" alt="" /></td> | ||
<td> | <td> | ||
| − | <p><strong> | + | <p><strong>Morfologia ideale per transfer</strong>:</p> |
| − | <p> | + | <p>Cellule, con morfologia ideale, da trasferire sono contrassegnate con il simbolo <strong>ET</strong> (verde).</p> |
</td> | </td> | ||
</tr> | </tr> | ||
| Line 358: | Line 357: | ||
<td><img src="/images/et.PNG" alt="" width="55" height="38" /></td> | <td><img src="/images/et.PNG" alt="" width="55" height="38" /></td> | ||
<td> | <td> | ||
| − | <p><strong> | + | <p><strong>Morfologia non ideale per transfer</strong>:</p> |
| − | <p> | + | <p>Cellule, con morfologia non ideale, da trasferire sono contrassegnate con il simbolo <strong>ET</strong> (arancione).</p> |
</td> | </td> | ||
</tr> | </tr> | ||
| Line 365: | Line 364: | ||
<td><img src="/images/o7.png" alt="" /></td> | <td><img src="/images/o7.png" alt="" /></td> | ||
<td> | <td> | ||
| − | <p><strong>In | + | <p><strong>In arresto</strong>:<strong> </strong></p> |
| − | <p> | + | <p>Cellule che hanno smesso di svilupparsi.<strong><br /></strong></p> |
</td> | </td> | ||
</tr> | </tr> | ||
| Line 372: | Line 371: | ||
<td><img src="/images/Donation_Donated.png" alt="" width="55" height="38" /></td> | <td><img src="/images/Donation_Donated.png" alt="" width="55" height="38" /></td> | ||
<td> | <td> | ||
| − | <p><strong> | + | <p><strong>Donazione - Donata:</strong></p> |
| − | <p> | + | <p>Cellule donate sono contrassegnate con una freccia verde a destra.</p> |
</td> | </td> | ||
</tr> | </tr> | ||
| Line 379: | Line 378: | ||
<td><img src="/images/Donation_received.png" alt="" width="55" height="38" /></td> | <td><img src="/images/Donation_received.png" alt="" width="55" height="38" /></td> | ||
<td> | <td> | ||
| − | <p><strong> | + | <p><strong>Donazione - Ricevuta:</strong></p> |
| − | <p> | + | <p>Cellule ricevute sono contrassegnate con una freccia verde a sinistra.</p> |
</td> | </td> | ||
</tr> | </tr> | ||
| Line 387: | Line 386: | ||
<td> | <td> | ||
<p><strong>PBD</strong>:</p> | <p><strong>PBD</strong>:</p> | ||
| − | <p style="text-align: justify;"> | + | <p style="text-align: justify;">Cellule soggette a diagnosi del corpo polare.</p> |
</td> | </td> | ||
</tr> | </tr> | ||
| Line 393: | Line 392: | ||
<td><img src="/images/o10.png" alt="" width="55" height="38" /></td> | <td><img src="/images/o10.png" alt="" width="55" height="38" /></td> | ||
<td> | <td> | ||
| − | <p><strong>PGD</strong>:</p> | + | <p><strong>PGD-PGS</strong>:</p> |
| − | <p> | + | <p><span>Cellule soggette a diagnosi/screening genetica/o pre-impianto.</span></p> |
</td> | </td> | ||
</tr> | </tr> | ||
| Line 401: | Line 400: | ||
<td> | <td> | ||
<p><strong>Assisted hatching</strong>:</p> | <p><strong>Assisted hatching</strong>:</p> | ||
| − | <p> | + | <p>Celllule sottoposte all' assisted hatching.</p> |
</td> | </td> | ||
</tr> | </tr> | ||
| Line 408: | Line 407: | ||
<td> | <td> | ||
<p><strong>IVF</strong>:</p> | <p><strong>IVF</strong>:</p> | ||
| − | <p> | + | <p>Metodo utilizzato per l'inseminazione.</p> |
</td> | </td> | ||
</tr> | </tr> | ||
| Line 415: | Line 414: | ||
<td> | <td> | ||
<p><strong>ICSI</strong>:</p> | <p><strong>ICSI</strong>:</p> | ||
| − | <p> | + | <p>Metodo utilizzato per l'inseminazione.</p> |
</td> | </td> | ||
</tr> | </tr> | ||
| Line 427: | Line 426: | ||
<td> | <td> | ||
<ul> | <ul> | ||
| − | <li style="text-align: justify;"><strong><span style="color: #ff0000;"> | + | <li style="text-align: justify;"><strong><span style="color: #ff0000;">Attenzione</span></strong><span style="color: #ff0000;"> </span>: se si attiva la <strong>Rappresentazione tabella</strong>, le informazioni dettagliate di ogni singola cellula verranno perse.</li> |
</ul> | </ul> | ||
<ul> | <ul> | ||
| − | <li style="text-align: justify;"> | + | <li style="text-align: justify;">L'ordine per la documentazione dello stadio è sempre da sinistra a destra. Indicare prima sempre lo stadio, e modificarlo <span>successivamente </span>se necessario.</li> |
</ul> | </ul> | ||
</td> | </td> | ||
| Line 436: | Line 435: | ||
<tr> | <tr> | ||
<td><a href="/index.php?title=How_to_cultivate_oocytes_with_the_Graphical_representation_tab%3F"><img src="/images/howto48.png" alt="" width="48" height="48" /></a></td> | <td><a href="/index.php?title=How_to_cultivate_oocytes_with_the_Graphical_representation_tab%3F"><img src="/images/howto48.png" alt="" width="48" height="48" /></a></td> | ||
| − | <td><a href="/index.php?title=How_to_cultivate_oocytes_with_the_Graphical_representation_tab%3F"> | + | <td><a href="/index.php?title=How_to_cultivate_oocytes_with_the_Graphical_representation_tab%3F">Cliccare qui</a> per maggiori informazioni sulla <strong>Rappresentazione Grafica</strong>.</td> |
</tr> | </tr> | ||
</tbody> | </tbody> | ||
</table> | </table> | ||
<p> </p> | <p> </p> | ||
| − | <h3> | + | <h3>Visualizzare Foto</h3> |
<table style="margin-left: auto; margin-right: auto;" border="0"> | <table style="margin-left: auto; margin-right: auto;" border="0"> | ||
<tbody> | <tbody> | ||
<tr> | <tr> | ||
<td><img src="/images/Oo3.png" alt="" /></td> | <td><img src="/images/Oo3.png" alt="" /></td> | ||
| − | <td> | + | <td>Se l'opzione presente in alto a destra del calendario della coltura è selezionata, quando presenti, le <strong>foto</strong> delle cellule verranno visualizzate al posto dell'icona rappresentante lo stadio. Per importare foto, fare <strong>doppio-click</strong> sulla cellula desiderata e cliccare <strong>Aggiungi file</strong>.</td> |
</tr> | </tr> | ||
<tr> | <tr> | ||
<td><img src="/images/Oo4.png" alt="" width="332" height="201" /></td> | <td><img src="/images/Oo4.png" alt="" width="332" height="201" /></td> | ||
| − | <td> | + | <td>Se l'opzione di visulaizzazione delle foto non è selezionata, quando foto sono disponibili per una cellula, una <strong>macchinetta fotografica</strong> verrà visualizzata nell'icona dello stadio.</td> |
</tr> | </tr> | ||
</tbody> | </tbody> | ||
| Line 459: | Line 458: | ||
<tr> | <tr> | ||
<td><img src="/images/Oo5.png" alt="" width="340" height="251" /></td> | <td><img src="/images/Oo5.png" alt="" width="340" height="251" /></td> | ||
| − | <td> | + | <td>In <strong>entranbe le situazioni</strong>, passando il mouse sulla cellula, verrà visualizzata una <strong>versione ingrandita della foto</strong>.</td> |
</tr> | </tr> | ||
</tbody> | </tbody> | ||
</table> | </table> | ||
<p> </p> | <p> </p> | ||
| − | <h3 style="text-align: justify;">Screenshot | + | <h3 style="text-align: justify;">Screenshot</h3> |
<table style="margin-left: auto; margin-right: auto;" border="0"> | <table style="margin-left: auto; margin-right: auto;" border="0"> | ||
<tbody> | <tbody> | ||
| Line 475: | Line 474: | ||
</table> | </table> | ||
<p> </p> | <p> </p> | ||
| − | <p> | + | <p>Cliccando sul simbolo della macchinetta fotografica presente sulla tab attiva è possibile esportare l'immagine della situazione attuale nel <a href="/index.php?title=Notebook_/_screenshots"><strong>Tool Quaderno</strong></a>. </p> |
<table style="margin-left: auto; margin-right: auto;" border="0"> | <table style="margin-left: auto; margin-right: auto;" border="0"> | ||
<tbody> | <tbody> | ||
Revision as of 16:55, 27 April 2016
| <a href="/index.php?title=Cycle_Cryo"><img src="/images/plus48.png" alt="" width="48" height="48" /></a> | <a href="/index.php?title=Cycle_Cryo">Cliccare qui</a> per Ciclo Solo Pick Up per Crioconservazione/Donazione. |
 |
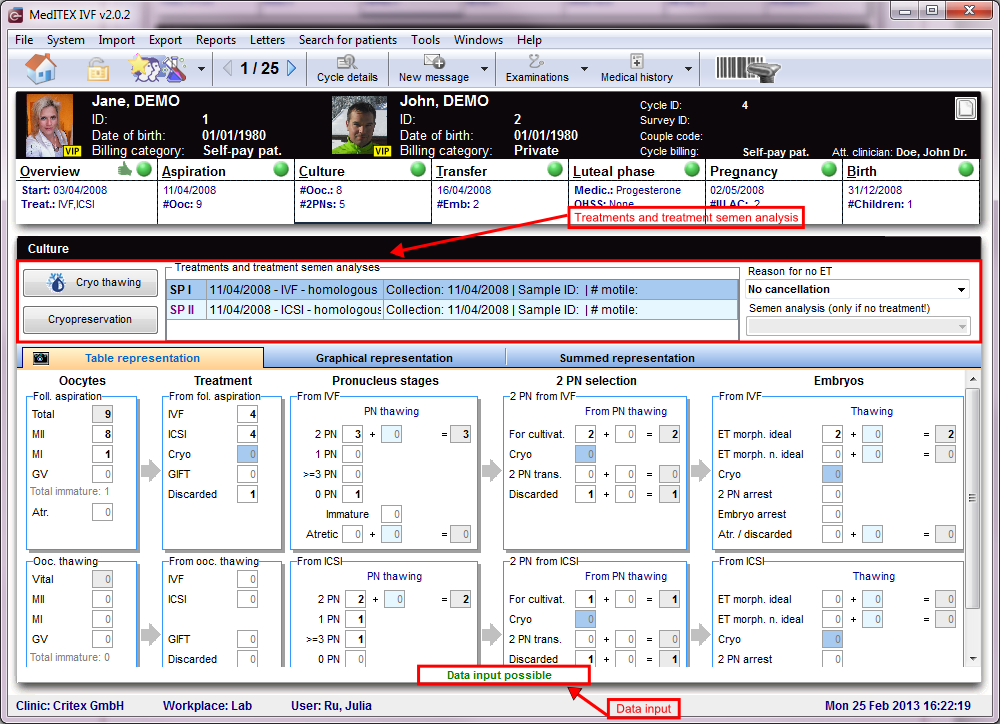
Ogni singola cellula (ovocita/embrione) può essere documentata in MedITEX IVF. La tab Coltura permette di inserire informazioni per un massimo di 10 giorni di coltura, anche se nella maggior parte dei casi 5/6 giorni bastano. Nella overview è possibile assegnare per una specifica data e stadio della cellula informazioni riguradanti lo stadio di sviluppo e i trattamenti eseguiti, come per esempio l'inseminazione o iniezione, assisted hatching, diagnosi del globulo polare, crioconservazione e scongelamento, embrio transfer e molti altri.
Prima di cominciare ad inserire dati, sarebbe utile considerale lo scopo della documentazione.
MedITEX IVF fornisce due possibilità:
- Una più semplice e riassuntiva forma di documentazione, chiamata Rappresentazione Tabellare;
- e una più completa, chiamata Rappresentazione Grafica.
Le due rappresentazioni sono collegate in maniera logica, per cui cambiamenti riportati in una rappresentazione verranno automaticamente apportati anche all'altra.
| <img src="/images/hint48.png" alt="" width="48" height="48" /> |
L'inserimento di dati è possibile solamente in una rappresentazione. Se si inizia a documentare informazioni nella rappresentazione tabellare, quella grafica verrà bloccata. Le due rappresentazioni possono essere bloccate/sbloccate cliccando sulla riga di testo rossa o verde sul fondo della schermo. |
| <img src="/images/datainput2.png" alt="" width="356" height="15" /> |
Sezione bloccata. L'input dei dati è possibile nell'altra rappresentazione. Nel nostro esempio questa scritta è presente nella rappresentazione grafica e indca che è attiva quella tabellare. Per attivare la rappresentazione grafica premere sulla riga rossa, che si trasformerà in verde. |
| <img src="/images/datainput.png" alt="" width="207" height="15" /> |
Sezione sbloccata e l'input dei dati è permesso. Nel nostro esempio questa scritta è presente nella rappresentazone tabellare. |
| <img src="/images/hint48.png" alt="" width="48" height="48" /> |
Passando da Rappresentazione Grafica a Tabellare alcune informazioni (stadio embrioni) già inserite potrebbero andare perse. |
Contents |
Trattamenti e Spermiogrammi
 |
| <a href="/index.php?title=Cryo thawing"><img style="display: block; margin-left: auto; margin-right: auto; border: 2px dotted blue;" src="/images/CryoThawing.png" alt="" /></a> | Scongelare campioni. |
| <a href="/index.php?title=Cryo_storage"><img style="display: block; margin-left: auto; margin-right: auto; border: 2px dotted blue;" src="/images/Cryopre.png" alt="" /></a> |
Apre la criobanca permettendo la crioconservazione di ovociti/embrioni. |
| <img style="display: block; margin-left: auto; margin-right: auto;" src="/images/Reason.png" alt="" width="232" height="81" /> |
Campo riservato alla documentazione delle ragioni di mancato transfer. |
| <a href="/index.php?title=Treatments and treatment semen analysis"><img style="display: block; margin-left: auto; margin-right: auto; border: 2px dotted blue;" src="/images/cryoprov2.png" alt="" width="400" height="72" /></a> |
Trattamenti e spermiogrammi: Doppio-click per visualizzare i trattamenti e gli spermiogrammi collegati alla terapia. Per cicli da scongelamento di zigoti/embrioni non è necessario collegare uno spermiogramma |
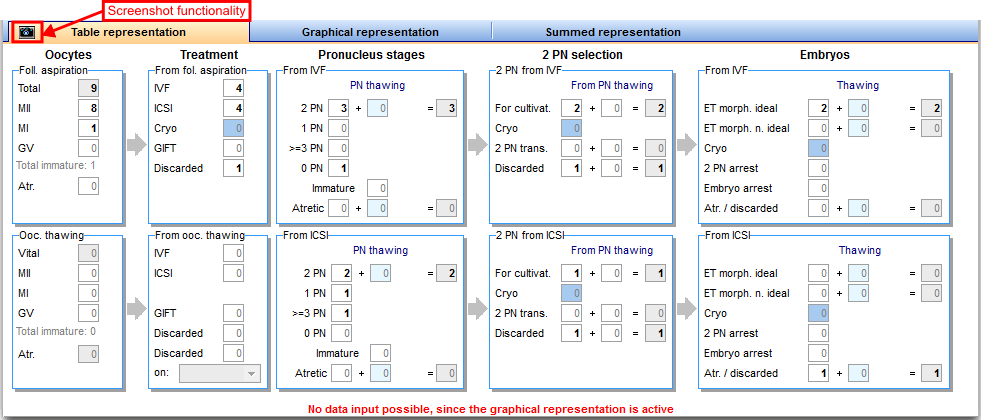
Rappresentazione tabellare
Questa rappresentazione pernette di documentare in maniera efficiente e veloce tutti i tipi di ciclo: Con Pick Up (FIVET/ICSI), Scongelamento, etc.
 |
|
| <img style="display: block; margin-left: auto; margin-right: auto;" src="/images/hint48.png" alt="" width="48" height="48" /> |
Vantaggi: veloce e semplice. Svantaggi: Documentazione sommaria, non a livello di singola cellula. |
Opzioni per crioconservazione
Nella tab della Coltura, ci sono tre opzioni per la crioconservazione di ovociti/embrioni:
| <img src="/images/ov2.png" alt="" width="450" height="272" /> |
1. Inserendo il numero si ovociti, PN o embrioni il programma inserirà automaticamente il numero nella sezione corretta nella finestra di crioconservazione. |
| <a href="/index.php?title=Cryo_storage"><img style="border: 2px dotted blue;" src="/images/cryocon.png" alt="" /></a> |
2. Facendo doppio-click sul numero di cellule crioconservate dalla rappresentazione tabellare , è possibile aprire la <a href="/index.php?title=Crioconservazione">criobanca</a>. |
| <a href="/index.php?title=Freezing_a_new_sample"><img style="border: 2px dotted blue;" src="/images/cryocon1.png" alt="" /></a> | 3. Cliccado sulla cella vuota, la finestra per la crioconservazione si aprirà e sarà possibile inserire il numero di cellule da crioconservare. |
| <a href="/index.php?title=How_to_cultivate_oocytes_with_the_Table_representation_tab%3F"><img src="/images/howto48.png" alt="" /></a> | <a href="/index.php?title=How_to_cultivate_oocytes_with_the_Table_representation_tab%3F">Cliccare qui</a> per maggiori informazioni sulla Rappresentazione Tabellare. |
Rappresentazione grafica
La Rappresentazione Grafica permette la documentazione di singoli ovociti/embrioni, del loro stadio di sviluppo e trattamenti specifice effettuati in qualsiasi giorno della coltura.
Le due rappresentazioni sono collegate in maniera logica, per cui cambiamenti riportati in una rappresentazione verranno automaticamente apportati anche all'altra. Tenere presente che è possibile modificare una sola rappresentazione alla volta e, per passare da una all'altra, è necessario sbloccare la rappresentazione desiderata premendo sulla riga di testo rossa sul fondo della finestra.
Dopo aver inserito i dati del Pick Up lo stasso numero di follicoli aspirati sarà disponibile per la coltura nella Rappresentazione Grafica. Il calendario della coltura rende disponibili al massimo 10 giorni per la documentazione dello sviluppo cellulare.
 |
|
| <img src="/images/hint48.png" alt="" width="48" height="48" /> |
Vantaggi: si può documentare il progresso di ogni singola cellula per ogni giorno della coltura; inoltre è possibile documentare assisted hatching, diagnosi del globulo polare, PGD,PGS e utilizzare incubatori. Svantaggi: potrebbe richiedere del tempo in caso di un gran numero di cellule da inserire e documentare. Cliccare <a href="/index.php?title=Coltura#Selezionare_diversi_ovociti.2Fembrioni">qui</a> per avere maggiori informazioni su come selezionare più di una cellula alla volta e <a href="/index.php?title=Coltura#Documentare_ovociti.2Fembrioni">qui</a> per modificare più di una cellula alla volta. |
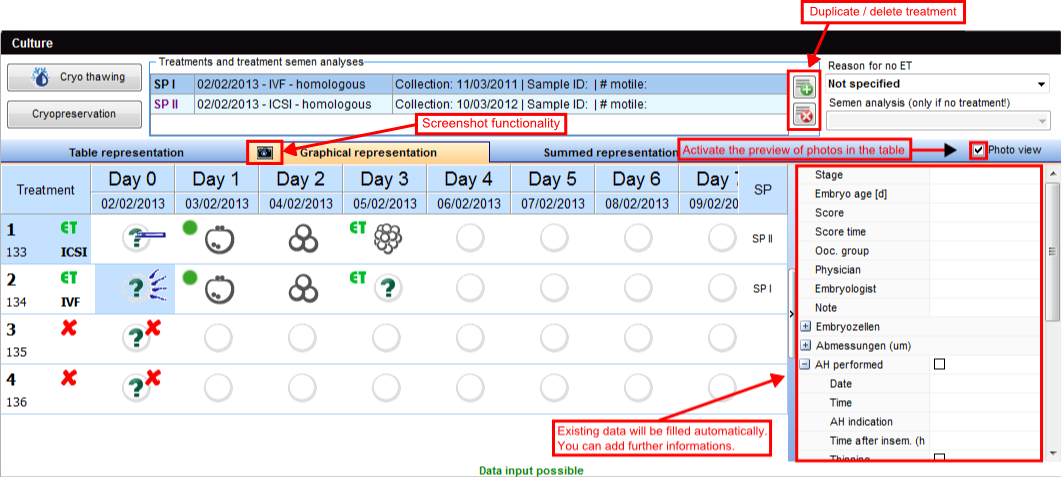
Duplicare / eliminare trattamenti
| Se vengono utilizzati ovociti/embrioni per diversi trattamenti (IVF e ICSI) o diversi campioni di liquido seminale vengono utilizzati in uno stesso ciclo, due o più spermiogrammi andranno collegati alla terapia. |
| <img style="display: block; margin-left: auto; margin-right: auto;" src="/images/cul8.png" alt="" /> |
|
Sia che sia attiva la Rappresentazione Tabellare o Grafica, se le cellule vengono trattate con IVF e con ICSI nello stesso ciclo, i trattamenti si sdoppieranno automaticamente permettendo di collegare due spermiogrammi. |
| <img style="display: block; margin-left: auto; margin-right: auto;" src="/images/cul9.png" alt="" /><img style="display: block; margin-left: auto; margin-right: auto;" src="/images/cul10.png" alt="" /> |
|
Nella Rappresentazione Grafica inoltre c'è anche la possibilità di duplicare i trattamenti, nel caso in cui si utilizzino diversi campioni seminali (diversi spermiogrammi), permettendo così di associare quali cellule sono state trattate con il primo spermiogramma e quali con il secondo. |
| <img style="display: block; margin-left: auto; margin-right: auto;" src="/images/cul11.png" alt="" /> |
|
Per associare i trattamenti alle cellule sarà sufficiente cliccare con il tasto destro sulla colonna SP della rappresentazione grafica e scegliere il tramento desiderato. Il trattamento al momento associato alla cellula è riportato in grassetto. |
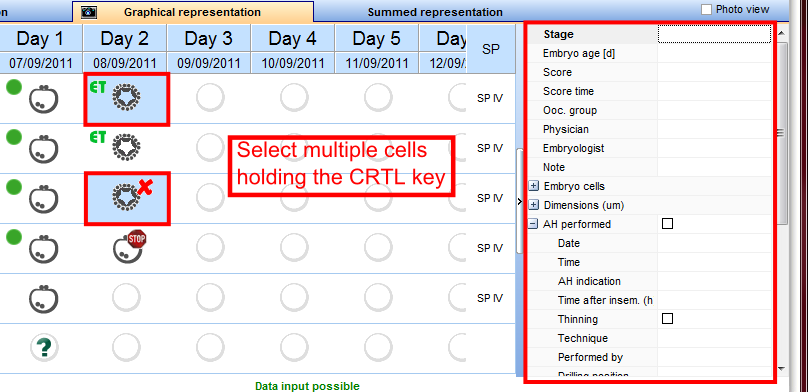
Selezionare diversi ovociti/embrioni
Ci sono due modi per selezionare più di una cellula alla volta
| <img src="/images/hint48.png" alt="" width="48" height="48" /> |
|
| <img src="/images/Oo2.png" alt="" /> | Tenere premuto Ctrl nella tastiera e con il mouse selezionare diverse cellule nello stesso giorno. |
| <img src="/images/Oo1.png" alt="" /> |
|
Documentare ovociti/embrioni
Nella rappresentazione grafica ci sono tre modi per modificare le informazioni delle cellule:
1. Pannello di destra.
Questo è il modo più veloce per inserire i dati. Nella tabella è possibile vedere tutti i dati disponibili per le cellule selezionate e inserire/modificare a piacere semplicemente cambiando i campi desiderati.
Per modificare le informazioni inserite per ovociti/embrioni è sufficiente quindi selezionare la cellula dalla Rappresentazione Grafica e inserire le informazioni nel pannello di destra.
Da questo pannello, selezionando più di una cellula alla volta utilizzando i tasti CTRL o Shift (le cellule devono appartenere allo stesso giorno di coltura), è possibile aggiungere le stesse informazioni a tutte le cellule selezionate, contemporaneamente.
 |
| <a href="/index.php?title=Cycle_Culture#Select_several_oocytes_.2F_embryos"><img src="/images/hint48.png" alt="" width="48" height="48" /></a> | <a href="/index.php?title=Coltura#Selezionare_diversi_ovociti.2Fembrioni">Cliccare qui</a> per maggiorni informazioni su come selezionare più cellule. |
2. Doppio-click
Facendo doppio-click su una cellula sarà possibile inserire lo stadio della cellula, il punteggio, note, foto, informazioni riguardanti l'assisted hatching e l'incubatore.
| <img src="/images/graph10.png" alt="" width="692" height="716" /> |
| <img src="/images/howto48.png" alt="" width="48" height="48" /> | Per maggiorni informazioni sulla Rappresentazione Grafica consultare il nostro <a href="/index.php?title=How_to_cultivate_oocytes_with_the_Graphical_representation_tab%3F">Come fare</a>. |
3. Click tasto destro
Cliccando sulla cellula desiderata con il tasto destro il menù a tendina rappresentato in figura si aprirà, qui potrete associare uno stadio alla cellula, crioconservarla, associare l'incubatore etc.
| <img src="/images/graph6.png" alt="" /> |
Tutti i cambiamenti effettuati qui verranno automaticamente inseriti nella rappresentazione tabellare! Tutavia controllare se qualche campo ha lo sfondo rosso e correggere le informazioni in modo da ottenere la somma corretta. |
| <a href="/index.php?title=How_to_cultivate_oocytes_with_the_Graphical_representation_tab%3F"><img src="/images/howto48.png" alt="" width="48" height="48" /></a> | <a href="/index.php?title=How_to_cultivate_oocytes_with_the_Graphical_representation_tab%3F">Cliccare qui</a> per maggiori informazioni sulla Rappresentazione Grafica. |
Stati delle cellule
| <img src="/images/o0.png" alt="" width="55" height="38" /> |
Sconosciuta: Cellule per le quali nessuno stadio è stato associato. |
| <img src="/images/o1.png" alt="" /> |
Scartata: Cellule scartate sono contrassegnate da una x rossa. |
| <img src="/images/o2.png" alt="" /> |
Crioconservata: Cellule crioconservate sono contrassegnate da un fiocco di neve. |
| <img src="/images/thaw.PNG" alt="" width="55" height="38" /> |
Scongelata: Cellule scongelate sono contrassegnate da un fiocco di neve sciolto. |
| <img src="/images/o3.png" alt="" /> |
Selezionata per transfer: 2PN selezionabili per il transfer sono contrassegnati da un cerchio verde. |
| <img src="/images/group.png" alt="" width="55" height="38" /> |
Gruppi ovociti: Se sulla destra della cellula sono presenti delle linee colorate, la cellula fà parte di un gruppo di ovociti/embrioni. |
| <img src="/images/o4.png" alt="" /> |
Morfologia ideale per transfer: Cellule, con morfologia ideale, da trasferire sono contrassegnate con il simbolo ET (verde). |
| <img src="/images/et.PNG" alt="" width="55" height="38" /> |
Morfologia non ideale per transfer: Cellule, con morfologia non ideale, da trasferire sono contrassegnate con il simbolo ET (arancione). |
| <img src="/images/o7.png" alt="" /> |
In arresto: Cellule che hanno smesso di svilupparsi. |
| <img src="/images/Donation_Donated.png" alt="" width="55" height="38" /> |
Donazione - Donata: Cellule donate sono contrassegnate con una freccia verde a destra. |
| <img src="/images/Donation_received.png" alt="" width="55" height="38" /> |
Donazione - Ricevuta: Cellule ricevute sono contrassegnate con una freccia verde a sinistra. |
| <img src="/images/o5.png" alt="" /> |
PBD: Cellule soggette a diagnosi del corpo polare. |
| <img src="/images/o10.png" alt="" width="55" height="38" /> |
PGD-PGS: Cellule soggette a diagnosi/screening genetica/o pre-impianto. |
| <img src="/images/o6.png" alt="" /> |
Assisted hatching: Celllule sottoposte all' assisted hatching. |
| <img src="/images/o9.png" alt="" width="55" height="38" /> |
IVF: Metodo utilizzato per l'inseminazione. |
| <img src="/images/o8.png" alt="" width="55" height="38" /> |
ICSI: Metodo utilizzato per l'inseminazione. |
| <img src="/images/hint48.png" alt="" width="48" height="48" /> |
|
| <a href="/index.php?title=How_to_cultivate_oocytes_with_the_Graphical_representation_tab%3F"><img src="/images/howto48.png" alt="" width="48" height="48" /></a> | <a href="/index.php?title=How_to_cultivate_oocytes_with_the_Graphical_representation_tab%3F">Cliccare qui</a> per maggiori informazioni sulla Rappresentazione Grafica. |
Visualizzare Foto
| <img src="/images/Oo3.png" alt="" /> | Se l'opzione presente in alto a destra del calendario della coltura è selezionata, quando presenti, le foto delle cellule verranno visualizzate al posto dell'icona rappresentante lo stadio. Per importare foto, fare doppio-click sulla cellula desiderata e cliccare Aggiungi file. |
| <img src="/images/Oo4.png" alt="" width="332" height="201" /> | Se l'opzione di visulaizzazione delle foto non è selezionata, quando foto sono disponibili per una cellula, una macchinetta fotografica verrà visualizzata nell'icona dello stadio. |
| <img src="/images/Oo5.png" alt="" width="340" height="251" /> | In entranbe le situazioni, passando il mouse sulla cellula, verrà visualizzata una versione ingrandita della foto. |
Screenshot
 |
Cliccando sul simbolo della macchinetta fotografica presente sulla tab attiva è possibile esportare l'immagine della situazione attuale nel <a href="/index.php?title=Notebook_/_screenshots">Tool Quaderno</a>.
| <img src="/images/screenshot1.png" alt="" width="650" height="442" /> |
| <img src="/images/screenshot2.png" alt="" width="650" /> |
If you do not close the notebook window and you take a second screenshot, it will automatically be added below the first one.
| <a href="/index.php?title=Notebook_/_screenshots"><img src="/images/plus48.png" alt="" width="48" height="48" /></a> | <a href="/index.php?title=Notebook_/_screenshots">Click here</a> to read more about the Notebook / screenshots tool. |
Summed representation
 |
An additional tab – Summed representation – provides a quick overview of the culture progress.
Data input is not possible here.
| <a href="/index.php?title=MedITEX_IVF_how_to#Cycle"><img src="/images/howto48.png" alt="" width="48" height="48" /></a> | <a href="/index.php?title=MedITEX_IVF_how_to#Cycle">Click here</a> to read more about this section<a href="/index.php?title=MedITEX_IVF_how_to#Cycle"></a>. |
| <a href="/index.php?title=MedITEX_IVF_manual">Back to the MedITEX IVF menu</a> | <a href="/index.php?title=MedITEX_IVF_manual"> </a><a href="/index.php?title=MedITEX_IVF_manual"> </a><a href="/index.php?title=Cycles">Back to the cycles</a> | <a href="#top">Back to top</a> |