Coltura
From MedITEX - Wiki
| Line 172: | Line 172: | ||
</table> | </table> | ||
<p> </p> | <p> </p> | ||
| − | <h3> | + | <h3>Duplicare / eliminare trattamenti</h3> |
<table style="margin-left: auto; margin-right: auto;" border="0" width="691" height="826"> | <table style="margin-left: auto; margin-right: auto;" border="0" width="691" height="826"> | ||
<tbody> | <tbody> | ||
| + | <tr> | ||
| + | <td>Se vengono utilizzati ovociti/embrioni per diversi trattamenti (<strong>IVF e</strong> <strong>ICSI</strong>) o diversi campioni di liquido seminale vengono utilizzati in uno stesso ciclo, due o più spermiogrammi andranno collegati alla terapia.</td> | ||
| + | </tr> | ||
<tr> | <tr> | ||
<td><img style="display: block; margin-left: auto; margin-right: auto;" src="/images/cul8.png" alt="" /></td> | <td><img style="display: block; margin-left: auto; margin-right: auto;" src="/images/cul8.png" alt="" /></td> | ||
| Line 180: | Line 183: | ||
<tr> | <tr> | ||
<td> | <td> | ||
| − | <p> | + | <p>Sia che sia attiva la <strong>Rappresentazione Tabellare o Grafica</strong>, se le cellule vengono trattate con <strong>IVF</strong> e con <strong>ICSI</strong> nello stesso ciclo, i trattamenti si sdoppieranno automaticamente permettendo di collegare due spermiogrammi.</p> |
| − | + | ||
</td> | </td> | ||
</tr> | </tr> | ||
<tr> | <tr> | ||
| − | <td><img style="display: block; margin-left: auto; margin-right: auto;" src="/images/cul9.png" alt="" /></td> | + | <td><img style="display: block; margin-left: auto; margin-right: auto;" src="/images/cul9.png" alt="" /><img style="display: block; margin-left: auto; margin-right: auto;" src="/images/cul10.png" alt="" /></td> |
</tr> | </tr> | ||
<tr> | <tr> | ||
| − | <td> | + | <td> |
| − | + | <p>Nella <strong>Rappresentazione Grafica</strong> inoltre c'è anche la possibilità di <strong>duplicare</strong> i trattamenti, nel caso in cui si utilizzino diversi campioni seminali (diversi spermiogrammi), permettendo così di associare quali cellule sono state trattate con il primo spermiogramma e quali con il secondo.</p> | |
| − | + | </td> | |
| − | + | ||
| − | + | ||
| − | + | ||
| − | + | ||
</tr> | </tr> | ||
<tr> | <tr> | ||
| Line 201: | Line 199: | ||
<tr> | <tr> | ||
<td> | <td> | ||
| − | <p> | + | <p>Per associare i trattamenti alle cellule sarà sufficiente cliccare con il<strong> tasto destro</strong> sulla colonna SP della rappresentazione grafica e scegliere il tramento desiderato. Il trattamento al momento associato alla cellula è riportato in grassetto.</p> |
| − | + | ||
</td> | </td> | ||
</tr> | </tr> | ||
Revision as of 15:59, 27 April 2016
| <a href="/index.php?title=Cycle_Cryo"><img src="/images/plus48.png" alt="" width="48" height="48" /></a> | <a href="/index.php?title=Cycle_Cryo">Cliccare qui</a> per Ciclo Solo Pick Up per Crioconservazione/Donazione. |
 |
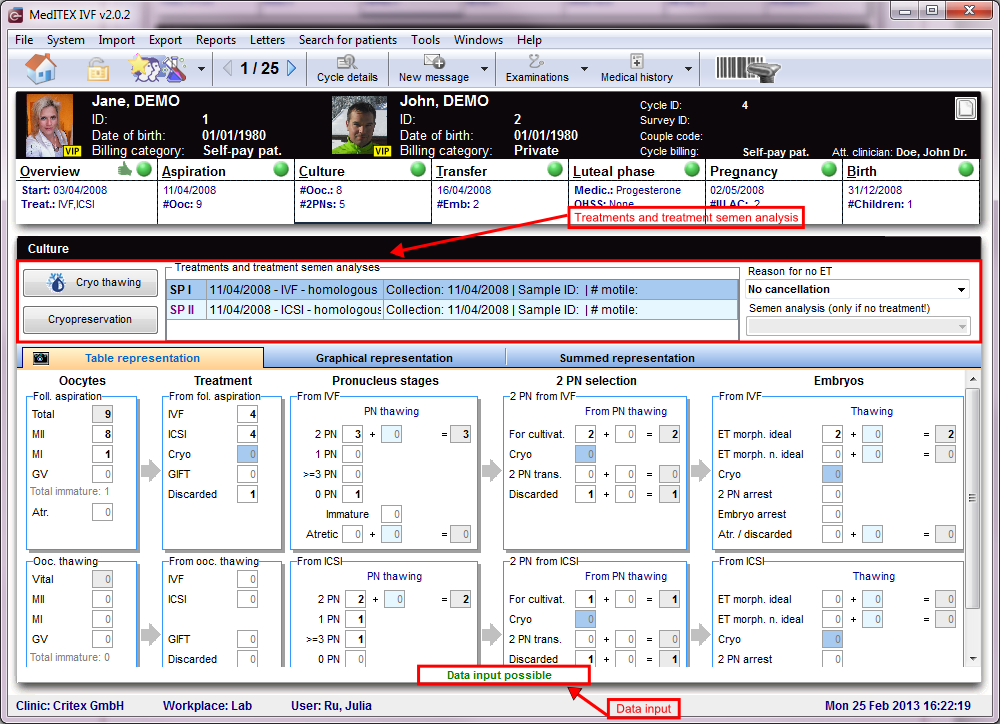
Ogni singola cellula (ovocita/embrione) può essere documentata in MedITEX IVF. La tab Coltura permette di inserire informazioni per un massimo di 10 giorni di coltura, anche se nella maggior parte dei casi 5/6 giorni bastano. Nella overview è possibile assegnare per una specifica data e stadio della cellula informazioni riguradanti lo stadio di sviluppo e i trattamenti eseguiti, come per esempio l'inseminazione o iniezione, assisted hatching, diagnosi del globulo polare, crioconservazione e scongelamento, embrio transfer e molti altri.
Prima di cominciare ad inserire dati, sarebbe utile considerale lo scopo della documentazione.
MedITEX IVF fornisce due possibilità:
- Una più semplice e riassuntiva forma di documentazione, chiamata Rappresentazione Tabellare;
- e una più completa, chiamata Rappresentazione Grafica.
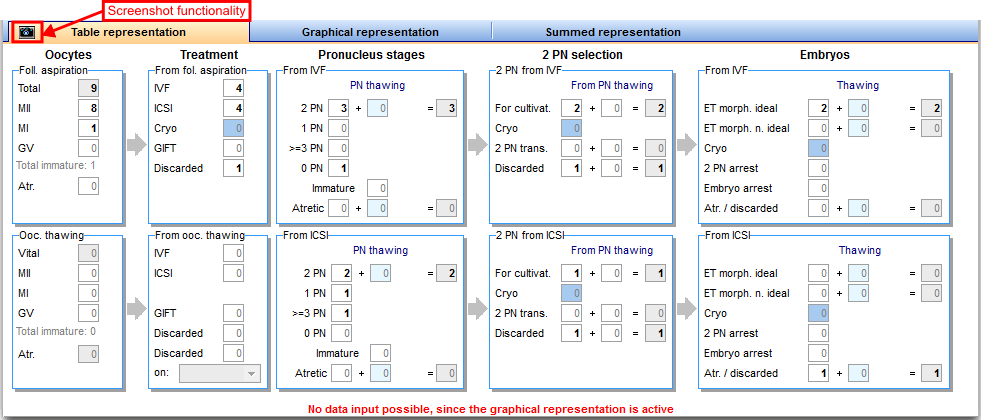
Le due rappresentazioni sono collegate in maniera logica, per cui cambiamenti riportati in una rappresentazione verranno automaticamente apportati anche all'altra.
| <img src="/images/hint48.png" alt="" width="48" height="48" /> |
L'inserimento di dati è possibile solamente in una rappresentazione. Se si inizia a documentare informazioni nella rappresentazione tabellare, quella grafica verrà bloccata. Le due rappresentazioni possono essere bloccate/sbloccate cliccando sulla riga di testo rossa o verde sul fondo della schermo. |
| <img src="/images/datainput2.png" alt="" width="356" height="15" /> |
Sezione bloccata. L'input dei dati è possibile nell'altra rappresentazione. Nel nostro esempio questa scritta è presente nella rappresentazione grafica e indca che è attiva quella tabellare. Per attivare la rappresentazione grafica premere sulla riga rossa, che si trasformerà in verde. |
| <img src="/images/datainput.png" alt="" width="207" height="15" /> |
Sezione sbloccata e l'input dei dati è permesso. Nel nostro esempio questa scritta è presente nella rappresentazone tabellare. |
| <img src="/images/hint48.png" alt="" width="48" height="48" /> |
Passando da Rappresentazione Grafica a Tabellare alcune informazioni (stadio embrioni) già inserite potrebbero andare perse. |
Contents |
Trattamenti e Spermiogrammi
 |
| <a href="/index.php?title=Cryo thawing"><img style="display: block; margin-left: auto; margin-right: auto; border: 2px dotted blue;" src="/images/CryoThawing.png" alt="" /></a> | Scongelare campioni. |
| <a href="/index.php?title=Cryo_storage"><img style="display: block; margin-left: auto; margin-right: auto; border: 2px dotted blue;" src="/images/Cryopre.png" alt="" /></a> |
Apre la criobanca permettendo la crioconservazione di ovociti/embrioni. |
| <img style="display: block; margin-left: auto; margin-right: auto;" src="/images/Reason.png" alt="" width="232" height="81" /> |
Campo riservato alla documentazione delle ragioni di mancato transfer. |
| <a href="/index.php?title=Treatments and treatment semen analysis"><img style="display: block; margin-left: auto; margin-right: auto; border: 2px dotted blue;" src="/images/cryoprov2.png" alt="" width="400" height="72" /></a> |
Trattamenti e spermiogrammi: Doppio-click per visualizzare i trattamenti e gli spermiogrammi collegati alla terapia. Per cicli da scongelamento di zigoti/embrioni non è necessario collegare uno spermiogramma |
Rappresentazione tabellare
Questa rappresentazione pernette di documentare in maniera efficiente e veloce tutti i tipi di ciclo: Con Pick Up (FIVET/ICSI), Scongelamento, etc.
 |
|
| <img style="display: block; margin-left: auto; margin-right: auto;" src="/images/hint48.png" alt="" width="48" height="48" /> |
Vantaggi: veloce e semplice. Svantaggi: Documentazione sommaria, non a livello di singola cellula. |
Opzioni per crioconservazione
Nella tab della Coltura, ci sono tre opzioni per la crioconservazione di ovociti/embrioni:
| <img src="/images/ov2.png" alt="" width="450" height="272" /> |
1. Inserendo il numero si ovociti, PN o embrioni il programma inserirà automaticamente il numero nella sezione corretta nella finestra di crioconservazione. |
| <a href="/index.php?title=Cryo_storage"><img style="border: 2px dotted blue;" src="/images/cryocon.png" alt="" /></a> |
2. Facendo doppio-click sul numero di cellule crioconservate dalla rappresentazione tabellare , è possibile aprire la <a href="/index.php?title=Crioconservazione">criobanca</a>. |
| <a href="/index.php?title=Freezing_a_new_sample"><img style="border: 2px dotted blue;" src="/images/cryocon1.png" alt="" /></a> | 3. Cliccado sulla cella vuota, la finestra per la crioconservazione si aprirà e sarà possibile inserire il numero di cellule da crioconservare. |
| <a href="/index.php?title=How_to_cultivate_oocytes_with_the_Table_representation_tab%3F"><img src="/images/howto48.png" alt="" /></a> | <a href="/index.php?title=How_to_cultivate_oocytes_with_the_Table_representation_tab%3F">Cliccare qui</a> per maggiori informazioni sulla Rappresentazione Tabellare. |
Rappresentazione grafica
La Rappresentazione Grafica permette la documentazione di singoli ovociti/embrioni, del loro stadio di sviluppo e trattamenti specifice effettuati in qualsiasi giorno della coltura.
Le due rappresentazioni sono collegate in maniera logica, per cui cambiamenti riportati in una rappresentazione verranno automaticamente apportati anche all'altra. Tenere presente che è possibile modificare una sola rappresentazione alla volta e, per passare da una all'altra, è necessario sbloccare la rappresentazione desiderata premendo sulla riga di testo rossa sul fondo della finestra.
Dopo aver inserito i dati del Pick Up lo stasso numero di follicoli aspirati sarà disponibile per la coltura nella Rappresentazione Grafica. Il calendario della coltura rende disponibili al massimo 10 giorni per la documentazione dello sviluppo cellulare.
 |
|
| <img src="/images/hint48.png" alt="" width="48" height="48" /> |
Vantaggi: si può documentare il progresso di ogni singola cellula per ogni giorno della coltura; inoltre è possibile documentare assisted hatching, diagnosi del globulo polare, PGD,PGS e utilizzare incubatori. Svantaggi: potrebbe richiedere del tempo in caso di un gran numero di cellule da inserire e documentare. Cliccare <a href="/index.php?title=Coltura#Selezionare_diversi_ovociti.2Fembrioni">qui</a> per avere maggiori informazioni su come selezionare più di una cellula alla volta e <a href="/index.php?title=Coltura#Documentare_ovociti.2Fembrioni">qui</a> per modificare più di una cellula alla volta. |
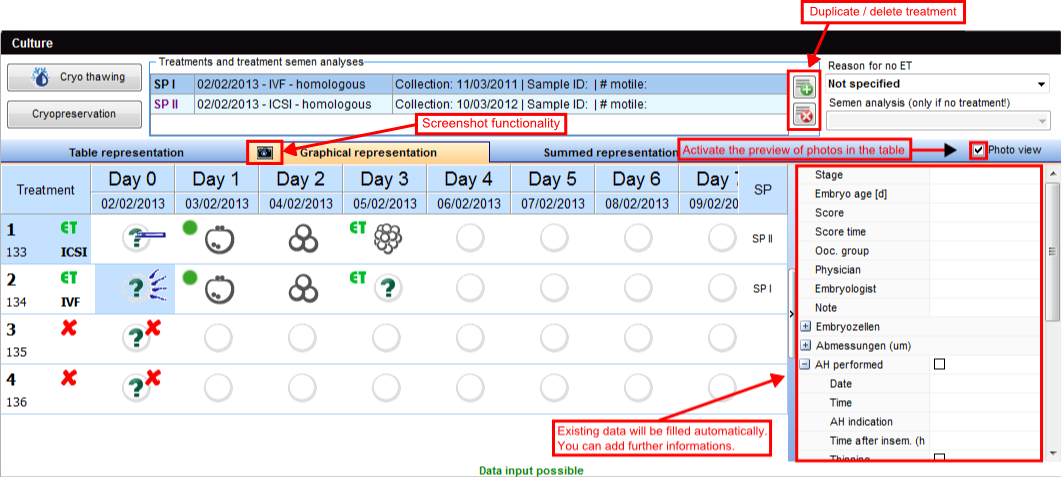
Duplicare / eliminare trattamenti
| Se vengono utilizzati ovociti/embrioni per diversi trattamenti (IVF e ICSI) o diversi campioni di liquido seminale vengono utilizzati in uno stesso ciclo, due o più spermiogrammi andranno collegati alla terapia. |
| <img style="display: block; margin-left: auto; margin-right: auto;" src="/images/cul8.png" alt="" /> |
|
Sia che sia attiva la Rappresentazione Tabellare o Grafica, se le cellule vengono trattate con IVF e con ICSI nello stesso ciclo, i trattamenti si sdoppieranno automaticamente permettendo di collegare due spermiogrammi. |
| <img style="display: block; margin-left: auto; margin-right: auto;" src="/images/cul9.png" alt="" /><img style="display: block; margin-left: auto; margin-right: auto;" src="/images/cul10.png" alt="" /> |
|
Nella Rappresentazione Grafica inoltre c'è anche la possibilità di duplicare i trattamenti, nel caso in cui si utilizzino diversi campioni seminali (diversi spermiogrammi), permettendo così di associare quali cellule sono state trattate con il primo spermiogramma e quali con il secondo. |
| <img style="display: block; margin-left: auto; margin-right: auto;" src="/images/cul11.png" alt="" /> |
|
Per associare i trattamenti alle cellule sarà sufficiente cliccare con il tasto destro sulla colonna SP della rappresentazione grafica e scegliere il tramento desiderato. Il trattamento al momento associato alla cellula è riportato in grassetto. |
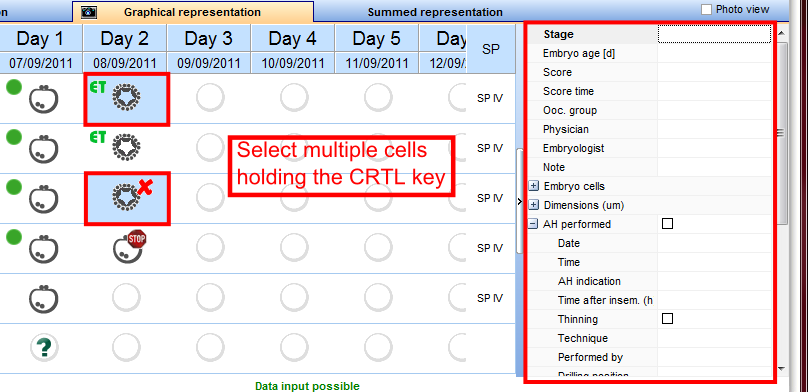
Selezionare diversi ovociti/embrioni
There are two ways of selecting several oocytes/embryos at the same time.
| <img src="/images/hint48.png" alt="" width="48" height="48" /> |
|
| <img src="/images/Oo2.png" alt="" /> | Hold the Ctrl key and select multiple cells on the same day. |
| <img src="/images/Oo1.png" alt="" /> |
|
Documentare ovociti/embrioni
Within the matrix you have three options to edit the oocytes/embryos:
1. Right-panel.
This is the quickest way of entering data. You can see all existing data of the selected oocyte/embryo and editing this information is simply performed by changing the related fields.
To edit the information for oocytes/embryos, select a cell from the Graphical representation view and add the relevant data to the Right-panel.
You can also edit multiple oocytes/embryos at the same time. Simply select several of them holding the CTRL or Shift keys (they must be in the same culture day). Keep in mind that the information added will be the same for all selected oocytes/embryos.
 |
| <a href="/index.php?title=Cycle_Culture#Select_several_oocytes_.2F_embryos"><img src="/images/hint48.png" alt="" width="48" height="48" /></a> | <a href="/index.php?title=Cycle_Culture#Select_several_oocytes_.2F_embryos">Click here</a> to read more about selecting several oocytes/embryos. |
2. Double-click
Double-click an oocyte/embryo to enter development stages, scores, notes, photos, assisted hatching, pre-implantation genetic diagnosis, polar body diagnostics and used incubators.
A new window will open in which you can enter different information:
| <img src="/images/graph10.png" alt="" width="692" height="716" /> |
| <img src="/images/howto48.png" alt="" width="48" height="48" /> | Read more about the cultivation of oocytes with the graphical overview in the <a href="/index.php?title=How_to_cultivate_oocytes_with_the_Graphical_representation_tab%3F">how to</a>. |
3. Right-click
Right-click an oocyte/embryo to enter treatments, stages, incubators, etc.
After right-clicking the oocyte/embryo, a context menu will open, in which you can select the modifications and the development stage for the oocyte/embryo.
| <img src="/images/graph6.png" alt="" /> |
All changes that are made here will be represented in the Table representation view! However, check if fields have a red background and correct your entries accordingly. |
| <a href="/index.php?title=How_to_cultivate_oocytes_with_the_Graphical_representation_tab%3F"><img src="/images/howto48.png" alt="" width="48" height="48" /></a> | <a href="/index.php?title=How_to_cultivate_oocytes_with_the_Graphical_representation_tab%3F">Click here</a> to read more about cultivating oocytes/embryos in the Graphical representation view. |
States of oocytes
| <img src="/images/o0.png" alt="" width="55" height="38" /> |
Unknown: Oocytes that did not have their stage selected. |
| <img src="/images/o1.png" alt="" /> |
Discarded: Discarded oocytes are marked with a red cross. |
| <img src="/images/o2.png" alt="" /> |
Frozen: Frozen oocytes are marked with a snowflake symbol. |
| <img src="/images/thaw.PNG" alt="" width="55" height="38" /> |
Thawed: Thawed oocytes are marked with a melting snowflake symbol. |
| <img src="/images/o3.png" alt="" /> |
Selected for transfer: Pro-nucleus stages that are selected for an embryo transfer are marked with a green circle. |
| <img src="/images/group.png" alt="" width="55" height="38" /> |
Oocyte groups: If there is any colored bar on the left, the oocyte is part of an embryo / oocyte group. |
| <img src="/images/o4.png" alt="" /> |
Transferred ideal: Those that are to be transferred are marked with the ET (green) symbol. |
| <img src="/images/et.PNG" alt="" width="55" height="38" /> |
Transferred not ideal : Those that are to be transferred are marked with the ET (orange) symbol. |
| <img src="/images/o7.png" alt="" /> |
In arrest: Oocytes that stopped developing. |
| <img src="/images/Donation_Donated.png" alt="" width="55" height="38" /> |
Donation - Donated: Oocytes that have been donated are marked with an arrow right to the oocyte. |
| <img src="/images/Donation_received.png" alt="" width="55" height="38" /> |
Donation - Received: Oocytes that have been received from a donation are marked with an arrow left to the oocyte. |
| <img src="/images/o5.png" alt="" /> |
PBD: Oocytes that have been subjected to a polar body diagnosis. |
| <img src="/images/o10.png" alt="" width="55" height="38" /> |
PGD: Oocytes that have been subjected to a pre-implantation genetic diagnosis. |
| <img src="/images/o6.png" alt="" /> |
Assisted hatching: Embryos subjected to assisted hatching. |
| <img src="/images/o9.png" alt="" width="55" height="38" /> |
IVF: Indicates the insemination method used. |
| <img src="/images/o8.png" alt="" width="55" height="38" /> |
ICSI: Indicates the insemination method used. |
| <img src="/images/hint48.png" alt="" width="48" height="48" /> |
|
| <a href="/index.php?title=How_to_cultivate_oocytes_with_the_Graphical_representation_tab%3F"><img src="/images/howto48.png" alt="" width="48" height="48" /></a> | <a href="/index.php?title=How_to_cultivate_oocytes_with_the_Graphical_representation_tab%3F">Click here</a> to read more about cultivating oocytes/embryos in the Graphical representation view. |
Photo view
| <img src="/images/Oo3.png" alt="" /> | In Photo view mode, imported images are displayed when available. To import images, double-click the desired cell and click on Add file from the new window. |
| <img src="/images/Oo4.png" alt="" width="332" height="201" /> | If Photo view is not active, a small camera icon will indicate that an image is available for viewing. |
| <img src="/images/Oo5.png" alt="" width="340" height="251" /> | For both modes, you can view an enlarged image by moving your mouse over the cell. |
Screenshot functionality
 |
Click on the camera symbol to export the current representation into the <a href="/index.php?title=Notebook_/_screenshots">Notebook tool</a>. The following window will open:
| <img src="/images/screenshot1.png" alt="" width="650" height="442" /> |
| <img src="/images/screenshot2.png" alt="" width="650" /> |
If you do not close the notebook window and you take a second screenshot, it will automatically be added below the first one.
| <a href="/index.php?title=Notebook_/_screenshots"><img src="/images/plus48.png" alt="" width="48" height="48" /></a> | <a href="/index.php?title=Notebook_/_screenshots">Click here</a> to read more about the Notebook / screenshots tool. |
Summed representation
 |
An additional tab – Summed representation – provides a quick overview of the culture progress.
Data input is not possible here.
| <a href="/index.php?title=MedITEX_IVF_how_to#Cycle"><img src="/images/howto48.png" alt="" width="48" height="48" /></a> | <a href="/index.php?title=MedITEX_IVF_how_to#Cycle">Click here</a> to read more about this section<a href="/index.php?title=MedITEX_IVF_how_to#Cycle"></a>. |
| <a href="/index.php?title=MedITEX_IVF_manual">Back to the MedITEX IVF menu</a> | <a href="/index.php?title=MedITEX_IVF_manual"> </a><a href="/index.php?title=MedITEX_IVF_manual"> </a><a href="/index.php?title=Cycles">Back to the cycles</a> | <a href="#top">Back to top</a> |