Benvenuti in MedITEX Scheduler
From MedITEX - Wiki
| Line 1: | Line 1: | ||
| − | + | <p>MedITEX Scheduler è uno strumento ideale per <strong>gestire il vostro tempo </strong>e <strong>pianificare gli appuntamenti</strong> con chiarezza per il vostro team, i pazienti e i vostri consulenti medici. In quanto <strong>strumento</strong> per l'<strong>organizzazione</strong>, la <strong>pianificazione</strong> ed il <strong>coordinamento </strong>MedITEX Scheduler tagliato su misura per seguire i trattamenti medici ed il procedere della terapia.</p> | |
| + | <h2>Interfaccia</h2> | ||
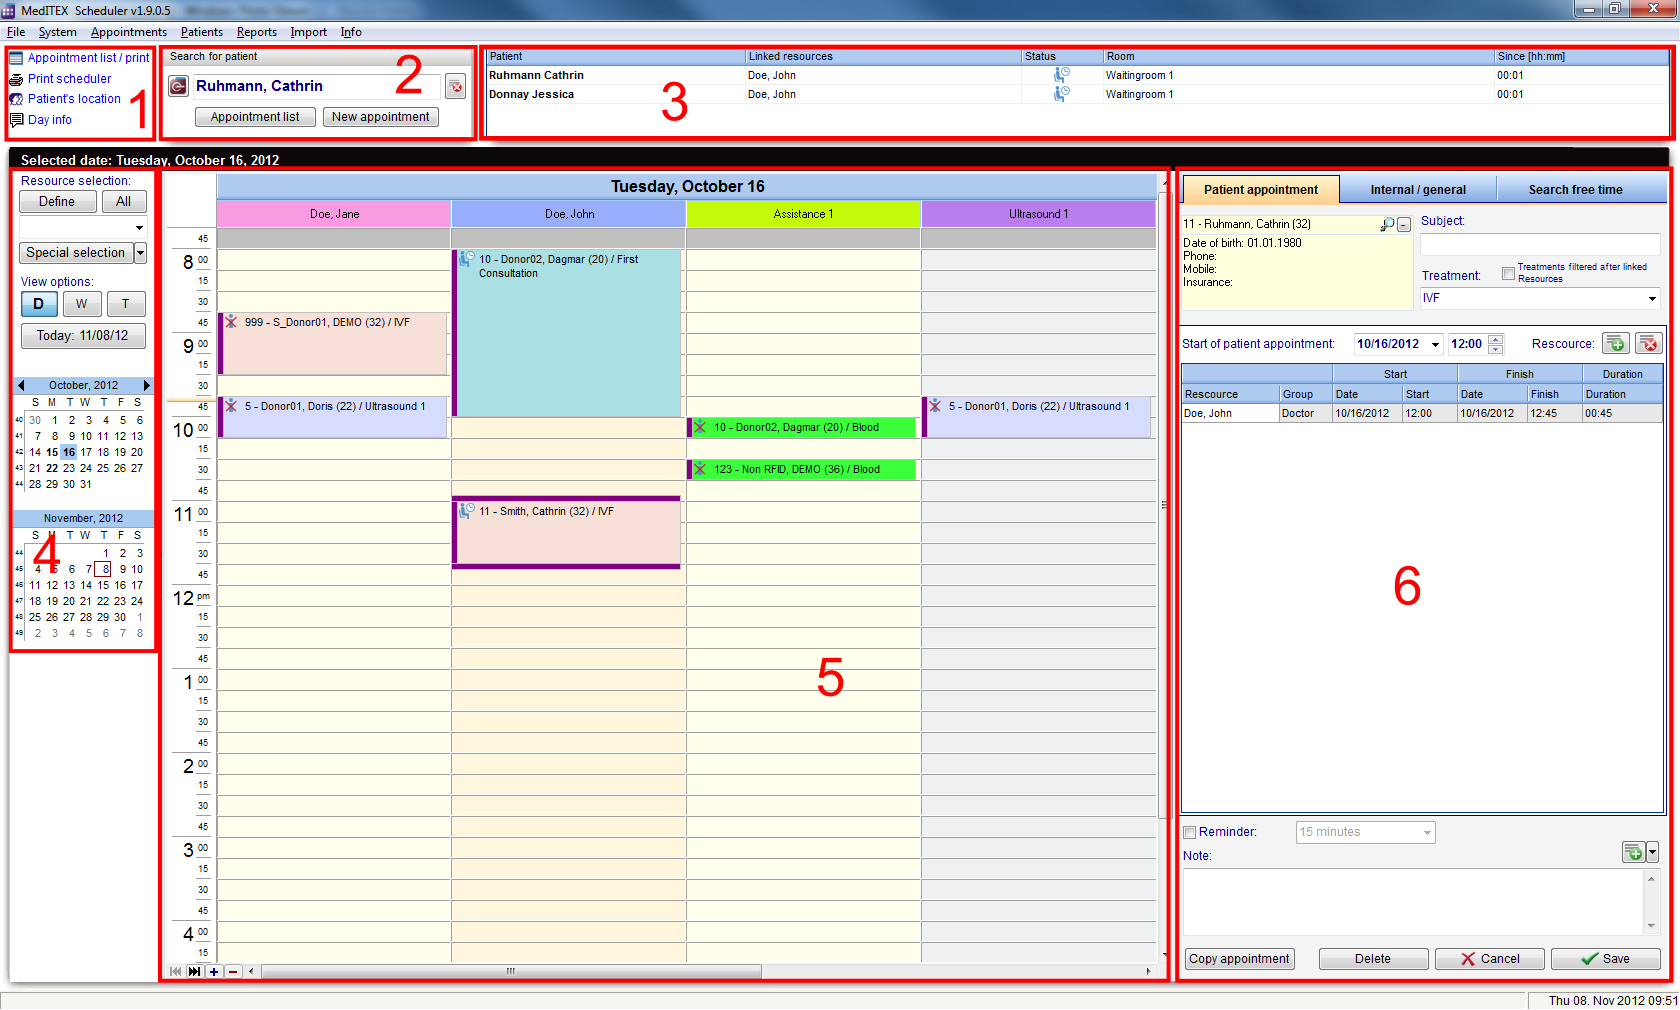
| + | <p>MedITEX Scheduler possiede un'interfaccia semplice ed intuitiva. Dividiamo questa interfaccia in sezioni più piccole aventi funzionalità specifiche.</p> | ||
| + | <p><em>Consiglio: fare click sulle immagini per ingrandirle. </em></p> | ||
| + | <table style="margin-left: auto; margin-right: auto;" border="0"> | ||
| + | <tbody> | ||
| + | <tr> | ||
| + | <td>[[Image:MainWindowParts.png|none|740px|thumb|left|link=http://wiki.meditex-software.com/images/MainWindowParts.png]]</td> | ||
| + | </tr> | ||
| + | </tbody> | ||
| + | </table> | ||
| + | <p> </p> | ||
| + | <h3>1. Collegamenti di supporto</h3> | ||
| + | <p><strong>Sono collegamenti speciali, usati con maggior frequenza in Scheduler.</strong> Da qui è possibile accedere facilmente e rapidamente a liste di stampa, alla posizione dei pazienti e ad altre funzionalità.</p> | ||
| + | <p> </p> | ||
| + | <h3>2. Cerca paziente</h3> | ||
| + | <p><strong>Questa è la barra di ricerca dei pazienti. </strong>Digitare il nome del paziente o fare click sulla freccia in fondo alla barra per avere la lista completa dei pazienti disponibili.</p> | ||
| + | <p>Se disponete di una licenza di MedITEX IVF, potete aprire in IVF il paziente selezionato selezionato su Scheduler premendo sul tasto a sinistra, riportante l'icona di MedITEX IVF.</p> | ||
| + | <p>E' possibile anche creare un nuovo appuntamento per il paziente cercato o vedere una lista di appuntamenti futuri o passati premendo i tasti sotto la barra di ricerca.</p> | ||
| + | <p> </p> | ||
| + | <h3>3. Sala d'aspetto</h3> | ||
| + | <p><strong>Qui vengono mostrati i pazienti in sala d'aspetto.</strong> In questa sezione , sono disponibili le informazioni relative alle risorse dedicate al paziente, lo status ed il tempo trascorso da quando il paziente è arrivato.</p> | ||
| + | <p>Questa sezione possiede anche una parte dedicata alle comunicazioni interne chiamata <strong>Info giorno</strong>. Se ci sono delle informazioni o degli avvisi che tutto lo staff deve sapere, è possibile condividere qui tali informazioni.</p> | ||
| + | <p> </p> | ||
| + | <h3>4. Resource, view and calendar</h3> | ||
| + | <p>This section provides extended functionalities for the schedule of the clinic. Here, you can change the format of visualization, sort by certain resources and navigate between days with the help of the calendar.</p> | ||
| + | <p> </p> | ||
| + | <h3>5. Schedule</h3> | ||
| + | <p><strong>The schedule is the main section of MedITEX Scheduler.</strong> Here you can view all appointments.</p> | ||
| + | <p>Each employee can set their preferred visualization method, so the next time they log in, their preferences will be kept the same.</p> | ||
| + | <p> </p> | ||
| + | <h3>6. Appointment editor</h3> | ||
| + | <p><strong>The appointment editor is only displayed when creating a new appointment or by double-clicking an appointment in the schedule</strong>. This second option can be altered in the settings menu, so instead of the appointment editor, a list of all appointments from the selected patient will open.</p> | ||
| + | <p>This editor lets you create, edit, copy and save appointments.</p> | ||
| + | <p> </p> | ||
| + | <h2><span id="Resource_administration_.E2.80.93_tab_sheet_.E2.80.9EResources.E2.80.9C" class="mw-headline">Resources</span></h2> | ||
| + | <p><span class="mw-headline">MedITEX Scheduler was developed around resources. Resources can be split into three distinct categories:</span><strong><span class="mw-headline"> person, room and object.</span></strong></p> | ||
| + | <ul> | ||
| + | <li><span class="mw-headline"><span style="text-decoration: underline;"><strong>Person</strong></span> is the category for the personnel working with patients. That can be: embryologists, assistants, doctors, etc.</span></li> | ||
| + | <li><span class="mw-headline"><strong><span style="text-decoration: underline;">Room</span></strong> are facilities in which patients can be allocated. For instance: operation room, labor room, consultation room, etc.</span></li> | ||
| + | <li><span class="mw-headline"><strong><span style="text-decoration: underline;">Object</span></strong> are equipments. If it is a big device, like an X-ray machine, it will also be linked to a room. But it could also be smaller devices such as: ultrasound, incubator, etc.</span></li> | ||
| + | </ul> | ||
| + | <p style="text-align: left;"><strong>Managing </strong>these <strong>resources </strong>is the main goal of <strong>MedITEX Scheduler</strong>.</p> | ||
| + | <p style="text-align: left;"><strong>MedITEX Scheduler</strong> creates appointments for selected resources with starting and finishing times. For instance, it is possible to know when a device is being used, when a room is occupied and when a doctor is consulting a patient. This helps you optimize processes and planning, but above all, it integrates with <strong>MedITEX IVF</strong> to give you the best possible results.</p> | ||
| + | <p style="text-align: left;"> </p> | ||
| + | <h2>Managing Lists</h2> | ||
| + | <p><strong>Every list in MedITEX Scheduler<em> </em>has several important features:</strong></p> | ||
| + | <p> </p> | ||
| + | <h3>Sort and filter</h3> | ||
| + | <p>Clicking on the arrow next to the column header, you can filter the table content by the information contained in that row. Therefore, only the information that was checked will be displayed.</p> | ||
| + | <p>To sort the list ascending or descending, simply click on the blue header of the desired column.</p> | ||
| + | <p><strong>For this example</strong>, the list is sorted ascending by <strong>Patient </strong>(red circle) and is filtered by Sex so it only shows female patients.</p> | ||
| + | <table style="margin-left: auto; margin-right: auto;" border="0"> | ||
| + | <tbody> | ||
| + | <tr> | ||
| + | <td><img src="/images/ListSortFilterRed.png" alt="" width="554" height="364" /></td> | ||
| + | </tr> | ||
| + | </tbody> | ||
| + | </table> | ||
| + | <p> </p> | ||
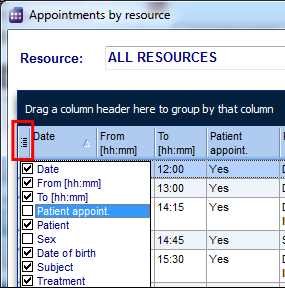
| + | <h3>Hide/show columns</h3> | ||
| + | <p>Some lists have a special button on the left side of the header. This button allows you to hide and move columns.</p> | ||
| + | <p><strong>For this example</strong>, the column Patient was unchecked. So when you compare it with the picture above, the whole column Patient is no longer available.</p> | ||
| + | <p>To move columns around from this button, simply click and drag the name of a column up and down. Two green arrows will help positioning the column in place.</p> | ||
| + | <table style="margin-left: auto; margin-right: auto;" border="0" width="282" height="266"> | ||
| + | <tbody> | ||
| + | <tr> | ||
| + | <td><img src="/images/ListHideColumn.png" alt="http://wiki.meditex-software.com/images/fig59.png" width="560" height="362" /></td> | ||
| + | </tr> | ||
| + | </tbody> | ||
| + | </table> | ||
| + | <p> </p> | ||
| + | <h3>Arrange columns</h3> | ||
| + | <p>It is also possible to move columns around the list simply by clicking and dragging. Two green arrows will help positioning the column in place.</p> | ||
| + | <table style="margin-left: auto; margin-right: auto;" border="0"> | ||
| + | <tbody> | ||
| + | <tr> | ||
| + | <td><img src="/images/ListMoveRed.png" alt="http://wiki.meditex-software.com/images/fig59.png" width="559" height="360" /></td> | ||
| + | </tr> | ||
| + | </tbody> | ||
| + | </table> | ||
| + | <p> </p> | ||
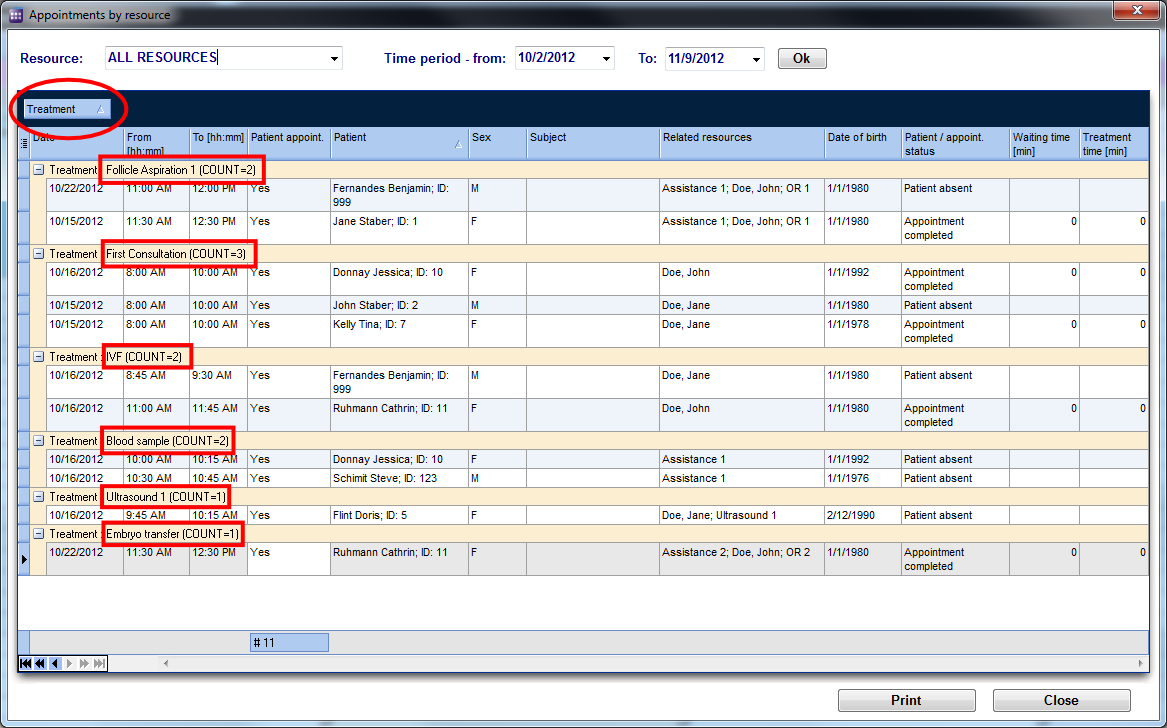
| + | <h3>Group</h3> | ||
| + | <p>It is also possible to group the content of lists in MedITEX Scheduler. In order to do that, simply drag a column to the dark blue area on the top of the list. It is also possible to group by more than one column.</p> | ||
| + | <p>To revert the list to its original form, simply drag the column back in place.</p> | ||
| + | <p><strong>For this example</strong>, the table was grouped by Treatment.</p> | ||
| + | <table style="margin-left: auto; margin-right: auto;" border="0"> | ||
| + | <tbody> | ||
| + | <tr> | ||
| + | <td>[[Image:ListSortGroupRed.png|none|740px|thumb|left|link=http://wiki.meditex-software.com/images/ListSortGroupRed.png]]</td> | ||
| + | </tr> | ||
| + | </tbody> | ||
| + | </table> | ||
| + | <p> </p> | ||
| + | <h3>Persistance</h3> | ||
| + | <p>One of the biggest advantages of managing lists is that each one is saved individually for a user. So next time you log in, MedITEX Scheduler will display your lists just the way you left them.</p> | ||
| + | <p> </p> | ||
| + | <h2>Navigation</h2> | ||
| + | <p>Some images and buttons throughtout this Wiki have links that, once clicked, will open another page with more information.</p> | ||
| + | <p>This links are identified by blue dots around images.</p> | ||
| + | <table style="margin-left: auto; margin-right: auto;" border="0"> | ||
| + | <tbody> | ||
| + | <tr> | ||
| + | <td><a href="/index.php?title=Welcome_to_MedITEX_Scheduler#Navigation"><img style="display: block; margin-left: auto; margin-right: auto; border: 2px dotted blue;" src="/images/MedITEX_Scheduler_129x129.png" alt="" width="129" height="129" /></a></td> | ||
| + | </tr> | ||
| + | <tr> | ||
| + | <td>Click on images with blue dots around it to have further information</td> | ||
| + | </tr> | ||
| + | </tbody> | ||
| + | </table> | ||
| + | <table style="float: right;" border="0"> | ||
| + | <tbody> | ||
| + | <tr> | ||
| + | <td style="text-align: right;"><a href="/index.php?title=MedITEX_Scheduler_manual">Back to the MedITEX Scheduler manual </a></td> | ||
| + | <td style="text-align: right;"><a href="#top">Back to top</a></td> | ||
| + | </tr> | ||
| + | </tbody> | ||
| + | </table> | ||
Revision as of 18:34, 23 January 2013
MedITEX Scheduler è uno strumento ideale per gestire il vostro tempo e pianificare gli appuntamenti con chiarezza per il vostro team, i pazienti e i vostri consulenti medici. In quanto strumento per l'organizzazione, la pianificazione ed il coordinamento MedITEX Scheduler tagliato su misura per seguire i trattamenti medici ed il procedere della terapia.
Contents |
Interfaccia
MedITEX Scheduler possiede un'interfaccia semplice ed intuitiva. Dividiamo questa interfaccia in sezioni più piccole aventi funzionalità specifiche.
Consiglio: fare click sulle immagini per ingrandirle.
 |
1. Collegamenti di supporto
Sono collegamenti speciali, usati con maggior frequenza in Scheduler. Da qui è possibile accedere facilmente e rapidamente a liste di stampa, alla posizione dei pazienti e ad altre funzionalità.
2. Cerca paziente
Questa è la barra di ricerca dei pazienti. Digitare il nome del paziente o fare click sulla freccia in fondo alla barra per avere la lista completa dei pazienti disponibili.
Se disponete di una licenza di MedITEX IVF, potete aprire in IVF il paziente selezionato selezionato su Scheduler premendo sul tasto a sinistra, riportante l'icona di MedITEX IVF.
E' possibile anche creare un nuovo appuntamento per il paziente cercato o vedere una lista di appuntamenti futuri o passati premendo i tasti sotto la barra di ricerca.
3. Sala d'aspetto
Qui vengono mostrati i pazienti in sala d'aspetto. In questa sezione , sono disponibili le informazioni relative alle risorse dedicate al paziente, lo status ed il tempo trascorso da quando il paziente è arrivato.
Questa sezione possiede anche una parte dedicata alle comunicazioni interne chiamata Info giorno. Se ci sono delle informazioni o degli avvisi che tutto lo staff deve sapere, è possibile condividere qui tali informazioni.
4. Resource, view and calendar
This section provides extended functionalities for the schedule of the clinic. Here, you can change the format of visualization, sort by certain resources and navigate between days with the help of the calendar.
5. Schedule
The schedule is the main section of MedITEX Scheduler. Here you can view all appointments.
Each employee can set their preferred visualization method, so the next time they log in, their preferences will be kept the same.
6. Appointment editor
The appointment editor is only displayed when creating a new appointment or by double-clicking an appointment in the schedule. This second option can be altered in the settings menu, so instead of the appointment editor, a list of all appointments from the selected patient will open.
This editor lets you create, edit, copy and save appointments.
Resources
MedITEX Scheduler was developed around resources. Resources can be split into three distinct categories: person, room and object.
- Person is the category for the personnel working with patients. That can be: embryologists, assistants, doctors, etc.
- Room are facilities in which patients can be allocated. For instance: operation room, labor room, consultation room, etc.
- Object are equipments. If it is a big device, like an X-ray machine, it will also be linked to a room. But it could also be smaller devices such as: ultrasound, incubator, etc.
Managing these resources is the main goal of MedITEX Scheduler.
MedITEX Scheduler creates appointments for selected resources with starting and finishing times. For instance, it is possible to know when a device is being used, when a room is occupied and when a doctor is consulting a patient. This helps you optimize processes and planning, but above all, it integrates with MedITEX IVF to give you the best possible results.
Managing Lists
Every list in MedITEX Scheduler has several important features:
Sort and filter
Clicking on the arrow next to the column header, you can filter the table content by the information contained in that row. Therefore, only the information that was checked will be displayed.
To sort the list ascending or descending, simply click on the blue header of the desired column.
For this example, the list is sorted ascending by Patient (red circle) and is filtered by Sex so it only shows female patients.
| <img src="/images/ListSortFilterRed.png" alt="" width="554" height="364" /> |
Hide/show columns
Some lists have a special button on the left side of the header. This button allows you to hide and move columns.
For this example, the column Patient was unchecked. So when you compare it with the picture above, the whole column Patient is no longer available.
To move columns around from this button, simply click and drag the name of a column up and down. Two green arrows will help positioning the column in place.
| <img src="/images/ListHideColumn.png" alt="http://wiki.meditex-software.com/images/fig59.png" width="560" height="362" /> |
Arrange columns
It is also possible to move columns around the list simply by clicking and dragging. Two green arrows will help positioning the column in place.
| <img src="/images/ListMoveRed.png" alt="http://wiki.meditex-software.com/images/fig59.png" width="559" height="360" /> |
Group
It is also possible to group the content of lists in MedITEX Scheduler. In order to do that, simply drag a column to the dark blue area on the top of the list. It is also possible to group by more than one column.
To revert the list to its original form, simply drag the column back in place.
For this example, the table was grouped by Treatment.
 |
Persistance
One of the biggest advantages of managing lists is that each one is saved individually for a user. So next time you log in, MedITEX Scheduler will display your lists just the way you left them.
Some images and buttons throughtout this Wiki have links that, once clicked, will open another page with more information.
This links are identified by blue dots around images.
| <a href="/index.php?title=Welcome_to_MedITEX_Scheduler#Navigation"><img style="display: block; margin-left: auto; margin-right: auto; border: 2px dotted blue;" src="/images/MedITEX_Scheduler_129x129.png" alt="" width="129" height="129" /></a> |
| Click on images with blue dots around it to have further information |
| <a href="/index.php?title=MedITEX_Scheduler_manual">Back to the MedITEX Scheduler manual </a> | <a href="#top">Back to top</a> |