Anagrafica
From MedITEX - Wiki
| Line 110: | Line 110: | ||
<ol> | <ol> | ||
<li><strong>tasto destro </strong>nell'area della foto e scegliere <strong>aggiungi foto nuovo paziente</strong></li> | <li><strong>tasto destro </strong>nell'area della foto e scegliere <strong>aggiungi foto nuovo paziente</strong></li> | ||
| − | <li>cliccare sulla risorsa esterna e scegliere la foto | + | <li>cliccare sulla risorsa esterna e scegliere la foto desiderata.</li> |
</ol> | </ol> | ||
<p> </p> | <p> </p> | ||
| − | <p> | + | <p>Per questa procedura è necessaria una webcam <strong>TWAIN-compatible</strong> webcam. Se la webcam non ha un driver TWAIN, si raccomanda il software seguente:</p> |
| − | <p><strong> | + | <p><strong> <a href="http://www.akond.net/index.php?issue_id=134">inPhoto ID Webcam</a> Software<br /></strong></p> |
<ul> | <ul> | ||
| − | <li> | + | <li>testato da noi</li> |
| − | <li> | + | <li>include riconoscimento facciale</li> |
| − | <li> | + | <li>ritaglio automatico del viso sull'immagine scattata</li> |
| − | <li> | + | <li>lavora su Windows 2000, XP, Vista, Windows 7 (32 and 64 bit), Windows 8</li> |
</ul> | </ul> | ||
</td> | </td> | ||
| Line 126: | Line 126: | ||
</table> | </table> | ||
<p> </p> | <p> </p> | ||
| − | <p> | + | <p>(Le immagini circondate da puntini blu sono selezionabili, se cliccate rimandano ad altre pagine con ulteriori informazioni riguradanti quella particolare sezione del programma).</p> |
<table border="0"> | <table border="0"> | ||
<tbody> | <tbody> | ||
Revision as of 10:40, 13 April 2016
| <img src="/images/Anagrafica_1_IT.png" alt="" width="750" height="544" /> |
La pagina dell'Anagrafica è divisa in due parti principali:
- La parte sopra contiene i dati personali del paziente, un riassunto di ulteriori <a href="/index.php?title=Demographics#Private_details">dati personali</a> (riquadro grigio), un riassunto del <a href="/index.php?title=Cryo_storage">materiale presente in criobanca</a> (riquadro blu) e un estratto relativo alle <a href="/index.php?title=Donation">Informazioni donatore</a> (riquadro verde). La sezione relative alle informazioni donatore non sono disonibili se la donazione non è prevista nel paese di riferimento dell'utente.
- La parte bassa della pagina contiene la sezione relativa alla lista dei documenti archiviati (Documenti di Amministrazione) e una sezione con la lista dei messaggi inviati/ricevuto relativi al paziente in questione (Comunicazioni). E' possibile selezionare i documenti raggruppati per tipo semplicemete selezionando il tipo nella colonna di sinistra.
| <img src="/images/Anagrafica_2_IT.png" alt="" width="700" height="52" /> |
All'inizio della pagina, una barra nera mostra le seguenti informazioni:
|
Contents |
Pulsanti
(Le immagini circondate da puntini blu sono selezionabili, se cliccate rimandano ad altre pagine con ulteriori informazioni riguradanti quella particolare sezione del programma).
| <a href="/index.php?title=MedITEX_IVF_main_page"><img style="display: block; margin-left: auto; margin-right: auto;" src="/images/homeico.jpg" alt="" /></a> | Home: cliccare per tornare alla pagina principale di MedITEX. |
| <a href="/index.php?title=Free / QM fields"><img style="display: block; margin-left: auto; margin-right: auto;" src="/images/QMico.jpg" alt="" /></a> | Campi liberi/QM: cliccare per accedere ai campi Qm relativi a quell'area. O cliccare sulla freccia sulla destra per bloccare lla sezione o accedere al log delle modifiche. |
| <a href="/index.php?title=Demographics#Edit_person"><img style="display: block; margin-left: auto; margin-right: auto;" src="/images/Anagrafica_3_IT.png" alt="" width="112" height="39" /></a> | Modica persona: accedere alla sezione informazioni personali per modificarle. |
| <a href="/index.php?title=Demographics#Set_partnership"><img style="display: block; margin-left: auto; margin-right: auto;" src="/images/Partnership.png" alt="" /></a> | Partnership: assegnare un partner. |
| <img style="display: block; margin-left: auto; margin-right: auto;" src="/images/Anagrafica_4_IT.png" alt="" width="102" height="35" /> | Cancella persona: Cllicare qui per cancellare una persona. Una persona può essere cancellata solo se alcuni requisiti siano soddisfatti (ad esempio nessun ciclo per il paziente da cancellare). |
| <a href="/index.php?title=Create a new entry in demographics"><img style="display: block; margin-left: auto; margin-right: auto;" src="/images/Anagrafica_5_IT.png" alt="" width="109" height="39" /></a> | Nuovo elemento: cliccare qui per creare un nuovo documento come una lettera, un report, un contratto, etc. |
| <a href="/index.php?title=Create_templates_for_patient_labels"><img style="display: block; margin-left: auto; margin-right: auto;" src="/images/Anagrafica_6_IT.png" alt="" width="113" height="39" /></a> |
Stampa etichette: cllica qui per stampare etichette con l'ID paziente, il Nome e il Cognome, la data di nascita, Nomee cognome del partner. |
| <a href="/index.php?title=SMS_interface"><img style="display: block; margin-left: auto; margin-right: auto;" src="/images/Anagrafica_7_IT.png" alt="" width="90" height="44" /></a> | Messaggio: mandare un messaggio al paziente. Questo messaggio può essere un SMS, una mail o un messaggio tramite web portal. |
| <img style="display: block; margin-left: auto; margin-right: auto;" src="/images/Anagrafica_9_IT.png" alt="" width="91" height="34" /> | MedITEX Accounting: cliccare per aprire MedITEX Accounting. |
| <img style="display: block; margin-left: auto; margin-right: auto;" src="/images/Anagrafica_8bis_IT.png" alt="" width="79" height="40" /> | Vai al partner: cliccare per andare ai dati personali del partner del paziente in questione. |
| <img style="display: block; margin-left: auto; margin-right: auto;" src="/images/Anagrafica_8_IT.png" alt="" width="67" height="36" /> | MedITEX Scheduler: cliccare per aprire MedITEX Scheduler. |
| <img style="display: block; margin-left: auto; margin-right: auto;" src="/images/PM.png" alt="" width="55" height="23" /> | Con questi tasti è possibile scegliere l'ampiezza delle colonne nelle liste (Espandere o comprimere le colonne) |
Aree interattive
| <img style="display: block; margin-left: auto; margin-right: auto;" src="/images/Anagrafica_10_IT.png" alt="" width="676" height="213" /> |
|
Foto del paziente: è possibile ingrandrila con un doppio click. Se si desidera aggiungere una nuova foto del paziente, si hanno due opzioni:
Se si desidera aggiungere una foto direttamente dalla webcam, seguire questi passi:
Per questa procedura è necessaria una webcam TWAIN-compatible webcam. Se la webcam non ha un driver TWAIN, si raccomanda il software seguente: <a href="http://www.akond.net/index.php?issue_id=134">inPhoto ID Webcam</a> Software
|
(Le immagini circondate da puntini blu sono selezionabili, se cliccate rimandano ad altre pagine con ulteriori informazioni riguradanti quella particolare sezione del programma).
| <a href="/index.php?title=Demographics#Private_details"><img style="display: block; margin-left: auto; margin-right: auto; border: 2px dotted blue;" src="/images/gray.png" alt="" width="408" height="105" /></a> | Additional patient data: if you wish to add further contact details, health insurance data, or if you wish to add referrers, click the grey box in the upper right corner. A window will open and you will be able to insert more data, such as: telephone number, billing category, marital status, professional info and referrers. |
| <a href="/index.php?title=Cryo_storage"><img style="display: block; margin-left: auto; margin-right: auto; border: 2px dotted blue;" src="/images/InCryo.png" alt="" width="410" height="32" /></a> | Cryo overview: to get an overview of the Cryo Gyn click on the blue box. A window will open and you can insert new straws, thaw selected items, open contracts and invoices and get and overview about the currently storage items and a history of storage changes. |
| <a href="/index.php?title=Donation"><img style="display: block; margin-left: auto; margin-right: auto; border: 2px dotted blue;" src="/images/DonorInfo.png" alt="" width="415" height="50" /></a> | Donation information: to see the details of donation of this patient, click on the green box. A window will be opened and you can see all the details about the person and the donor information. Reservations for possible donor sperm can be entered here. |
Tabs with lists on the bottom of the page
Administration of documents
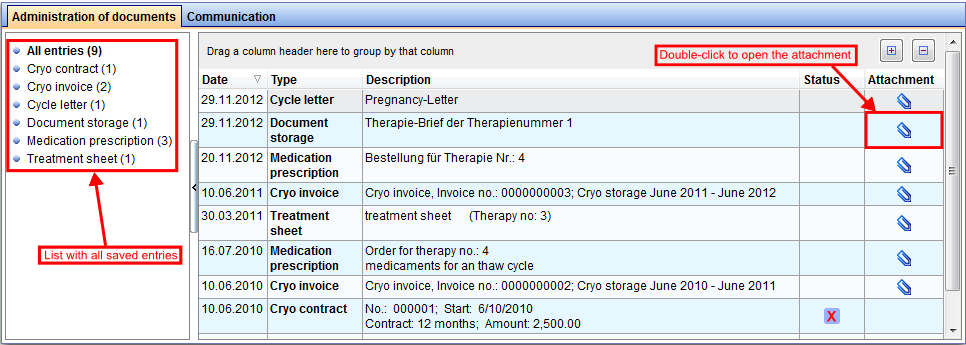 |
In this area you can find all kinds of documents of one patient. They are divided into different types:
- All entries
- Cryo contract
- Cryo invoice
- Cycle letter
- Document storage
- Medication prescription
- Treatment sheet
If you double-click a row at the right side, the document will be opened. You can also see the status and the document attached.
Communication
 |
In this area you can find all Web portal and SMS messages exchanged with a patient.
If you double-click a row, the message will open.
| <img src="/images/CommOverviewRefreshButton.png" alt="" width="29" height="27" /> | Refresh button: refreshes statuses of existing messages and checks if there are some new messages |
Edit person
Private details
Enter personal contact details of the patient.
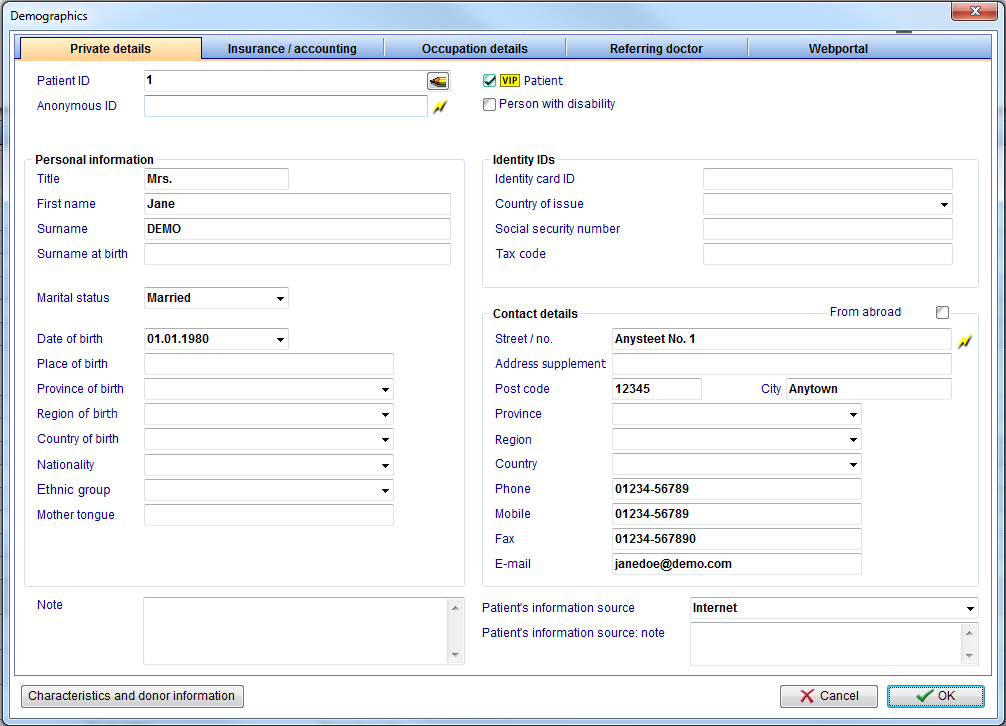 |
- Patient ID: if you click on <img src="/images/Pencil.png" alt="" width="27" height="21" /> at the end, a window will be opened and you can change the Patient ID manually. It is possible that you have no permission for changing. Permissions can be set by users with admin rights in the <a href="/index.php?title=Administration_of_user#Administration_of_user_rights">administration tool</a>.
- Anonym. ID: create an anonymous ID by clicking on <img src="/images/AnonymID.pn.png" alt="" width="29" height="26" />.
- Title: enter the title of the patient.
- Firstname: set here the firstname of the patient.
- Surname: add the surname.
- Maiden name: the birth name can be entered here.
- Date of birth: insert the date of birth manually or choose it out of the calendar by clicking on the arrow.
- Nationality: select a nationality from the list provided.
- Place of birth: add the place of birth.
- Street / no.: insert the street and the house number.
- Postal code: postal code of the residence.
- City: residence of the patient.
- Province: select a province from the list. You can edit the options in the settings under <a href="/index.php?title=MedITEX_IVF_Settings#System_tables">system tables</a>.
- Note: important notes and comments about the patient, e.g. intolerances, allergies, etc.
- Check the box VIP patient to assign special or important patients as a VIP. This information will appear in addition to the patient's name in the search window.
- You can edit the options for the information source of patient in the settings under <a href="/index.php?title=MedITEX_IVF_Settings#System_tables">system tables</a>.
Insurance / accounting
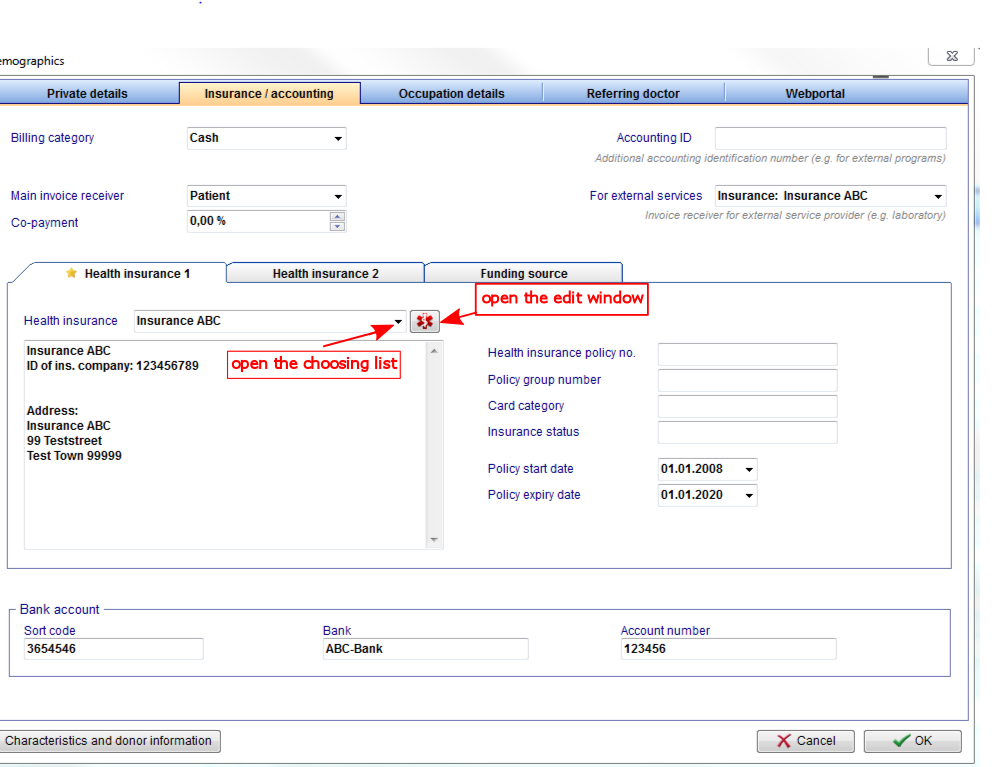 |
- Here you can find important data of the health insurance and the billing category of the patient.
Occupation details
 |
Reffering doctor
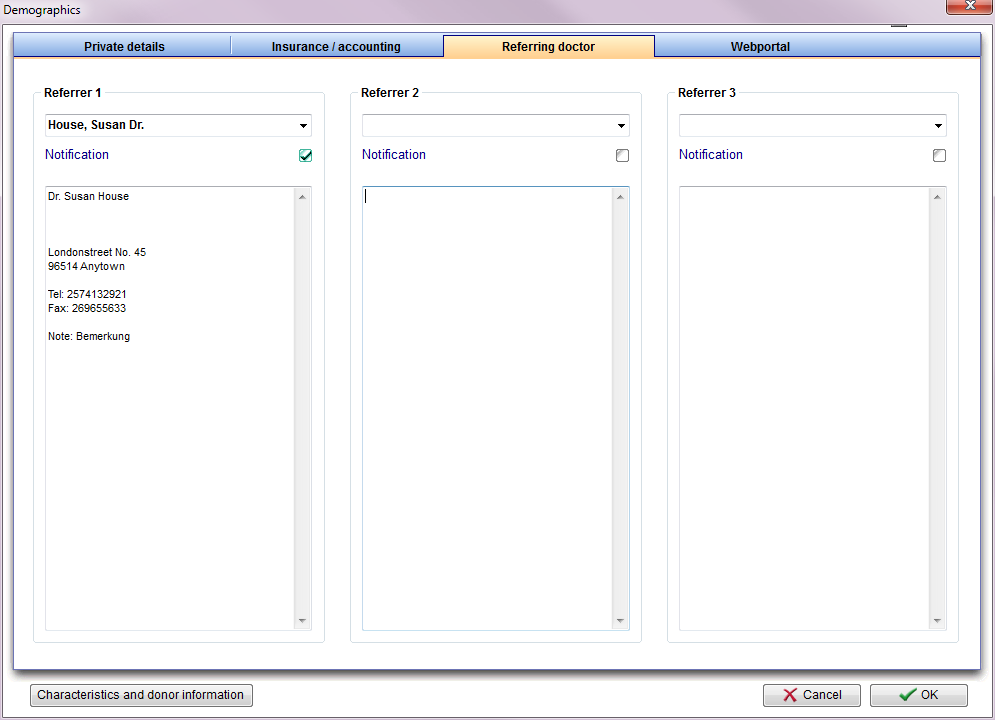 |
- Here the consulting doctor will be added.
- You can assign a maximum of three referrers to each patient. Referrers can be managed and added on the top menu under System -> <a href="/index.php?title=Referrers">Referrers</a>.
- Check the box Notification if the doctor should be notified.
- New referrers can be selected from the list of available doctors by clicking on the arrow symbol.
- Linked referrers are visible on the main page.
Webportal
 |
Switch to characteristics and donor information
| <a href="/index.php?title=Donation"><img style="border: 2px dotted blue;" src="/images/char1.png" alt="" /></a> | Click on the button to see the details of donation of this patient. A window will be opened and you can see all the details about the characteristics and the donor information. Reservations for possible donor sperm can be entered here. |
Set partnership
 |
- This window displays all important information of the partnership.
- Here you can specify the couple identification code.
- In the list you can see which patients are present in your database and which status they have. (Has partners)
- You can reassign partnerships. To prevent accidental changes of current partnerships, a security message will be opened.
| <a href="/index.php?title=How_to_create_a_new_patient%3F"><img style="display: block; margin-left: auto; margin-right: auto; border: 2px dotted blue;" src="/images/NewP.png" alt="" /></a> | New person: add a new patient in the database. |
| <a href="/index.php?title=MedITEX_IVF_manual">Back to the MedITEX IVF menu </a> | <a href="#top">Back to top</a> |