Administration of user
From MedITEX - Wiki
| (11 intermediate revisions by 2 users not shown) | |||
| Line 1: | Line 1: | ||
<p>Groups and rights can be managed very easily in the respective links.</p> | <p>Groups and rights can be managed very easily in the respective links.</p> | ||
| − | <p>From the management of user groups and rights window, it is possible to assign rights to multiple users by categorizing them into groups.</p> | + | <p>From the <strong>management of user groups and rights window</strong>, it is possible to assign rights to multiple users by categorizing them into groups.</p> |
<h2>Administration of user groups</h2> | <h2>Administration of user groups</h2> | ||
| − | <p>This section allows you to assign a user to a specific group.</p> | + | <p>This section allows you to assign a user to a<strong> specific group</strong>.</p> |
<table style="margin-left: auto; margin-right: auto;" border="0" width="111" height="24"> | <table style="margin-left: auto; margin-right: auto;" border="0" width="111" height="24"> | ||
<tbody> | <tbody> | ||
<tr> | <tr> | ||
| − | <td>[[Image:AdministrationOfUserGroups.png|none|740px|thumb|left|link=http://wiki.meditex-software.com/images/AdministrationOfUserGroups.png|]]</td> | + | <td>[[Image:AdministrationOfUserGroups.png|none|740px|thumb|left|link=http://wiki.meditex-software.com/images/AdministrationOfUserGroups.png|Rights management - Administration of user groups.]]</td> |
</tr> | </tr> | ||
</tbody> | </tbody> | ||
| Line 15: | Line 15: | ||
<tbody> | <tbody> | ||
<tr> | <tr> | ||
| − | <td style="text-align: center;"><img src="/images/Plus.png" alt="" width=" | + | <td style="text-align: center;"><img src="/images/Plus.png" alt="" width="23" height="23" /></td> |
| − | <td style="text-align: justify;">Create new user group: click here to add a new group to the list.<br /></td> | + | <td style="text-align: justify;"><strong>Create new user group:</strong> click here to add a new group to the list.<br /></td> |
</tr> | </tr> | ||
<tr> | <tr> | ||
<td style="text-align: center;"><img src="/images/DeleteX.png" alt="" width="26" height="24" /></td> | <td style="text-align: center;"><img src="/images/DeleteX.png" alt="" width="26" height="24" /></td> | ||
| − | <td style="text-align: justify;">Delete group of users: click here to delete the selected group from the list. Confirmation is required.<br /></td> | + | <td style="text-align: justify;"><strong>Delete group of users:</strong> click here to delete the selected group from the list. Confirmation is required.<br /></td> |
</tr> | </tr> | ||
<tr> | <tr> | ||
<td style="text-align: center;"><img style="display: block; margin-left: auto; margin-right: auto;" src="/images/ChangeGroupButton.png" alt="" width="86" height="26" /></td> | <td style="text-align: center;"><img style="display: block; margin-left: auto; margin-right: auto;" src="/images/ChangeGroupButton.png" alt="" width="86" height="26" /></td> | ||
| − | <td style="text-align: justify;">Rename user group: click here to edit the name of the selected group.<br /></td> | + | <td style="text-align: justify;"><strong>Rename user group:</strong> click here to edit the name of the selected group.<br /></td> |
</tr> | </tr> | ||
<tr> | <tr> | ||
<td style="text-align: center;"><img src="/images/ArrowLeftRed.png" alt="" width="28" height="27" /><img src="/images/ArrowRightRed.png" alt="" width="28" height="26" /></td> | <td style="text-align: center;"><img src="/images/ArrowLeftRed.png" alt="" width="28" height="27" /><img src="/images/ArrowRightRed.png" alt="" width="28" height="26" /></td> | ||
| − | <td style="text-align: justify;">Assign/Remove selected staff to the selected group: moves the selected person to or off a group.</td> | + | <td style="text-align: justify;"><strong>Assign/Remove selected staff to the selected group:</strong> moves the selected person to or off a group.</td> |
</tr> | </tr> | ||
</tbody> | </tbody> | ||
| Line 34: | Line 34: | ||
<p> </p> | <p> </p> | ||
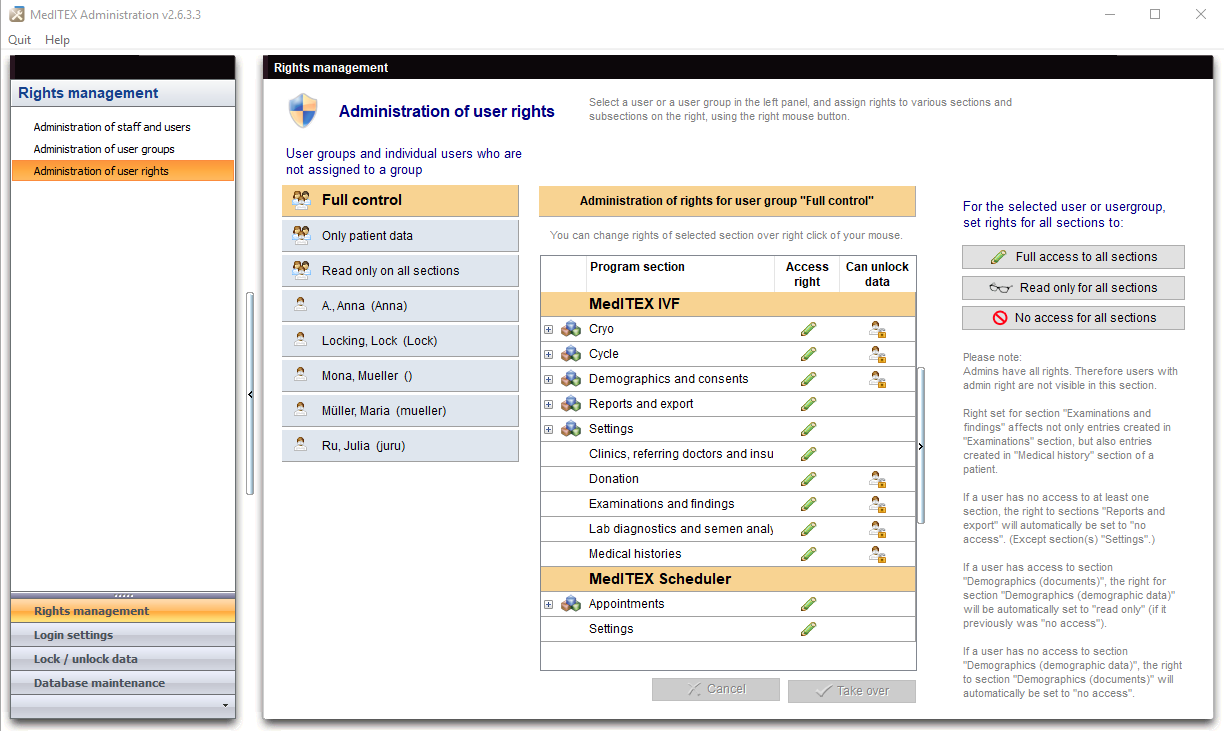
<h2>Administration of user rights</h2> | <h2>Administration of user rights</h2> | ||
| − | <p>This section allows you to set permissions for groups and individual users.</p> | + | <p>This section allows you to <strong>set permissions for groups and individual users</strong>.</p> |
<table style="margin-left: auto; margin-right: auto;" border="0" width="111" height="24"> | <table style="margin-left: auto; margin-right: auto;" border="0" width="111" height="24"> | ||
<tbody> | <tbody> | ||
<tr> | <tr> | ||
| − | <td>[[Image:AdministrationOfUserRights.png|none|740px|thumb|left|link=http://wiki.meditex-software.com/images/AdministrationOfUserRights.png|]]</td> | + | <td>[[Image:AdministrationOfUserRights.png|none|740px|thumb|left|link=http://wiki.meditex-software.com/images/AdministrationOfUserRights.png|Rights management - Administration of user rights.]]</td> |
</tr> | </tr> | ||
</tbody> | </tbody> | ||
| Line 48: | Line 48: | ||
<tr> | <tr> | ||
<td style="text-align: center;"><img src="/images/FullAccessToAllSections.png" alt="" width="226" height="26" /></td> | <td style="text-align: center;"><img src="/images/FullAccessToAllSections.png" alt="" width="226" height="26" /></td> | ||
| − | <td style="text-align: justify;">Create new user group: click here to add a new group to the list.<br /></td> | + | <td style="text-align: justify;"><strong>Create new user group: </strong>click here to add a new group to the list.<br /></td> |
</tr> | </tr> | ||
<tr> | <tr> | ||
<td style="text-align: center;"><img src="/images/ReadOnlyForAllSections.png" alt="" width="225" height="25" /></td> | <td style="text-align: center;"><img src="/images/ReadOnlyForAllSections.png" alt="" width="225" height="25" /></td> | ||
| − | <td style="text-align: justify;">Delete group of users: click here to delete the selected group from the list. Confirmation is required.<br /></td> | + | <td style="text-align: justify;"><strong>Delete group of users:</strong> click here to delete the selected group from the list. Confirmation is required.<br /></td> |
</tr> | </tr> | ||
<tr> | <tr> | ||
<td style="text-align: center;"><img style="display: block; margin-left: auto; margin-right: auto;" src="/images/NoAccessForAllSections.png" alt="" width="225" height="27" /></td> | <td style="text-align: center;"><img style="display: block; margin-left: auto; margin-right: auto;" src="/images/NoAccessForAllSections.png" alt="" width="225" height="27" /></td> | ||
| − | <td style="text-align: justify;">Rename user group: click here to edit the name of the selected group.<br /></td> | + | <td style="text-align: justify;"><strong>Rename user group: </strong>click here to edit the name of the selected group.<br /></td> |
</tr> | </tr> | ||
<tr> | <tr> | ||
<td style="text-align: center;"><img src="/images/TakeOverButton.png" alt="" width="135" height="26" /></td> | <td style="text-align: center;"><img src="/images/TakeOverButton.png" alt="" width="135" height="26" /></td> | ||
| − | <td style="text-align: justify;">Assign/Remove selected staff to the selected group: moves the selected person to or off a group.</td> | + | <td style="text-align: justify;"><strong>Assign/Remove selected staff to the selected group:</strong> moves the selected person to or off a group.</td> |
| + | </tr> | ||
| + | </tbody> | ||
| + | </table> | ||
| + | <p> </p> | ||
| + | <p> </p> | ||
| + | <p>You can also right-click on individual user groups to set permissions in detail.</p> | ||
| + | <table style="margin-left: auto; margin-right: auto;" border="0"> | ||
| + | <tbody> | ||
| + | <tr> | ||
| + | <td><img style="display: block; margin-left: auto; margin-right: auto;" src="/images/Rights1.png" alt="" width="363" height="421" /></td> | ||
| + | <td> | ||
| + | <p>Program section: Settings -> Subsections: Clinic data.</p> | ||
| + | <p>Here you can set the user rights <strong>only for the clinic data</strong>.</p> | ||
| + | </td> | ||
| + | </tr> | ||
| + | <tr> | ||
| + | <td><img style="display: block; margin-left: auto; margin-right: auto;" src="/images/Rights2.png" alt="" width="436" height="254" /></td> | ||
| + | <td> | ||
| + | <p>Program section: Settings.</p> | ||
| + | <p>Here you can set the user rights <strong>for the whole area</strong>.</p> | ||
| + | </td> | ||
| + | </tr> | ||
| + | </tbody> | ||
| + | </table> | ||
| + | <p> </p> | ||
| + | <table border="0"> | ||
| + | <tbody> | ||
| + | <tr> | ||
| + | <td><img style="display: block; margin-left: auto; margin-right: auto;" src="/images/howto48.png" alt="" width="48" height="48" /></td> | ||
| + | <td> | ||
| + | <p>If you would like to get more information, please follow <a href="/index.php?title=MedITEX_Administration_how_to">this link</a> and check our <strong>How to </strong>page.</p> | ||
| + | </td> | ||
</tr> | </tr> | ||
</tbody> | </tbody> | ||
Latest revision as of 14:21, 29 May 2013
Groups and rights can be managed very easily in the respective links.
From the management of user groups and rights window, it is possible to assign rights to multiple users by categorizing them into groups.
Contents |
Administration of user groups
This section allows you to assign a user to a specific group.
 |
Buttons
| <img src="/images/Plus.png" alt="" width="23" height="23" /> | Create new user group: click here to add a new group to the list. |
| <img src="/images/DeleteX.png" alt="" width="26" height="24" /> | Delete group of users: click here to delete the selected group from the list. Confirmation is required. |
| <img style="display: block; margin-left: auto; margin-right: auto;" src="/images/ChangeGroupButton.png" alt="" width="86" height="26" /> | Rename user group: click here to edit the name of the selected group. |
| <img src="/images/ArrowLeftRed.png" alt="" width="28" height="27" /><img src="/images/ArrowRightRed.png" alt="" width="28" height="26" /> | Assign/Remove selected staff to the selected group: moves the selected person to or off a group. |
Administration of user rights
This section allows you to set permissions for groups and individual users.
 |
Buttons
| <img src="/images/FullAccessToAllSections.png" alt="" width="226" height="26" /> | Create new user group: click here to add a new group to the list. |
| <img src="/images/ReadOnlyForAllSections.png" alt="" width="225" height="25" /> | Delete group of users: click here to delete the selected group from the list. Confirmation is required. |
| <img style="display: block; margin-left: auto; margin-right: auto;" src="/images/NoAccessForAllSections.png" alt="" width="225" height="27" /> | Rename user group: click here to edit the name of the selected group. |
| <img src="/images/TakeOverButton.png" alt="" width="135" height="26" /> | Assign/Remove selected staff to the selected group: moves the selected person to or off a group. |
You can also right-click on individual user groups to set permissions in detail.
| <img style="display: block; margin-left: auto; margin-right: auto;" src="/images/Rights1.png" alt="" width="363" height="421" /> |
Program section: Settings -> Subsections: Clinic data. Here you can set the user rights only for the clinic data. |
| <img style="display: block; margin-left: auto; margin-right: auto;" src="/images/Rights2.png" alt="" width="436" height="254" /> |
Program section: Settings. Here you can set the user rights for the whole area. |
| <img style="display: block; margin-left: auto; margin-right: auto;" src="/images/howto48.png" alt="" width="48" height="48" /> |
If you would like to get more information, please follow <a href="/index.php?title=MedITEX_Administration_how_to">this link</a> and check our How to page. |
| <a href="/index.php?title=MedITEX_Administration_manual">Back to MedITEX Administration manual </a> |
<a href="#top">Back to top</a> |