Configurazione di MedITEX Scheduler
From MedITEX - Wiki
Back to MedITEX Scheduler Manual home page
Per modificare le impostazioni di MedITEX Scheduler fare click sul menu Sistema -> Impostazioni:

Contents |
Impostazioni: sezione "Generale"
Scala temporale di Scheduler
Nella sezione generale è possibile modificare le unità di tempo del calendario. Questo avrà effetto sulle impostazioni di tutti gli utenti del programma. Ciscun utente può comunque modificare temporaneamente queste impostazioni generali premendo con il tasto destro del mouse sulla scala temporale.


Aprire un appuntamento
Se la casella „Apri lista appuntamenti di questo paziente con doppio click su lista appuntamenti del paziente (invece che mostrare dettagli appuntamento)“ è selezionata e fate doppio click su un appuntamento, si aprirà la lista degli appuntamenti contenente tutti gli appuntamenti di questo paziente invece che l'editor appuntamenti. Il vantaggio è che l'utente può avere una panoramica di tutti gli appuntamenti del paziente. I dettaglli di ciascun appuntamento della lista possono essere visualizzati con un doppio click. 

Waiting time limit
The waiting limit defines the maximal allowed time for the patient to wait in the waiting room. If this limit is exceeded, the waiting time info (“Since [hh:mm]”) will turn red.


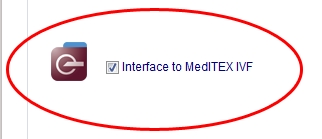
Interface to MedITEX IVF
This setting enables you to open the selected patient’s data in MedITEX IVF, using the patient search mask, or the patient appointment (right click on appointment).
|
|
|
|
|
Resource administration – tab sheet „Resources“
Groups
A group has to be assigned to each resource. There are three group types: “Person”, “Room” and “Object”. For example, the group „Doctor“ belongs to the group type „Person“, and the group „Device“ to the group type „Object“.
You can create new groups and edit or delete existing ones in the area “Group”, to the left.

Resources
Every resource is located in the table to the right
Hint: there are several important features available in every table in MedITEX Scheduler:
|
 |

By double-clicking a line - or by clicking on the button „Edit resource“ - the editor window for the selected resource will appear.

A view of the main scheduler window. On the left, the time scale is set to time interval of 15 minutes. On the right all resources are displayed side by side, in one day. Every user can reorder the resources individually.

Resources settings – tab sheet „Working times and restrictions“
In this area each resource can be adjusted in detail. General working times can be defined for the whole clinic, as well as special working times for each individual resource. Using “appointment types” it is possible to restrict some parts of the day to only accept certain appointment types, for each resource. It is also possible to restrict a resource to an allocated maximum number of appointments.
Appointment type
Time sections that allow only certain types of appointments can be defined for each resource. For example on Monday from 08:00 AM to 10:00 AM the doctor X performs only first interviews with new patients. By defining an appointment type “First interview” and assigning it to this resource and time, it will be possible to schedule only first interviews with doctor X on Monday morning. Or you may want to schedule on Thursday from 09:30 AM to 02:00 PM only appointments that take place in the operation room (OR)? In this case you can define an appointment type “OR” which you should assign to the involved resources and the specific time.

In the table to the left you can create and edit the appointment types. The first line in the table cannot be changed because it stands for all types of appointments (all kinds of appointments are possible).
|
If the box „Show text for the appointment types in resource row” is checked, the allocated possible appointment types will be shown as text for each resource in the scheduler. It is also possible to provide these times with a special resource background colour. However, this colour is the same for all appointment types, so if you have several appointment types defined it is advisable to use only the text.
|
|
Working times, assignment of an appointment type, and limitations
Over the right table you can define the working times for each resource. The first upper line of this table represents the general work times of your clinic. These will be automatically valid for all resources that have no specific work time defined. In the bottom table you can see the overview of each selected resource.

With double click on a resource or with the button „Edit resource settings“ you can open the settings window of the selected resource.

With a click on the button “New work time definition” a new line will be inserted, in which you can define a new work model for the selected resource.
|
In the drop down list you can choose the appointment type(s) allowed for the selected work model – selected line. (Information: the conflict messages for not suitable appointment types, while scheduling appointments, will only work if you have also assigned the types to the related treatments. Please see the section – “Treatments”). If you do not make a special selection (all boxes checked), “all appointments” will be displayed in the scheduler. In this way there will be no constraints on appointment type.
|
 |
For each day you can define the time of start and end. If you like to define a break, like e. g. a lunch break, insert a further row (button “New work time definition”). In one row you apply the times UNTIL the break, in the row bellow you apply the times beginning FROM the break. If you have more rows for a day and there are overlapping times, the summary of the appointment types of the intersection are valid for the overlapping time.
Column “Validity”: If you don’t fill something out, the row with that working time definition will always be valid. But you can also fill out “from” or/and “until”. The scheduler will accordingly show the work times for that resource.
Limitation of resources to a maximum number of assigned appointments
Resources can be limited to accept up to a maximum number of appointment starts per day. The limitation can be defined for each day or for whole week.
Example:
In a clinic there are four beds available. Every day one bed can be assigned only once, to one patient. A resource „Beds“ has been defined. In order not to reserve more beds then beds available, a maximum number of starts of appointments for the resource „Beds“ is limited to four.

If at the assignment of an appointment the maximum number is exceeded, a warning will be displayed.

Treatments as appointment templates – tab sheet „Treatments“
Reason for an appointment
Treatments are suggested as reasons for appointments.
Example: An appointment is made with a patient who should come for an embryo transfer. In the appointment details to the right, you should select “Embryo transfer” from the list of possible treatments.

In order to edit a treatment you can double click on the desired treatment (line), or select the line and click the button „Edit treatment“. You can create a new treatment template with the button “New treatment”.


If you have defined appointment types in tab „Working times and limitations“, you should assign the corresponding appointment types to the treatments. In this way the warning system will be active while scheduling appointments. If a treatment has no appointment type assigned, this treatment will always be allowed and no warning will appear if an appointment including this treatment is scheduled at a time that is actually reserved for other appointment types.
Treatments as appointment templates
For a treatment it is possible not only to define the duration and colour which the appointment will have if this treatment is selected, but also all involved resources.
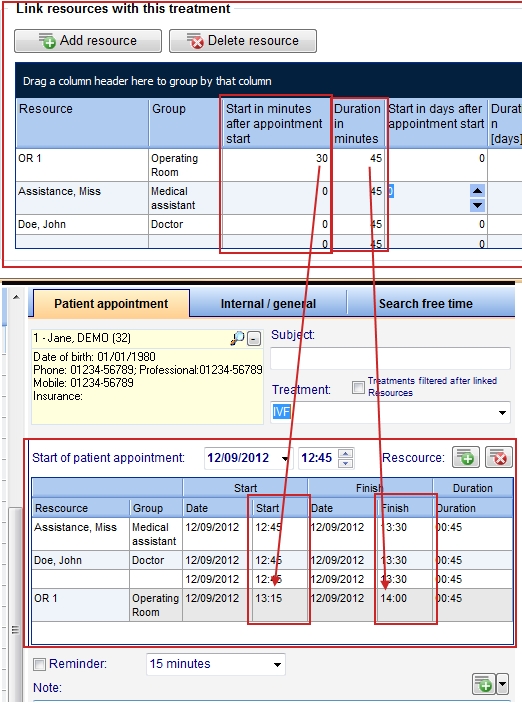
In order to link a resource with the treatment, please click on button “Add resource” and select the resource in column 1. For each linked resource, it is possible to define a different start time and duration. If you select this treatment while scheduling an appointment, all linked resources with their corresponding times will automatically be assigned to the appointment.

Example:
The treatment „Follow-up examination” is always executed by doctor John Doe and an assistant. We have the resource „Doe, John“ and a resource „Assistance“, which in this case stands commonly for all assistances as for the person who is on duty at the moment. If an appointment “Follow-up examination” is assigned, it will appear in both resources. In order not to select each resource manually every time when assigning that appointment, we previously have linked these resources with the treatment in the settings. So if we choose this treatment for an appointment, the appointment will automatically be inserted in all linked resources.
In our example the follow-up examination is not only performed by Dr. John Doe, but also by Dr. Smith and the corresponding assistance. Therefore we apply a second treatment with the description “follow-up examination” and we add the resource “Dr. Smith” and “Assistance”.
|
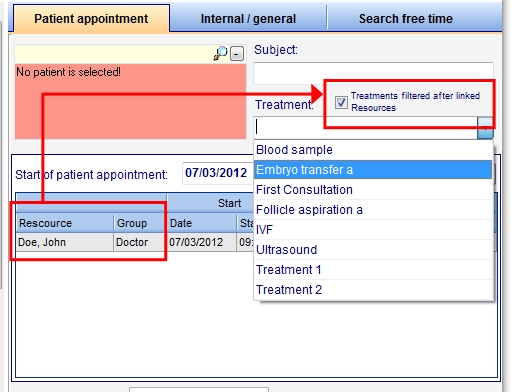
To assign a new appointment you usually double click in one of the resources that is involved in that kind of appointment. If you do so, this resource is already inserted in the appointment editor. The checkbox “Treatments filtered after linked resource” will be active, so you will have only treatments as choice, which are linked with the already selected resource, or those treatments that have no link to a resource at all. Hint: In order to distinguish in the overview more easily between treatments with the same description, you may place the initials or the abbreviation of the doctor whose resource is linked with the treatment. |
 |

Users and passwords – tab sheet „Staff“
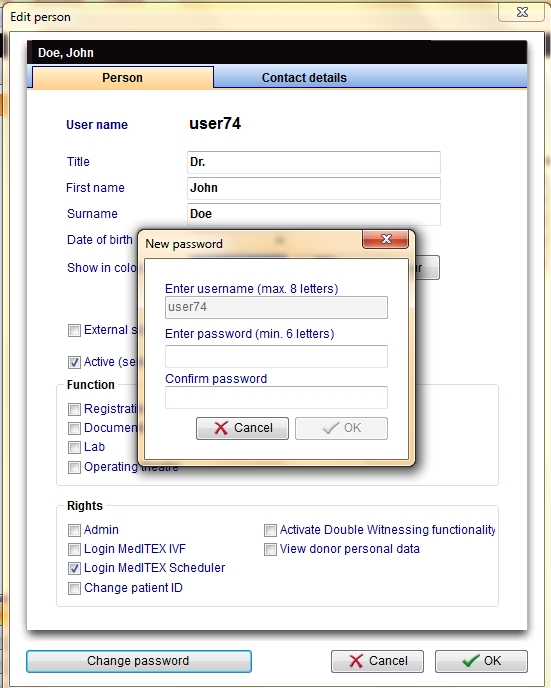
In tab sheet „Staff” you declare with the checkbox “Login” every user of the MedITEX scheduler. If the checkbox „Admin” is deactivated, this user cannot access to the settings.


