MedITEX IVF Impostazioni
From MedITEX - Wiki
| Line 90: | Line 90: | ||
<p><strong>Criteri di ricerca</strong></p> | <p><strong>Criteri di ricerca</strong></p> | ||
<ul> | <ul> | ||
| − | <li>Da questa sezione è possibile selezionare i criteri di ricerca dei pazienti: | + | <li>Da questa sezione è possibile selezionare i criteri di ricerca dei pazienti: |
<ul> | <ul> | ||
<li>ID Paziente</li> | <li>ID Paziente</li> | ||
| Line 269: | Line 269: | ||
<p><strong>Template Lettere</strong>: In questa sezione è possibile definire le proprietà del logo della clinica che potrà essere inserito nei template delle lettere create con report editor.</p> | <p><strong>Template Lettere</strong>: In questa sezione è possibile definire le proprietà del logo della clinica che potrà essere inserito nei template delle lettere create con report editor.</p> | ||
<ul> | <ul> | ||
| − | <li><strong>Sigla Clinica</strong>: Se il centro opera in diverse sedi è possibile creare templete personalizzati per | + | <li><strong>Sigla Clinica</strong>: Se il centro opera in diverse sedi è possibile creare templete personalizzati per ogniuna delle sedi. I tasti di posizione permettono di selezionare le varie sedi.</li> |
</ul> | </ul> | ||
<ul> | <ul> | ||
| − | <li><strong> | + | <li><strong>Requisiti grafici per segnaposti addizionali</strong>: è possibile definire le dimensioni delle immagini di cellule ed ecografie utilizzate nelle lettere e il numero di immagini per riga, permettendo di ottenere sempre un modello uguale di referto.</li> |
</ul> | </ul> | ||
<ul> | <ul> | ||
| − | <li><strong>WOMOD | + | <li><strong>Impostazioni WOMOD (Moduli word)</strong>: Creare/Modificare il template di default.</li> |
</ul> | </ul> | ||
<ul> | <ul> | ||
| − | <li><strong> | + | <li><strong>Gestisci lettere</strong>: Permette di visualizzare la sezione di amministrazione di tutte le lettere gestite dal programma.</li> |
</ul> | </ul> | ||
<table style="margin-left: auto; margin-right: auto;" border="0"> | <table style="margin-left: auto; margin-right: auto;" border="0"> | ||
| Line 284: | Line 284: | ||
<tr> | <tr> | ||
<td><a href="/index.php?title=Result_management#Administrate_letters"><img src="/images/plus48.png" alt="" width="48" height="48" /></a></td> | <td><a href="/index.php?title=Result_management#Administrate_letters"><img src="/images/plus48.png" alt="" width="48" height="48" /></a></td> | ||
| − | <td><a href="/index.php?title=Result_management#Administrate_letters"> | + | <td><a href="/index.php?title=Result_management#Administrate_letters">Cliccare qui</a> per avere ulteriori informazioni su <strong>Gestisci lettere</strong>.</td> |
</tr> | </tr> | ||
</tbody> | </tbody> | ||
| Line 298: | Line 298: | ||
<p> </p> | <p> </p> | ||
<p> </p> | <p> </p> | ||
| − | <h4> | + | <h4>Spermiogramma</h4> |
| − | <p> | + | <p>Per modificare le <strong>impostazioni</strong> degli <strong>spermiogrammi </strong>cliccare su <strong>Sistema-> Configurazione/Amministrazione</strong><strong>-> Impostazioni -> Sistema -> Funzioni -> Spermiogramma</strong>.</p> |
<table style="margin-left: auto; margin-right: auto;" border="0"> | <table style="margin-left: auto; margin-right: auto;" border="0"> | ||
<tbody> | <tbody> | ||
| Line 309: | Line 309: | ||
<ul> | <ul> | ||
<li> | <li> | ||
| − | <p><strong> | + | <p><strong>Utilizza linea guida WHO [A+B]</strong>: Permette di scegliere tra l'utilizzo di tre o quattro parametri per la motilità - motilità prograssiva (PR), motilità locale (NP) e immotilità (IM) come specificato dalla linea guida WHO attuale per l'analisi del liquido seminale (parametri A e B insieme per calcolo PR, C e D separati per calcolo di NP e IM).</p> |
</li> | </li> | ||
</ul> | </ul> | ||
| − | <blockquote> | + | <blockquote></blockquote> |
| − | + | ||
| − | + | ||
| − | + | ||
| − | </blockquote> | + | |
<ul> | <ul> | ||
| − | <li><strong> | + | <li><strong>Quality assessment spermiogr.</strong>: Attivazione della quality assessment con relativa aggiunta automatica dei dati di default inseriti</li> |
</ul> | </ul> | ||
<blockquote> | <blockquote> | ||
<ul> | <ul> | ||
| − | <li><strong> | + | <li>Le informazioni su<strong> Postazione</strong>, <strong>esame</strong> e <strong>metodo d'esame</strong>, necessarie per il calcolo e la validazione del liquido seminale, possono essere inserite qui. </li> |
| − | <li> | + | <li>Inoltre se necessario è possibile scegliere <strong>l'unità di calcolo</strong> e <strong>adattare il fattore di diluizione</strong> e il <strong>fattore porzione.</strong></li> |
</ul> | </ul> | ||
</blockquote> | </blockquote> | ||
| Line 337: | Line 333: | ||
</blockquote> | </blockquote> | ||
<ul> | <ul> | ||
| − | <li><a href="/index.php?title=MedITEX_IVF_Settings#System_tables"><img style="border: 2px dotted blue; float: left;" src="/images/EditSemen.png" alt="" width="31" height="26" /></a> | + | <li><a href="/index.php?title=MedITEX_IVF_Settings#System_tables"><img style="border: 2px dotted blue; float: left;" src="/images/EditSemen.png" alt="" width="31" height="26" /></a> Permette di spostarsi nella sezione delle tabelle di sistema per aggiungere o modificare <strong>postazioni/unità. </strong>Successivamente le nuove opzioni <strong>potranno essere scelte</strong> nella sezione di quality assesment.</li> |
</ul> | </ul> | ||
<ul> | <ul> | ||
| − | <li><strong> | + | <li><strong>Periodo minimo di quarantena per liquido seminale</strong>: Giorni di quarantena per il liquido seminale crioconservato. Liquidi seminali di donatori con valori di HEP B, HEP C, TPHA e HIV positivi, o quelli che non hanno raggiunto il periodo minimo di quarantena non possono essere scongelati o utilizzati.</li> |
</ul> | </ul> | ||
<p> </p> | <p> </p> | ||
| Line 347: | Line 343: | ||
<tr> | <tr> | ||
<td><a href="/index.php?title=Documenting_a_new_sample#Documenting_a_semen_analysis"><img src="/images/plus48.png" alt="" width="48" height="48" /></a></td> | <td><a href="/index.php?title=Documenting_a_new_sample#Documenting_a_semen_analysis"><img src="/images/plus48.png" alt="" width="48" height="48" /></a></td> | ||
| − | <td><a href="/index.php?title=Documenting_a_new_sample#Documenting_a_semen_analysis"> | + | <td><a href="/index.php?title=Documenting_a_new_sample#Documenting_a_semen_analysis">Cliccare qui</a> per avere ulteriori informazioni sulla documentazione di spermiogrammi.</td> |
</tr> | </tr> | ||
</tbody> | </tbody> | ||
| Line 354: | Line 350: | ||
<tbody> | <tbody> | ||
<tr> | <tr> | ||
| − | <td style="text-align: left;"><a href="#top"> | + | <td style="text-align: left;"><a href="#top">Inizio pagina</a></td> |
</tr> | </tr> | ||
</tbody> | </tbody> | ||
| Line 361: | Line 357: | ||
<p> </p> | <p> </p> | ||
<p> </p> | <p> </p> | ||
| − | <h4> | + | <h4>Ciclo</h4> |
<p>To edit the <strong>Settings </strong>of <strong>Cycles </strong>click on the menu item <strong>System -> Configuration</strong><strong> / administration</strong><strong> -> Settings -> System -> Functions -> Cycle</strong>.</p> | <p>To edit the <strong>Settings </strong>of <strong>Cycles </strong>click on the menu item <strong>System -> Configuration</strong><strong> / administration</strong><strong> -> Settings -> System -> Functions -> Cycle</strong>.</p> | ||
<table style="margin-left: auto; margin-right: auto;" border="0"> | <table style="margin-left: auto; margin-right: auto;" border="0"> | ||
| Line 450: | Line 446: | ||
<p><strong>Actions and document templates</strong>:</p> | <p><strong>Actions and document templates</strong>:</p> | ||
<ul> | <ul> | ||
| − | <li><strong>Invoice</strong>: the first invoice created. | + | <li><strong>Invoice</strong>: the first invoice created. |
<ul> | <ul> | ||
<li><strong>Dunning level 1</strong>: first document emitted if payment for the invoice has not been done.</li> | <li><strong>Dunning level 1</strong>: first document emitted if payment for the invoice has not been done.</li> | ||
| Line 1,133: | Line 1,129: | ||
<p><strong>Storage dimensioning:</strong></p> | <p><strong>Storage dimensioning:</strong></p> | ||
<ul> | <ul> | ||
| − | <li>When a new unit is created, the following fields have to be filled: | + | <li>When a new unit is created, the following fields have to be filled: |
<ul> | <ul> | ||
<li>Description</li> | <li>Description</li> | ||
Revision as of 13:45, 7 April 2016
 |
Definire la propria struttura.
Le Impostazioni MedITEX IVF sono della massima importanza. Essi consentono di adattare il programma alle condizioni e circostanze specifiche del Centro.
Questo include l'aggiunta o la modifica di farmaci, la gestione dei materiali utilizzati e le interfacce con programmi di laboratorio e di fatturazione, la definizione degli incubatori e l'organizzazione della criobanca. In questa sezione è anche possibile definire campi liberi/QM e il contenuto di particolari tabelle di sistema.
La definizione completa e corretta delle impostazioni è un'attività cruciale da svolgere prima di cominciare ad utilizzare MedITEX IVF.
Contents |
Clinica
Per modificare le impostazioni della clinica è sufficiente cliccare su Sistema -> Configurazione/Amministrazione -> Impostazioni -> Clinica.
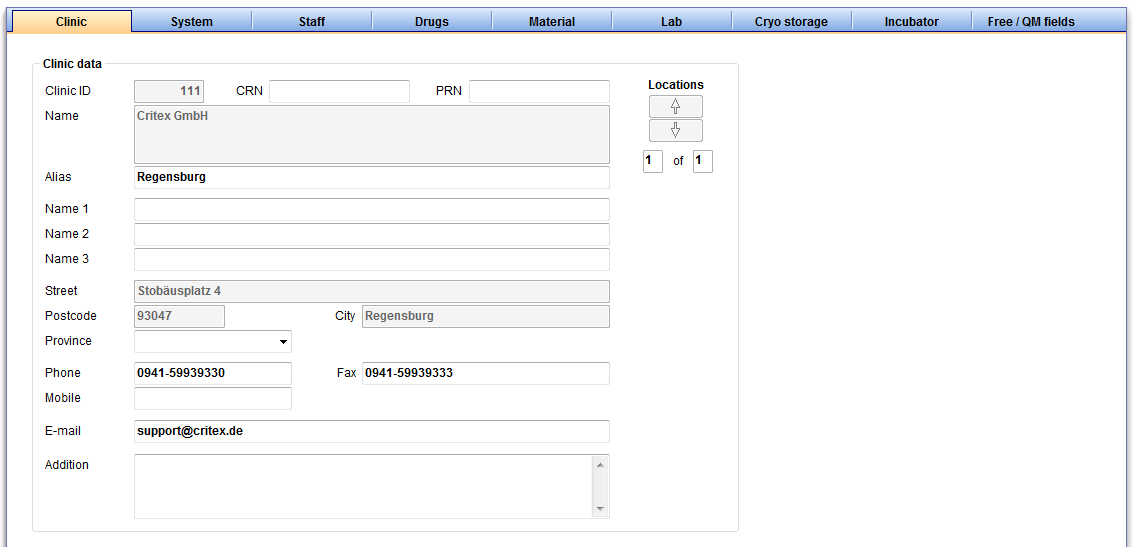 |
- Qui si possono inserire i dettagli di contatto del centro e visualizzare l'ID della clinica.
- Inserire e modificare l'alias della clinica, il nome del medico responsabile del centro e altri dati.
- Se nel Database sono impostate diverse cliniche, è possibile passare da una all'altra premendo il pulsante "Posizione".
- I campi disabilitati sono riempiti automaticamente al momento dell'installazione. Se si desidera modificarli contattare l'assistenza.
| <a href="#top">Inizio pagina</a> |
Sistema
Per modificare le impostazioni di sistema cliccare su Sistema-> <strong>Configurazione / Amministrazione -> Impostazioni -> Sistema -> Generale</strong>.
Generale
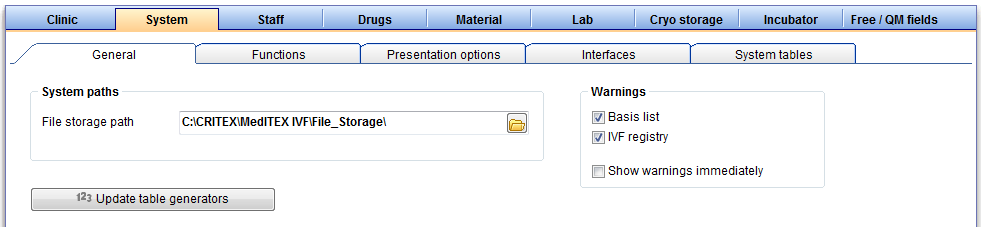 |
- Percorsi Sistema: Qui è possibile definire il percorso utilizzato dalle interfacce esterne di programmi di fatturazione e laboratorio e da MedITEX per la conservazione dei file word utilizzabili nel programma e documenti digitali stampati per ogni singolo paziente. Per modificare questo percorso è sufficiente cliccare sull'icone di "cartella" posta sulla destra del campo in questione. Dalla finestra di dialogo che si apre sarà possibile selezionare il nuovo percorso.
- Aggiorna generatori tabelle: Cliccando su questo pulsante i generatori delle tabelle che costituiscono il Database di MedITEX verranno aggiornati. Prima di utilizzare questa funzione è necessario accertarsi che nessuno stia utilizzando il software e che tutti gli utenti abbiano effettuato il logoff.
- Plausibilità ed esportazioni: Da questa sezione è possibile impostare i messaggi di plausibilità che verranno mostrati nelle varie sezione del programma (per esempio “Lista base Anfomed”). L'opzione DIR (Registro IVF Tedesco) contiene messaggi di plausibilità rilevanti solamente per centri con sede nel territorio Tedesco.
Le opzioni selezionate in questa sezione rappresenterano l'insieme dei messaggi di plausibilità, evidenziati attraverso semafori di color rosso, nelle varie sezioni del programma in caso di informazioni mancanti o erroneamente documentate.
MedITEX IVF controlla i dati in tempo reale, permettendo la visualizzazione automatica dei messaggi di plausibilità al passaggio da una maschera di input all'altra. Se si deseleziona l'opzione "Mostra subito messaggi di warning" questa feature può essere disabilitata.
- Importante: Modifiche alle impostazioni di plausibilità possono causare la documentazione di informazioni incorrette.
| <a href="#top">Back to top</a> |
Funzioni
Generale
Per modificare le impostazioni di funzioni generali cliccare su Sistema-> <strong>Configurazione/Amministrazione -> Impostazioni -> Sistema -> Funzioni -> Generale.</strong>
 |
|
Criteri di ricerca
|
|
|
Anamnesi
|
|
| <img src="/images/SFGeneral5.png" alt="" width="490" height="117" /> |
Anteprima / Blocco note
|
| <img src="/images/SFGeneral7.png" alt="" /> |
Stampante etichette per Barcode / RFID MedITEX permette:
|
| <img src="/images/SFGeneral8.png" alt="" /> |
Impostazioni Mediaplayer
|
| <a href="#top">Inizio pagina</a> |
Generazione ID automatica
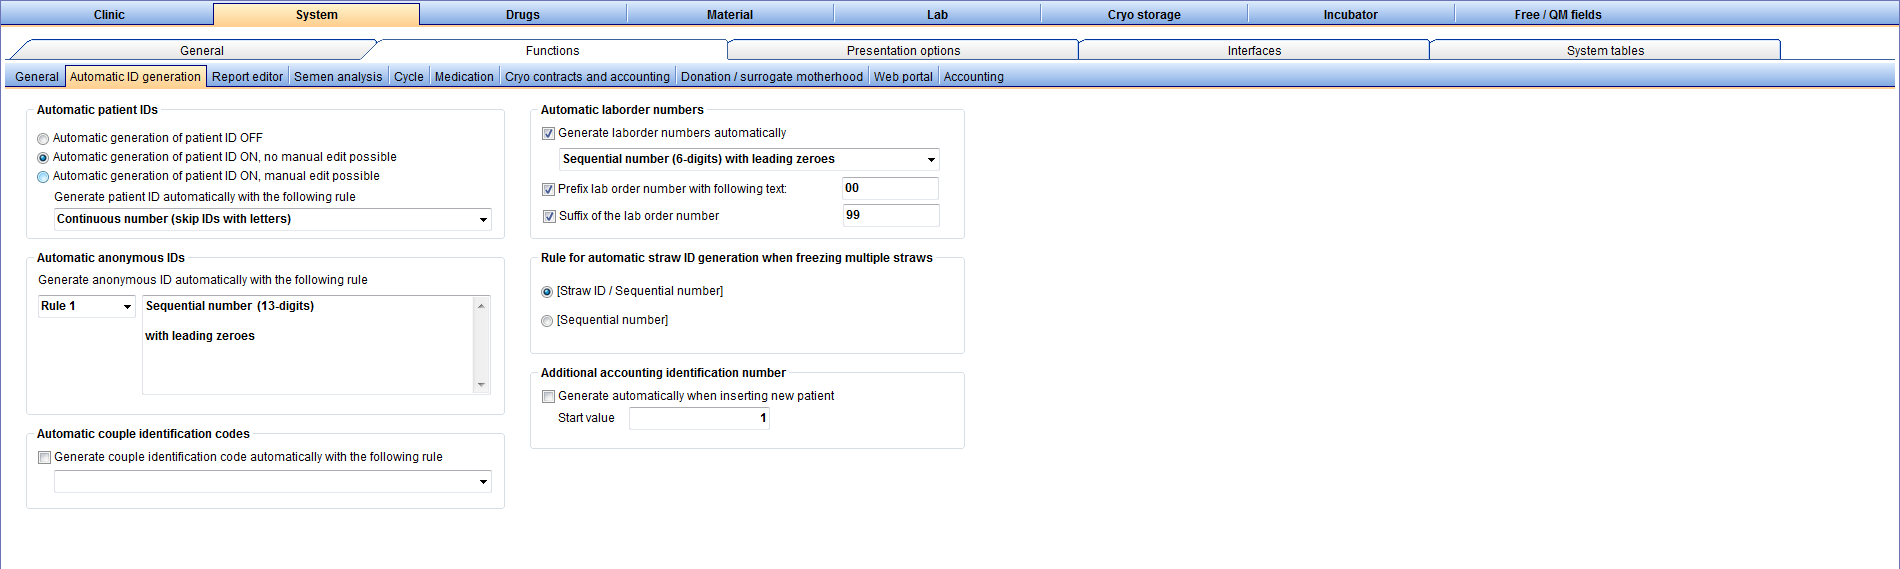
Per modificare i criteri di generazione automatica di particolari ID cliccare su Sistema-> <strong>Configurazione/Amministrazione -> Impost.-> </strong>Sistema -> Funzioni -> Generazione ID automatica
 |
| <img src="/images/SFGeneral2.png" alt="" width="488" height="148" /> |
ID paziente automatici
|
| <img src="/images/SFGeneral3.png" alt="" width="483" height="165" /> |
ID anonimo automatico
|
|
Codice identificazione coppia automatici
|
|
|
Numeri laborder automatici
|
|
|
Regola generazione ID criocarrier quando si congelano più criocarriers
|
|
|
Ulteriore numero identificativo fatturazione
|
Report editor
Questa sezione descrive le impostazione per Report editor.
| <a href="/index.php?title=Queries_of_Report_editor"><img src="/images/plus48.png" alt="" width="48" height="48" /></a> | <a href="/index.php?title=Queries_of_Report_editor">Cliccare qui</a> per avere ulteriori informazioni sulle query. |
Per modificare le Impostazioni di Report editor cliccare su Sistema-> <strong>Configurazione/Amministrazione -> Impostazioni -> Sistema -> </strong>Funzioni -> Report editor.
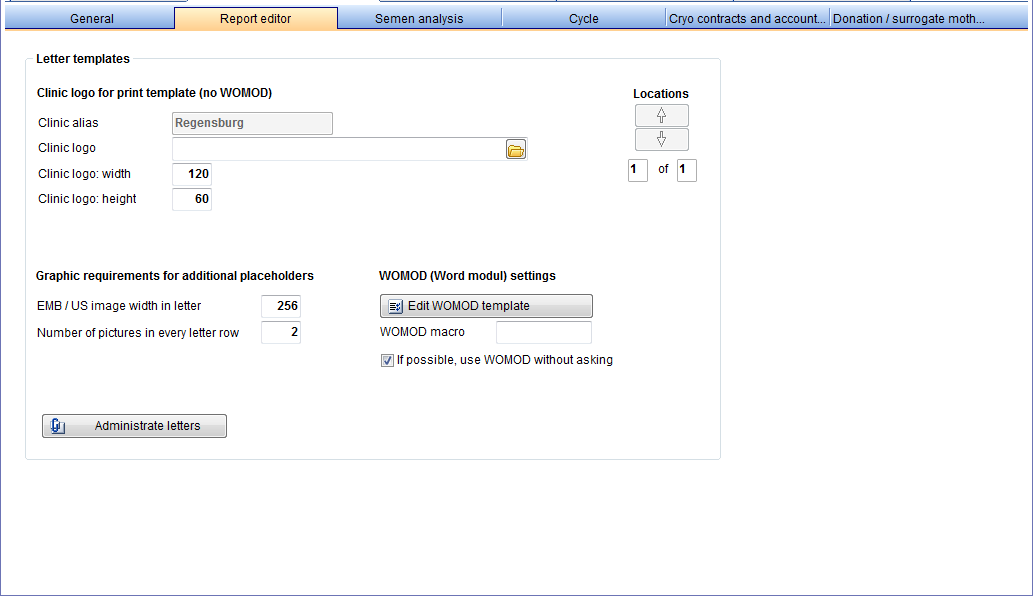 |
Template Lettere: In questa sezione è possibile definire le proprietà del logo della clinica che potrà essere inserito nei template delle lettere create con report editor.
- Sigla Clinica: Se il centro opera in diverse sedi è possibile creare templete personalizzati per ogniuna delle sedi. I tasti di posizione permettono di selezionare le varie sedi.
- Requisiti grafici per segnaposti addizionali: è possibile definire le dimensioni delle immagini di cellule ed ecografie utilizzate nelle lettere e il numero di immagini per riga, permettendo di ottenere sempre un modello uguale di referto.
- Impostazioni WOMOD (Moduli word): Creare/Modificare il template di default.
- Gestisci lettere: Permette di visualizzare la sezione di amministrazione di tutte le lettere gestite dal programma.
| <a href="/index.php?title=Result_management#Administrate_letters"><img src="/images/plus48.png" alt="" width="48" height="48" /></a> | <a href="/index.php?title=Result_management#Administrate_letters">Cliccare qui</a> per avere ulteriori informazioni su Gestisci lettere. |
| <a href="#top">Back to top</a> |
Spermiogramma
Per modificare le impostazioni degli spermiogrammi cliccare su Sistema-> Configurazione/Amministrazione-> Impostazioni -> Sistema -> Funzioni -> Spermiogramma.
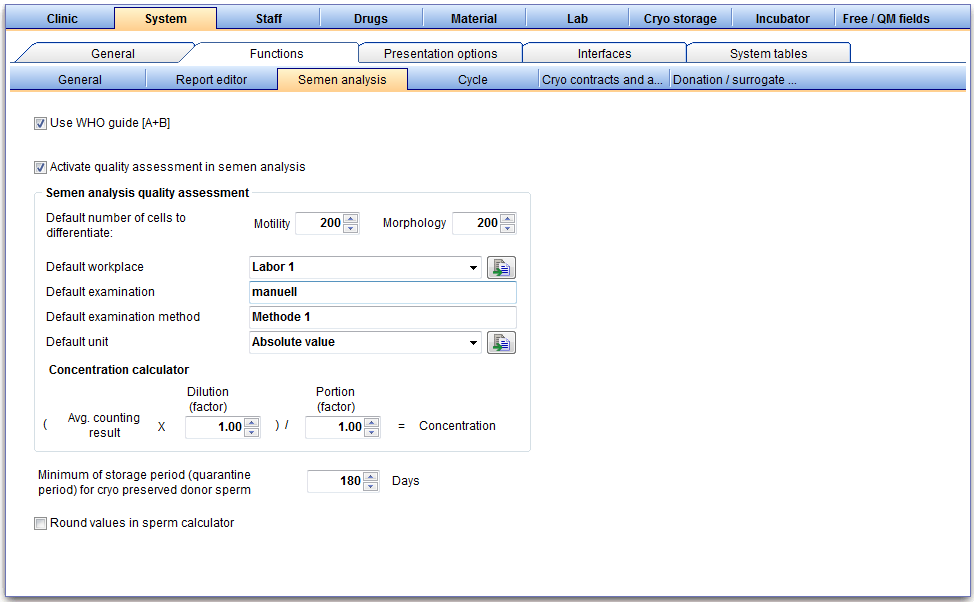 |
-
Utilizza linea guida WHO [A+B]: Permette di scegliere tra l'utilizzo di tre o quattro parametri per la motilità - motilità prograssiva (PR), motilità locale (NP) e immotilità (IM) come specificato dalla linea guida WHO attuale per l'analisi del liquido seminale (parametri A e B insieme per calcolo PR, C e D separati per calcolo di NP e IM).
- Quality assessment spermiogr.: Attivazione della quality assessment con relativa aggiunta automatica dei dati di default inseriti
- Le informazioni su Postazione, esame e metodo d'esame, necessarie per il calcolo e la validazione del liquido seminale, possono essere inserite qui.
- Inoltre se necessario è possibile scegliere l'unità di calcolo e adattare il fattore di diluizione e il fattore porzione.
- <a href="/index.php?title=MedITEX_IVF_Settings#System_tables"><img style="border: 2px dotted blue; float: left;" src="/images/EditSemen.png" alt="" width="31" height="26" /></a> Permette di spostarsi nella sezione delle tabelle di sistema per aggiungere o modificare postazioni/unità. Successivamente le nuove opzioni potranno essere scelte nella sezione di quality assesment.
- Periodo minimo di quarantena per liquido seminale: Giorni di quarantena per il liquido seminale crioconservato. Liquidi seminali di donatori con valori di HEP B, HEP C, TPHA e HIV positivi, o quelli che non hanno raggiunto il periodo minimo di quarantena non possono essere scongelati o utilizzati.
| <a href="/index.php?title=Documenting_a_new_sample#Documenting_a_semen_analysis"><img src="/images/plus48.png" alt="" width="48" height="48" /></a> | <a href="/index.php?title=Documenting_a_new_sample#Documenting_a_semen_analysis">Cliccare qui</a> per avere ulteriori informazioni sulla documentazione di spermiogrammi. |
| <a href="#top">Inizio pagina</a> |
Ciclo
To edit the Settings of Cycles click on the menu item System -> Configuration / administration -> Settings -> System -> Functions -> Cycle.
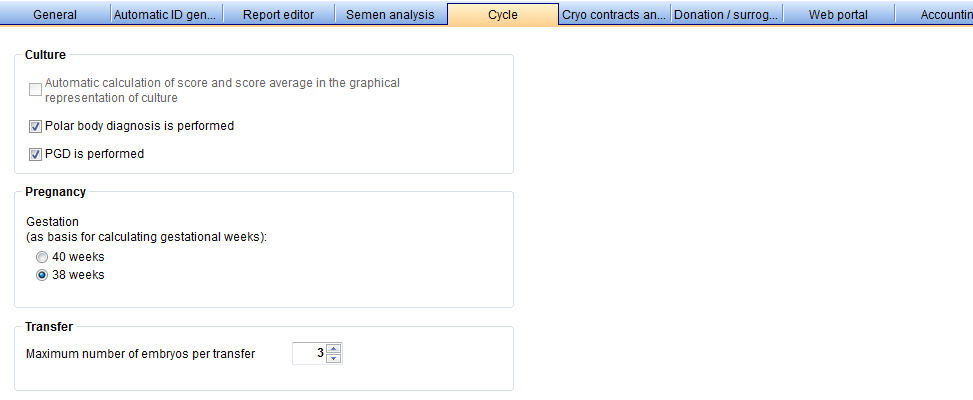 |
- <a href="/index.php?title=Cycle_Culture">Culture</a>: activates the automatic calculation of score and score average in the <a href="/index.php?title=Cycle_Culture#Graphical_representation">Graphical representation</a> of culture for a cycle.
- <a href="/index.php?title=Cycle_Pregnancy">Pregnancy</a>: gestational weeks throughout the program will be calculated based on this setting. You can choose between 40 or 38 weeks.
- <a href="/index.php?title=Cycle_Transfer">Transfer</a>: the maximum number of embryos per transfer. Observe the legal requirements of your country.
| <a href="#top">Back to top</a> |
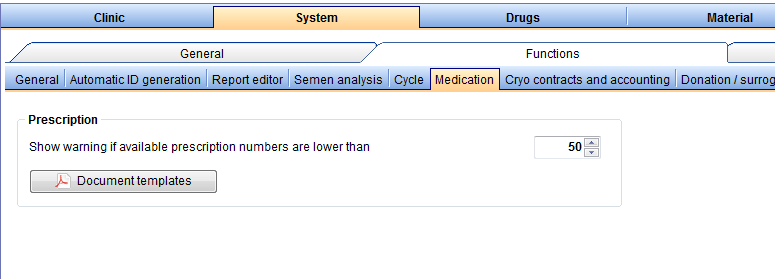
Medication
 |
Cryo contracts and accounting
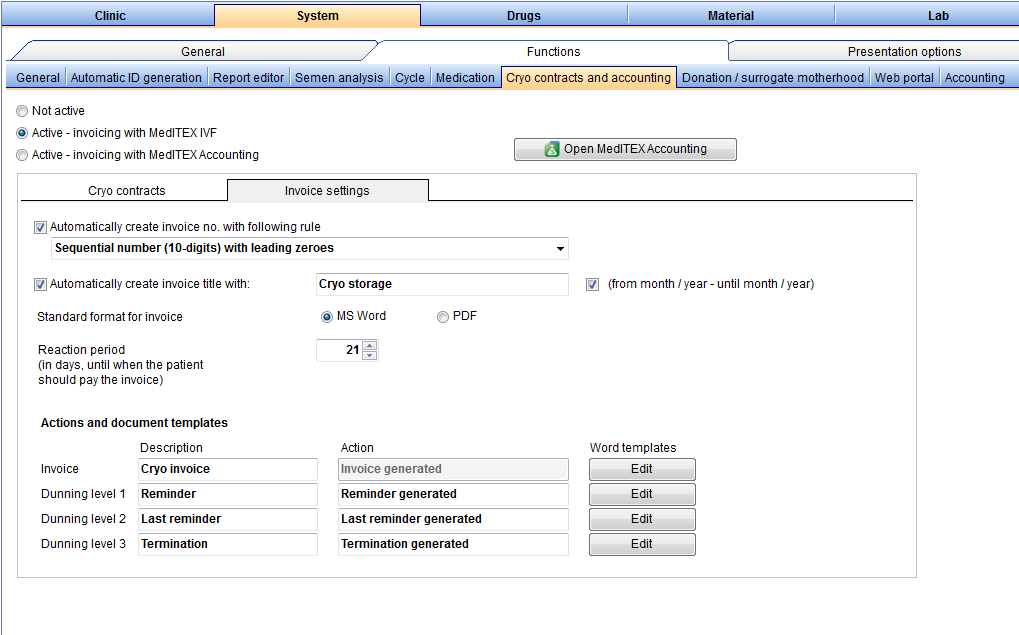
To edit the Settings of Cryo contracts and accounting click on the menu item System -> Configuration / administration -> Settings -> System -> Functions -> Cryo contracts and accounting.
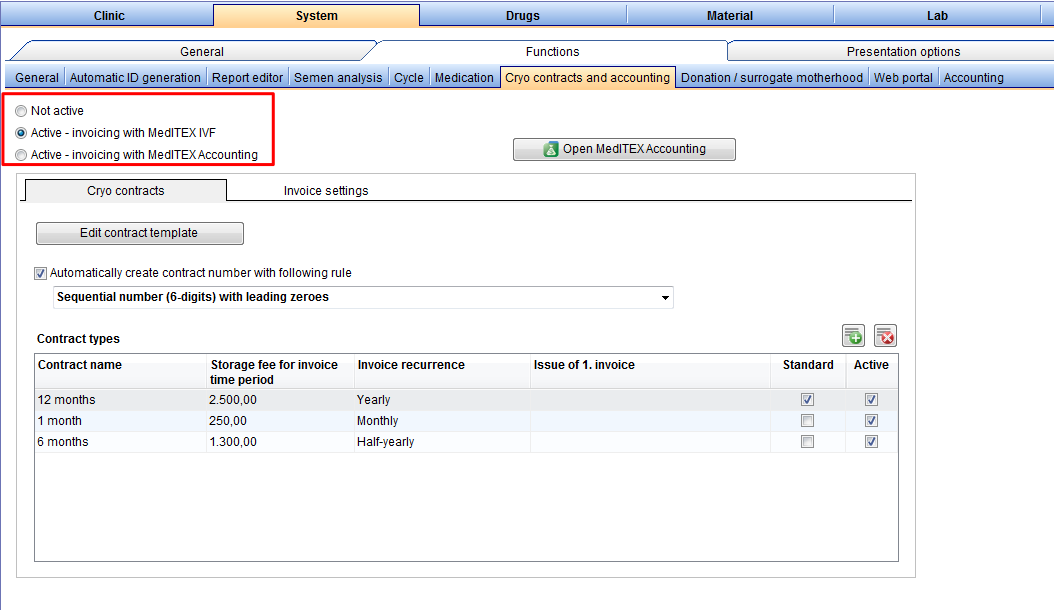 |
- Activate cryo contracts and accounting: by default, this option is checked. It enables the creation of cryo contracts and invoices for a patient. If this option is unchecked, all contract and invoice functionalities will be disabled throughout the program.
 |
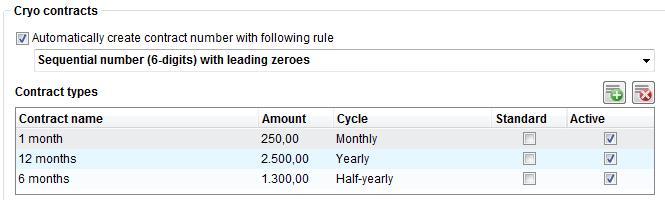 |
- Automatically create contract number: if this option is checked, it will apply a predefined rule to generate a number once every <a href="/index.php?title=Create_a_new_entry_in_demographics">cryo contract</a> is created in the <a href="/index.php?title=Demographics">demographics</a>.
-
Contract types: a list with all types of contracts that can be issued. With the "Plus" button, you can add a new type of contract. Do this by specifying the name, frequency and amount in the new window. Here, you can also set whether a contract is used as a Standard (template for every contract) or Active (visible templates for choosing in the cryo mask). To edit an existing contract, double-click the desired row. Deleting a contract is only possible if it is not being used.
- Edit contract template: opens MS Word to enable creation and editing of templates used for cryo contracts. Only change the content of these templates and never the grey colour placeholders. The program requires them for the correct transferring of data.
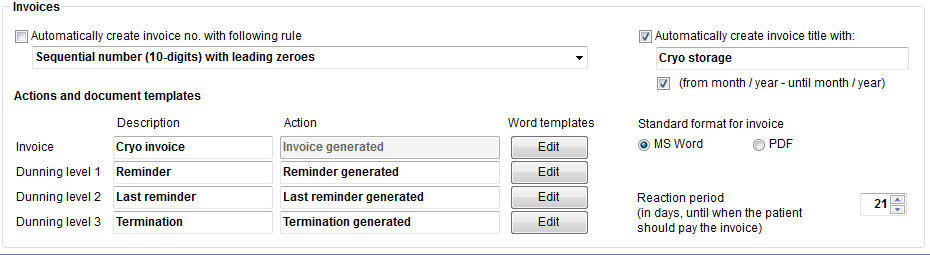 |
| Automatically create invoice number: If this option is checked, it will apply a predefined rule to generate a number once <a href="/index.php?title=How_to_create_a_new_cryo_invoice%3F"> every invoice is created</a>. |
Actions and document templates:
- Invoice: the first invoice created.
- Dunning level 1: first document emitted if payment for the invoice has not been done.
- Dunning level 2: second document emitted if payment for the invoice has not been done.
- Dunning level 3: third and final document emitted if payment for the invoice has not been done.
- Description: describes the content of the document. This information appears when navigating through Administration of documents for a patient.
- Action: describes what action is taken when creating the document. This information appears when navigating through Outstanding invoices and on individual invoices for a patient.
- Word templates: option to create and edit template of documents. A few options are available when clicking the Edit button: Create new document prompts for a Template name and opens MSWord so it is possible to create a brand new document. To edit, delete or rename an existing template, select the desired template and choose one of the options.
- Automatically create invoice title: sets the name for the created invoice according to the information provided by this setting. If this option is unchecked, when creating a new invoice, no name will be automatically created, although it will still be possible to click on the auto generate button or enter the desired name. If (from month / year – until month / year) is checked, it also includes month and year to the name.
-
Standard format for invoice: choose a default format for your invoices.
-
Reaction period: the amount of days the patient has to pay an invoice.
| <img src="/images/plus48.png" alt="" width="48" height="48" /> | <a href="/index.php?title=MedITEX_IVF_Settings#Cryo_storage">Click here</a> to read more about the settings of the Cryo storage. |
| <a href="/index.php?title=Cryo_storage">Click here</a> to read more about Cryo storage. | |
| <a href="/index.php?title=Cryo_contracts_and_accounting">Click here</a> to read more about Cryo contracts and accounting. | |
| <a href="/index.php?title=MedITEX_IVF_how_to#Cryo_contracts_and_invoicing"><img src="/images/howto48.png" alt="" width="48" height="48" /></a> | <a href="/index.php?title=MedITEX_IVF_how_to#Cryo_contracts_and_invoicing">Click here</a> to read our How to page. |
| <a href="#top">Back to top</a> |
Donation / surrogate motherhood
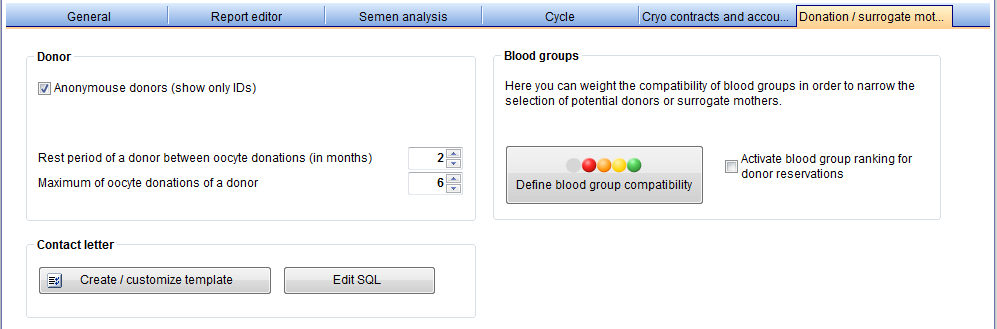
To edit the Settings of Donation / surrogate motherhood click on the menu item System -> Configuration / administration -> Settings -> System -> Functions -> Donation / surrogate motherhood.
 |
| <img style="display: block; margin-left: auto; margin-right: auto;" src="/images/DonationDonor.png" alt="" width="458" height="181" /> |
Donor:
|
| <img style="display: block; margin-left: auto; margin-right: auto;" src="/images/DonationCreateButton.png" alt="" width="241" height="30" />
<img style="display: block; margin-left: auto; margin-right: auto;" src="/images/DonationSQLButton.png" alt="" width="156" height="30" /> |
Contact letter:
|
| <img style="display: block; margin-left: auto; margin-right: auto;" src="/images/DonationBlood.png" alt="" width="458" height="180" /> |
Blood groups ranking for donor reservations: activates the blood group ranking for donor reservations. If you link a donor, you can see how good the compatibility of the blood groups is.
Define blood group compatibility. With this button, you can choose the compatibilities of blood groups. The following window will be opened: |
| <img style="display: block; margin-left: auto; margin-right: auto;" src="/images/BloodGroups.png" alt="" width="695" height="514" />
Weight of compatibility: choose the weight of the compatibility with colours. The description of the colours is explained at the top of this window. Click on the fields in the table and choose the appropriate colour. |
|
| <img style="display: block; margin-left: auto; margin-right: auto;" src="/images/Initialize1.png" alt="" /> | Initialise: with this button you can initialise the table settings. Without settings makes the whole table empty. With settings makes the main diagonal green. Set all combinations with will fill the whole table with your chosen colour and Standard will fill the table with good compatibility. |
| <img style="display: block; margin-left: auto; margin-right: auto;" src="/images/BloodGroups2.png" alt="" width="231" height="27" /> | Mirror modifications automatically mirrors modifications to automatically reflect the set points on the diagonal of the table. |
| <img style="display: block; margin-left: auto; margin-right: auto;" src="/images/plus48.png" alt="" width="48" height="48" /> | <a href="/index.php?title=Search_for_suitable_patient#Search_area">Click here</a> to go directly to the search for donor page, where you can use this feature. |
| <a href="#top">Back to top</a> |
Presentation options
General
To edit the Settings of the overall Presentation options click on the menu item System -> Configuration / administration -> Settings -> System -> Presentation options -> General.
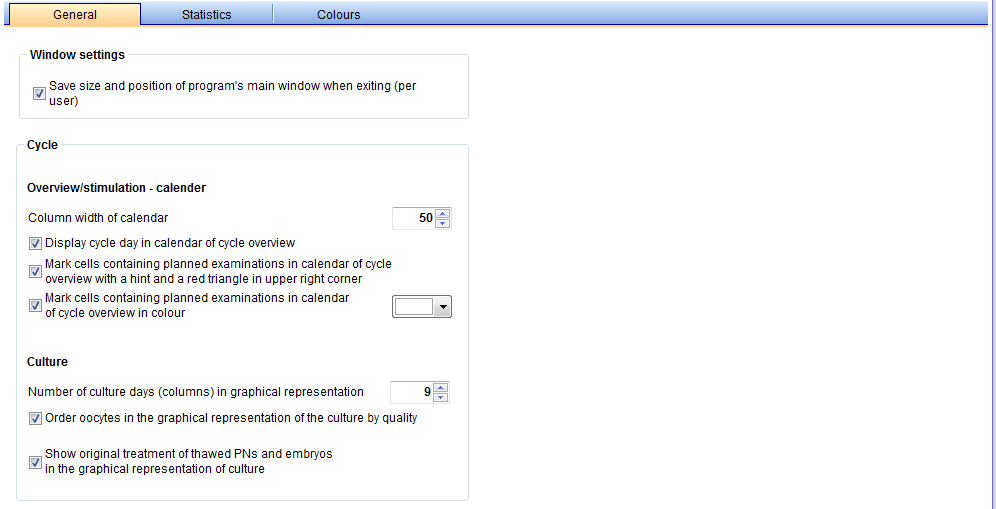 |
- Window settings: here you can set whether the view of the main window (height, width, position) will be stored and should be resorted at the next login. This option saves the presentation of the program individually for each user. So different users might have slightly different interfaces.
- <a href="/index.php?title=Cycle_Overview">Cycle</a>: settings for changing the interface of the calendar.
-
<a href="/index.php?title=Cycle_Culture">Culture</a>: under culture, you can choose the number of days at the graphical representation.
- You can set the sorting of oocytes and embryos of the culture window. You can choose between sorting according to quality (the best first) or according to the relative oocyte ID.
- Displays the original treatment of the thawed PNs and embryos in the graph view.
| <a href="#top">Back to top</a> |
Statistics
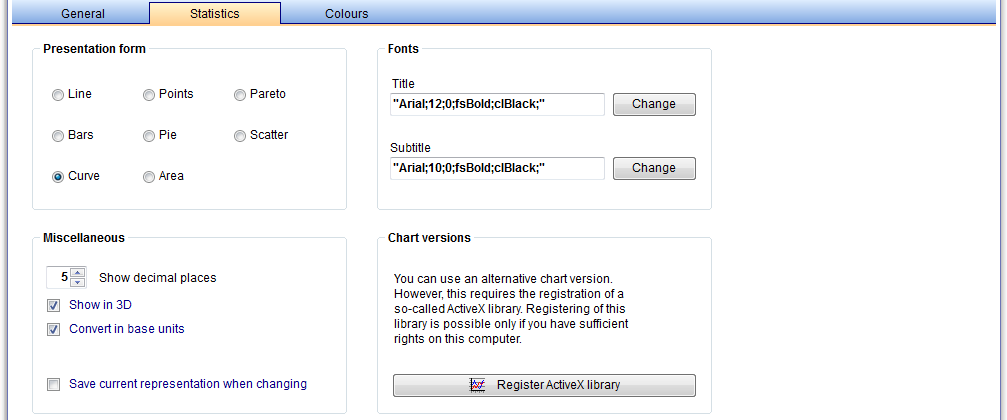
To edit the Settings of Statistics click on the menu item System -> Configuration / administration -> Settings -> System -> Presentation options -> Statistics.
 |
|
In the section Statistics, you can determine how your charts will be displayed in the reports. With this setting, your reports will always be consistent. |
| <a href="#top">Back to top</a> |
Colours
To edit the Settings of Colours click on the menu item System -> Configuration / administration -> Settings -> System -> Presentation options -> Colours.
You can use colours in the different sections of MedITEX IVF, for example in the section <a href="/index.php?title=Cryo_storage">Cryo storage</a>.
 |
|
| <img style="display: block; margin-left: auto; margin-right: auto;" src="/images/ColourUse.png" alt="" width="180" height="27" /> | Check this option if you wish to use custom colours only. |
Choose a colour:
- You can choose a colour by scrolling through the entire colour palette. If you wish to use standardized colour values, you can enter RGB values numerically. The currently selected colour will be shown in a small preview window.
- Click OK and the colour will be displayed in the list on the left side. The colour code of your operating system will be used for the description of the colour.
- To change the description, click on the text next to the colour.
| <a href="#top">Back to top</a> |
Interfaces
Only change the interface settings if you are sure what these changes will do in the program. Otherwise there may be functionality errors or complete failure of certain functions.
Internal
To edit the Settings of Internal interfaces click on the menu item System -> Configuration / administration -> Settings -> System -> Interfaces -> Internal.
 |
| In order to change file paths, click the directory symbol on the right side of the respective row. A dialog window will open and you can change the file path accordingly. |
External
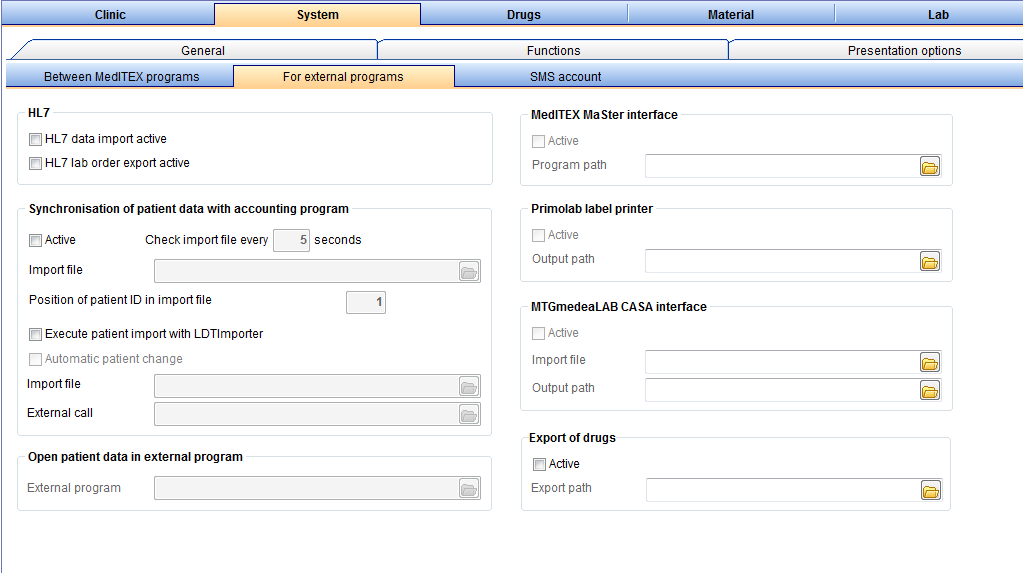
To edit the Settings of External interfaces click on the menu item System -> Configuration / administration -> Settings -> System -> Interfaces -> External.
 |
|
On this page you should include the path for importing or exporting Data from different programs. In order to change file paths, click the directory button on the right side of the respective row. A dialog window will open and you can change the file path accordingly. |
| <a href="#top">Back to top</a> |
SMS Account
 |
System tables
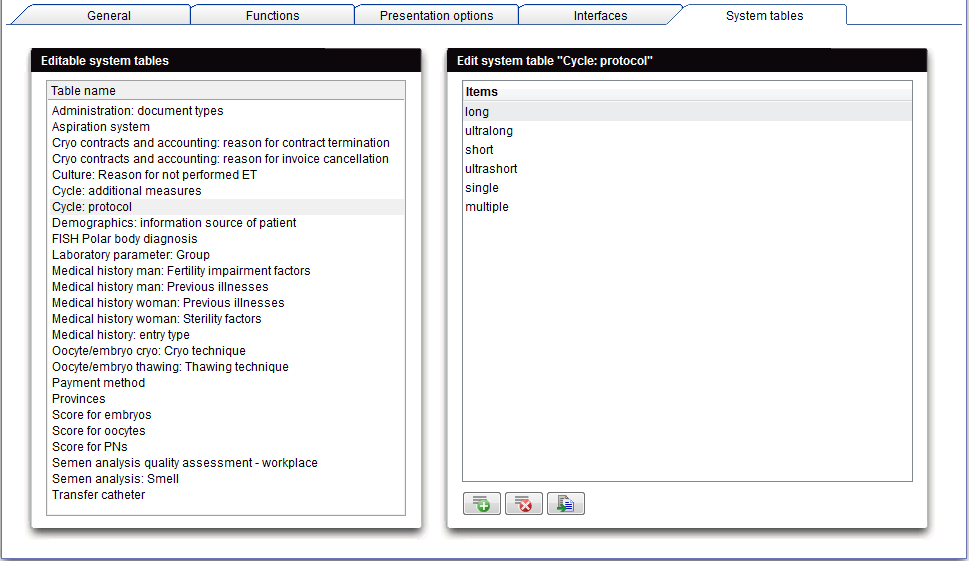
To edit the Settings of System tables click on the menu item System -> Configuration / administration -> Settings -> System -> System tables.
In the section System tables you can modify different values within the program accordingly. You can, for example, define additional measures for a cycle. These can then be shown as a selection field in the cycle.
 |
| <img style="display: block; margin-left: auto; margin-right: auto;" src="/images/Plus.png" alt="" width="23" height="23" /> |
Press New entry and enter the additional measure in the new line. Subsequently, the new additional measure will be displayed. The program will order the list alphabetically. |
| <img style="display: block; margin-left: auto; margin-right: auto;" src="/images/EditSemen.png" alt="" width="28" height="26" /> <img style="display: block; margin-left: auto; margin-right: auto;" src="/images/DeleteX.png" alt="" width="28" height="24" /> |
You can edit or delete the contents of the tables at any time. However, the predefined entries cannot be edited or deleted. |
There is one exception:
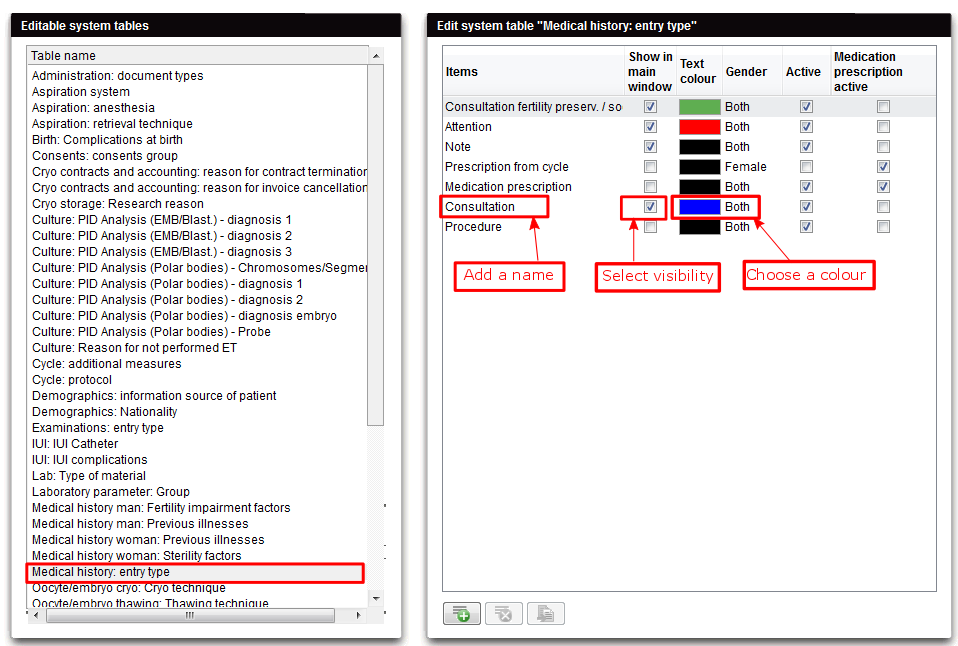 |
At the table Medical history: entry type you have more functionalities, as in the others. Here you can add additionally a text colour and if the Item should be shown in the main window.
| <img src="/images/tablesmedical1.png" alt="" width="532" height="130" /> | Here we are in the main window. You can see the different types of informations in their colours. |
You can also go to the system tables from the medical history page:
| <img src="/images/tablesmedical2.png" alt="" width="227" height="174" /> |
To edit the entries of medical history
In this list you can see all existing possibilities for entries at the medical history area. |
| <a href="#top">Back to top</a> |
Staff
To edit the Settings of Staff click on the menu item System -> Configuration / administration -> Settings -> Staff.
 |
| <a href="#top">Back to top</a> |
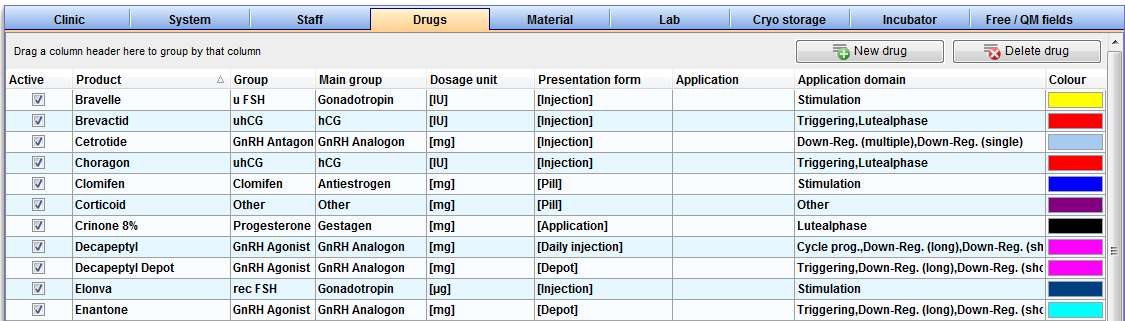
Drugs
To edit the Settings of Drugs click on the menu item System -> Configuration / administration -> Settings -> Drugs.
The section Drugs contains a fixed list of the most important products used in the field of reproductive medicine.
Besides, you can also define additional long-term and pill products that are used in your medical centre.
 |
| <img style="display: block; margin-left: auto; margin-right: auto;" src="/images/NewDrug.png" alt="" width="154" height="26" /> |
New drug: add a new drug. |
| <img style="display: block; margin-left: auto; margin-right: auto;" src="/images/DeleteDrug.png" alt="" width="152" height="25" /> |
Delete drug: only drugs you have added yourself can be deleted by pressing this button. |
- The list of drugs contains products in the groups Gonadotropin, GnRH Analogon, hCG, Progesterone, Gestagen, Estrogen, Antiestrogen and Pill according to the current Red List®.
- The list of drugs is provided and updated by CRITEX and cannot be changed by the user.
- If you do not wish to use this drug, uncheck the box Active or double-click on the drug to open the drug editor. There you can uncheck the box Active. Now, the drug will not be available for selection in any window of the program.
- Press the column header to sort the entries according to their names, to reverse the sorting or to filter the list. <a href="/index.php?title=Welcome_to_MedITEX_IVF#Managing_Lists">Read here</a> how to manage lists.
 |
| <a href="/index.php?title=How_to_add_new_drugs%3F"><img src="/images/howto48.png" alt="" width="48" height="48" /></a> | <a href="/index.php?title=How_to_add_new_drugs%3F">Click here</a> to read more about adding new drugs. |
| <a href="#top">Back to top</a> |
Material
To edit the Settings of Material click on the menu item System -> Configuration / administration -> Settings -> Material.
In the section Material you can enter data concerning material groups, manufacturers and products. You can also create different batches and activate them for a certain period of time.
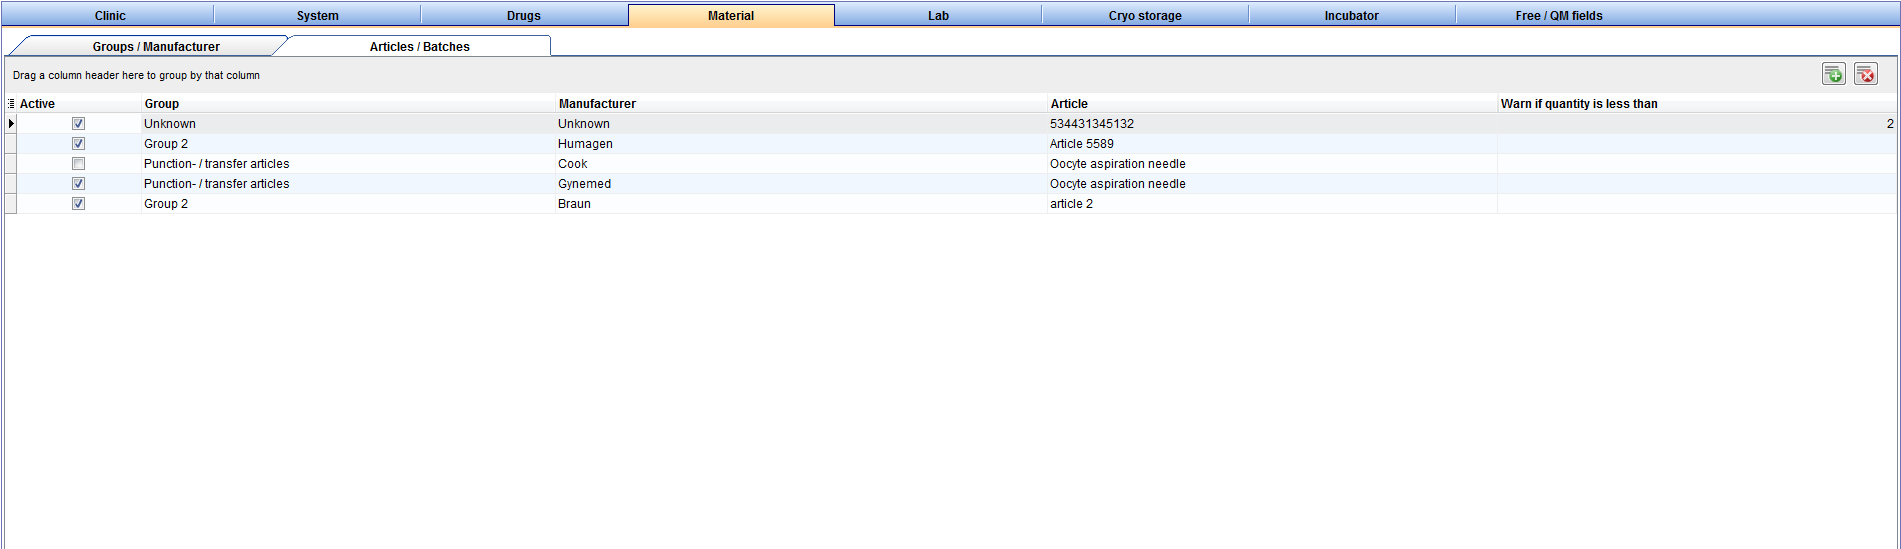
Articles / Batches
To edit the Settings of Articles / Batches click on the menu item System -> Configuration / administration -> Settings -> Material -> Articles / Batches.
On this tab, you can add the needed materials to the list and make them available for the creation of QM fields.
 |
| <img style="display: block; margin-left: auto; margin-right: auto;" src="/images/Plus.png" alt="" /> | Press this button on the right to add a new article/batch. |
| <img style="display: block; margin-left: auto; margin-right: auto;" src="/images/DeleteX.png" alt="" width="26" height="24" /> |
Delete it with this button. This is only possible if articles have not been assigned to QM fields or are being used. Should this be the case, deactivate the item by unchecking the box Active. This data will then be hidden without being deleted. Articles can only be deleted if they have not yet been used. |
| <a href="/index.php?title=How_to_add_material_articles_/_batches%3F"><img src="/images/howto48.png" alt="" width="48" height="48" /></a> | <a href="/index.php?title=How_to_add_material_articles_/_batches%3F">Click here</a> to read more about adding new material and articles. |
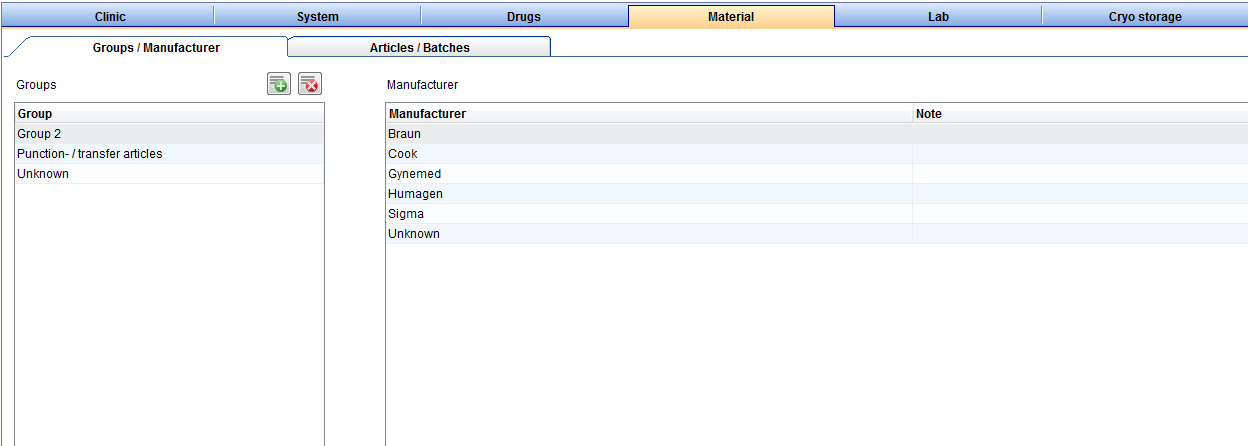
Manufacturer
To edit the Settings of Manufacturer click on the menu item System -> Configuration / administration -> Settings -> Material -> Manufacturer.
You can see a list of all existing manufactures on the tab Manufacturer.
 |
| <img style="display: block; margin-left: auto; margin-right: auto;" src="/images/Plus.png" alt="" /> | Press this button on the top right to add a new manufacturer. |
| <img style="display: block; margin-left: auto; margin-right: auto;" src="/images/DeleteX.png" alt="" width="26" height="24" /> |
Delete it with this button. This is only possible if manufactures have not been assigned to QM fields or are being used. Should this be the case, deactivate the item by unchecking the box Active. This data will then be hidden without being deleted. Manufacturers can only be deleted if they have not yet been used. |
| <a href="/index.php?title=How_to_add_material_manufacturer%3F"><img src="/images/howto48.png" alt="" width="48" height="48" /></a> | <a href="/index.php?title=How_to_add_material_manufacturer%3F">Click here</a> to read more about adding new manufacturers. |
Groups
To edit the Settings of Groups click on the menu item System -> Configuration / administration -> Settings -> Material -> Groups.
On this tab, you can create a new material group, for example probes. Here you can see a list of all existing groups.
 |
| <img style="display: block; margin-left: auto; margin-right: auto;" src="/images/Plus.png" alt="" /> | Press this button on the top right to create a new group. |
| <img style="display: block; margin-left: auto; margin-right: auto;" src="/images/DeleteX.png" alt="" width="26" height="24" /> |
Delete a group with this button. This is only possible if groups have not been assigned to QM fields or are being used. Should this be the case, deactivate the item by unchecking the box Active. This data will then be hidden without being deleted. Groups can only be deleted if they have not yet been used. |
| <a href="/index.php?title=How_to_add_material_groups%3F"><img src="/images/howto48.png" alt="" width="48" height="48" /></a> | <a href="/index.php?title=How_to_add_material_groups%3F">Click here</a> to read more about adding new manufacturers. |
| <a href="#top">Back to top</a> |
Lab
To edit the Settings of Lab click on the menu item System -> Configuration / administration -> Settings -> Lab.
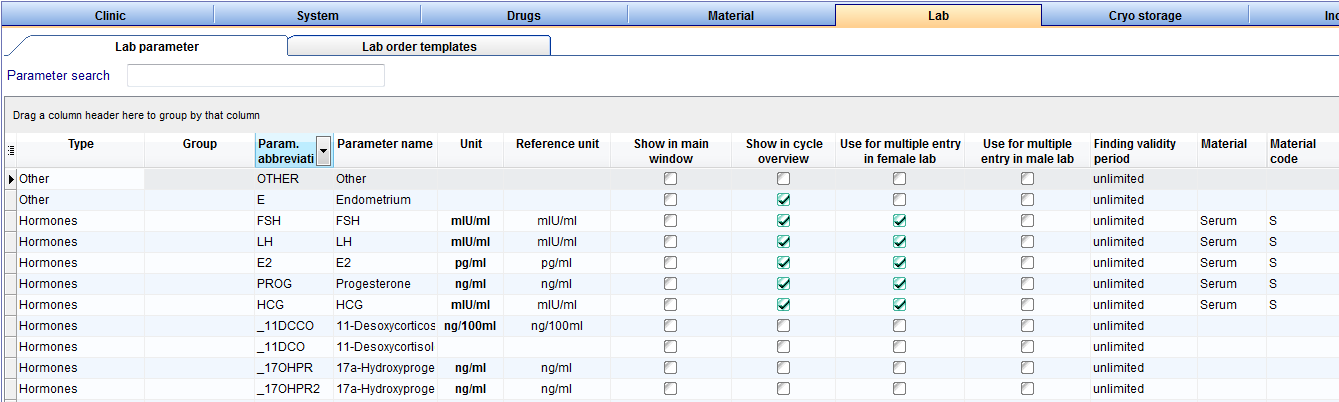 |
Explanation of the columns:
- Area: type of the lab value like: Hormones, Serology, Clinical chemistry, Genetics or Microbiology.
- Group: defines the groups of laboratory values as: Blood count, Coagulation, Genotype, Family history, etc.
- Param. short name: abbreviation of the parameter name.
- Parameter name: full name of the parameter.
- Unit: value specified unit. This can be customized in the laboratory parameter editor.
- Reference unit: through the button Restore reference units all changed parameters units are adjusted to the value of the reference units.
- Show in main window: if this box is checked, the laboratory value is displayed in the Lab test in the main window.
- Show in cycle overview: if this box is checked, the laboratory value is displayed in the Cycle overview.
- Use for multiple entry in female lab: when activating this field, the parameter appears in the list of female multiple entry.
- Use for multiple entry in male lab: when activating this field, the parameter appears in the list of male multiple entry.
- Finding validity period: decide here on the findings validity of the selected parameters.
 |
| <img style="display: block; margin-left: auto; margin-right: auto;" src="/images/Plus.png" alt="" /> | Press this button on the top right to add a new laboratory value. |
| <img src="/images/DeleteX.png" alt="" width="26" height="24" /> | Delete an existing laboratory value with this button. |
| <img src="/images/RestoreLab.png" alt="" width="200" height="28" /> | Through this button all changed parameters units are adjusted to the value of the reference units. |
| <a href="/index.php?title=How_to_add_/_edit_a_laboratory_parameter%3F"><img src="/images/howto48.png" alt="" width="48" height="48" /></a> | <a href="/index.php?title=How_to_add_/_edit_a_laboratory_parameter%3F">Click here</a> to read more about adding laboratory parameters. |
| <a href="#top">Back to top</a> |
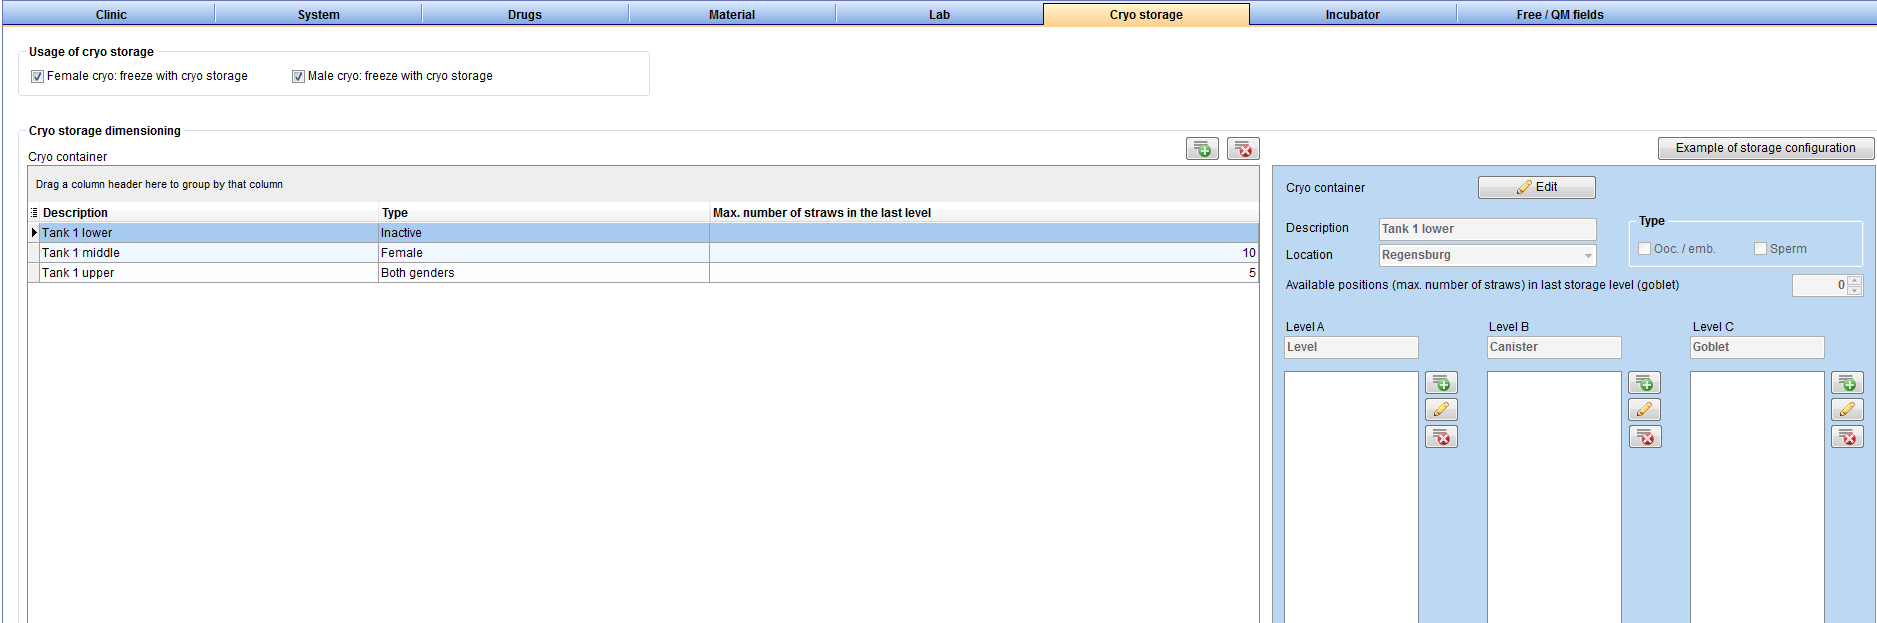
Cryo storage
To edit the Settings of Cryo storage click on the menu item System -> Configuration / administration -> Settings -> Cryo storage.
In the section Cryo storage you can manage all cryo canisters and their storage system. You can define up to three hierarchic storage levels per canister. Their filling level can be checked in the freezing section to determine free space.
 |
| <img src="/images/CryoFreeze.png" alt="" /> |
Freeze with cryo storage: You can choose which type you will freeze in your cryostorage: samples of women, samples of men, or both. This information is important because it is displayed in the <a href="/index.php?title=Cryo_storage#Cryostorage_overview">Cryo storage Overview</a>. |
| <img src="/images/ChangeLocation1.png" alt="" width="276" height="33" /> | Here you can switch between your different cryo storage locations, if you have more then one. |
| <img src="/images/ChangeLocation.png" alt="" width="44" height="27" /> | Modify the location of the selected container. |
| <img style="display: block; margin-left: auto; margin-right: auto;" src="/images/Plus.png" alt="" /> |
Press this button to add a new unit. For more information about adding a new unit, read <a href="/index.php?title=How_to_add_a_new_canister_to_the_cryo_storage%3F">here</a>. |
| <img style="display: block; margin-left: auto; margin-right: auto;" src="/images/DeleteX.png" alt="" width="26" height="24" /> | Select the unit you wish to delete and click this button. |
| <img src="/images/MaxNum.png" alt="" width="369" height="28" /> | Enter here the maximum number of frozen straws in the last level. It helps you for searching an empty place, if you are freeze a new straw in the freezing section. |
 |
Storage dimensioning:
- When a new unit is created, the following fields have to be filled:
- Description
- Type
- Storage levels
- Type: you can also determine whether oocytes and embryos ("Ooc./emb.") or sperms (“Sperm”) will be stored in a given unit.
- It is possible to modify the name of the allocation units. Select an existing unit by clicking on it in the column Allocation unit and edit Description, Type and Storage levels accordingly.
| <a href="/index.php?title=How_to_add_a_new_canister_to_the_cryo_storage%3F"><img src="/images/howto48.png" alt="" width="48" height="48" /></a> | <a href="/index.php?title=How_to_add_a_new_canister_to_the_cryo_storage%3F">Click here</a> to learn how to add a new canister to the Cryo storage. |
| <a href="#top">Back to top</a> |
Incubator
To edit the Settings of Incubator click on the menu item System -> Configuration / administration -> Settings -> Incubator -> Incubator.
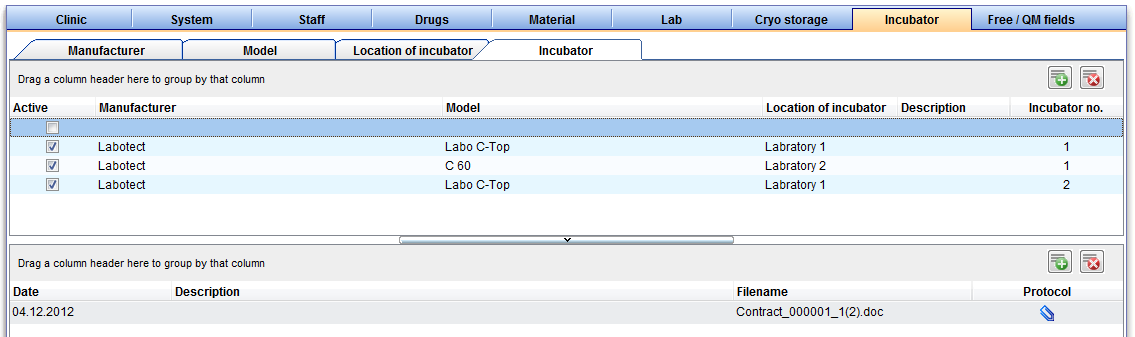 |
Incubator administration:
- Active: here you can see whether the incubator is set to Active.
- Manufacturer: registered Manufacturer of the incubator.
- Model: model/type of the incubator.
- Location of incubator: the place where the incubator is used.
- Description: special or specific notes about the incubator.
- Incubator no: enter a number to each incubator in order to distinguish them.
Incubator documents:
You can see the documents of a selected incubator.
- Date: creation date of the document.
- Description: short description with important information.
- Filename: name of the stored protocol.
- Protocol: stored notes.
Get more information about the adding and editing an incubator, .
| <a href="/index.php?title=How_to_add_/_edit_an_incubator%3F"><img src="/images/howto48.png" alt="" width="48" height="48" /></a> | <a href="/index.php?title=How_to_add_/_edit_an_incubator%3F">Click here</a> to read more about adding incubators. |
| <a href="#top">Back to top</a> |
Free / QM fields
To edit the Settings of Free / QM fields click on the menu item System -> Configuration / administration -> Settings -> Free / QM fields.
- Here you can configure all QM and free fields. QM stands for Quality Management and gives you an option to document all the extra information relevant to you with the help of QM fields.
- Staff, material, times and further free fields can be assigned to any QM field – and therefore every associated input area - in the settings.
 |
Buttons with a blue dotted frame have special functionalities. Click on it to have more information.
| <img style="display: block; margin-left: auto; margin-right: auto;" src="/images/Plus.png" alt="" /> | This button is placed at the QM assignment selection. It allows you to define or add new sub items. |
| <img style="display: block; margin-left: auto; margin-right: auto;" src="/images/DeleteX.png" alt="" /> | This button is placed at the QM assignment selection. You can delete articles from this area. |
| <img style="display: block; margin-left: auto; margin-right: auto;" src="/images/LeftRight.png" alt="" width="29" height="64" /> | Use this buttons between QM domain assignment and QM assignment selection to assign a selected entry (right) to a QM field (left) or delete an entry from the QM domain assignment (left). |
| <a href="/index.php?title=How_to_configure_items%3F"><img style="display: block; margin-left: auto; margin-right: auto; border: 2px dotted blue;" src="/images/QMEdit.png" alt="" width="24" height="23" /></a> | Configuration: add or edit members of staff, material or values. |
| Three QM types: | |
| <img style="display: block; margin-left: auto; margin-right: auto;" src="/images/O.png" alt="" /> | Staff: type of personnel. |
| <img style="display: block; margin-left: auto; margin-right: auto;" src="/images/L.png" alt="" /> | Material: materials and batch numbers. |
| <img style="display: block; margin-left: auto; margin-right: auto;" src="/images/F.png" alt="" /> | Free fields: any additional information. |
| <img style="display: block; margin-left: auto; margin-right: auto;" src="/images/QMDomanissignment.png" alt="" /> |
QM fields:
|
| <img src="/images/QMDomanis.png" alt="" /> |
Items assigned to the selected QM field:
|
| <img style="display: block; margin-left: auto; margin-right: auto;" src="/images/QMDomanissignmentSelection.png" alt="" /> |
Pool of all available items:
|
Press the column header to sort the items by their names, type or description.
| <a href="/index.php?title=MedITEX_IVF_how_to#QM_.2F_free_fields"><img src="/images/howto48.png" alt="" width="48" height="48" /></a> |
There are several options available to edit the items assigned to a QM field. Read more about it on our <a href="/index.php?title=MedITEX_IVF_how_to#QM_.2F_free_fields">How to</a> section. |
| <img src="/images/hint48.png" alt="" width="48" height="48" /> |
Tips for managing QM fields:
|
| <a href="/index.php?title=MedITEX_IVF_manual">Back to the MedITEX IVF menu </a> | <a href="#top">Back to top</a> |