How to configure items?
From MedITEX - Wiki
| Line 48: | Line 48: | ||
<li style="text-align: justify;"><strong>Changes</strong> made in the list <strong>"QM assignment selection"</strong> will automatically be applied to all QM fields that use these items. Therefore, you do not have to assign the new items again.</li> | <li style="text-align: justify;"><strong>Changes</strong> made in the list <strong>"QM assignment selection"</strong> will automatically be applied to all QM fields that use these items. Therefore, you do not have to assign the new items again.</li> | ||
</ul> | </ul> | ||
| − | |||
| − | |||
| − | |||
<h2>Material selection</h2> | <h2>Material selection</h2> | ||
<p>Material that you have defined in the settings can be assigned the same way in the same window.</p> | <p>Material that you have defined in the settings can be assigned the same way in the same window.</p> | ||
| Line 94: | Line 91: | ||
</ul> | </ul> | ||
<p style="text-align: justify;"> </p> | <p style="text-align: justify;"> </p> | ||
| − | < | + | <h2>Assigning values</h2> |
<table style="float: left;" border="0"> | <table style="float: left;" border="0"> | ||
<tbody> | <tbody> | ||
| Line 104: | Line 101: | ||
</table> | </table> | ||
<p> </p> | <p> </p> | ||
| + | <p> </p> | ||
| + | <table border="0" width="16" height="24"> | ||
| + | <tbody> | ||
| + | <tr> | ||
| + | <td>[[Image:QMStaff.png|none|740px|thumb|left|link=http://wiki.meditex-software.com/images/QMStaff.png| ]]</td> | ||
| + | </tr> | ||
| + | <tr> | ||
| + | <td> | ||
| + | <p style="text-align: justify;">If values have already been assigned to the item they will be displayed in the new window. Those can be freely edited by the user.</p> | ||
| + | Enter the desired information (e.g. yes or no, never, sometimes,...)<br /></td> | ||
| + | </tr> | ||
| + | </tbody> | ||
| + | </table> | ||
| + | <ul> | ||
| + | <li>The values listed in the column<strong> “QM assignment selection” </strong>can be selected in the corresponding QM field.</li> | ||
| + | <li><strong>Changes</strong> made in the list <strong>"QM assignment selection"</strong> will automatically be applied to all QM fields that use these items. Therefore, you do not have to assign the new items again.</li> | ||
| + | </ul> | ||
<p> </p> | <p> </p> | ||
<table style="float: right;" border="0"> | <table style="float: right;" border="0"> | ||
| Line 113: | Line 127: | ||
</tbody> | </tbody> | ||
</table> | </table> | ||
| + | <p> </p> | ||
| + | <p> </p> | ||
<p><span class="mw-headline"><br /></span></p> | <p><span class="mw-headline"><br /></span></p> | ||
Revision as of 13:18, 5 December 2012
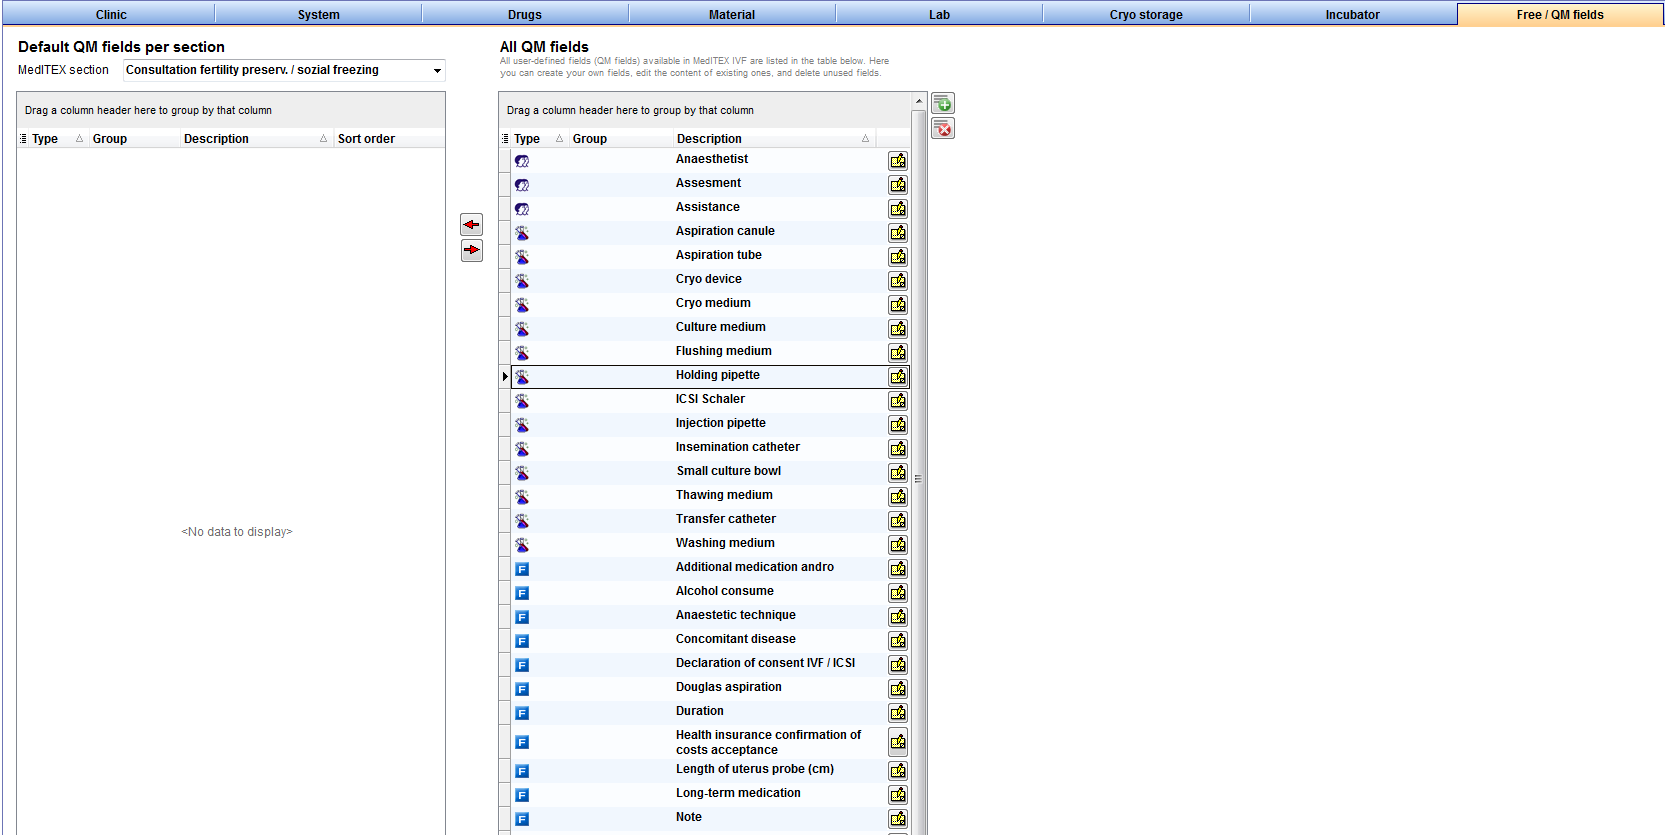
Go to System -> Configuration -> Settings -> Free / QM fields.
Staff selection
| <img style="display: block; margin-left: auto; margin-right: auto;" src="/images/QMEdit.png" alt="" width="24" height="23" /> | Use this button if you want to add or edit something to the types of items. |
|
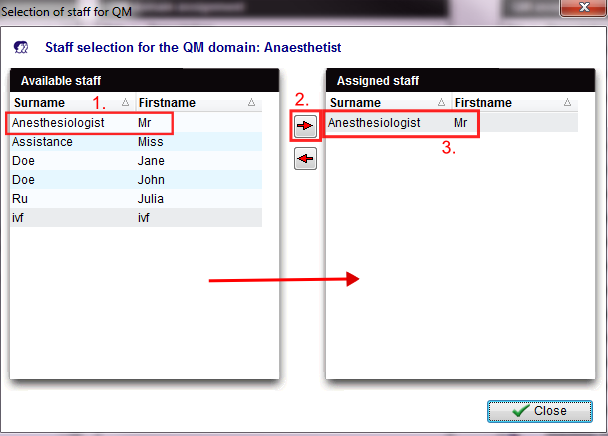
In the new window you can add any members of staff that you have created in the "Staff" section of the settings. You can also delete members of staff.
|
| <img src="/images/QMButton2.png" alt="" width="28" height="29" /> | To delete a member of staff, you have to select the member of staff you wish to delete in the column on the right "Assigned staff" and press the button. |
- The members of staff listed in the column “QM assignment selection” can be selected when pressing the corresponding QM field.
- You can only assign members of staff that you have created in the section "Staff" in the <a href="/index.php?title=MedITEX_IVF_Settings#Free_.2F_QM_fields">settings</a>.
- If members of staff are already used in QM fields, you cannot delete them.
- Changes made in the list "QM assignment selection" will automatically be applied to all QM fields that use these items. Therefore, you do not have to assign the new items again.
Material selection
Material that you have defined in the settings can be assigned the same way in the same window.
| <img style="display: block; margin-left: auto; margin-right: auto;" src="/images/QMEdit.png" alt="" width="24" height="23" /> | Use this button if you want to add or edit something to the types of items. |
|
In new window you can add any material that you have created in the section "Material" in the settings. You can also delete material.
|
| <img src="/images/QMButton2.png" alt="" width="28" height="29" /> | To delete a article of material, you have to select the article of material you wish to delete in the column on the right "Assigned staff" and press the button. |
- The material listed in the column “QM assignment selection” can be selected when pressing the corresponding QM field.
- If only one batch of an assigned article is released, this batch will be assigned automatically in the corresponding QM field.
- You can only assign material that you have created in the section "Material" in the <a href="/index.php?title=MedITEX_IVF_Settings#Free_.2F_QM_fields">settings</a>.
- If articles are already used in QM fields, you cannot delete them.
- Changes made in the list "QM assignment selection" will automatically be applied to all QM fields that use these items. Therefore, you do not have to assign the new items again.
Assigning values
| <img style="display: block; margin-left: auto; margin-right: auto;" src="/images/QMEdit.png" alt="" width="24" height="23" /> | Use this button if you want to add or edit something to the types of items. |
|
If values have already been assigned to the item they will be displayed in the new window. Those can be freely edited by the user. Enter the desired information (e.g. yes or no, never, sometimes,...) |
- The values listed in the column “QM assignment selection” can be selected in the corresponding QM field.
- Changes made in the list "QM assignment selection" will automatically be applied to all QM fields that use these items. Therefore, you do not have to assign the new items again.
| <a href="/index.php?title=MedITEX_IVF_how_to">Back to How to</a> | <a href="#top">Back to top</a> |

