How to set working time for each resource?
From MedITEX - Wiki
| Line 6: | Line 6: | ||
</tbody> | </tbody> | ||
</table> | </table> | ||
| − | <p><span id="result_box" class="short_text" lang="en"><span class="hps">Working times and constraints can</span> <span class="hps">be edited</span> <span class="hps">in the settings.</span></span><span id="result_box" lang="en"><span class="hps"> For that you</span> <span class="hps">go</span> <span class="hps">System -></span> <span class="hps">Settings</span> <span class="hps">-</span><span>></span> Working times and constraints.<span></span></span></p> | + | <p><span id="result_box" class="short_text" lang="en"><span class="hps">Working times and constraints can</span> <span class="hps">be edited</span> <span class="hps">in the settings.</span></span><span id="result_box" lang="en"><span class="hps"> For that you</span> <span class="hps">go</span> <span class="hps">System -></span> <span class="hps">Settings</span> <span class="hps">-</span><span>></span> Working times and constraints.<span> </span></span></p> |
<p style="text-align: left;">In this area each resource can be adjusted in detail. General working times can be defined for the whole clinic, as well as special working times for each individual resource. It is also possible to restrict a resource to an allocated maximum number of appointments.</p> | <p style="text-align: left;">In this area each resource can be adjusted in detail. General working times can be defined for the whole clinic, as well as special working times for each individual resource. It is also possible to restrict a resource to an allocated maximum number of appointments.</p> | ||
<p style="text-align: left;"> </p> | <p style="text-align: left;"> </p> | ||
| Line 12: | Line 12: | ||
<h3><span id="Working_times.2C_assignment_of_an_appointment_type.2C_and_limitations" class="mw-headline">Working times, assignment of an appointment type, and limitations</span></h3> | <h3><span id="Working_times.2C_assignment_of_an_appointment_type.2C_and_limitations" class="mw-headline">Working times, assignment of an appointment type, and limitations</span></h3> | ||
<p style="text-align: justify;">Over the right table you can define the working times for each resource. The first upper line of this table represents the general work times of your clinic. These will be automatically valid for all resources that have no specific work time defined. In the bottom table you can see the overview of each selected resource.</p> | <p style="text-align: justify;">Over the right table you can define the working times for each resource. The first upper line of this table represents the general work times of your clinic. These will be automatically valid for all resources that have no specific work time defined. In the bottom table you can see the overview of each selected resource.</p> | ||
| − | |||
<table style="margin-left: auto; margin-right: auto;" border="0" width="88" height="44"> | <table style="margin-left: auto; margin-right: auto;" border="0" width="88" height="44"> | ||
<tbody> | <tbody> | ||
| Line 19: | Line 18: | ||
<p>[[Image:Settings_WorkingTimesRed.png|none|740px|thumb|left|link=http://wiki.meditex-software.com/images/Settings_WorkingTimesRed.png]]</p> | <p>[[Image:Settings_WorkingTimesRed.png|none|740px|thumb|left|link=http://wiki.meditex-software.com/images/Settings_WorkingTimesRed.png]]</p> | ||
</td> | </td> | ||
| − | |||
| − | |||
| − | |||
</tr> | </tr> | ||
</tbody> | </tbody> | ||
</table> | </table> | ||
| − | < | + | <ul> |
| + | <li>With double click on a resource or with the button „Edit resource settings“ you can open the settings window of the selected resource.</li> | ||
| + | </ul> | ||
<table style="margin-left: auto; margin-right: auto;" border="0" width="56" height="44"> | <table style="margin-left: auto; margin-right: auto;" border="0" width="56" height="44"> | ||
<tbody> | <tbody> | ||
| Line 32: | Line 30: | ||
<p>[[Image:Settings_WorkingTimeNew.png|none|740px|thumb|left|link=http://wiki.meditex-software.com/images/Settings_WorkingTimeNew.png]]</p> | <p>[[Image:Settings_WorkingTimeNew.png|none|740px|thumb|left|link=http://wiki.meditex-software.com/images/Settings_WorkingTimeNew.png]]</p> | ||
</td> | </td> | ||
| − | |||
| − | |||
| − | |||
</tr> | </tr> | ||
</tbody> | </tbody> | ||
</table> | </table> | ||
| − | < | + | <ul> |
| − | < | + | <li><span id="result_box" lang="en"><span class="hps">Change the</span> <span class="hps">times</span> <span class="hps">of available resources</span> <span class="hps">directly in the fields</span><span>.</span></span></li> |
| + | </ul> | ||
| + | <ul> | ||
| + | <li>With a click on the button “New work time definition” a new line will be inserted, in which you can define a new work model for the selected resource.</li> | ||
| + | </ul> | ||
| + | <table border="0"> | ||
<tbody> | <tbody> | ||
<tr> | <tr> | ||
| + | <td><img src="/images/AppointmentTypes.png" alt="" width="233" height="231" /></td> | ||
<td> | <td> | ||
| − | <p style="text-align: justify;">In the | + | <p style="text-align: justify;">In the drop down list you can choose the appointment type(s) allowed for the selected work model – selected line. (Information: the conflict messages for not suitable appointment types, while scheduling appointments, will only work if you have also assigned the types to the related treatments. Please see the section – “<a href="/index.php?title=Welcome_to_MedITEX_Scheduler#Treatments">Treatments</a>”). </p> |
| − | <p style="text-align: justify;">If you | + | <p style="text-align: justify;">If you do not make a special selection (all boxes checked), “all appointments” will be displayed in the scheduler. In this way there will be no constraints on appointment type.</p> |
</td> | </td> | ||
| − | |||
</tr> | </tr> | ||
</tbody> | </tbody> | ||
Revision as of 11:47, 14 November 2012
| <img src="/images/Setting.png" alt="" width="483" height="148" /> |
Working times and constraints can be edited in the settings. For that you go System -> Settings -> Working times and constraints.
In this area each resource can be adjusted in detail. General working times can be defined for the whole clinic, as well as special working times for each individual resource. It is also possible to restrict a resource to an allocated maximum number of appointments.
Working times, assignment of an appointment type, and limitations
Over the right table you can define the working times for each resource. The first upper line of this table represents the general work times of your clinic. These will be automatically valid for all resources that have no specific work time defined. In the bottom table you can see the overview of each selected resource.
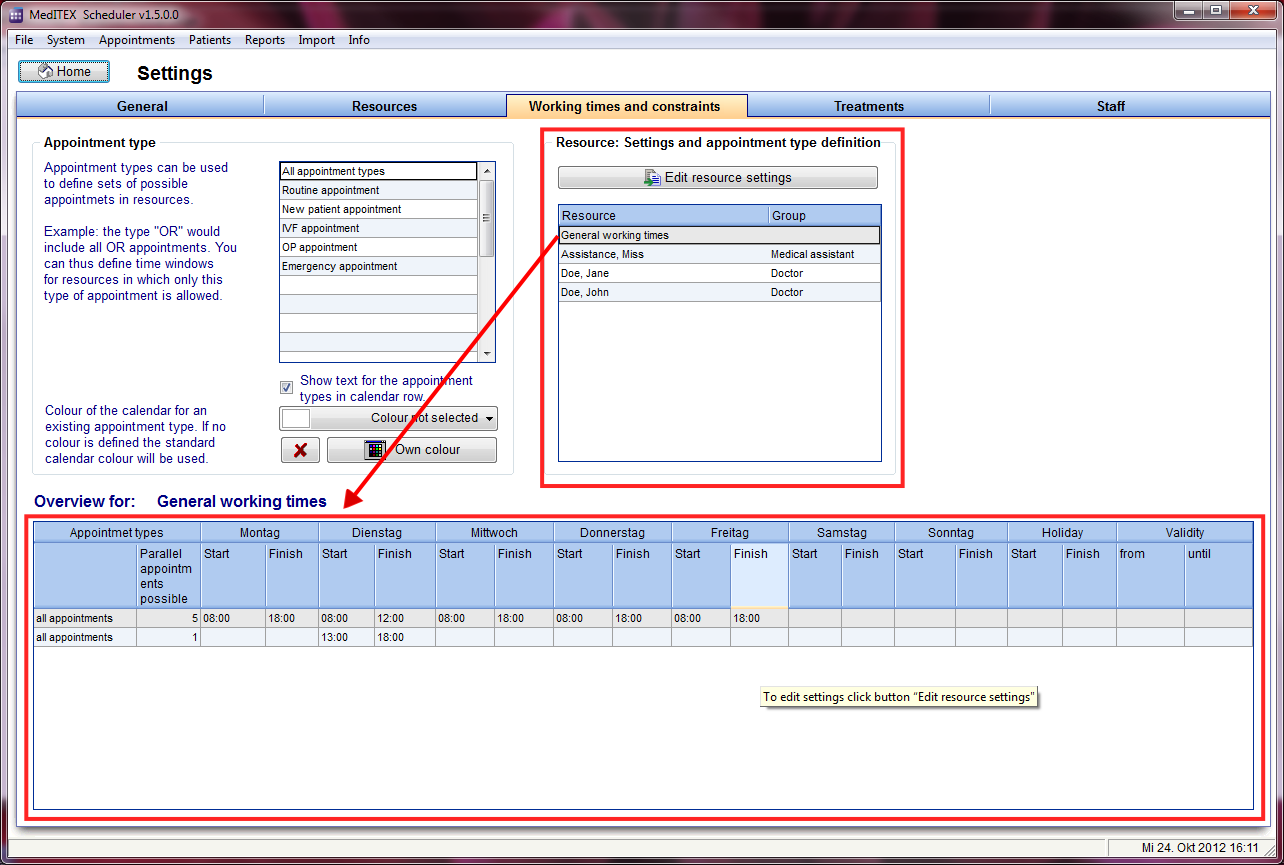 |
- With double click on a resource or with the button „Edit resource settings“ you can open the settings window of the selected resource.
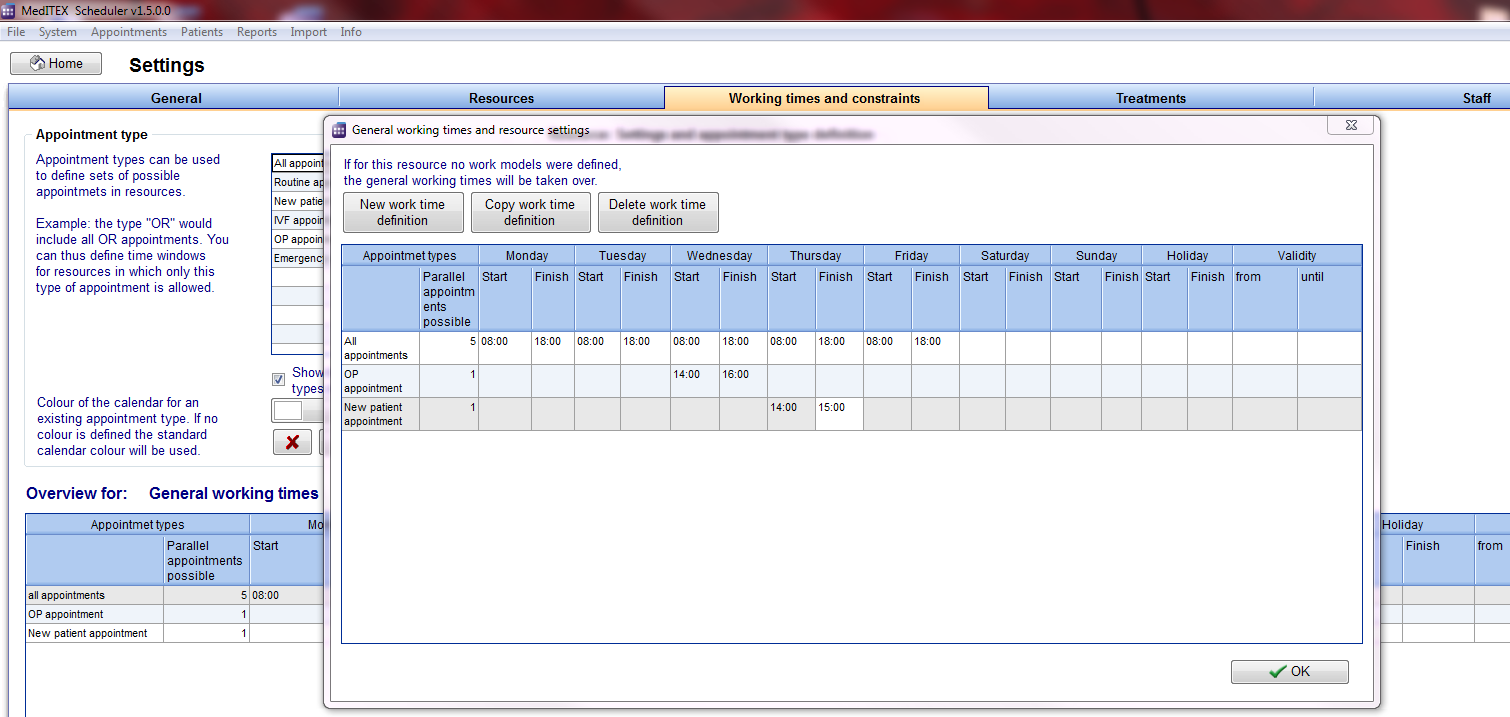 |
- Change the times of available resources directly in the fields.
- With a click on the button “New work time definition” a new line will be inserted, in which you can define a new work model for the selected resource.
| <img src="/images/AppointmentTypes.png" alt="" width="233" height="231" /> |
In the drop down list you can choose the appointment type(s) allowed for the selected work model – selected line. (Information: the conflict messages for not suitable appointment types, while scheduling appointments, will only work if you have also assigned the types to the related treatments. Please see the section – “<a href="/index.php?title=Welcome_to_MedITEX_Scheduler#Treatments">Treatments</a>”). If you do not make a special selection (all boxes checked), “all appointments” will be displayed in the scheduler. In this way there will be no constraints on appointment type. |
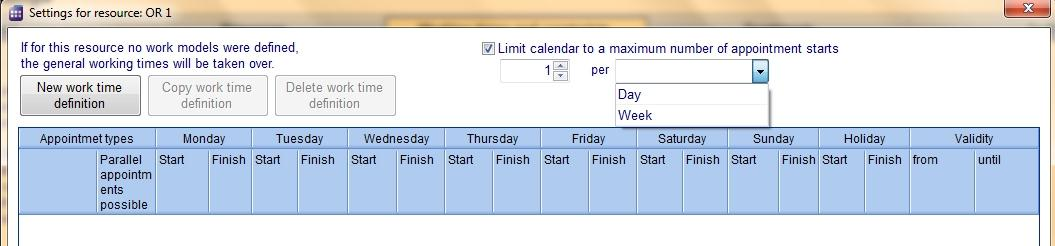
Limitation of resources to a maximum number of assigned appointments
Resources can be limited to accept up to a maximum number of appointment starts per day. The limitation can be defined for each day or for whole week.
Example:
In a clinic there are four beds available. Every day one bed can be assigned only once, to one patient. A resource „Beds“ has been defined. In order not to reserve more beds then beds available, a maximum number of starts of appointments for the resource „Beds“ is limited to four.
 |
 |
|
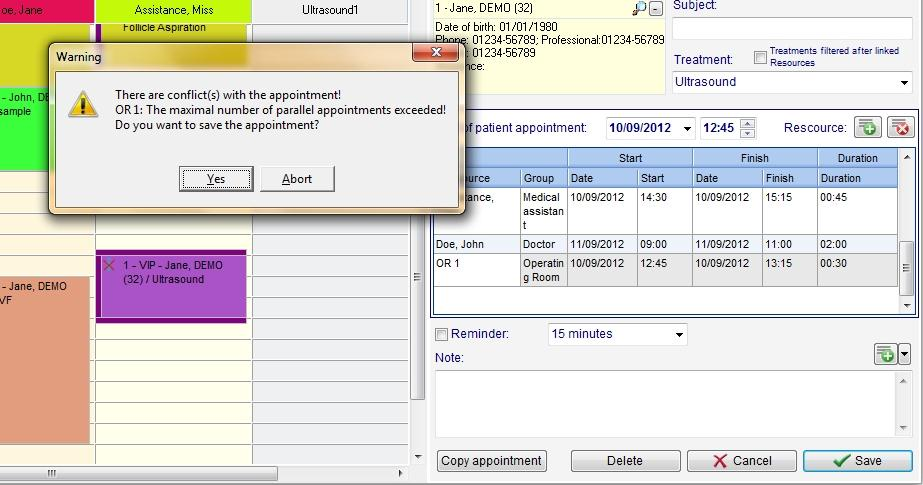
If at the assignment of an appointment the maximum number is exceeded, a warning will be displayed. |
For each day you can define the time of start and end. If you like to define a break, like e. g. a lunch break, insert a further row (button “New work time definition”). In one row you apply the times UNTIL the break, in the row bellow you apply the times beginning FROM the break. If you have more rows for a day and there are overlapping times, the summary of the appointment types of the intersection are valid for the overlapping time.
Column “Validity”: If you don’t fill something out, the row with that working time definition will always be valid. But you can also fill out “from” or/and “until”. The scheduler will accordingly show the work times for that resource.