MedITEX Accounting - barra dei menù
From MedITEX - Wiki
| Line 77: | Line 77: | ||
<tbody> | <tbody> | ||
<tr> | <tr> | ||
| − | <td>[[Image:Acc_BarraMenù_13_IT.png|none|740px|thumb|left|link= | + | <td>[[Image:Acc_BarraMenù_13_IT.png|none|740px|thumb|left|link=http://wiki.meditex-software.com/images/Acc_BarraMen%C3%B9_13_IT.png|]]<br /></td> |
</tr> | </tr> | ||
</tbody> | </tbody> | ||
Revision as of 16:11, 5 May 2016
| <img src="/images/Acc_BarraMenù_1_IT.png" alt="" width="750" height="130" /> |
Contents |
Ricerca pazienti
| <img src="/images/Acc_BarraMenù_2_IT.png" alt="" width="340" height="43" /> |
In questo campo sarà possibile ricercare i pazienti. La ricerca può essere fatta per Cognome, data di nascita, ID Paziente o numero di telefono. Se solo parte del cognome o id viene inserito, nella lista compariranno tutti i pazienti con tali caratteristiche.
Per selezionare il paziente dalla lista fare doppio-click sul nome. La finestra si aggiornerà e il paziente selezionato verra visualizzato nella sezione superiore della finestra.
| <img src="/images/Acc_BarraMenù_3_IT.png" alt="" width="500" height="316" /> |
Pulsanti
Pulsanti con cornice blu tratteggiata hanno funzionalità particolari. Cliccare per avere ulteriori informazioni.
| <img style="display: block; margin-left: auto; margin-right: auto;" src="/images/Acc_BarraMenù_4_IT.png" alt="" width="90" height="36" /> | Vai al partner: Accounting caricherà automaticamente il partner della persona selezionata e visualizzerà le sue voci del conto. |
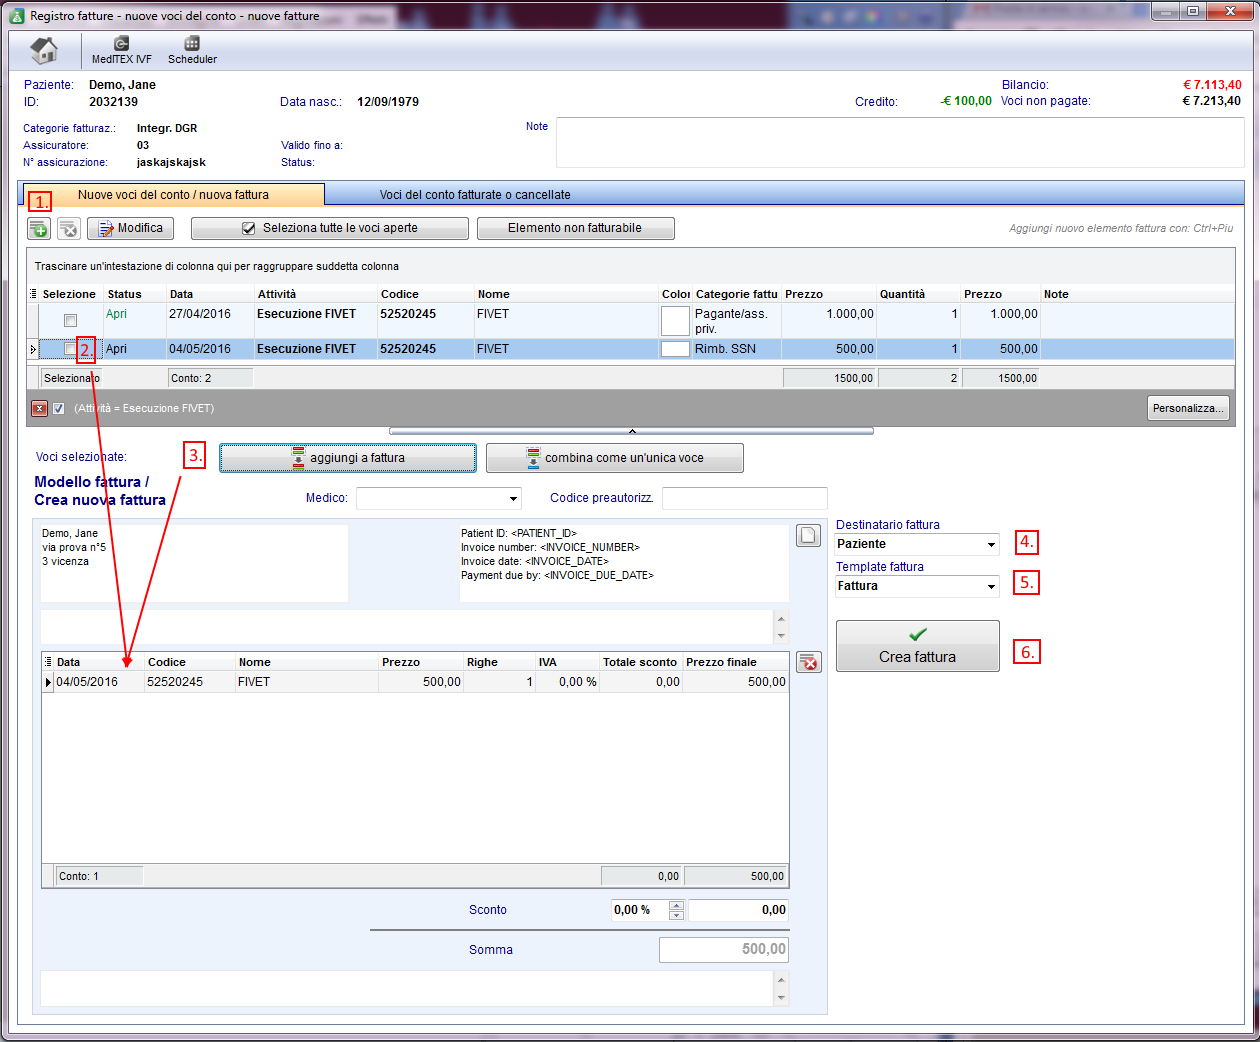
| <a href="/index.php?title=MedITEX_Accounting_-_barra_dei_menù#Nuove_fatture.2FVoci"><img style="display: block; margin-left: auto; margin-right: auto; border: 2px dotted blue;" src="/images/Acc_BarraMenù_5_IT.png" alt="" width="112" height="36" /></a> | Nuove Fatture/Voci: Permette di inserire voci di fatture e creare fatture per il paziente selezionato. |
| <a href="/index.php?title=MedITEX_Accounting_-_barra_dei_menù#Nuova_Registrazione"><img style="display: block; margin-left: auto; margin-right: auto; border: 2px dotted blue;" src="/images/Acc_BarraMenù_6_IT.png" alt="" width="100" height="35" /></a> | Nuova registrazione: Permette di inserire Acconti, pagamenti, Rimborsi, etc. |
| <a href="/index.php?title=MedITEX_Accounting_-_menu_bar#MedITEX_IVF"><img style="display: block; margin-left: auto; margin-right: auto;" src="/images/Acc_BarraMenù_7_IT.png" alt="" width="78" height="37" /></a> | MedITEX IVF: Cliccando questo pulsante MedITEX IVF si aprirà nella overview della coppia /paziente selezionato in Accounting. Lo user loggato in IVF sarà lo stesso di Accounting e non sarà necessario inserire la password. |
| <img style="display: block; margin-left: auto; margin-right: auto;" src="/images/Acc_BarraMenù_8_IT.png" alt="" width="66" height="35" /> | MedITEX Scheduler: Cliccando questo pulsante MedITEX Scheduler si aprirà nella overview del paziente selezionato in Accounting.<a href="/index.php?title=MedITEX_Accounting_-_menu_bar#MedITEX_IVF"></a> |
| <a href="/index.php?title=MedITEX_Accounting_-_menu_bar#Print"><img style="display: block; margin-left: auto; margin-right: auto;" src="/images/Acc_BarraMenù_9_IT.png" alt="" width="72" height="36" /></a> |
Stampa: Cliccando questo pulsante una stampa a video della sezione attiva in Accounting verrà eseguita. Aprire la sezione desiderata cliccando l'opzione nella barra laterale e premere Stampa. L'anteprima si aprirà e le impostazioni di stampa potranno essere modificate a piacere. <a href="/index.php?title=MedITEX_Accounting_-_menu_bar#Print"></a> |
| <a href="/index.php?title=MedITEX_Accounting_-_menu_bar#Export"><img style="display: block; margin-left: auto; margin-right: auto;" src="/images/Acc_BarraMenù_10_IT.png" alt="" width="71" height="39" /></a> | Esporta: Cliccando questo pulsante una stampa a video della sezione attiva in Accounting verrà esportata in un file Excel, CSV o Testo. Aprire la sezione desiderata cliccando l'opzione nella barra laterale e premere la freccia sulla destra del tasto Esporta e seleziona l'opzione desiderata. |
| <a href="/index.php?title=Benvenuti_in_MedITEX_Accounting"><img style="display: block; margin-left: auto; margin-right: auto; border: 2px dotted blue;" src="/images/Acc_BarraMenù_11_IT.png" alt="" width="76" height="39" /></a> | Sezione in cui sono presenti le impostazioni del programma. <a href="/index.php?title=Benvenuti_in_MedITEX_Accounting">Cliccare qui</a> per ulteriori informazioni.<a href="/index.php?title=Welcome_to_MedITEX_Accounting"></a> |
| <img style="display: block; margin-left: auto; margin-right: auto;" src="/images/Acc_BarraMenù_12_IT.png" alt="" width="74" height="35" /> | Finestra contenente tutti i prezzi inseriti nelle impostazioni.<a href="/index.php?title=Welcome_to_MedITEX_Accounting"></a> |
Nuove fatture/Voci
Nuova Registrazione
To enter a new booking you need to follow the following steps:
| <img src="/images/Acc_BarraMenù_15_IT.png" alt="" width="700" height="454" /> |
| 1. | Enter the Transaction: |
You can only edit the other fields if this field is filled. |
| 2. | Insert the name of a patient: | The name of the patient will be filled automatically with the actual person. To change that, delete the name with the Red Cross button on the right and search another patient. In the little grey field on the right side you can see a short summary of the most important data of the patient. |
| 3. | Enter the date of the booking: | The current date appears automatically. |
| 4. | Contribute the amount of the booking and choose a payment method: |
|
| 5. | The name of the logged in employee appears in the field staff. | If you want to change the name of the staff, choose another one from the list. |
| 6. | Add a note: | If it is necessary. |
| 7. | As last step you have to select an outstanding invoice from the list. | |
| <a href="/index.php?title=MedITEX_Accounting_Manuale">Torna al Manuale di MedITEX Accounting</a> | <a href="#top">Inizio pagina</a> |
