Come creare ed utilizzare un blocco di testo?
From MedITEX - Wiki
| Line 67: | Line 67: | ||
<tr> | <tr> | ||
<td><img style="display: block; margin-left: auto; margin-right: auto;" src="/images/Blocchi_testo_8_IT.png" alt="" width="247" height="43" /></td> | <td><img style="display: block; margin-left: auto; margin-right: auto;" src="/images/Blocchi_testo_8_IT.png" alt="" width="247" height="43" /></td> | ||
| − | <td><strong> | + | <td><strong>Nome </strong>del nuovo blocco di testo. </td> |
</tr> | </tr> | ||
<tr> | <tr> | ||
| − | <td><img style="display: block; margin-left: auto; margin-right: auto;" src="/images/ | + | <td><img style="display: block; margin-left: auto; margin-right: auto;" src="/images/Blocchi_testo_9_IT.png" alt="" width="227" height="65" /></td> |
<td><strong>Content</strong> of the new text block.</td> | <td><strong>Content</strong> of the new text block.</td> | ||
</tr> | </tr> | ||
<tr> | <tr> | ||
| − | <td><img style="display: block; margin-left: auto; margin-right: auto;" src="/images/ | + | <td><img style="display: block; margin-left: auto; margin-right: auto;" src="/images/Blocchi_testo_10_IT.png" alt="" width="210" height="35" /></td> |
<td> | <td> | ||
<p><strong>General text blocks</strong> are <strong>available in all sections in MedITEX</strong>. Check this option if you want to define text block you are creating as general. </p> | <p><strong>General text blocks</strong> are <strong>available in all sections in MedITEX</strong>. Check this option if you want to define text block you are creating as general. </p> | ||
| Line 81: | Line 81: | ||
</tr> | </tr> | ||
<tr> | <tr> | ||
| − | <td><img style="display: block; margin-left: auto; margin-right: auto;" src="/images/ | + | <td><img style="display: block; margin-left: auto; margin-right: auto;" src="/images/Blocchi_testo_11_IT.png" alt="" width="132" height="31" /></td> |
<td><strong>Cancel </strong>the operation.</td> | <td><strong>Cancel </strong>the operation.</td> | ||
</tr> | </tr> | ||
<tr> | <tr> | ||
| − | <td><img style="display: block; margin-left: auto; margin-right: auto;" src="/images/ | + | <td><img style="display: block; margin-left: auto; margin-right: auto;" src="/images/Blocchi_testo_12_IT.png" alt="" width="130" height="33" /></td> |
<td><strong>Save</strong> the text block.</td> | <td><strong>Save</strong> the text block.</td> | ||
</tr> | </tr> | ||
| Line 95: | Line 95: | ||
<tbody> | <tbody> | ||
<tr> | <tr> | ||
| − | <td> | + | <td><img src="/images/Blocchi_testo_13_IT.png" alt="" width="575" height="693" /><br /></td> |
</tr> | </tr> | ||
</tbody> | </tbody> | ||
Revision as of 14:55, 3 May 2016
I blocchi di testo danno la possibilità di utilizzare dei testi predefiniti in tutti i campi note di MedITEX IVF e di MedITEX Scheduler.
Facendo tasto destro in un campo Note si aprirà un menù a tendina che contiene due opzioni relative ai blocchi d testo:
| <img src="/images/Blocchi_testo_1_IT.png" alt="" width="314" height="265" /> |
Se si clicca sull'opzione Testo, si aprirà la seguente finestra:
| <img src="/images/Blocchi_testo_2_IT.png" alt="" width="580" height="688" /> |
Tutti i blocchi di testo che possono essere usati in un determinato campo Note sono elencati nella parte più alta della finestra. Nella parte bassa è possibile trovare dei pulsanti che permettono l'inserimento di blocchi di testo selezionati, la creazione di nuovi blocchi e la modifica di quelli esistenti.
Pulsanti
| <img style="display: block; margin-left: auto; margin-right: auto;" src="/images/TBButtonNew.png" alt="" width="55" height="31" /> | Creare un nuovo blocco di testo |
| <img style="display: block; margin-left: auto; margin-right: auto;" src="/images/TBButtonDelete.png" alt="" width="35" height="31" /> | Cancellare un blocco selezionato |
| <img src="/images/Blocchi_testo_3_IT.png" alt="" width="133" height="35" /> |
Modificare un blocco selezionato |
| <img src="/images/Blocchi_testo_4_IT.png" alt="" width="126" height="35" /> | Chiudere la finestra |
| <img src="/images/Blocchi_testo_5_IT.png" alt="" width="145" height="36" /> | Inserire il blocco di testo selezionato |
Creare un nuovo blocco di testo
The button for creating new text blocks offers two ways for doing this (click on an arrow on the right side of the button):
| <img src="/images/Blocchi_testo_6_IT.png" alt="" width="281" height="76" /> |
If you click on the first one (or press the key Ins on your keyboard), the following window will open:
| <img src="/images/Blocchi_testo_7_IT.png" alt="" width="576" height="688" /> |
The section at the bottom is used for creating new text blocks.
| <img style="display: block; margin-left: auto; margin-right: auto;" src="/images/Blocchi_testo_8_IT.png" alt="" width="247" height="43" /> | Nome del nuovo blocco di testo. |
| <img style="display: block; margin-left: auto; margin-right: auto;" src="/images/Blocchi_testo_9_IT.png" alt="" width="227" height="65" /> | Content of the new text block. |
| <img style="display: block; margin-left: auto; margin-right: auto;" src="/images/Blocchi_testo_10_IT.png" alt="" width="210" height="35" /> |
General text blocks are available in all sections in MedITEX. Check this option if you want to define text block you are creating as general. Text blocks which are not defined as general are available only in the section where the note field you have selected is. |
| <img style="display: block; margin-left: auto; margin-right: auto;" src="/images/Blocchi_testo_11_IT.png" alt="" width="132" height="31" /> | Cancel the operation. |
| <img style="display: block; margin-left: auto; margin-right: auto;" src="/images/Blocchi_testo_12_IT.png" alt="" width="130" height="33" /> | Save the text block. |
If you want to create new text block as a copy of selected one, choose this option from drop-down menu of the button (or press key combination Ctrl+C on your keyboard). The following window will open:
| <img src="/images/Blocchi_testo_13_IT.png" alt="" width="575" height="693" /> |
Initially, name and content of a new text block, as well as the property "General text block" will be identical to all corresponding properties of the text block you have selected, but all fields can be modified.
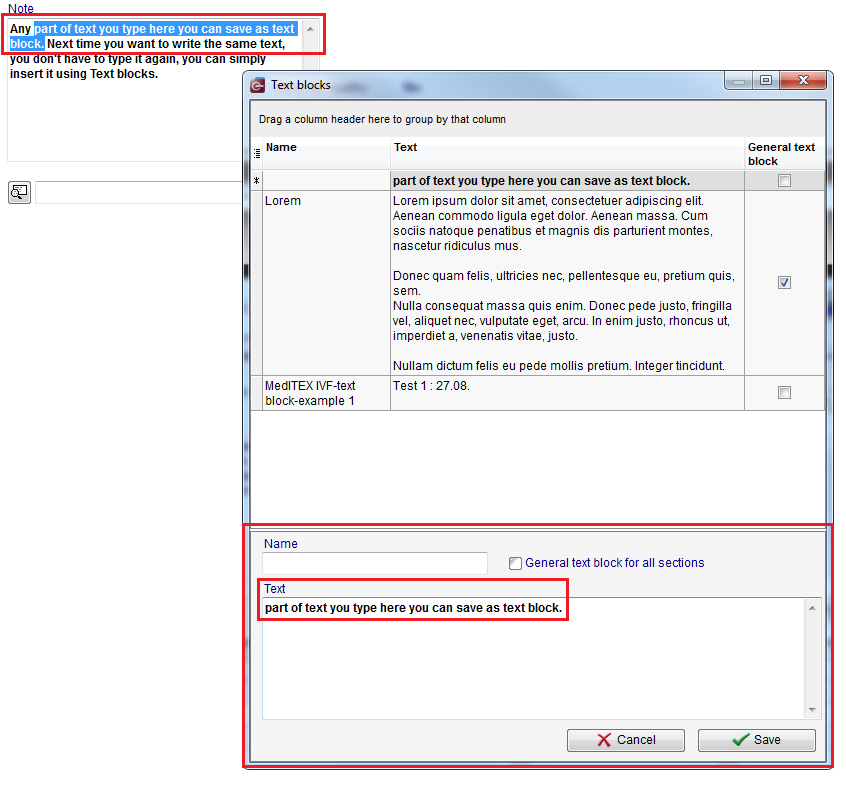
It is also possible to create new text block using a part of the text you have typed in the note field. To do this, select the part of text you want to save, press right-click and choose the option <a href="#top">Save text as new text block.</a> The following window will open:
| <img src="/images/hint48.png" alt="" width="48" height="48" /> |
Remember to define the text block as General text block if you want to use it in all sections of MedITEX. |
Inserire blocco di testo
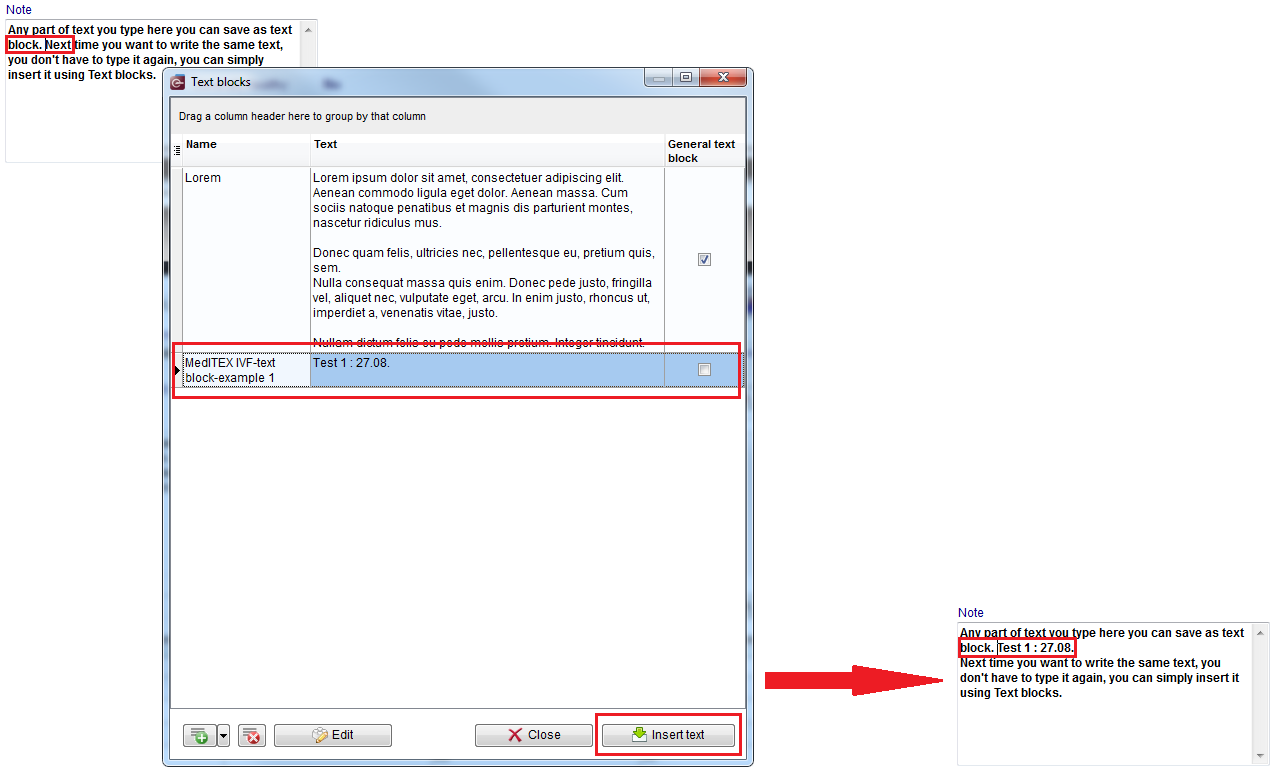
To insert a text block in the text you are typing, choose the position were you want to insert it, press right-click, choose the option Text blocks from the drop-down menu, select the text block you want to insert and click on the button Insert:
| <a href="/index.php?title=MedITEX_IVF_how_to">Back to How to</a> | <a href="#top">Back to top</a> |

