Come gestire la coltura con la Rappresentazione Tabellare?
From MedITEX - Wiki
| Line 1: | Line 1: | ||
| − | <p>La coltura relativa ad <strong>ovociti/embrioni</strong> si sviluppa da sinistra a destra nella tab della <strong>Rappresentazione Tabellare.</strong></p> | + | <p style="text-align: justify;">La coltura relativa ad <strong>ovociti/embrioni</strong> si sviluppa da sinistra a destra nella tab della <strong>Rappresentazione Tabellare.</strong></p> |
| − | <p>La tabella è divisa in due sezioni:</p> | + | <p style="text-align: justify;">La tabella è divisa in due sezioni:</p> |
| − | <ul> | + | <ul style="text-align: justify;"> |
<li>Una per la <strong>FIVET</strong> in alto;</li> | <li>Una per la <strong>FIVET</strong> in alto;</li> | ||
<li>e una per l' <strong>ICSI </strong>in basso.</li> | <li>e una per l' <strong>ICSI </strong>in basso.</li> | ||
</ul> | </ul> | ||
| − | <p> </p> | + | <p style="text-align: justify;"> </p> |
<table style="margin-left: auto; margin-right: auto;" border="0"> | <table style="margin-left: auto; margin-right: auto;" border="0"> | ||
<tbody> | <tbody> | ||
<tr> | <tr> | ||
| − | <td><img src="/images/hint48.png" alt="" width="48" height="48" /></td> | + | <td style="text-align: justify;"><img src="/images/hint48.png" alt="" width="48" height="48" /></td> |
| − | <td>I campi con lo sfondo <strong><span style="color: #ff0000;">rosso </span></strong><span style="color: #ff0000;"><span style="color: #000000;">non solo mostrano gli errori ma guidano l'utente nel giusto percorso da seguire per la documentazione. Evidenzia i campi dove è necessario l'inserimento dei dati per permettere la corretta documentazione. </span></span><br /></td> | + | <td style="text-align: justify;">I campi con lo sfondo <strong><span style="color: #ff0000;">rosso </span></strong><span style="color: #ff0000;"><span style="color: #000000;">non solo mostrano gli errori ma guidano l'utente nel giusto percorso da seguire per la documentazione. Evidenzia i campi dove è necessario l'inserimento dei dati per permettere la corretta documentazione. </span></span><br /></td> |
</tr> | </tr> | ||
</tbody> | </tbody> | ||
| Line 19: | Line 19: | ||
<tbody> | <tbody> | ||
<tr> | <tr> | ||
| − | <td> | + | <td><img src="/images/Rappr_tabellare_1_IT.png" alt="" width="770" height="375" /></td> |
</tr> | </tr> | ||
</tbody> | </tbody> | ||
</table> | </table> | ||
<p> </p> | <p> </p> | ||
| − | <p> | + | <p style="text-align: justify;">Il campo <strong>Totale</strong> nel blocco <strong>PU</strong> mostra automaticamente gli ovociti documentati nella tab<strong> Pick Up</strong>. Se lo stato di sviluppo è conosciuto, indicare quale sia nei campi sottostanti. </p> |
| − | <ul> | + | <ul style="text-align: justify;"> |
| − | <li> | + | <li>Inserire il numero totale di ovociti maturi in metafase II nel campo <strong>MII</strong>; </li> |
| − | <li> | + | <li>Inserire il numero totale di ovociti immaturi nel campo <strong>GV</strong> o in metafase I nel campo <strong>MI</strong>. Il campo <strong>"di cui immaturi"</strong> viene completato automaticamente; </li> |
| − | <li> | + | <li>Inserire il numero totale degli ovociti atretici nel campo <strong>Deg-ZPV</strong>.</li> |
</ul> | </ul> | ||
| − | <p>The fields in the block <strong>Ooc. thawing </strong>below, will be filled automatically if you thaw unfertilized oocytes.</p> | + | <p style="text-align: justify;">The fields in the block <strong>Ooc. thawing </strong>below, will be filled automatically if you thaw unfertilized oocytes.</p> |
<p> </p> | <p> </p> | ||
<h3>Treatment</h3> | <h3>Treatment</h3> | ||
Revision as of 14:23, 29 April 2016
La coltura relativa ad ovociti/embrioni si sviluppa da sinistra a destra nella tab della Rappresentazione Tabellare.
La tabella è divisa in due sezioni:
- Una per la FIVET in alto;
- e una per l' ICSI in basso.
| <img src="/images/hint48.png" alt="" width="48" height="48" /> | I campi con lo sfondo rosso non solo mostrano gli errori ma guidano l'utente nel giusto percorso da seguire per la documentazione. Evidenzia i campi dove è necessario l'inserimento dei dati per permettere la corretta documentazione. |
Contents |
Ovociti
| <img src="/images/Rappr_tabellare_1_IT.png" alt="" width="770" height="375" /> |
Il campo Totale nel blocco PU mostra automaticamente gli ovociti documentati nella tab Pick Up. Se lo stato di sviluppo è conosciuto, indicare quale sia nei campi sottostanti.
- Inserire il numero totale di ovociti maturi in metafase II nel campo MII;
- Inserire il numero totale di ovociti immaturi nel campo GV o in metafase I nel campo MI. Il campo "di cui immaturi" viene completato automaticamente;
- Inserire il numero totale degli ovociti atretici nel campo Deg-ZPV.
The fields in the block Ooc. thawing below, will be filled automatically if you thaw unfertilized oocytes.
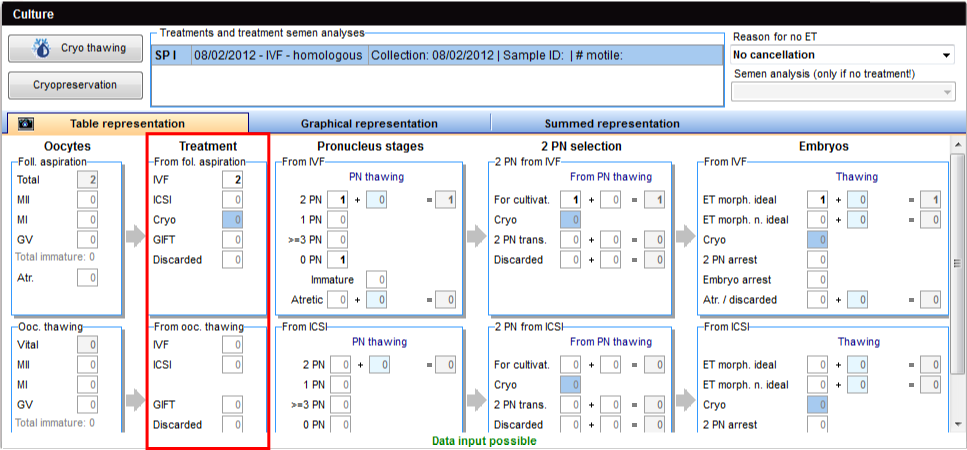
Treatment
In the block From fol. aspiration you can enter all treatments or processes related to the unfertilized oocytes from the aspiration. Here you can also indicate a transfer in the framework of a GIFT cycle or a cryopreservation of the unfertilized oocyte.
In the block From ooc. thawing below, you can enter the respective treatments of unfertilized oocytes from the Oocyte-thawing process.
- Enter the total amount of oocytes treated with IVF in the field IVF;
- Enter the total amount of oocytes treated with ICSI in the field ICSI;
- Enter the total amount of cryopreserved, unfertilized oocytes in the field Cryo;
- Enter the total amount of oocytes transferred in the framework of a GIFT cycle in the field GIFT;
- Enter the total amount of untreated or lost oocytes in the field Discarded.
As soon as you have entered at least one oocyte for IVF or ICSI in the block Treatment, this can be seen in the panel Treatments and treatment semen analysis on the top of the Table representation.
Double-click on the corresponding semen analysis. The window Treatment semen analysis will open.
| <img src="/images/plus48.png" alt="" width="48" height="48" /> | <a href="/index.php?title=Treatments_and_treatment_semen_analysis">Click here</a> to have more information about the Treatment semen analysis window. |
Pronucleus stages
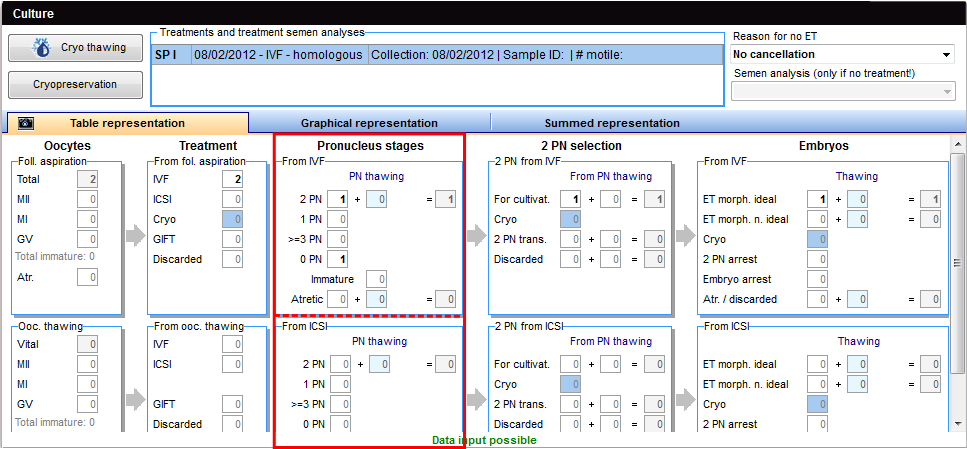
Here you can document the fertilization results in the pronucleus stage (on day 1 after IVF/ICSI), divided in IVF (block from IVF) and ICSI (block from ICSI).
- Enter the total amount of regularly impregnated oocytes in the 2PN stage in the field 2PN;
- Enter the total amount of oocytes in the 1PN stage in the field 1PN;
- Enter the total amount of oocytes with 3 or more pronuclei in the field >=3PN;
- Enter the total amount of unfertilized oocytes in the 0PN stage in the field 0PN;
- Enter the total amount of atretic or lost oocytes after IVF or ICSI in the field Atretic.
Fields PN-thawing will be filled automatically as soon as oocytes are thawed in the PN stages in the course of the active cycle.
2 PN selection
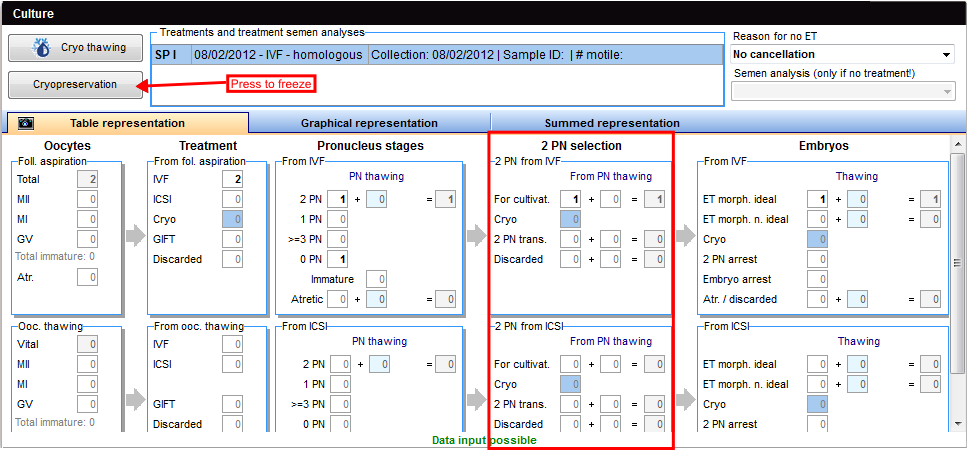
The blocks 2PN from IVF and 2PN from ICSI document prenucleus stage oocytes that have been inseminated regularly.
- Enter the total amount of the selected 2PN stages embryos for transfer in the field For cultivat.;
- If you wish to cryopreserve the remaining cells, enter its number in the field Cryo. The Cryopreservation window will open;
| <img style="display: block; margin-left: auto; margin-right: auto;" src="/images/hint48.png" alt="" width="48" height="48" /> |
Fields Cryo will be automatically filled if oocytes in the PN stage have been frozen during the active cycle. |
- Enter the total amount of transferred oocytes in the 2PN stage in the field 2PN trans.;
- Enter the total amount of discarded 2PN stages in the field Discarded.
If you have previously thawed oocytes in the block Pronucleus stages, please indicate these separately in the column From PN thawing in both blocks for 2PN selection.
Embryos
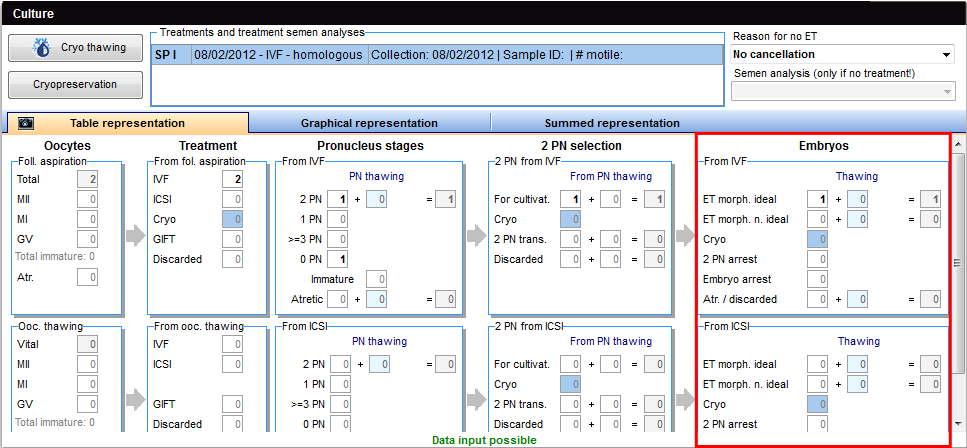
In both blocks, From IVF and From ICSI, you must decide what happens to the 2PN stages selected for embryo transfer – again, this is done separately according to their origin from either IVF or ICSI.
- Enter the total amount of the transferred, morphologically ideal embryos in the field ET morph. ideal (max. of 3);
- Enter the total amount of the transferred, morphologically not ideal embryos in the field ET morph. n. ideal (max. of 3);
- Enter the transfer date in the new window;
- Enter the total amount of arrested oocytes in the 2PN stage in the field 2PN arrest;
- Enter the total amount of embryos arrested in the embryonic stage (after the karyogamy) in the field Embryo arrest;
- Enter the total amount of atretic or lost oocytes in the field Atr./discarded.
| <img src="/images/hint48.png" alt="" width="48" height="48" /> |
The fields in the column Thawing will be automatically filled as soon as oocytes are thawed in the course of the active cycle. |
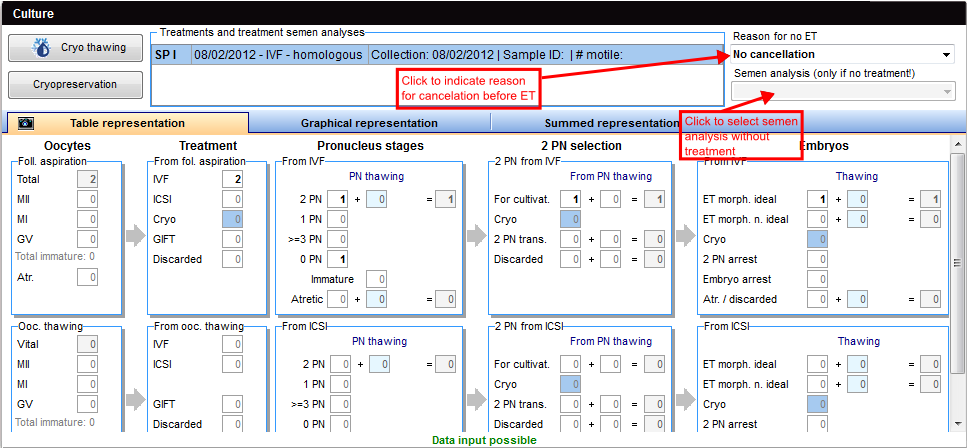
Cancelation before ET
| <img src="/images/Reason.png" alt="" /> |
In the field Reason for no ET, select No cancellation if a transfer took place. Otherwise, select from the list one of the reasons why the transfer did not occur.
If this treatment needs to be cancelled for any reason, but the treatment semen analysis has already been created, this semen analysis can be assigned to another cycle if necessary.
If you need to document that the semen analysis was created for this cycle, even though it was cancelled, you can assign it by selecting its item in the field Semen analysis (only if no treatment).
| <a href="/index.php?title=MedITEX_IVF_how_to">Back to How to</a> | <a href="#top">Back to top</a> |
