SMS interface
From MedITEX - Wiki
| Line 54: | Line 54: | ||
</ul> | </ul> | ||
<p><strong>It can be also used</strong> for <a href="/index.php?title=title=How to send appointment details via SMS?">sending details about appoitnments</a> to a patient.</p> | <p><strong>It can be also used</strong> for <a href="/index.php?title=title=How to send appointment details via SMS?">sending details about appoitnments</a> to a patient.</p> | ||
| − | < | + | <p> </p> |
| + | <p> </p> | ||
<h2>Sending SMS</h2> | <h2>Sending SMS</h2> | ||
<table style="margin-left: auto; margin-right: auto;" border="0"> | <table style="margin-left: auto; margin-right: auto;" border="0"> | ||
Revision as of 07:35, 18 September 2014
| <img src="/images/hint48.png" alt="" width="48" height="48" /> |
In order to use the SMS interface, special configuration is required. More details you can find <a href="/index.php?title=How_to_configure_SMS_interface%3F">here</a>. |
The SMS interface can be used in both MedITEX IVF and MedITEX Scheduler.
In MedITEX IVF, the SMS interface can be found as a button in the menu bar in the following areas:
- Demographics
- Medical history
- Laboratory diagnostics
- Male/Female examination
- Individual cycles overviews
It can be also found as a button in a window where <a href="/index.php?title=How_to_edit_drugs%3F#How_to_send_an_SMS_with_instructions_about_the_application_or_dosage_of_a_drug.3F">all medication from one cycle are listed</a>.
In MedITEX Scheduler, the SMS interface can be found as a button in the menu bar in the following areas:
- Main window (when a patient is selected)
- Page where all patient's appointment are listed
It can be also used for <a href="/index.php?title=title=How to send appointment details via SMS?">sending details about appoitnments</a> to a patient.
Contents |
Sending SMS
| <img src="/images/CreateSMS.png" alt="" /> |
Buttons
| <img style="display: block; margin-left: auto; margin-right: auto;" src="/images/SaveSMSOnly.png" alt="" width="198" height="30" /> |
Saves the SMS without sending. |
| <img style="display: block; margin-left: auto; margin-right: auto;" src="/images/CancelSMS.png" alt="" width="102" height="28" /> | Cancel the operation. |
| <img style="display: block; margin-left: auto; margin-right: auto;" src="/images/SaveAndSendSMS.png" alt="" width="232" height="27" /> | Save and send the SMS. |
Clickable Areas
| <img src="/images/ClickableAreas.png" alt="" /> |
| <img style="display: block; margin-left: auto; margin-right: auto;" src="/images/Date.png" alt="" /> | The current date is automatically inserted. |
| <img style="display: block; margin-left: auto; margin-right: auto;" src="/images/By.png" alt="" width="191" height="143" /> | Choose the person sending the SMS. |
|
Insert the mobile phone number of the patient. If the patient has a mobile phone number in the system, it will be automatically added. Pay attention to the phone number format. It has to begin with international country calling code. The code can be added manually by the user or automatically by MedITEX if the code is entered in <a href="/index.php?title=How_to_configure_an_SMS_interface%3F">SMS settings</a>. |
|
|
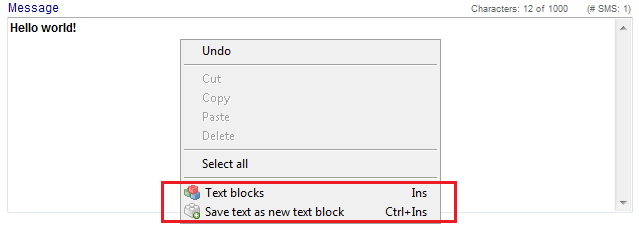
The text field for your message. Right-click in this field gives the possibility to use existing and create new SMS templates in the form of textblocks. |
|
| <img style="display: block; margin-left: auto; margin-right: auto;" src="/images/NumberOfChars.png" alt="" /> |
In this little box above the text box, you can see how many characters you have available. |
SMS status
| <img src="/images/SentSMSstatusRed.png" alt="" width="695" height="703" /> |
There are 6 possible statuses of a sent SMS message. In the field Protocol you can see the exact date and time when the message was created, saved, submitted etc.
| <img src="/images/StatusDraft.png" alt="" /> | Draft |
| <img src="/images/StatusSending.png" alt="" /> |
Sending |
| <img src="/images/StatusSent.png" alt="" width="44" height="23" /> |
Sent (not yet delivered) |
| <img src="/images/StatusDelivered.png" alt="" width="43" height="24" /> |
Delivered |
| <img src="/images/StatusErrorNotDelivered.png" alt="" width="44" height="26" /> |
Error: SMS could not be delivered |
| <img src="/images/StatusErrorTimeOut.png" alt="" width="44" height="26" /> |
Error: SMS could not be sent |
Receiving SMS
| <img style="display: block; margin-left: auto; margin-right: auto;" src="/images/ReceivedSMS.png" alt="" /> |
Buttons
| <img style="display: block; margin-left: auto; margin-right: auto;" src="/images/CancelSMS.png" alt="" width="102" height="28" /> | Cancel the operation. |
| <img src="/images/SMSMarkAsRead.png" alt="" width="230" height="24" /> | Mark message as read. |
SMS status
| <img src="/images/ReceivedSMSstatusRed.png" alt="" /> |
There are 2 possible statuses of a received SMS message. In the field Protocol you can see the exact date and time when the message was sent by a patient, received by MedITEX and read by user.
| <img src="/images/StatusUnread.png" alt="" width="40" height="24" /> | Unread |
| <img src="/images/StatusRead.png" alt="" width="41" height="24" /> | Read |
Communication overview
| <a href="/index.php?title=Communication_overview"><img src="/images/plus48.png" alt="" width="48" height="48" /></a> | <a href="/index.php?title=Communication_overview">Click here</a> to read more about the Communication overview. |
How to...
| <a href="/index.php?title=MedITEX_IVF_how_to#SMS"><img style="vertical-align: middle;" src="/images/howto48.png" alt="" width="48" height="48" /></a> <a href="/index.php?title=MedITEX_IVF_how_to#SMS">SMS interface</a> |
| <a href="/index.php?title=Main_Page">Back to MedITEX products </a> | <a href="#top">Back to top</a> |


