Treatments and treatment semen analysis
From MedITEX - Wiki
| (8 intermediate revisions by 3 users not shown) | |||
| Line 3: | Line 3: | ||
<tbody> | <tbody> | ||
<tr> | <tr> | ||
| − | <td>[[Image:TreatSemenAnalyses.png|none|740px|thumb|left|link=http://wiki.meditex-software.com/images/TreatSemenAnalyses.png| ]]</td> | + | <td>[[Image:TreatSemenAnalyses.png|none|740px|thumb|left|link=http://wiki.meditex-software.com/images/TreatSemenAnalyses.png| Treatments and treatment semen analysis area.]]</td> |
</tr> | </tr> | ||
</tbody> | </tbody> | ||
| Line 10: | Line 10: | ||
<p><strong>Double-click</strong> one of the entries that were automatically created and the following window will open:</p> | <p><strong>Double-click</strong> one of the entries that were automatically created and the following window will open:</p> | ||
<p> </p> | <p> </p> | ||
| − | <h2> | + | <h2>Partner</h2> |
<table border="0"> | <table border="0"> | ||
<tbody> | <tbody> | ||
<tr> | <tr> | ||
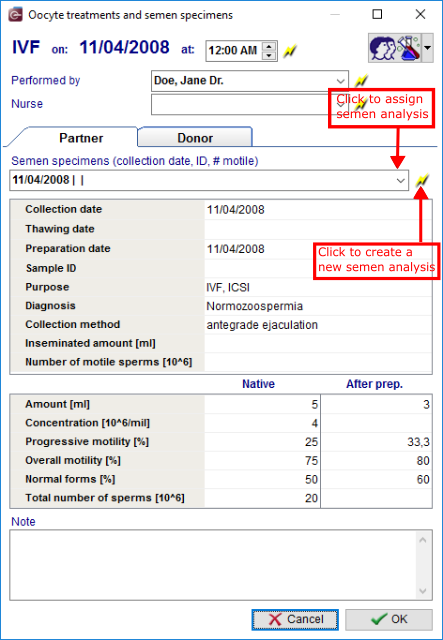
| − | <td>[[Image:TreatmSem.png|none|740px|thumb|left|link=http://wiki.meditex-software.com/images/TreatmSem.png| ]]</td> | + | <td>[[Image:TreatmSem.png|none|740px|thumb|left|link=http://wiki.meditex-software.com/images/TreatmSem.png| Input window Partner.]]</td> |
<td> | <td> | ||
<ul> | <ul> | ||
| Line 56: | Line 56: | ||
</table> | </table> | ||
<p> </p> | <p> </p> | ||
| − | <h2> | + | <h2>Donor</h2> |
<table border="0"> | <table border="0"> | ||
<tbody> | <tbody> | ||
<tr> | <tr> | ||
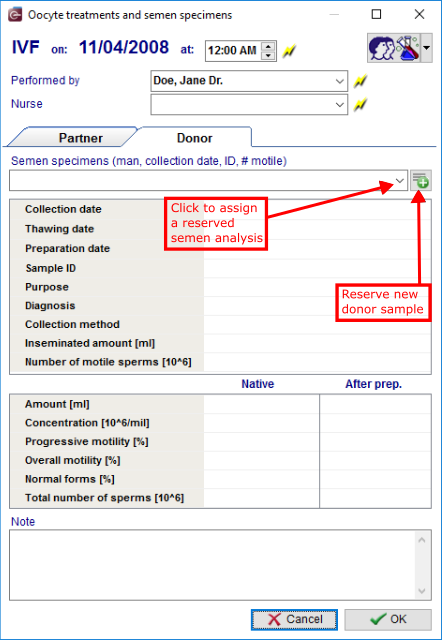
| − | <td>[[Image:TreatmSem1.png|none|740px|thumb|left|link=http://wiki.meditex-software.com/images/TreatmSem1.png| ]]</td> | + | <td>[[Image:TreatmSem1.png|none|740px|thumb|left|link=http://wiki.meditex-software.com/images/TreatmSem1.png| Input window Donor.]]</td> |
<td> | <td> | ||
<ul> | <ul> | ||
| Line 71: | Line 71: | ||
<p> </p> | <p> </p> | ||
<ul> | <ul> | ||
| − | <li><img src="/images/Plus.png" alt="" width="23" height="23" /> <strong>Reserve a new donor sample</strong> with the <strong>Plus </strong>button.<strong><br /></strong></li> | + | <li><a href="/index.php?title=Search_for_suitable_patient"><img style="border: 2px dotted blue;" src="/images/Plus.png" alt="" width="23" height="23" /></a> <strong>Reserve a new donor sample</strong> with the <strong>Plus </strong>button.<strong><br /></strong></li> |
</ul> | </ul> | ||
<p> </p> | <p> </p> | ||
| Line 93: | Line 93: | ||
</tbody> | </tbody> | ||
</table> | </table> | ||
| − | |||
<p> </p> | <p> </p> | ||
<table style="margin-left: auto; margin-right: auto;" border="0"> | <table style="margin-left: auto; margin-right: auto;" border="0"> | ||
| Line 100: | Line 99: | ||
<td><a href="/index.php?title=How_to_use_donated_sperm%3F#Using_a_donor.27s_sperm_in_a_cycle"><img style="display: block; margin-left: auto; margin-right: auto;" src="/images/howto48.png" alt="" width="48" height="48" /></a></td> | <td><a href="/index.php?title=How_to_use_donated_sperm%3F#Using_a_donor.27s_sperm_in_a_cycle"><img style="display: block; margin-left: auto; margin-right: auto;" src="/images/howto48.png" alt="" width="48" height="48" /></a></td> | ||
<td> | <td> | ||
| − | <p><a href="/index.php?title=How_to_use_donated_sperm%3F#Using_a_donor.27s_sperm_in_a_cycle">Click here</a> to read more about <strong>Semen analyses</strong>.</p> | + | <p><a href="/index.php?title=How_to_use_donated_sperm%3F#Using_a_donor.27s_sperm_in_a_cycle">Click here</a> to read more about <strong>using sperm in a Semen analyses</strong>.</p> |
</td> | </td> | ||
</tr> | </tr> | ||
<tr> | <tr> | ||
| − | <td><a href="/index.php?title=Free_/_QM_fields"><img style="display: block; margin-left: auto; margin-right: auto; border: 2px dotted blue;" src="/images/QMButton.png" alt=" | + | <td><a href="/index.php?title=Free_/_QM_fields"><img style="display: block; margin-left: auto; margin-right: auto; border: 2px dotted blue;" src="/images/QMButton.png" alt="" /></a></td> |
<td> | <td> | ||
<p>Press the <strong>QM field</strong> on the navigation panel on the top right corner to add <strong>staff</strong>, <strong>material</strong>, <strong>times </strong>or<strong> free fields</strong>.</p> | <p>Press the <strong>QM field</strong> on the navigation panel on the top right corner to add <strong>staff</strong>, <strong>material</strong>, <strong>times </strong>or<strong> free fields</strong>.</p> | ||
Latest revision as of 15:06, 4 November 2016
Semen analyses can be assigned to cycles in the Culture tab, by selecting it in the Treatments and treatment semen analyses field.
Double-click one of the entries that were automatically created and the following window will open:
Partner
|
Donor
|
| <a href="/index.php?title=How_to_use_donated_sperm%3F#Using_a_donor.27s_sperm_in_a_cycle"><img style="display: block; margin-left: auto; margin-right: auto;" src="/images/howto48.png" alt="" width="48" height="48" /></a> |
<a href="/index.php?title=How_to_use_donated_sperm%3F#Using_a_donor.27s_sperm_in_a_cycle">Click here</a> to read more about using sperm in a Semen analyses. |
| <a href="/index.php?title=Free_/_QM_fields"><img style="display: block; margin-left: auto; margin-right: auto; border: 2px dotted blue;" src="/images/QMButton.png" alt="" /></a> |
Press the QM field on the navigation panel on the top right corner to add staff, material, times or free fields. Information on how to use or define QM fields can be found in the section <a href="/index.php?title=Free_/_QM_fields">Free / QM fields</a>. |
| <a href="/index.php?title=MedITEX_IVF_manual">Back to the MedITEX IVF menu</a> | <a href="/index.php?title=MedITEX_IVF_manual"> </a><a href="/index.php?title=MedITEX_IVF_manual"> </a><a href="/index.php?title=Cycles">Back to the cycle overview</a> | <a href="#top">Back to top</a> |

