Gestione gruppi login
From MedITEX - Wiki
| (4 intermediate revisions by one user not shown) | |||
| Line 1: | Line 1: | ||
| − | <p> | + | <p>I diritti di login possono essere associati a diversi gruppi di <strong>Active Directory</strong> utilizzando i seguenti checkbox:</p> |
<table border="0"> | <table border="0"> | ||
<tbody> | <tbody> | ||
<tr> | <tr> | ||
| − | <td>[[Image: | + | <td>[[Image:AD_2.png|none|740px|thumb|middle|link=http://wiki.meditex-software.com/images/AD_2.png|]]</td> |
</tr> | </tr> | ||
</tbody> | </tbody> | ||
</table> | </table> | ||
| − | <p> | + | <p>Durante l'importazione, MedITEX controlla a che gruppo è assegnato l'utente e assegna i diritti corrispondenti. Dopo la configurazione dei gruppi sarà possibile cominciare l'import/sincronizzazione.</p> |
| − | <p> | + | <p>Per assegnare ad un particolare utente l'utilizzo dell' <strong>Active Directory</strong> è sufficiente selezionare l'opzione nelle <strong>Impostazioni dell utente</strong>.</p> |
<table border="0"> | <table border="0"> | ||
<tbody> | <tbody> | ||
<tr> | <tr> | ||
| − | <td>[[Image: | + | <td>[[Image:AD_3.png|none|740px|thumb|middle|link=http://wiki.meditex-software.com/images/AD_3.png|]]</td> |
</tr> | </tr> | ||
</tbody> | </tbody> | ||
</table> | </table> | ||
| − | <p> | + | <p>Per utenti creati attraverso la sincronizzazione, l'opzione <strong>Login con Active Directory</strong> viene impostato automaticamente. Se un utente è un utente di <strong>Active Directory</strong> i diritti non possono essere impostati nella sezione <strong>Impostazioni dell utente</strong>. Se tutti gli utenti utilizzano l'<strong>Active Directory</strong> lsi può selezionare a checkbox in alto a destra della pagina <strong>Gestione di staff e utenti</strong>.</p> |
<table border="0"> | <table border="0"> | ||
<tbody> | <tbody> | ||
<tr> | <tr> | ||
| − | <td>[[Image: | + | <td>[[Image:AD_4.png|none|740px|thumb|middle|link=http://wiki.meditex-software.com/images/AD_4.png|]]</td> |
</tr> | </tr> | ||
</tbody> | </tbody> | ||
| Line 28: | Line 28: | ||
<tr> | <tr> | ||
<td><a href="/index.php?title=Administration_of_staff_and_users#Import.2Fsynchronization_of_users_from_Active_directory"><img src="/images/plus48.png" alt="" width="48" height="48" /></a></td> | <td><a href="/index.php?title=Administration_of_staff_and_users#Import.2Fsynchronization_of_users_from_Active_directory"><img src="/images/plus48.png" alt="" width="48" height="48" /></a></td> | ||
| − | <td><a href="/index.php?title= | + | <td><a href="/index.php?title=Gestione_staff_e_utenti#Import.2Fsincronizzazione_utenti_da_Active_directory">Clicca qui </a>per maggiori informazioni sulla sincronizzazione dell' Active Directory<br /></td> |
</tr> | </tr> | ||
</tbody> | </tbody> | ||
| Line 35: | Line 35: | ||
<tbody> | <tbody> | ||
<tr> | <tr> | ||
| − | <td style="text-align: right;"><a href="/index.php?title= | + | <td style="text-align: right;"><a href="/index.php?title=MedITEX_Administration_manuale">Torna a manuale MedITEX Administration<br /></a></td> |
| − | <td style="text-align: right;"><a href="#top"> | + | <td style="text-align: right;"><a href="#top">Inizio pagina</a><br /></td> |
</tr> | </tr> | ||
</tbody> | </tbody> | ||
</table> | </table> | ||
Latest revision as of 11:07, 11 November 2024
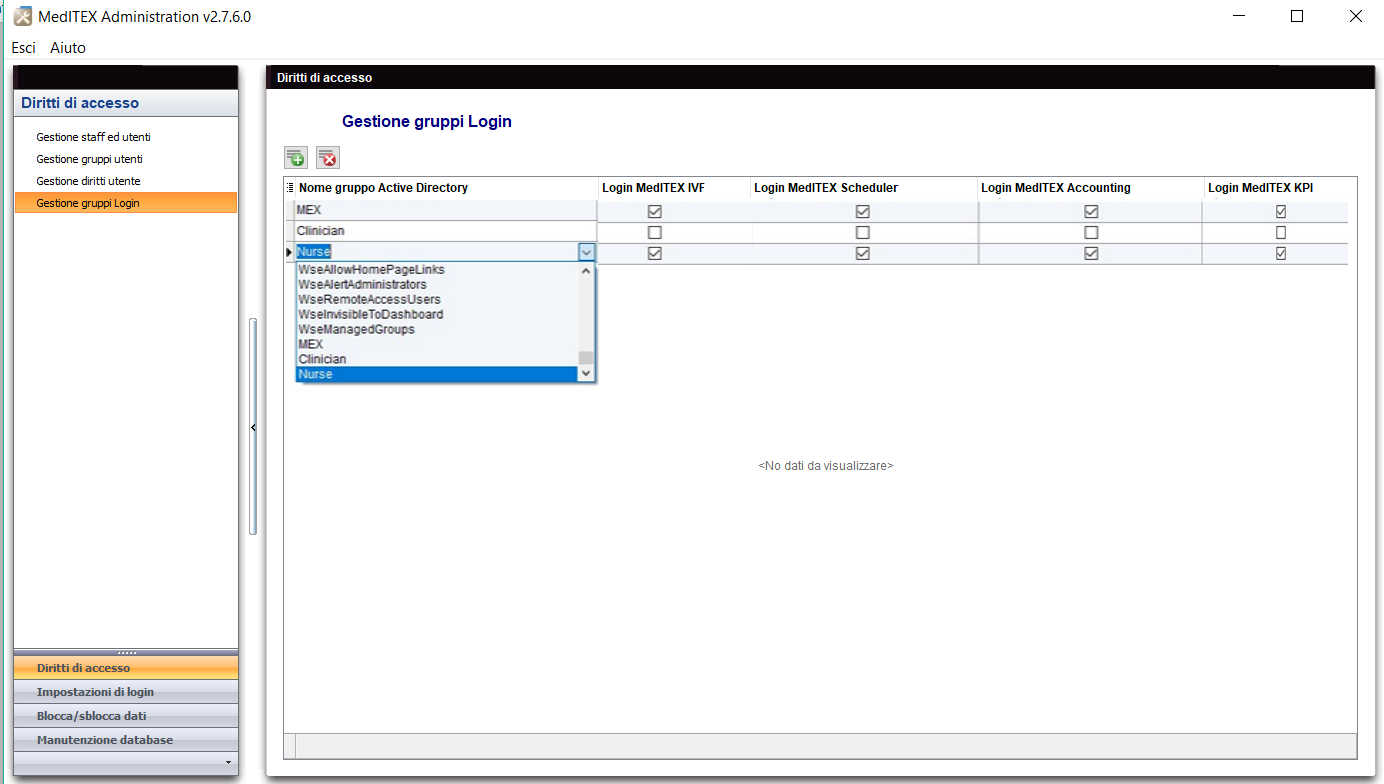
I diritti di login possono essere associati a diversi gruppi di Active Directory utilizzando i seguenti checkbox:
Durante l'importazione, MedITEX controlla a che gruppo è assegnato l'utente e assegna i diritti corrispondenti. Dopo la configurazione dei gruppi sarà possibile cominciare l'import/sincronizzazione.
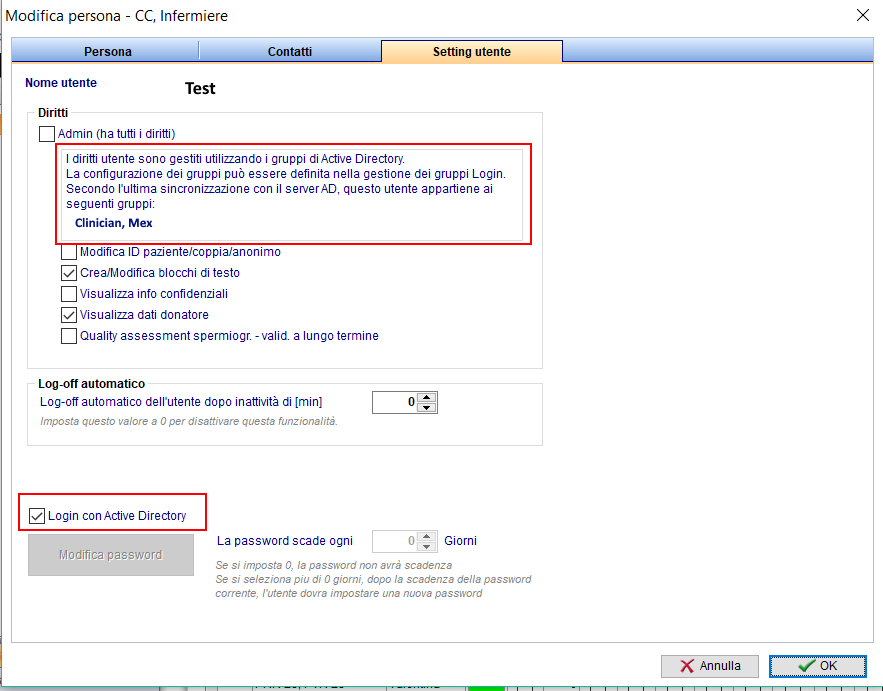
Per assegnare ad un particolare utente l'utilizzo dell' Active Directory è sufficiente selezionare l'opzione nelle Impostazioni dell utente.
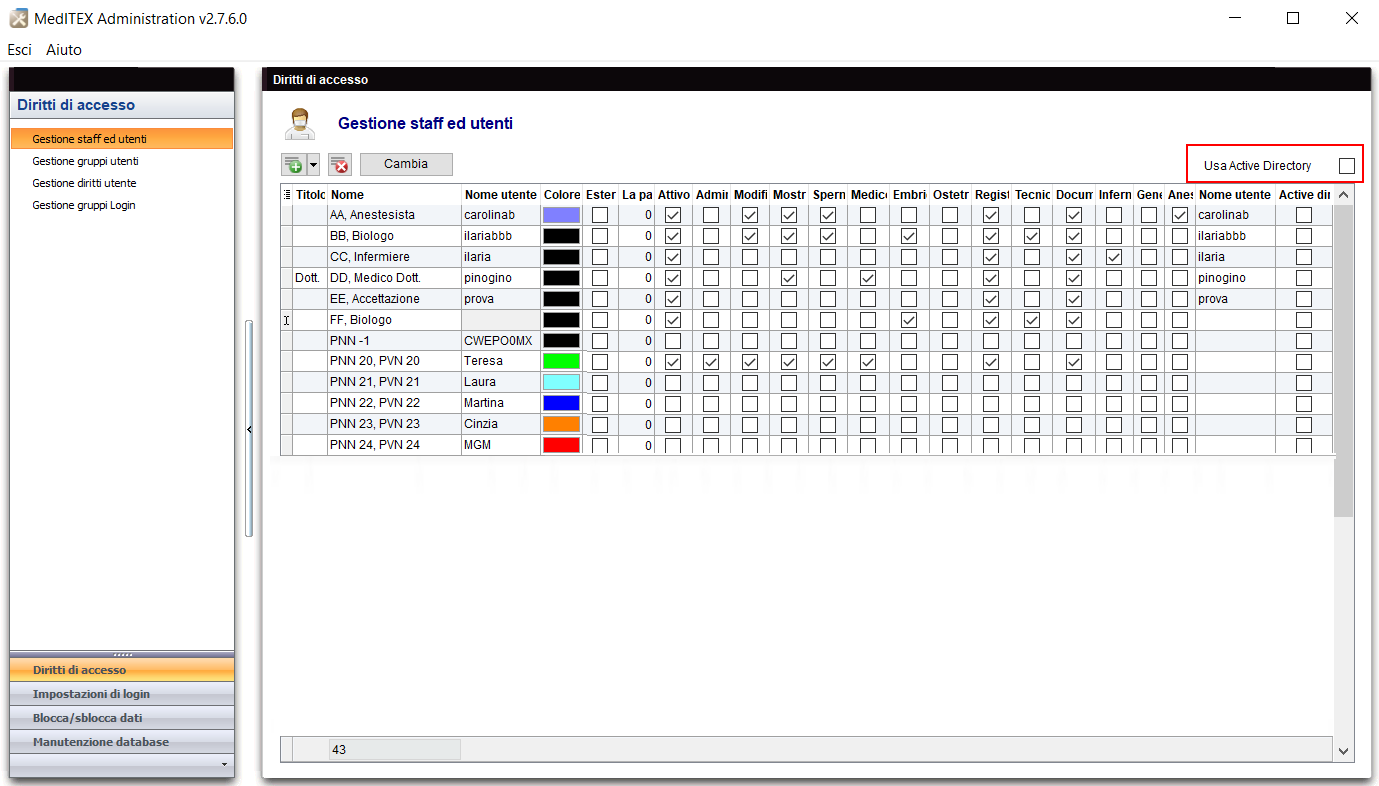
Per utenti creati attraverso la sincronizzazione, l'opzione Login con Active Directory viene impostato automaticamente. Se un utente è un utente di Active Directory i diritti non possono essere impostati nella sezione Impostazioni dell utente. Se tutti gli utenti utilizzano l'Active Directory lsi può selezionare a checkbox in alto a destra della pagina Gestione di staff e utenti.
| <a href="/index.php?title=Administration_of_staff_and_users#Import.2Fsynchronization_of_users_from_Active_directory"><img src="/images/plus48.png" alt="" width="48" height="48" /></a> | <a href="/index.php?title=Gestione_staff_e_utenti#Import.2Fsincronizzazione_utenti_da_Active_directory">Clicca qui </a>per maggiori informazioni sulla sincronizzazione dell' Active Directory |
| <a href="/index.php?title=MedITEX_Administration_manuale">Torna a manuale MedITEX Administration </a> |
<a href="#top">Inizio pagina</a> |


