Example 6
From MedITEX - Wiki
| (9 intermediate revisions by one user not shown) | |||
| Line 1: | Line 1: | ||
| + | <p>To open <strong>Report editor</strong>, go to <strong>Reports -> Report editor </strong>in the menu bar.</p> | ||
| + | <table style="margin-left: auto; margin-right: auto;" border="0" width="10" height="24"> | ||
| + | <tbody> | ||
| + | <tr> | ||
| + | <td><img src="/images/ReportEd.png" alt="" /><br /></td> | ||
| + | </tr> | ||
| + | </tbody> | ||
| + | </table> | ||
| + | <p> </p> | ||
| + | <p> </p> | ||
<p>After opening the <strong>Report Editor</strong>, you will see on the main screen the <strong>Report editor selection</strong> with tables and fields, in addition to the <strong>Report editor queries</strong> which allows you to create and edit queries.</p> | <p>After opening the <strong>Report Editor</strong>, you will see on the main screen the <strong>Report editor selection</strong> with tables and fields, in addition to the <strong>Report editor queries</strong> which allows you to create and edit queries.</p> | ||
<p> </p> | <p> </p> | ||
| Line 41: | Line 51: | ||
<tr> | <tr> | ||
<td> | <td> | ||
| − | <p>You can move as | + | <p>You can move as many tables as you want and choose the right fields to create some more complex queries that match your requierments.</p> |
<p>It's important to know that with every table you move, recalculations are made in the report editor selection to display just tables and fields that can be joined with the current table you have chosen and go with.</p> | <p>It's important to know that with every table you move, recalculations are made in the report editor selection to display just tables and fields that can be joined with the current table you have chosen and go with.</p> | ||
<p>The tables and filters choice should be carefully considered, so you will be able to reach the specific requested fields.</p> | <p>The tables and filters choice should be carefully considered, so you will be able to reach the specific requested fields.</p> | ||
| Line 66: | Line 76: | ||
<p>[[Image:Example6Result4.png|none|740px|thumb|left|link=http://wiki.meditex-software.com/images/Example6Result4.png| ]]</p> | <p>[[Image:Example6Result4.png|none|740px|thumb|left|link=http://wiki.meditex-software.com/images/Example6Result4.png| ]]</p> | ||
</td> | </td> | ||
| + | </tr> | ||
| + | <tr> | ||
| + | <td style="text-align: center;" colspan="2">The query result you get, contains as many columns as the fields you have previously chosen.</td> | ||
</tr> | </tr> | ||
</tbody> | </tbody> | ||
| Line 86: | Line 99: | ||
<p><span lang="en">This filter can be further processed.</span></p> | <p><span lang="en">This filter can be further processed.</span></p> | ||
</span></td> | </span></td> | ||
| + | </tr> | ||
| + | <tr> | ||
| + | <td><img style="display: block; margin-left: auto; margin-right: auto;" src="/images/Example6CustomFilter1.png" alt="" /> | ||
| + | <p> </p> | ||
| + | <img style="display: block; margin-left: auto; margin-right: auto;" src="/images/Example6CustomFilter2.png" alt="" /></td> | ||
| + | <td><span lang="en"><span lang="en">You can also customize and set filters of your choice.</span></span></td> | ||
</tr> | </tr> | ||
</tbody> | </tbody> | ||
| Line 129: | Line 148: | ||
<p> </p> | <p> </p> | ||
<h3>More</h3> | <h3>More</h3> | ||
| − | |||
| − | |||
| − | |||
| − | |||
| − | |||
| − | |||
| − | |||
| − | |||
| − | |||
| − | |||
<p> </p> | <p> </p> | ||
<table style="margin-left: auto; margin-right: auto;" border="0"> | <table style="margin-left: auto; margin-right: auto;" border="0"> | ||
Latest revision as of 09:49, 31 March 2020
To open Report editor, go to Reports -> Report editor in the menu bar.
| <img src="/images/ReportEd.png" alt="" /> |
After opening the Report Editor, you will see on the main screen the Report editor selection with tables and fields, in addition to the Report editor queries which allows you to create and edit queries.
Contents |
Create and edit queries
|
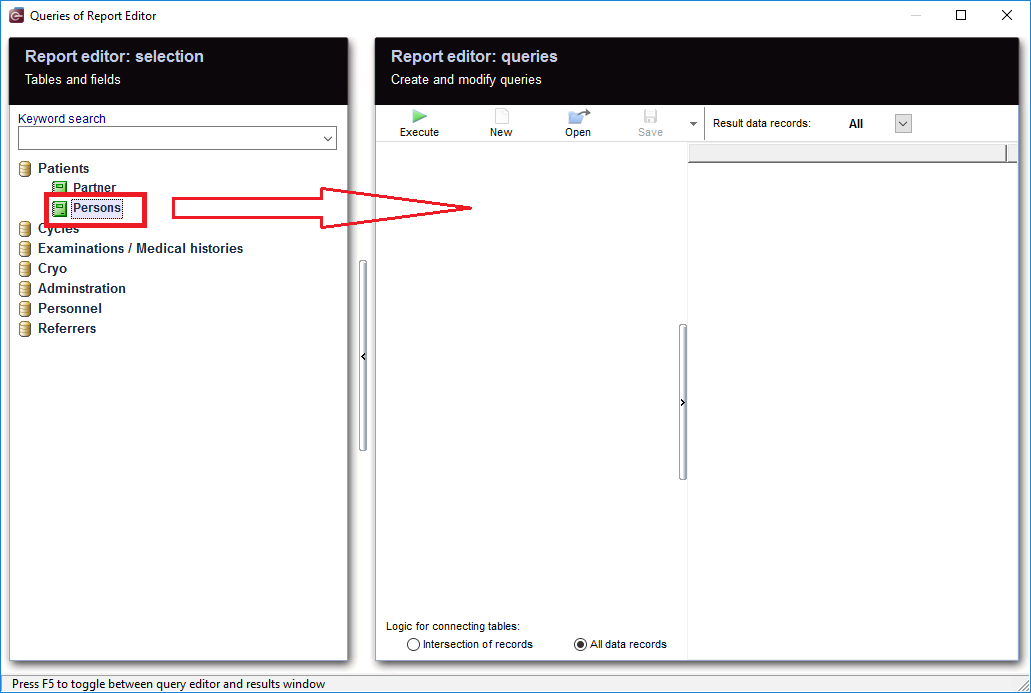
From the left, drag the section "Persons" and drop it in the center. |
|
|
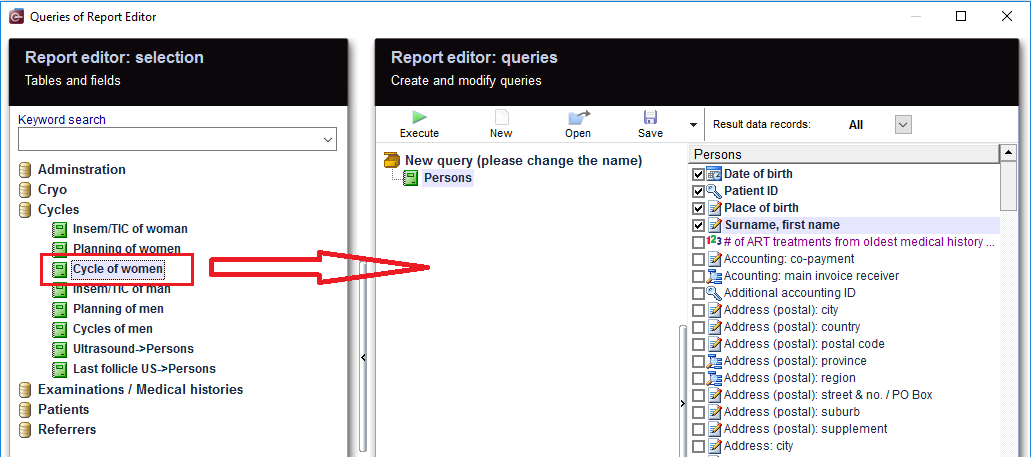
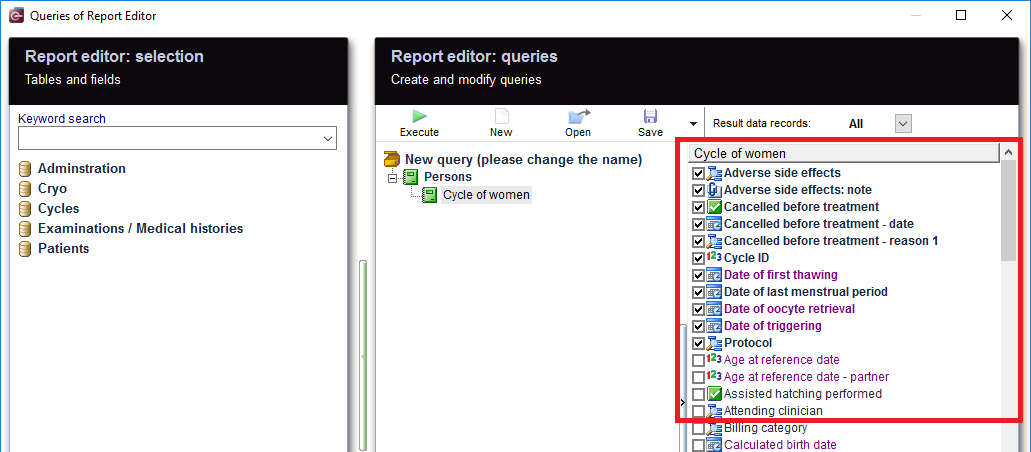
| Then move "Cycle of women" to the center and select the desired fields. |
|
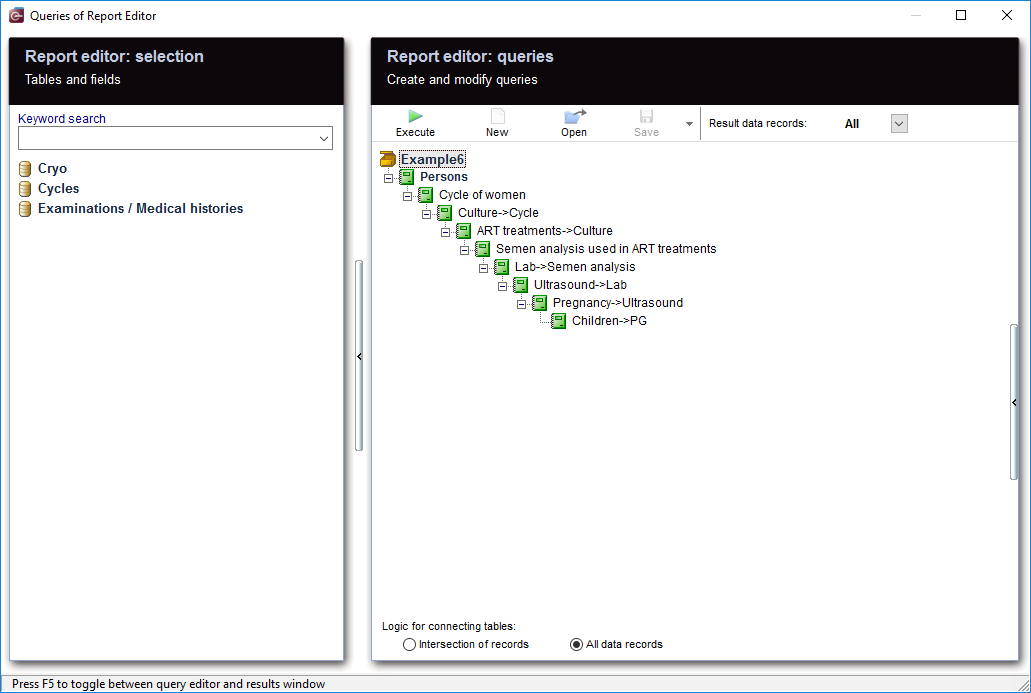
You can move as many tables as you want and choose the right fields to create some more complex queries that match your requierments. It's important to know that with every table you move, recalculations are made in the report editor selection to display just tables and fields that can be joined with the current table you have chosen and go with. The tables and filters choice should be carefully considered, so you will be able to reach the specific requested fields. |
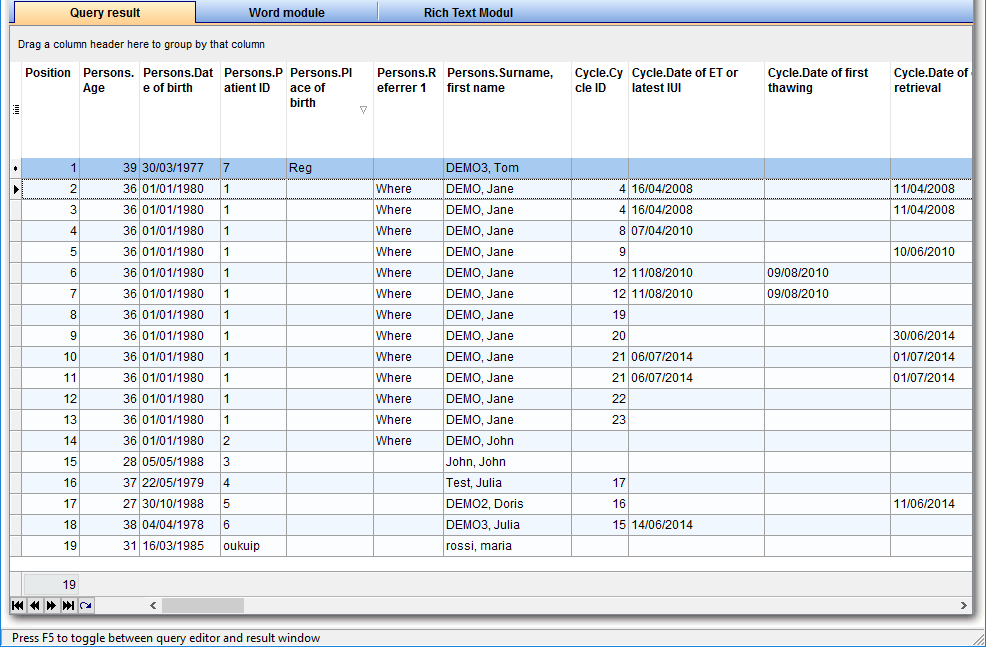
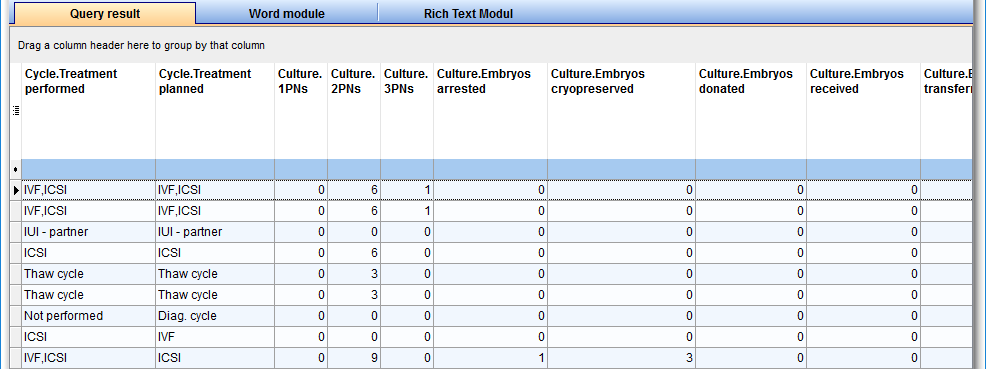
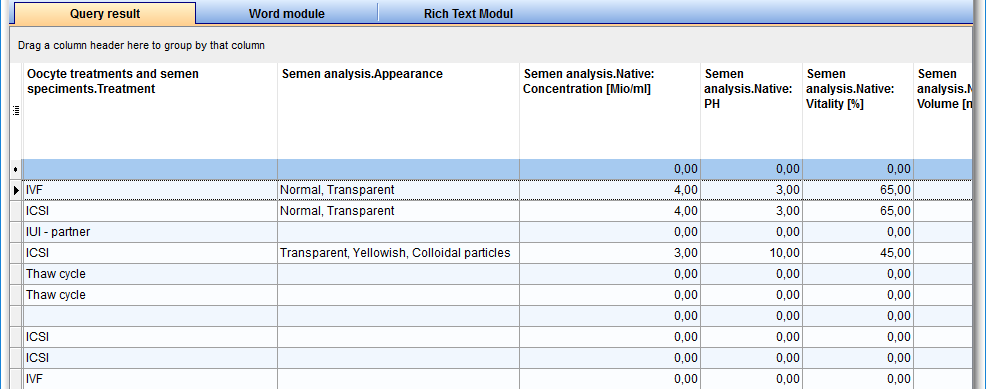
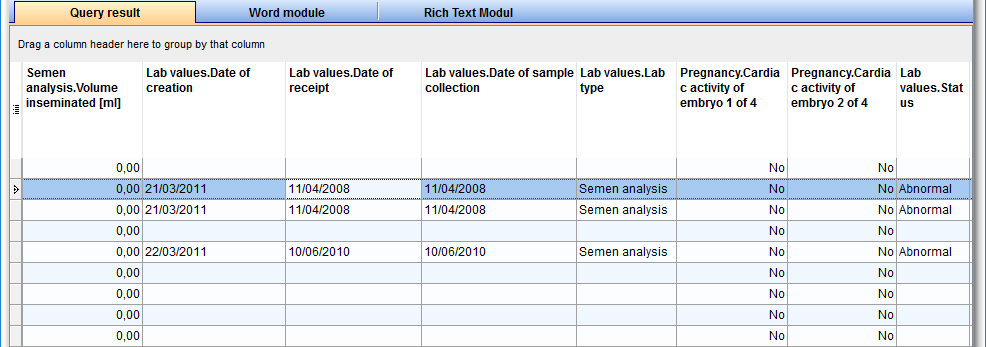
| <img src="/images/RunButton.PNG" alt="" /> | When you click on the tool bar button "Execute", the evaluation is carried out and you get the results. |
|
|
|
| The query result you get, contains as many columns as the fields you have previously chosen. | |
Apply filters
| <img style="display: block; margin-left: auto; margin-right: auto;" src="/images/CycleOfWomanFurtherFilter1.png" alt="" /> |
As a result, sections can be filtered. For example, "Date of oocyte retrieval" can be set to "NonBlanks". |
| <img src="/images/CycleOfWomanFurtherFilter2.png" alt="" width="432" height="397" /> |
Or Cycle treatment performed = "IVF, ICSI" This filter can be further processed. |
| <img style="display: block; margin-left: auto; margin-right: auto;" src="/images/Example6CustomFilter1.png" alt="" />
<img style="display: block; margin-left: auto; margin-right: auto;" src="/images/Example6CustomFilter2.png" alt="" /> |
You can also customize and set filters of your choice. |
Define conditions
|
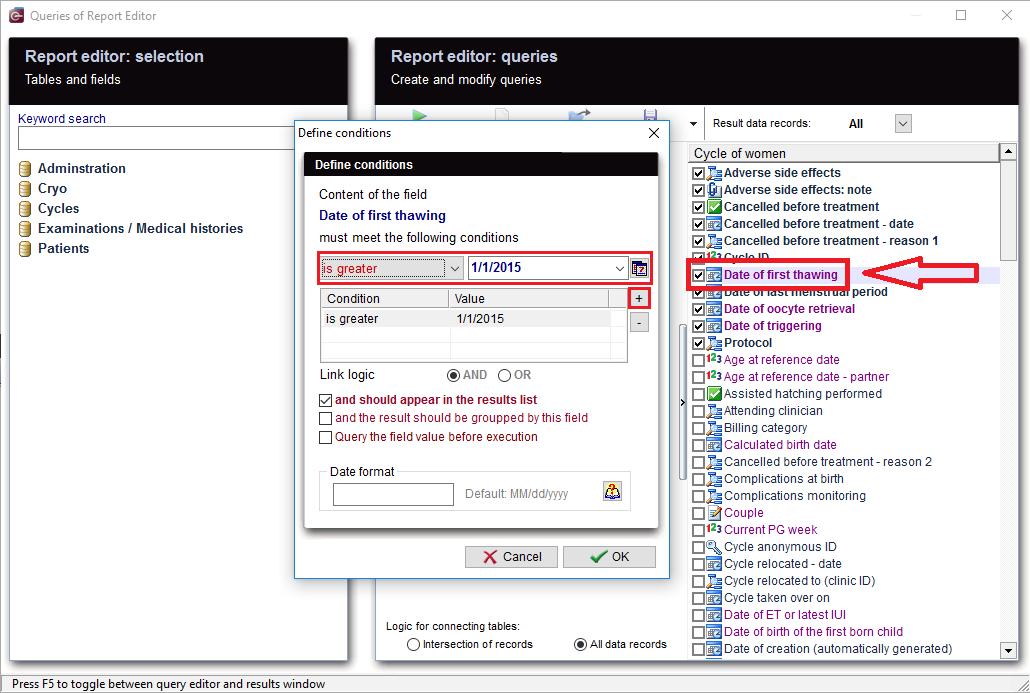
You can define your own conditions. If you want the time range to be limited, or look for a suitable date of your choice, E.g.: "Date of first thawing", double-clicking on this date opens the window for the condition you want to set. With '+' button, a new condition is applied. Several conditions can be applied, for example, "is greater" and "less equal". This condtion filters "Date of first thawing" .You get now all the cycles in which a thawing was made in this period. Inseminations or Aspirations then naturally fall out. If you just want cycles with thawing, this is the correct filter. You could, for example, Filter on "reference date". Then again, all therapies are considered, but you were just expecting the result of your choice (for example, all pregnancies), so, inevitably another filter should be set. But you could also choose "Date of ET or latest IUI" to use as a filter, then only therapies in which there has been an insemination or a transfer can be used. It's not the case for not implemented, canceled cycles, or cycles where everything was frozen, thus there was no transfer, and that makes them automatically fall out of the result. |
| <img style="display: block; margin-left: auto; margin-right: auto;" src="/images/WomanCycleQueryParameter.png" alt="" /> |
| You can check this box before running your query. |
| <img style="display: block; margin-left: auto; margin-right: auto;" src="/images/CycleOfWomanParameter.png" alt="" /> |
| As soon as you run your query, an extra window will appear, and you have the possibility to edit or insert a value as a parameter for the condition you already set. |
As you can see, there are many ways to make a query, so it should be carefully considered; what methods to use and which filters to set, so no cycles are accidentally excluded, or there is no way to get too many results, since unwanted therapies have been filtered out.
More
| <img src="/images/CycleOfWomanRecords.png" alt="" /> |
|
From the results, the patient records can be opened by double-clicking on the desired section. Double-clicking on the column "Persons." opens the Administration space. Double-clicking on the column "Cycle." opens the Cycle overview. |
| <img src="/images/SaveLoad.PNG" alt="" width="160" height="36" /> |
Do not forget to save the query. It can be loaded later. |
| <a href="/index.php?title=Queries_examples">Back to Queries examples </a> |
<a href="#top">Back to top</a> |
