Come bloccare i messaggi di Alert?
From MedITEX - Wiki
(Difference between revisions)
| Line 3: | Line 3: | ||
<tbody> | <tbody> | ||
<tr> | <tr> | ||
| − | <td><img src="/images/ | + | <td><img src="/images/Alert_1_IT.png" alt="" width="415" height="311" /></td> |
</tr> | </tr> | ||
<tr> | <tr> | ||
| Line 21: | Line 21: | ||
<p><em>Nota:Se il vostro <strong>Pannello di Controllo</strong> non è categorizzato, saltare questo step.</em></p> | <p><em>Nota:Se il vostro <strong>Pannello di Controllo</strong> non è categorizzato, saltare questo step.</em></p> | ||
</td> | </td> | ||
| − | <td> [[Image: | + | <td> [[Image:Alert_2_IT.png|none|300px|thumb|left|link=http://wiki.meditex-software.com/images/Alert_2_IT.png]]</td> |
</tr> | </tr> | ||
<tr> | <tr> | ||
| Line 27: | Line 27: | ||
<p>3. Selezionare <strong>Opzioni Internet.</strong></p> | <p>3. Selezionare <strong>Opzioni Internet.</strong></p> | ||
</td> | </td> | ||
| − | <td> [[Image: | + | <td> [[Image:Alert_3_IT.png|none|300px|thumb|left|link=http://wiki.meditex-software.com/images/Alert_3_IT.png]]</td> |
</tr> | </tr> | ||
<tr> | <tr> | ||
<td>4. In questa finestra selezionare la tab <strong>Securezza</strong>, selezionare <strong>Siti attendibili</strong> e successivamente il pulsante <strong>Siti</strong>.</td> | <td>4. In questa finestra selezionare la tab <strong>Securezza</strong>, selezionare <strong>Siti attendibili</strong> e successivamente il pulsante <strong>Siti</strong>.</td> | ||
| − | <td>[[Image: | + | <td>[[Image:Alert_4_IT.png|none|300px|thumb|left|link=http://wiki.meditex-software.com/images/Alert_4_IT.png]]</td> |
</tr> | </tr> | ||
<tr> | <tr> | ||
<td>5.Nel campo <strong>Aggiungi il sito Web all'area:</strong> inserire il nome del server, per esempio: "\\MedITEXSrv".<br /></td> | <td>5.Nel campo <strong>Aggiungi il sito Web all'area:</strong> inserire il nome del server, per esempio: "\\MedITEXSrv".<br /></td> | ||
| − | <td> [[Image: | + | <td> [[Image:Alert_5_IT.png|none|300px|thumb|left|link=http://wiki.meditex-software.com/images/Alert_5_IT.png]]</td> |
</tr> | </tr> | ||
<tr> | <tr> | ||
Latest revision as of 15:50, 3 May 2016
L'avviso di sicurezza rappresentato di seguito può essere evitato:
| <img src="/images/Alert_1_IT.png" alt="" width="415" height="311" /> |
| Avviso di sicurezza all'apertura di MedITEX da un Client. |
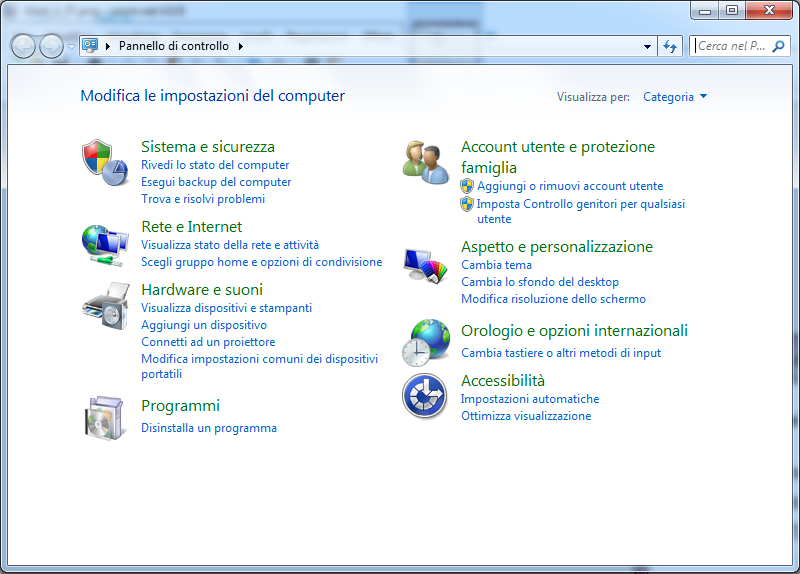
| 1.Aprire il Pannello di controllo da menù Start. | |
|
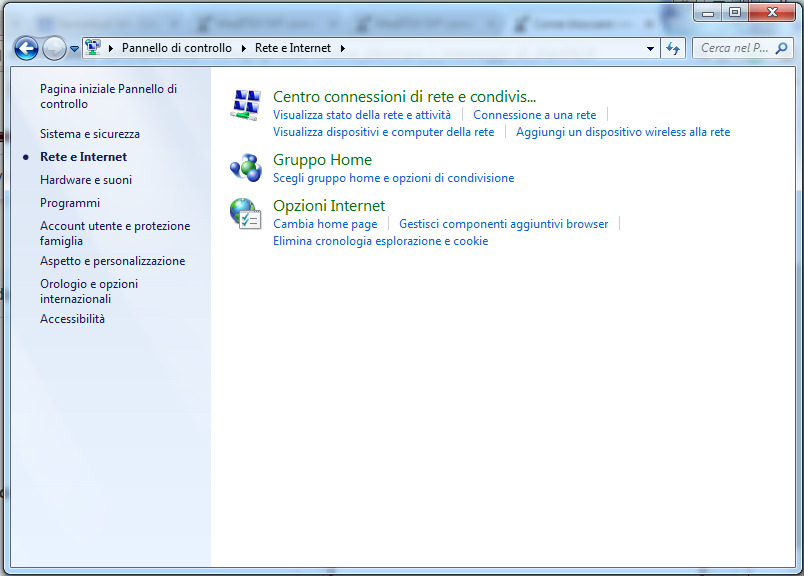
2. Cliccare Rete e Internet. Nota:Se il vostro Pannello di Controllo non è categorizzato, saltare questo step. |
|
|
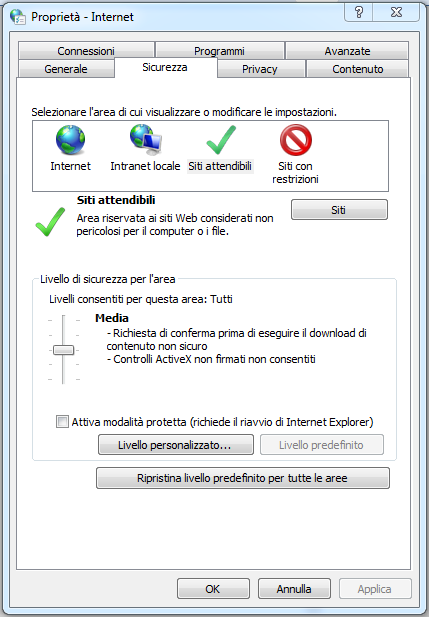
3. Selezionare Opzioni Internet. |
|
| 4. In questa finestra selezionare la tab Securezza, selezionare Siti attendibili e successivamente il pulsante Siti. | |
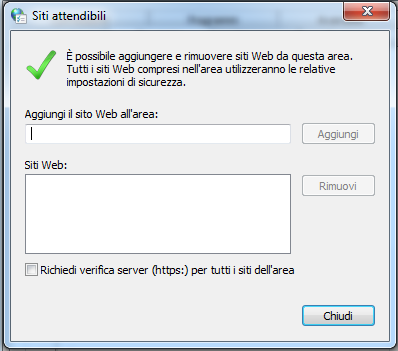
| 5.Nel campo Aggiungi il sito Web all'area: inserire il nome del server, per esempio: "\\MedITEXSrv". |
|
| 6. Cliccare Aggiungi. | |
| 7. Cliccare Chiudi. | |
| 8. Cliccare OK. | |
| <img src="/images/hint129.png" alt="" width="129" height="129" /> | Tutti questi passi vanno ripetuti in tutti i client. |
| <a href="/index.php?title=MedITEX_IVF_how_to"> </a><a style="font-size: small;" href="/index.php?title=Administrators_Support">Torna ad Administrators Support</a> | <a href="/index.php?title=MedITEX_IVF_come_fare">Torna a Come Fare</a> | <a href="#top">Inizio pagina</a> |


