Come aggiungere i gruppi di materiali?
From MedITEX - Wiki
| (5 intermediate revisions by one user not shown) | |||
| Line 1: | Line 1: | ||
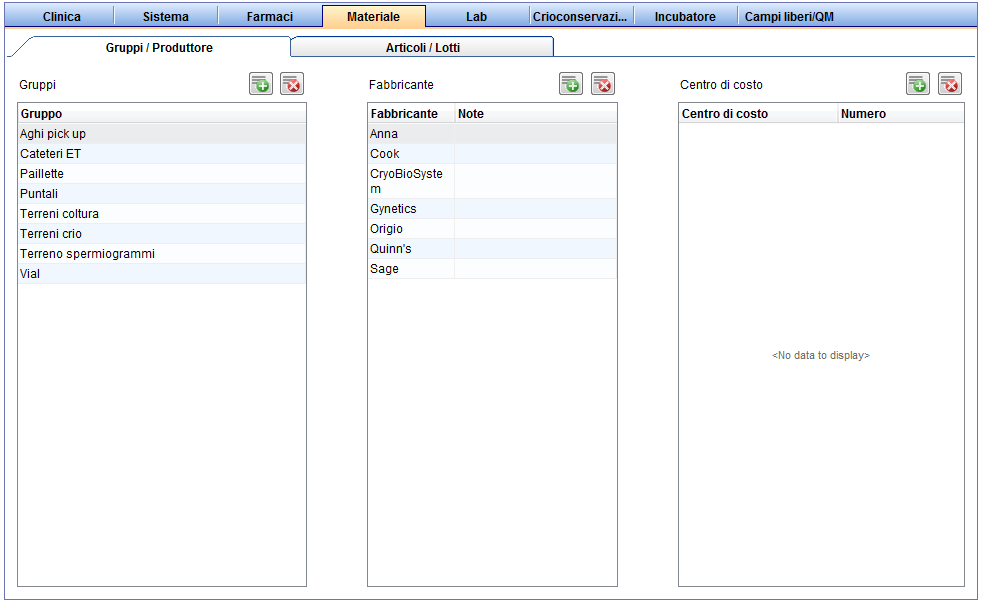
| − | <p> | + | <p><span>Per modificare le </span><strong>Impostazioni </strong><span>dei </span><strong>Gruppi</strong><span> cliccare su </span><strong>Sistema <span>⮕</span> Configurazione/Amministrazione <span>⮕</span> Impostazioni <span>⮕</span> Materiale <span>⮕</span> Gruppi/Produttori.</strong></p> |
| − | <p> | + | <p><span>In questa sezione sarà possibile inserire </span><strong>Gruppi</strong><span> di materiali utilizzati, come per esempio Cateteri transfer.</span></p> |
| − | <table style="margin-left: auto; margin-right: auto;" border="0"> | + | <table style="margin-left: auto; margin-right: auto;" border="0" width="10" height="24"> |
<tbody> | <tbody> | ||
<tr> | <tr> | ||
| − | <td>[[Image: | + | <td>[[Image:Impostazioni_49_IT.png|none|740px|thumb|left|link=http://wiki.meditex-software.com/images/Impostazioni_49_IT.png| ]]</td> |
</tr> | </tr> | ||
</tbody> | </tbody> | ||
</table> | </table> | ||
| − | <table | + | <p> </p> |
| + | <table border="0"> | ||
<tbody> | <tbody> | ||
<tr> | <tr> | ||
<td><img style="display: block; margin-left: auto; margin-right: auto;" src="/images/Plus.png" alt="" /></td> | <td><img style="display: block; margin-left: auto; margin-right: auto;" src="/images/Plus.png" alt="" /></td> | ||
| − | <td> | + | <td>Premere questo pulsante nella sezione <strong>Gruppi</strong> per aggiungerne di nuovi.</td> |
</tr> | </tr> | ||
<tr> | <tr> | ||
<td><img style="display: block; margin-left: auto; margin-right: auto;" src="/images/DeleteX.png" alt="" width="26" height="24" /></td> | <td><img style="display: block; margin-left: auto; margin-right: auto;" src="/images/DeleteX.png" alt="" width="26" height="24" /></td> | ||
<td> | <td> | ||
| − | <p> | + | <p>L'eliminazione di un Gruppo è possibile solamente se non è stato assegnato a nessun articolo collegato a <strong>Campi QM. </strong>Nel caso l'eliminazione non sia possibile ma si vuole comunque nascondere il gruppo dalle opzioni nei menù a tendina serve andare nella scheda <strong>Articoli/Lotti</strong> e deselezionare l'opzione<strong> Attivo</strong>.</p> |
| − | + | ||
| − | < | + | |
</td> | </td> | ||
</tr> | </tr> | ||
</tbody> | </tbody> | ||
</table> | </table> | ||
| − | <table | + | <p> </p> |
| + | <table border="0"> | ||
<tbody> | <tbody> | ||
<tr> | <tr> | ||
| − | <td><img style="display: block; margin-left: auto; margin-right: auto;" src="/images/ | + | <td><img style="display: block; margin-left: auto; margin-right: auto;" src="/images/Materiali_1_IT.PNG" alt="" width="289" height="150" /></td> |
| − | <td | + | <td>Inserire il nome del gruppo e confermare premendo <strong>OK.</strong></td> |
</tr> | </tr> | ||
<tr> | <tr> | ||
| − | <td> | + | <td><img src="/images/Materiali_2_IT.PNG" alt="" width="306" height="261" /></td> |
| − | <td> | + | <td>Il nuovo gruppo verrà visualizzato nella lista.</td> |
</tr> | </tr> | ||
</tbody> | </tbody> | ||
| Line 39: | Line 39: | ||
<tbody> | <tbody> | ||
<tr> | <tr> | ||
| − | <td style="text-align: right;"><a href="/index.php?title= | + | <td style="text-align: right;"><a href="/index.php?title=MedITEX_IVF_come_fare">Torna a Come fare</a></td> |
| − | <td style="text-align: right;"><a href="#top"> | + | <td style="text-align: right;"><a href="#top">Inizio pagina</a></td> |
</tr> | </tr> | ||
</tbody> | </tbody> | ||
</table> | </table> | ||
| − | |||
Latest revision as of 14:12, 31 October 2024
Per modificare le Impostazioni dei Gruppi cliccare su Sistema ⮕ Configurazione/Amministrazione ⮕ Impostazioni ⮕ Materiale ⮕ Gruppi/Produttori.
In questa sezione sarà possibile inserire Gruppi di materiali utilizzati, come per esempio Cateteri transfer.
| <img style="display: block; margin-left: auto; margin-right: auto;" src="/images/Plus.png" alt="" /> | Premere questo pulsante nella sezione Gruppi per aggiungerne di nuovi. |
| <img style="display: block; margin-left: auto; margin-right: auto;" src="/images/DeleteX.png" alt="" width="26" height="24" /> |
L'eliminazione di un Gruppo è possibile solamente se non è stato assegnato a nessun articolo collegato a Campi QM. Nel caso l'eliminazione non sia possibile ma si vuole comunque nascondere il gruppo dalle opzioni nei menù a tendina serve andare nella scheda Articoli/Lotti e deselezionare l'opzione Attivo. |
| <img style="display: block; margin-left: auto; margin-right: auto;" src="/images/Materiali_1_IT.PNG" alt="" width="289" height="150" /> | Inserire il nome del gruppo e confermare premendo OK. |
| <img src="/images/Materiali_2_IT.PNG" alt="" width="306" height="261" /> | Il nuovo gruppo verrà visualizzato nella lista. |
| <a href="/index.php?title=MedITEX_IVF_come_fare">Torna a Come fare</a> | <a href="#top">Inizio pagina</a> |
