Come importare/esportare una query?
From MedITEX - Wiki
| (4 intermediate revisions by one user not shown) | |||
| Line 1: | Line 1: | ||
| − | <p> | + | <p>Per aprire <strong>Report editor</strong>, cliccare su <strong>Report -> Report editor </strong>nella bara dei menù.</p> |
<table style="margin-left: auto; margin-right: auto;" border="0" width="10" height="24"> | <table style="margin-left: auto; margin-right: auto;" border="0" width="10" height="24"> | ||
<tbody> | <tbody> | ||
<tr> | <tr> | ||
| − | <td><img src="/images/ | + | <td><img src="/images/Report_Editor_1_IT.png" alt="" width="462" height="288" /></td> |
</tr> | </tr> | ||
</tbody> | </tbody> | ||
</table> | </table> | ||
<p> </p> | <p> </p> | ||
| − | <p>Report | + | <p>Report Editor si aprirà.</p> |
<table style="margin-left: auto; margin-right: auto;" border="0"> | <table style="margin-left: auto; margin-right: auto;" border="0"> | ||
<tbody> | <tbody> | ||
<tr> | <tr> | ||
| − | <td style="text-align: center;"><img src="/images/ | + | <td style="text-align: center;"><img src="/images/Report_Editor_7_IT.png" alt="" width="63" height="35" /></td> |
| − | <td> | + | <td>Cliccare su <strong>Apri</strong> per aprire la finestra sottostante ed <strong>Importare/Esportare </strong>query.<strong> <br /></strong></td> |
</tr> | </tr> | ||
<tr> | <tr> | ||
| − | <td colspan="2"><img src="/images/ | + | <td colspan="2"><img src="/images/Strum_amm_query_1_IT.png" alt="" width="750" height="539" /></td> |
</tr> | </tr> | ||
</tbody> | </tbody> | ||
| Line 25: | Line 25: | ||
<tr> | <tr> | ||
<td> | <td> | ||
| − | <p><strong> | + | <p><strong>Tasto destro </strong>sulla query e selezionare l'opzione <strong>Query</strong>.</p> |
</td> | </td> | ||
</tr> | </tr> | ||
<tr> | <tr> | ||
| − | <td><img src="/images/ | + | <td><img src="/images/Strum_amm_query_5_IT.png" alt="" width="646" height="374" /></td> |
</tr> | </tr> | ||
</tbody> | </tbody> | ||
</table> | </table> | ||
<p> </p> | <p> </p> | ||
| − | <h2> | + | <h2>Esportare una query</h2> |
| − | <p> | + | <p style="text-align: justify;"><span>Una query può essere esportata per essere successivamente importata in un nuovo server (es. è possibile inviare la query ad un collega che utilizza MedITEX in un altro centro) o da un nuovo utente nella propria cartella. </span></p> |
| − | <p> | + | <p style="text-align: justify;"><span>Selezionando l'opzione Esporta la query verrà salvata nella cartella </span><strong>Query builder</strong><span> di solito posizionata in "\\Nome_Server\MedITEX IVF\File_Storage\QueryBuilder". Il file verrà salvato come </span><strong>FQB [Nome_Query].grd. </strong><span>Questo file può essere inviato o copiato in un altro pc.</span></p> |
<p> </p> | <p> </p> | ||
| − | <h2> | + | <h2>Importare una query</h2> |
| − | <p> | + | <p><span>Per importare una query sarà sufficiente selezionare l'opzione corrispondente dal menù </span><strong>Query, </strong><span>cercare il file </span><strong>FQB [Nome_Query].grd </strong><span>nel vostro computer e selezionarlo. </span></p> |
<table style="margin-left: auto; margin-right: auto;" border="0" width="563" height="5"> | <table style="margin-left: auto; margin-right: auto;" border="0" width="563" height="5"> | ||
<tbody> | <tbody> | ||
<tr> | <tr> | ||
<td><img style="display: block; margin-left: auto; margin-right: auto;" src="/images/hint48.png" alt="" width="48" height="48" /></td> | <td><img style="display: block; margin-left: auto; margin-right: auto;" src="/images/hint48.png" alt="" width="48" height="48" /></td> | ||
| − | <td> | + | <td style="text-align: justify;">Cliccando con il tasto destro su una query e scegliendo <strong>importa</strong>, la query importasta non andrà a sovrascrivere quella selezionata, ma verrà chiesto di inserire un nuovo nome e la query verrà importata separatamente.</td> |
</tr> | </tr> | ||
</tbody> | </tbody> | ||
</table> | </table> | ||
<p> </p> | <p> </p> | ||
| − | <h2> | + | <h2>Importare una query Expert</h2> |
| − | <p> | + | <p>Le query expert sono create dal team di supporto e sono create per soddisfare particolari richieste degli utenti. Queste query non sono modificabili.</p> |
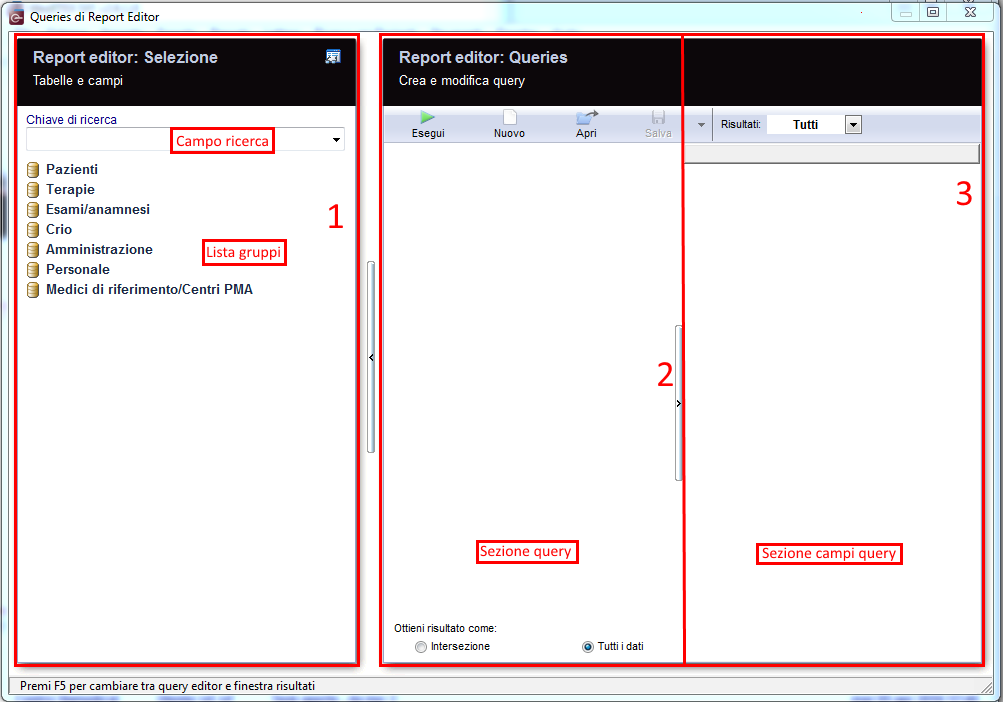
| − | <p> | + | <p>Per importare una query expert è necessario premere un qualsiasi campo presente nella <strong>lista dei Gruppi</strong> (sezione 1)</p> |
<table style="margin-left: auto; margin-right: auto;" border="0"> | <table style="margin-left: auto; margin-right: auto;" border="0"> | ||
<tbody> | <tbody> | ||
<tr> | <tr> | ||
| − | <td>[[Image: | + | <td>[[Image:Report_Editor_2_IT.png|none|740px|thumb|left|link=http://wiki.meditex-software.com/images/Report_Editor_2_IT.png| ]]<br /></td> |
</tr> | </tr> | ||
</tbody> | </tbody> | ||
</table> | </table> | ||
<p> </p> | <p> </p> | ||
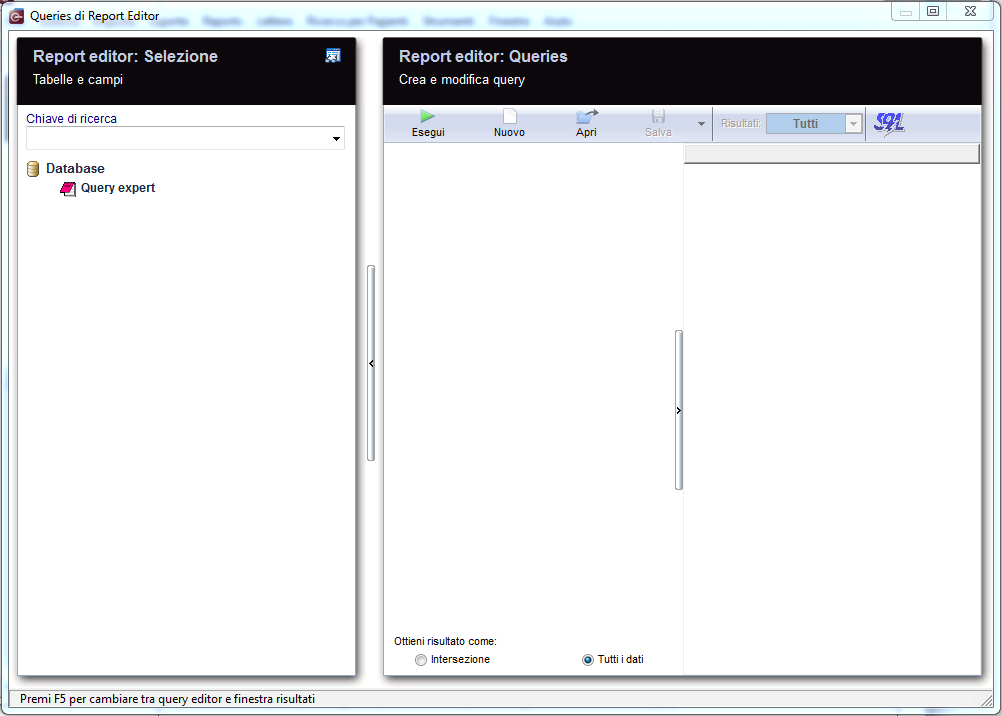
| − | <p> | + | <p>Successivamente, premere <strong>Ctrl+E</strong>. La sezione di <strong>Selezione</strong> cambierà mone mostrato nella figura sottostante.</p> |
<table style="margin-left: auto; margin-right: auto;" border="0"> | <table style="margin-left: auto; margin-right: auto;" border="0"> | ||
<tbody> | <tbody> | ||
<tr> | <tr> | ||
| − | <td>[[Image: | + | <td>[[Image:Query_Expert_1_IT.PNG|none|740px|thumb|left|link=http://wiki.meditex-software.com/images/Query_Expert_1_IT.PNG| ]]<br /></td> |
</tr> | </tr> | ||
</tbody> | </tbody> | ||
</table> | </table> | ||
<p> </p> | <p> </p> | ||
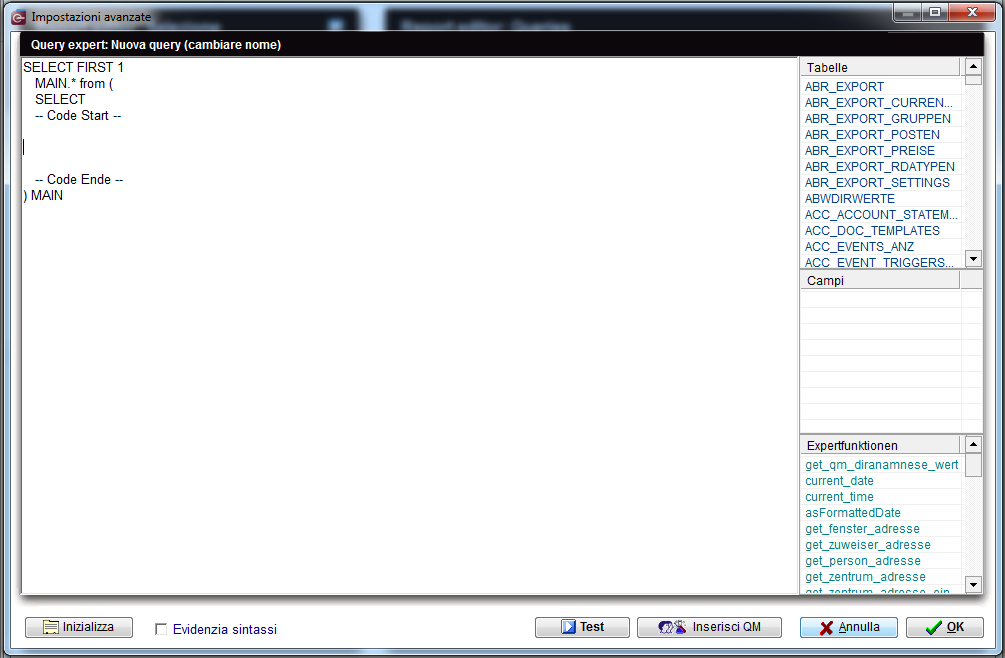
| − | <p> | + | <p>Cliccare su Query Expert e trascinarla nella <strong>sezione delle Query</strong> (sezione 2). La finestra di <strong>Modifica della expert query</strong> si aprirà.</p> |
<table style="margin-left: auto; margin-right: auto;" border="0"> | <table style="margin-left: auto; margin-right: auto;" border="0"> | ||
<tbody> | <tbody> | ||
<tr> | <tr> | ||
| − | <td>[[Image: | + | <td>[[Image:Query_Expert_2_IT.PNG|none|740px|thumb|left|link=http://wiki.meditex-software.com/images/Query_Expert_2_IT.PNG| ]]<br /></td> |
</tr> | </tr> | ||
</tbody> | </tbody> | ||
</table> | </table> | ||
<p> </p> | <p> </p> | ||
| − | <p> | + | <p>A questo punto aprire il file "<strong>*.sql</strong>", inviato dal supporto, con qualsiasi editor di testo (es <strong>Blocco Note</strong>). Copiare tutto utilizzando i tasti <strong>Ctrl+A</strong> e successivamente <strong>Ctrl+C </strong>o selezionare l'intero codice e con il tasto destro scegliere <strong>Copia</strong>.</p> |
| − | <p> | + | <p>Tornare alla finestra di <strong>Modifica della expert query.</strong> Cancellare tutto il codice di default presente.</p> |
| − | <p> | + | <p>Premere <strong>Ctrl+V</strong> per incollare il codice copiato, oppute tasto destro <strong>Incolla</strong>.</p> |
| − | <p> | + | <p>Premere <strong>OK </strong>sul fono della finestra.</p> |
| − | <p> | + | <p>Tornati alla finestra principale di <strong>Report editor</strong>, salvare la query ed eseguirla come una normale query.</p> |
<table style="float: right;" border="0"> | <table style="float: right;" border="0"> | ||
<tbody> | <tbody> | ||
<tr> | <tr> | ||
| − | <td style="text-align: right;"><a href="/index.php?title= | + | <td style="text-align: right;"><a href="/index.php?title=MedITEX_IVF_come_fare">Torna a Come fare</a></td> |
| − | <td style="text-align: right;"><a href="#top"> | + | <td style="text-align: right;"><a href="#top">Inizio pagina</a></td> |
</tr> | </tr> | ||
</tbody> | </tbody> | ||
</table> | </table> | ||
<p><span class="mw-headline"><br /></span></p> | <p><span class="mw-headline"><br /></span></p> | ||
Latest revision as of 12:33, 31 October 2024
Per aprire Report editor, cliccare su Report -> Report editor nella bara dei menù.
| <img src="/images/Report_Editor_1_IT.png" alt="" width="462" height="288" /> |
Report Editor si aprirà.
| <img src="/images/Report_Editor_7_IT.png" alt="" width="63" height="35" /> | Cliccare su Apri per aprire la finestra sottostante ed Importare/Esportare query. |
| <img src="/images/Strum_amm_query_1_IT.png" alt="" width="750" height="539" /> | |
|
Tasto destro sulla query e selezionare l'opzione Query. |
| <img src="/images/Strum_amm_query_5_IT.png" alt="" width="646" height="374" /> |
Esportare una query
Una query può essere esportata per essere successivamente importata in un nuovo server (es. è possibile inviare la query ad un collega che utilizza MedITEX in un altro centro) o da un nuovo utente nella propria cartella.
Selezionando l'opzione Esporta la query verrà salvata nella cartella Query builder di solito posizionata in "\\Nome_Server\MedITEX IVF\File_Storage\QueryBuilder". Il file verrà salvato come FQB [Nome_Query].grd. Questo file può essere inviato o copiato in un altro pc.
Importare una query
Per importare una query sarà sufficiente selezionare l'opzione corrispondente dal menù Query, cercare il file FQB [Nome_Query].grd nel vostro computer e selezionarlo.
| <img style="display: block; margin-left: auto; margin-right: auto;" src="/images/hint48.png" alt="" width="48" height="48" /> | Cliccando con il tasto destro su una query e scegliendo importa, la query importasta non andrà a sovrascrivere quella selezionata, ma verrà chiesto di inserire un nuovo nome e la query verrà importata separatamente. |
Importare una query Expert
Le query expert sono create dal team di supporto e sono create per soddisfare particolari richieste degli utenti. Queste query non sono modificabili.
Per importare una query expert è necessario premere un qualsiasi campo presente nella lista dei Gruppi (sezione 1)
Successivamente, premere Ctrl+E. La sezione di Selezione cambierà mone mostrato nella figura sottostante.
Cliccare su Query Expert e trascinarla nella sezione delle Query (sezione 2). La finestra di Modifica della expert query si aprirà.
A questo punto aprire il file "*.sql", inviato dal supporto, con qualsiasi editor di testo (es Blocco Note). Copiare tutto utilizzando i tasti Ctrl+A e successivamente Ctrl+C o selezionare l'intero codice e con il tasto destro scegliere Copia.
Tornare alla finestra di Modifica della expert query. Cancellare tutto il codice di default presente.
Premere Ctrl+V per incollare il codice copiato, oppute tasto destro Incolla.
Premere OK sul fono della finestra.
Tornati alla finestra principale di Report editor, salvare la query ed eseguirla come una normale query.
| <a href="/index.php?title=MedITEX_IVF_come_fare">Torna a Come fare</a> | <a href="#top">Inizio pagina</a> |


