How to create/edit lab order templates?
From MedITEX - Wiki
(Difference between revisions)
| (5 intermediate revisions by one user not shown) | |||
| Line 3: | Line 3: | ||
<tr> | <tr> | ||
<td colspan="2"> | <td colspan="2"> | ||
| − | <p>In the following steps, you'll be guided through the process of creating and editing lab-order templates; which should significantly cut the time consumed in creating a new lab order:</p> | + | <p><strong>In the following steps, you'll be guided through the process of creating and editing lab-order templates; which should significantly cut the time consumed in creating a new lab order:</strong></p> |
</td> | </td> | ||
</tr> | </tr> | ||
<tr> | <tr> | ||
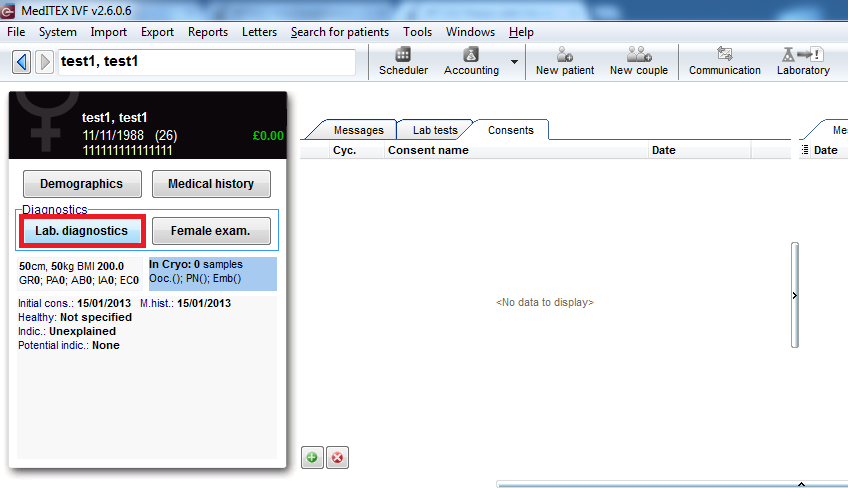
| − | <td colspan="2"> | + | <td colspan="2">1- From the home screen, with a patient selected, click on the button titled "Lab Diagnostics" located right by the "demographics" button, bellow the patient picture location.</td> |
</tr> | </tr> | ||
<tr> | <tr> | ||
| Line 13: | Line 13: | ||
</tr> | </tr> | ||
<tr> | <tr> | ||
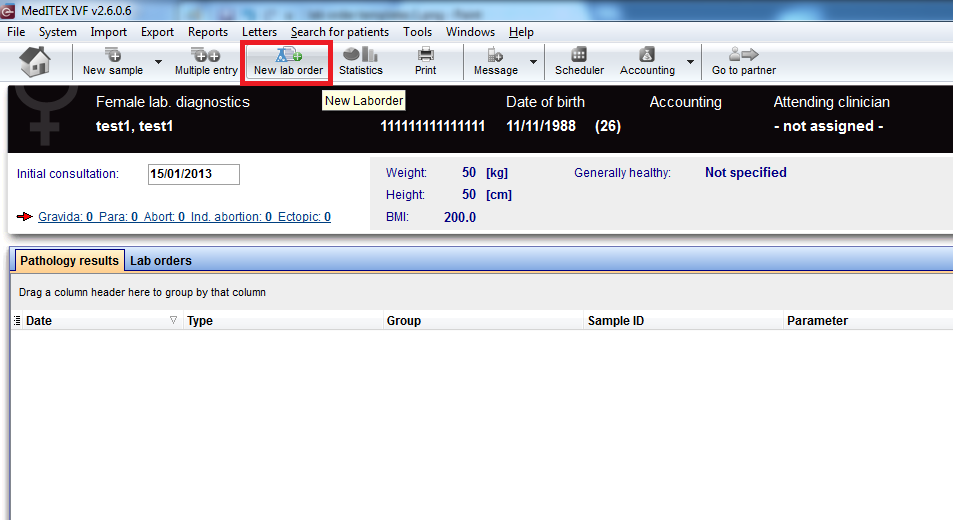
| − | <td colspan="2">Click on the button at the top of the page, titled "New lab order".</td> | + | <td colspan="2">2- Click on the button at the top of the page, titled "New lab order".</td> |
</tr> | </tr> | ||
<tr> | <tr> | ||
| − | <td colspan="2">[[File:LabOrderTemplates2.png|none|740px|thumb|left|link=http://wiki.meditex-software.com/images/ | + | <td colspan="2">[[File:LabOrderTemplates2.png|none|740px|thumb|left|link=http://wiki.meditex-software.com/images/LabOrderTemplates2.png]]</td> |
</tr> | </tr> | ||
<tr> | <tr> | ||
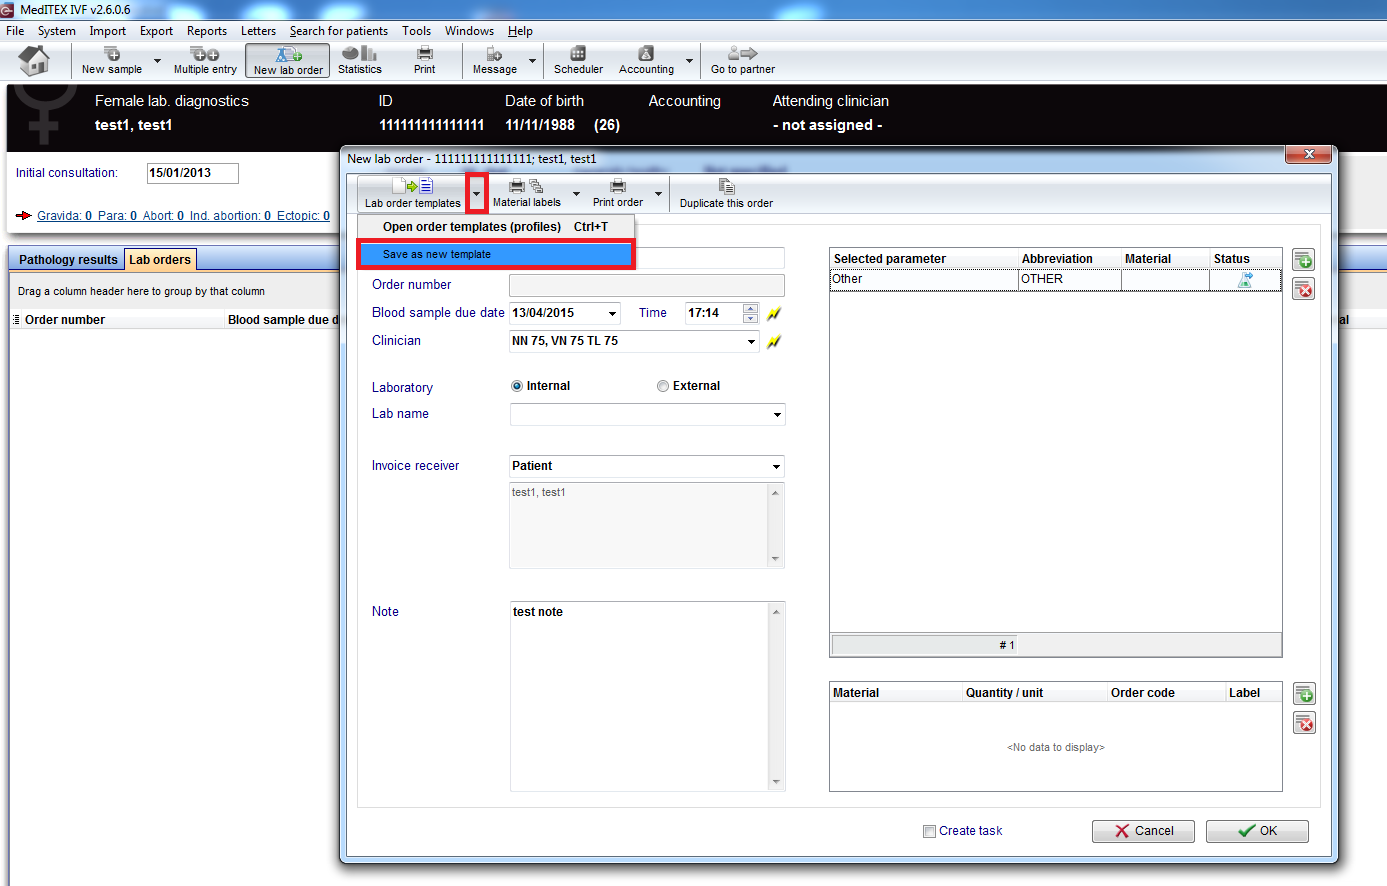
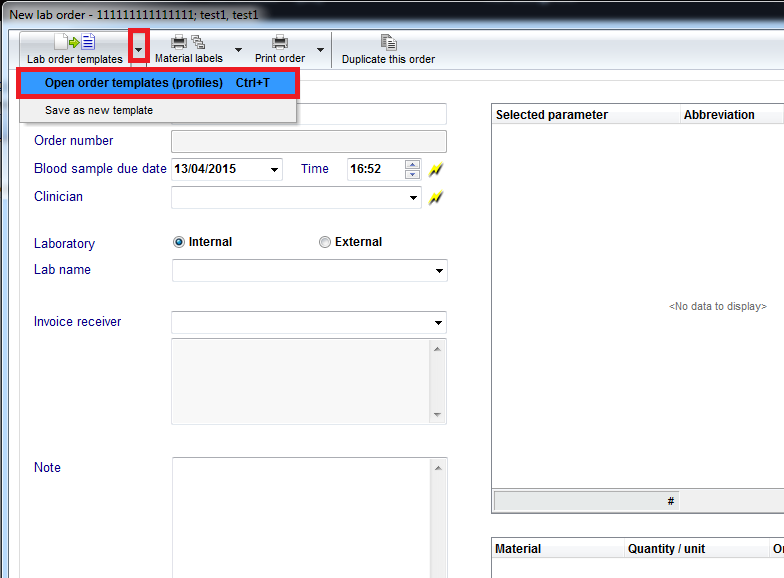
| − | <td colspan="2">Enter the common lab data for the specific order that you need in the following screen, and when done, click on the arrow pointing downwards which is on the right side of the button titled "Lab order templates" at the top of the page.</td> | + | <td colspan="2">3- Enter the common lab data for the specific order that you need in the following screen, and when done, click on the arrow pointing downwards which is on the right side of the button titled "Lab order templates" at the top of the page.</td> |
</tr> | </tr> | ||
<tr> | <tr> | ||
| − | <td colspan="2">[[File:LabOrderTemplates3.png|none|740px|thumb|left|link=http://wiki.meditex-software.com/images/ | + | <td colspan="2">[[File:LabOrderTemplates3.png|none|740px|thumb|left|link=http://wiki.meditex-software.com/images/LabOrderTemplates3.png]]</td> |
</tr> | </tr> | ||
<tr> | <tr> | ||
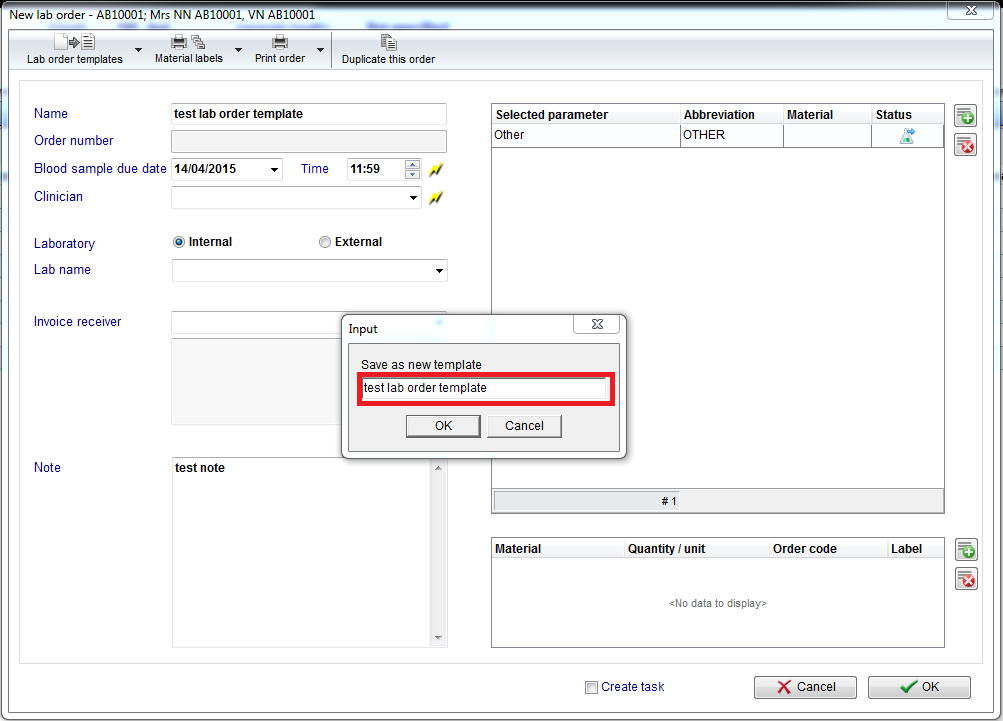
| − | <td colspan="2">Enter the name of the lab order template, and click ok.</td> | + | <td colspan="2">4- Enter the name of the lab order template, and click ok.</td> |
</tr> | </tr> | ||
<tr> | <tr> | ||
| − | <td colspan="2">[[File:LabOrderTemplates4.png|none|740px|thumb|left|link=http://wiki.meditex-software.com/images/ | + | <td colspan="2">[[File:LabOrderTemplates4.png|none|740px|thumb|left|link=http://wiki.meditex-software.com/images/LabOrderTemplates4.png]]</td> |
</tr> | </tr> | ||
<tr> | <tr> | ||
| − | <td colspan="2">From this point onwards, you'll be able to open the template, and reuse it for future lab-orders that have the same parameters.</td> | + | <td colspan="2">5- From this point onwards, you'll be able to open the template, and reuse it for future lab-orders that have the same parameters.</td> |
</tr> | </tr> | ||
<tr> | <tr> | ||
| − | <td colspan="2">[[File:LabOrderTemplates5.png|none|740px|thumb|left|link=http://wiki.meditex-software.com/images/ | + | <td colspan="2">[[File:LabOrderTemplates5.png|none|740px|thumb|left|link=http://wiki.meditex-software.com/images/LabOrderTemplates5.png]]<br /></td> |
</tr> | </tr> | ||
<tr> | <tr> | ||
| − | <td colspan="2">[[File:LabOrderTemplates6.png|none|740px|thumb|left|link=http://wiki.meditex-software.com/images/ | + | <td colspan="2">[[File:LabOrderTemplates6.png|none|740px|thumb|left|link=http://wiki.meditex-software.com/images/LabOrderTemplates6.png]] </td> |
</tr> | </tr> | ||
<tr> | <tr> | ||
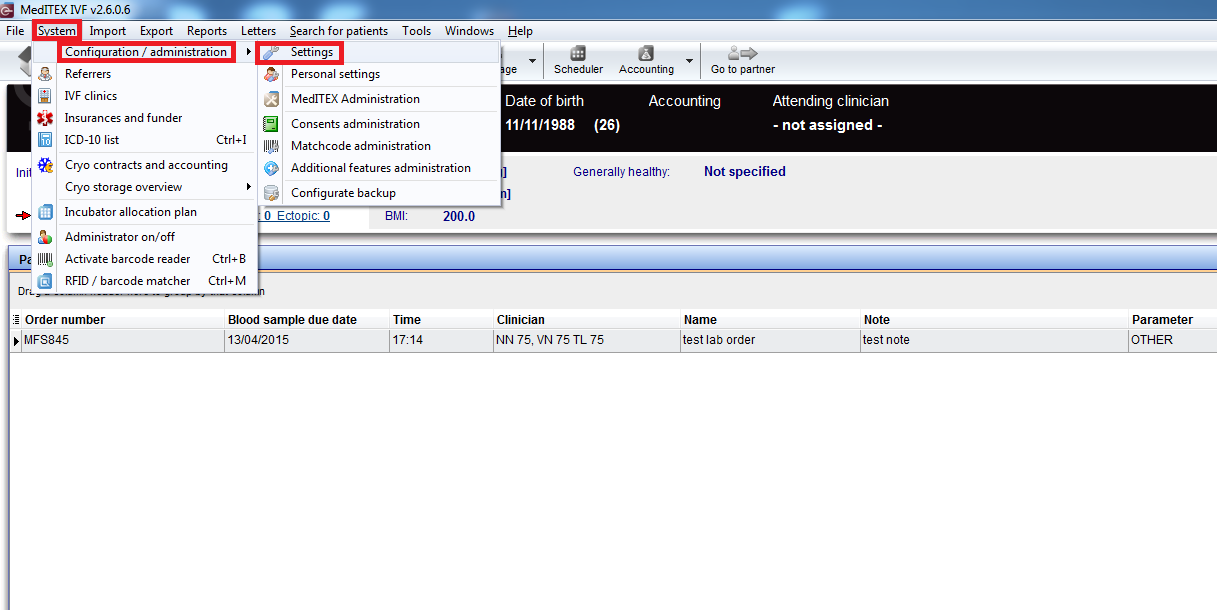
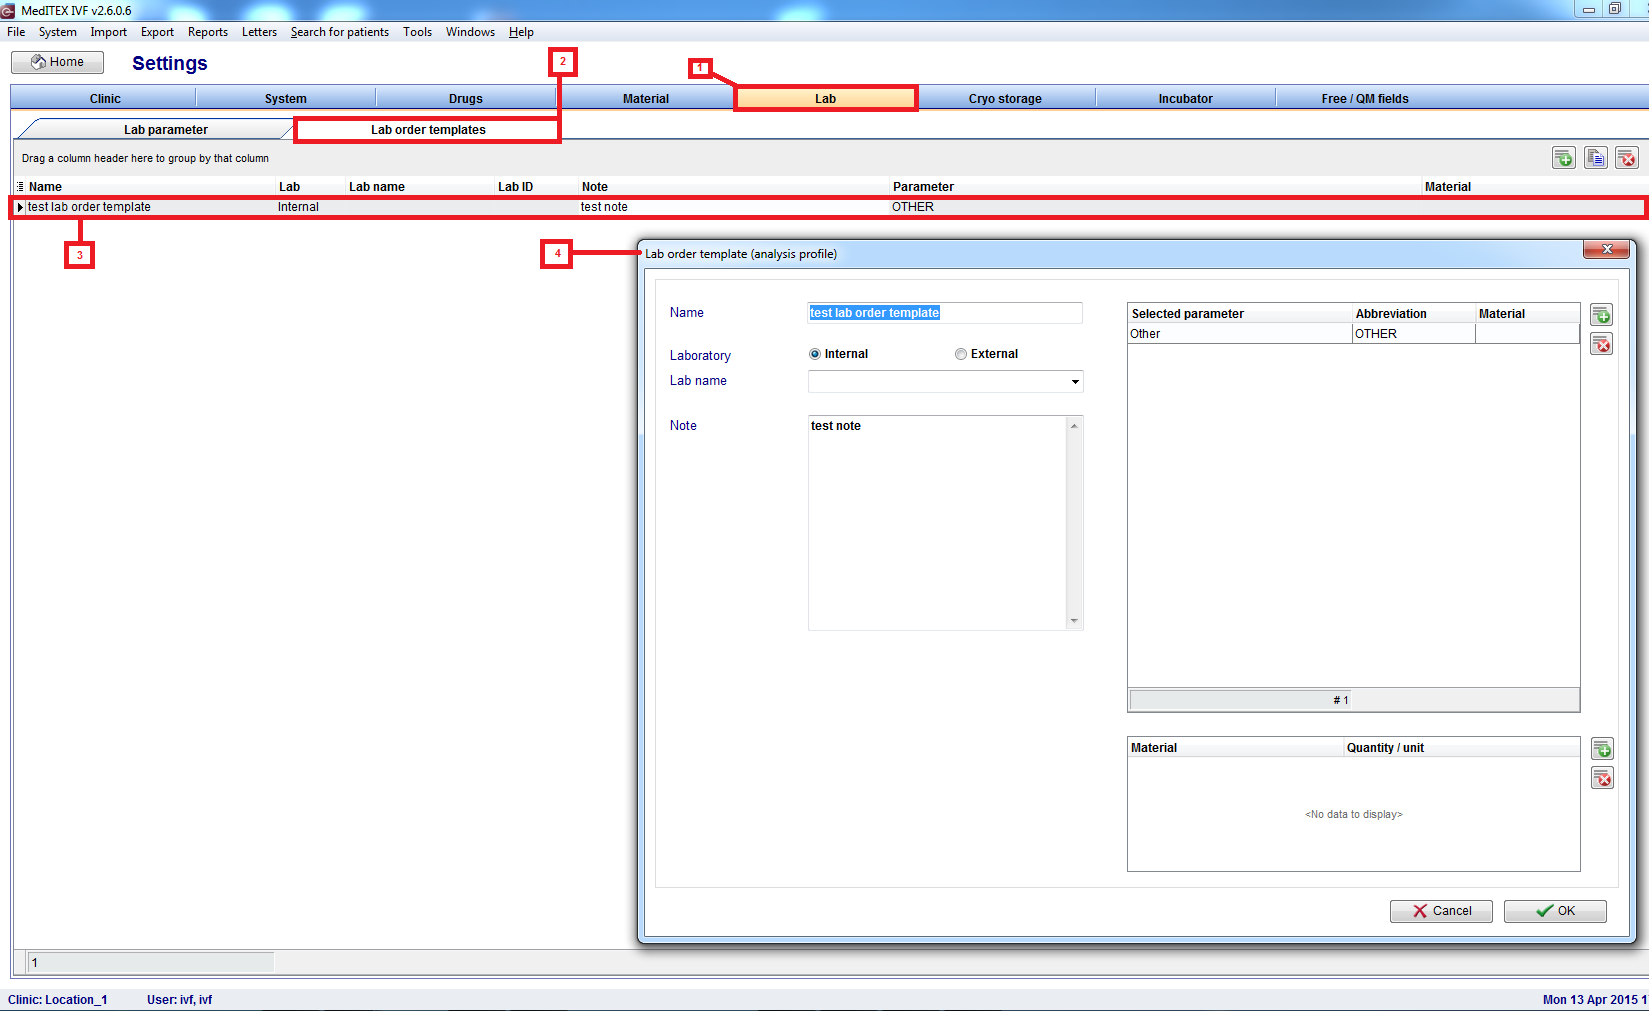
| − | <td colspan="2">After creating a template, if you need to change its contents, then you'll need to navigate to: Home screen > System > configuration/administration > Settings > Lab > Lab Order Templates > Double click the required template > Edit its contents > Click | + | <td colspan="2">6- After creating a template, if you need to change its contents, then you'll need to navigate to: Home screen > System > configuration/administration > Settings > Lab > Lab Order Templates > Double click the required template > Edit its contents > Click the "Ok" button.</td> |
</tr> | </tr> | ||
<tr> | <tr> | ||
| − | <td colspan="2">[[File:LabOrderTemplates7.png|none|740px|thumb|left|link=http://wiki.meditex-software.com/images/ | + | <td colspan="2">[[File:LabOrderTemplates7.png|none|740px|thumb|left|link=http://wiki.meditex-software.com/images/LabOrderTemplates7.png]]</td> |
</tr> | </tr> | ||
<tr> | <tr> | ||
| − | <td colspan="2">[[File:LabOrderTemplates8.png|none|740px|thumb|left|link=http://wiki.meditex-software.com/images/ | + | <td colspan="2">[[File:LabOrderTemplates8.png|none|740px|thumb|left|link=http://wiki.meditex-software.com/images/LabOrderTemplates8.png]]</td> |
| + | </tr> | ||
| + | </tbody> | ||
| + | </table> | ||
| + | <p style="text-align: right;"> </p> | ||
| + | <p style="text-align: right;"> </p> | ||
| + | <p style="text-align: right;"> </p> | ||
| + | <p style="text-align: right;"> </p> | ||
| + | <p style="text-align: left;"> </p> | ||
| + | <p style="text-align: right;"> </p> | ||
| + | | ||
| + | <table style="float: right;" border="0"> | ||
| + | <tbody> | ||
| + | <tr> | ||
| + | <td style="text-align: right;"><a href="/index.php?title=MedITEX_IVF_how_to">Back to How to</a></td> | ||
| + | <td style="text-align: right;"><a href="#top">Back to top</a><br /></td> | ||
</tr> | </tr> | ||
</tbody> | </tbody> | ||
</table> | </table> | ||
Latest revision as of 14:56, 14 April 2015
|
In the following steps, you'll be guided through the process of creating and editing lab-order templates; which should significantly cut the time consumed in creating a new lab order: |
|
| 1- From the home screen, with a patient selected, click on the button titled "Lab Diagnostics" located right by the "demographics" button, bellow the patient picture location. | |
| 2- Click on the button at the top of the page, titled "New lab order". | |
| 3- Enter the common lab data for the specific order that you need in the following screen, and when done, click on the arrow pointing downwards which is on the right side of the button titled "Lab order templates" at the top of the page. | |
| 4- Enter the name of the lab order template, and click ok. | |
| 5- From this point onwards, you'll be able to open the template, and reuse it for future lab-orders that have the same parameters. | |
| 6- After creating a template, if you need to change its contents, then you'll need to navigate to: Home screen > System > configuration/administration > Settings > Lab > Lab Order Templates > Double click the required template > Edit its contents > Click the "Ok" button. | |
| <a href="/index.php?title=MedITEX_IVF_how_to">Back to How to</a> | <a href="#top">Back to top</a> |
