How to change the settings of the schedule view?
From MedITEX - Wiki
(Difference between revisions)
| (7 intermediate revisions by 2 users not shown) | |||
| Line 1: | Line 1: | ||
<p style="text-align: left;"><span id="result_box" lang="en"><span class="hps alt-edited">There are many options</span> <span class="hps">to change the settings</span> <span class="hps">of views</span><span>.</span></span></p> | <p style="text-align: left;"><span id="result_box" lang="en"><span class="hps alt-edited">There are many options</span> <span class="hps">to change the settings</span> <span class="hps">of views</span><span>.</span></span></p> | ||
| − | |||
<table border="0"> | <table border="0"> | ||
<tbody> | <tbody> | ||
<tr> | <tr> | ||
| − | <td><img src="/images/ | + | <td><img src="/images/howto48.png" alt="" width="48" height="48" /></td> |
| + | <td>All view settings are also described individually in the <a href="/index.php?title=MedITEX_Scheduler_how_to...#Scheduler_views">How to</a>.</td> | ||
</tr> | </tr> | ||
</tbody> | </tbody> | ||
</table> | </table> | ||
| − | <table border="0" width="765" height="252"> | + | <p style="text-align: left;"> </p> |
| + | <table style="margin-left: auto; margin-right: auto;" border="0"> | ||
| + | <tbody> | ||
| + | <tr> | ||
| + | <td>[[Image:MainWindowSettingsRed.png|none|740px|thumb|left|link=http://wiki.meditex-software.com/images/MainWindowSettingsRed.png|]]</td> | ||
| + | </tr> | ||
| + | </tbody> | ||
| + | </table> | ||
| + | <p> </p> | ||
| + | <table style="margin-left: auto; margin-right: auto;" border="0" width="765" height="252"> | ||
<tbody> | <tbody> | ||
<tr> | <tr> | ||
<td rowspan="5"><img style="float: left;" src="/images/Del.png" alt="" width="140" height="99" /></td> | <td rowspan="5"><img style="float: left;" src="/images/Del.png" alt="" width="140" height="99" /></td> | ||
<td> | <td> | ||
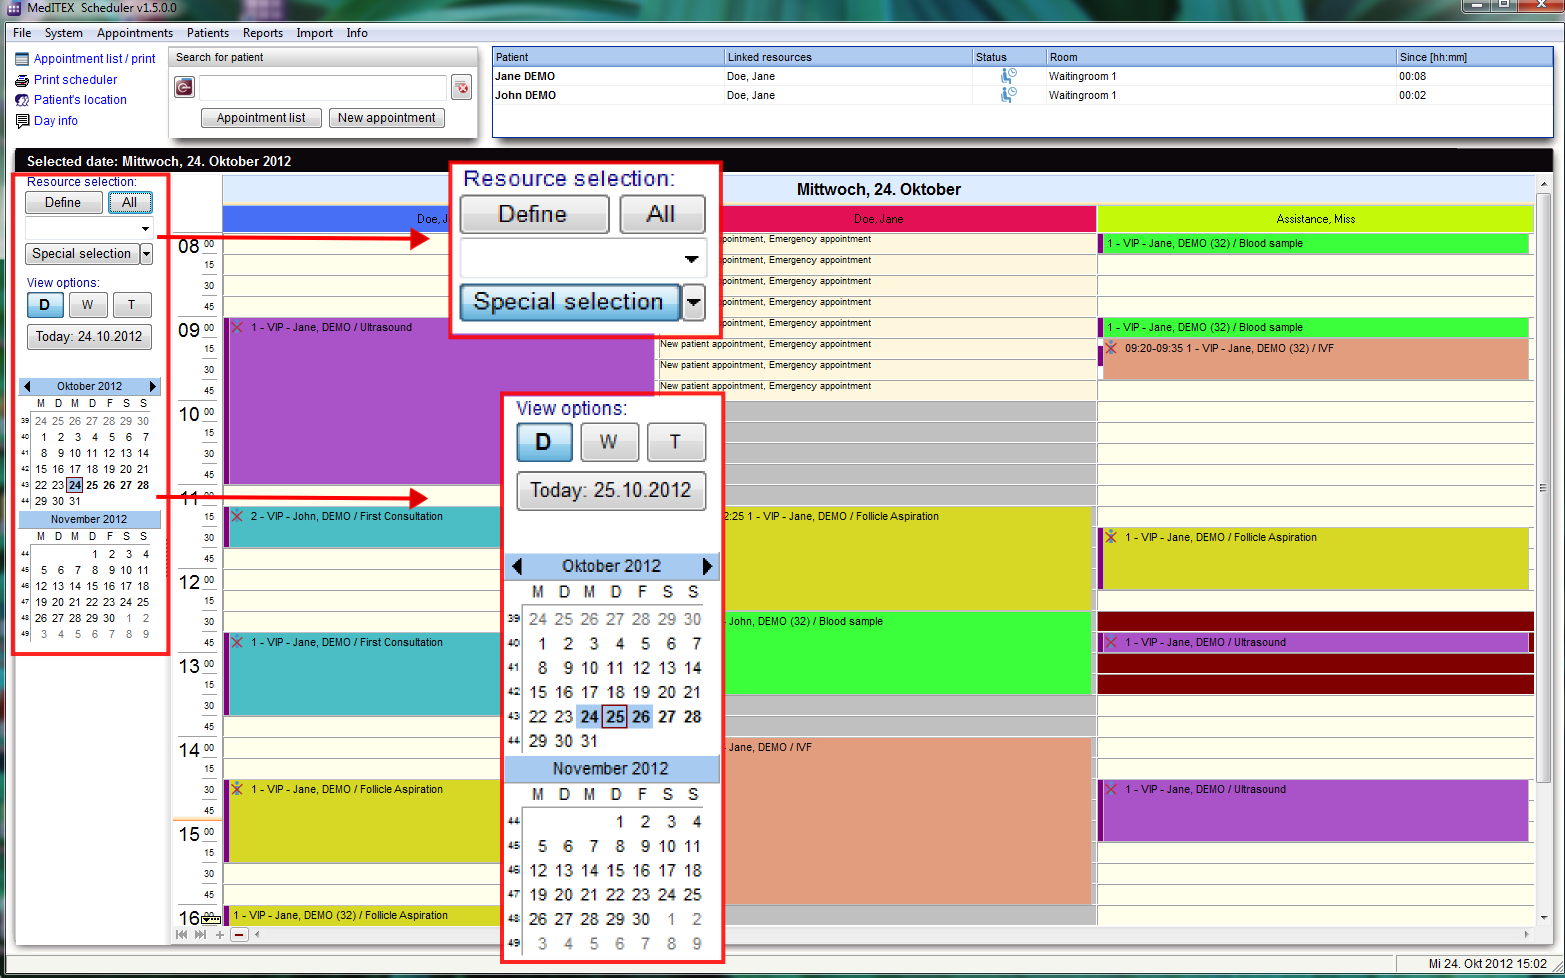
| − | <p><strong>1. The area of the resource selection | + | <p><strong>1. The area of the resource selection</strong></p> |
</td> | </td> | ||
</tr> | </tr> | ||
| Line 19: | Line 28: | ||
<td> | <td> | ||
<ul> | <ul> | ||
| − | <li> | + | <li>Clicking on <strong>Define</strong> you can open a list with all existing and active resources, which were defined in the settings. With this list it is possible to change the order of resources. Read more <a href="/index.php?title=How_to_define_groups_or_sets_of_resources%3F">here</a>.</li> |
</ul> | </ul> | ||
</td> | </td> | ||
| Line 26: | Line 35: | ||
<td> | <td> | ||
<ul> | <ul> | ||
| − | <li> | + | <li> <strong>All</strong> displays every available resource of the clinic in the schedule.</li> |
</ul> | </ul> | ||
</td> | </td> | ||
| Line 33: | Line 42: | ||
<td> | <td> | ||
<ul> | <ul> | ||
| − | <li>All groups that contain at least one resource are listed in the drop-down box beneath | + | <li>All groups that contain at least one resource are listed in the drop-down box beneath <strong>Resource selection</strong>. If you select one of these groups, all resources belonging to this group will immediately be displayed in the schedule. Read more <a href="/index.php?title=How_to_define_groups_or_sets_of_resources%3F">here</a>.</li> |
</ul> | </ul> | ||
</td> | </td> | ||
| Line 40: | Line 49: | ||
<td> | <td> | ||
<ul> | <ul> | ||
| − | <li> | + | <li>Clicking on <strong>Special selection</strong> you can open a list with all existing and active resources, which were defined in the settings. In this list it is possible to change the order of resources by moving the selected resource up or down, using the corresponding buttons on the right side. Read more <a href="/index.php?title=Scheduler_main_page#Special_selection">here</a>.</li> |
</ul> | </ul> | ||
</td> | </td> | ||
| Line 46: | Line 55: | ||
</tbody> | </tbody> | ||
</table> | </table> | ||
| − | <table border="0" width="760" height="331"> | + | <p> </p> |
| + | <table style="margin-left: auto; margin-right: auto;" border="0" width="760" height="331"> | ||
<tbody> | <tbody> | ||
<tr> | <tr> | ||
| Line 56: | Line 66: | ||
<p> </p> | <p> </p> | ||
<ul> | <ul> | ||
| − | <li>By clicking the | + | <li>By clicking the <strong>D</strong> button, the day view will be shown. Take a look at the <a href="/index.php?title=How_to_change_the_schedule_view_to_be_displayed_by_days%3F">day view</a>.</li> |
</ul> | </ul> | ||
<p> </p> | <p> </p> | ||
| Line 64: | Line 74: | ||
<td> | <td> | ||
<ul> | <ul> | ||
| − | <li>By clicking the | + | <li>By clicking the <strong>W</strong> button, the work week view will be shown. Take a look at the view of a <a href="/index.php?title=How_to_change_the_schedule_view_to_be_displayed_by_work_weeks%3F">work week</a>.</li> |
</ul> | </ul> | ||
</td> | </td> | ||
| Line 71: | Line 81: | ||
<td> | <td> | ||
<ul> | <ul> | ||
| − | <li>By clicking the | + | <li>By clicking the <strong>T </strong>button, the view in a time grid will be shown. Take a look at the <a href="/index.php?title=How_to_change_the_schedule_view_to_display_a_time_grid%3F">time grid view</a>.</li> |
</ul> | </ul> | ||
</td> | </td> | ||
| Line 78: | Line 88: | ||
<td> | <td> | ||
<ul> | <ul> | ||
| − | <li>If | + | <li>If <strong>Day view</strong> is active, it's possible to select several days in the months navigation. Take a look at the <a href="/index.php?title=How_to_select_several_days_in_the_schedule%3F">view of several days</a>.</li> |
</ul> | </ul> | ||
</td> | </td> | ||
| Line 84: | Line 94: | ||
</tbody> | </tbody> | ||
</table> | </table> | ||
| − | |||
<table style="float: right;" border="0"> | <table style="float: right;" border="0"> | ||
<tbody> | <tbody> | ||
<tr> | <tr> | ||
| − | <td style="text-align: right;"><a href="/index.php?title=MedITEX_Scheduler_how_to | + | <td style="text-align: right;"><a href="/index.php?title=MedITEX_Scheduler_how_to">Back to How to</a></td> |
<td style="text-align: right;"><a href="#top">Back to top</a></td> | <td style="text-align: right;"><a href="#top">Back to top</a></td> | ||
</tr> | </tr> | ||
Latest revision as of 16:42, 12 February 2013
There are many options to change the settings of views.
| <img src="/images/howto48.png" alt="" width="48" height="48" /> | All view settings are also described individually in the <a href="/index.php?title=MedITEX_Scheduler_how_to...#Scheduler_views">How to</a>. |
 |
| <img style="float: left;" src="/images/Del.png" alt="" width="140" height="99" /> |
1. The area of the resource selection |
|
|
|
|
|
|
|
| <img src="/images/ViewOptions.PNG" alt="" width="146" height="371" /> | 2. Area of the view options: |
|
|
|
|
|
|
|
|
| <a href="/index.php?title=MedITEX_Scheduler_how_to">Back to How to</a> | <a href="#top">Back to top</a> |