How to add, edit or delete notes?
From MedITEX - Wiki
(Difference between revisions)
| Line 1: | Line 1: | ||
| − | <p style="text-align: | + | <p style="text-align: justify;">To add a note to an appointment, you must open the appointment editor.</p> |
| − | <table border="0"> | + | <table style="margin-left: auto; margin-right: auto;" border="0"> |
<tbody> | <tbody> | ||
<tr> | <tr> | ||
| Line 7: | Line 7: | ||
</tbody> | </tbody> | ||
</table> | </table> | ||
| − | <p style="text-align: | + | <p style="text-align: justify;"> </p> |
| − | <p style="text-align: | + | <p style="text-align: justify;">The note can be written in the note area on the bottom of the window. <span id="result_box" class="short_text" lang="en"><span class="hps"> </span></span></p> |
| − | <table border="0"> | + | <p style="text-align: justify;"><span id="result_box" class="short_text" lang="en"><span class="hps">To</span> <span class="hps">use a predefined</span> <span class="hps">note,</span> <span class="hps">click</span> <span class="hps">on the + button</span><span>. </span></span>A new window will be opened.</p> |
| + | <table style="margin-left: auto; margin-right: auto;" border="0"> | ||
<tbody> | <tbody> | ||
<tr> | <tr> | ||
<td> | <td> | ||
| − | <p>[[Image:notesarea.png|none|740px|thumb|left|link=http://wiki.meditex-software.com/images/notesarea.png|]]</p> | + | <p style="text-align: center;">[[Image:notesarea.png|none|740px|thumb|left|link=http://wiki.meditex-software.com/images/notesarea.png|]]</p> |
</td> | </td> | ||
</tr> | </tr> | ||
</tbody> | </tbody> | ||
</table> | </table> | ||
| − | <p style="text-align: | + | <p style="text-align: justify;"> </p> |
| + | <p style="text-align: justify;"><span id="result_box" lang="en"><span class="hps">On this</span> <span class="hps">window you can see</span> <span class="hps">all predefined</span> <span class="hps">notes</span><span>. </span><span class="hps"> </span></span>Notes can be added, deleted or edited. Or you can select an existing one and use it for the the patient selected previously.</p> | ||
<table border="0"> | <table border="0"> | ||
<tbody> | <tbody> | ||
| Line 26: | Line 28: | ||
</tbody> | </tbody> | ||
</table> | </table> | ||
| − | <p style="text-align: | + | <p style="text-align: justify;"><span id="result_box" lang="en"><span class="hps">When deciding on</span> <span class="hps">a new note</span> <span class="hps">opens</span> <span class="hps">a blank window</span><span>, which can be</span> <span class="hps">filled with</span> <span class="hps">notes</span><span>.</span></span></p> |
<p> </p> | <p> </p> | ||
<table style="float: right;" border="0"> | <table style="float: right;" border="0"> | ||
Revision as of 13:15, 13 November 2012
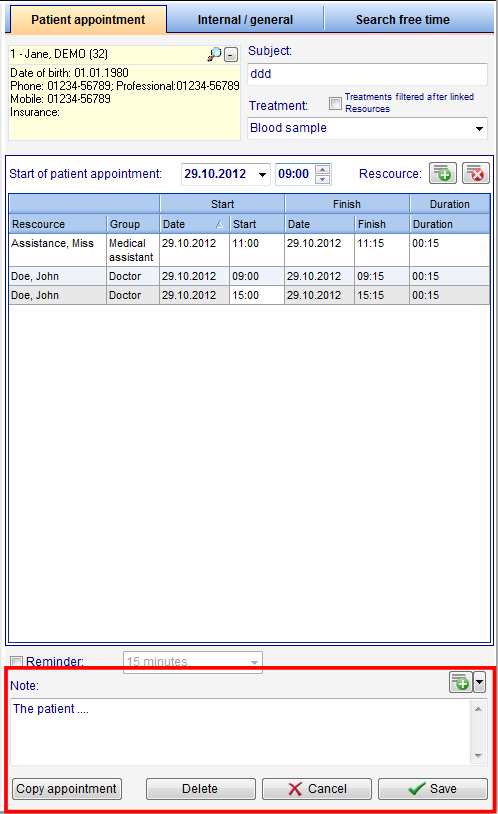
To add a note to an appointment, you must open the appointment editor.
The note can be written in the note area on the bottom of the window.
To use a predefined note, click on the + button. A new window will be opened.
On this window you can see all predefined notes. Notes can be added, deleted or edited. Or you can select an existing one and use it for the the patient selected previously.
| <img src="/images/newnote.png" alt="" width="531" height="439" /> |
When deciding on a new note opens a blank window, which can be filled with notes.
| <a href="/index.php?title=MedITEX_Scheduler_how_to...">Back to How to...</a> | <a href="#top">Back to top</a> |

