Digital Signature
From MedITEX - Wiki
| (12 intermediate revisions by 2 users not shown) | |||
| Line 1: | Line 1: | ||
| − | + | <p>A file can be signed if it's a PDF or a doc(x) file. If it's a doc(x) file, it will be converted to PDF and afterwards signed.</p> | |
| + | <p> </p> | ||
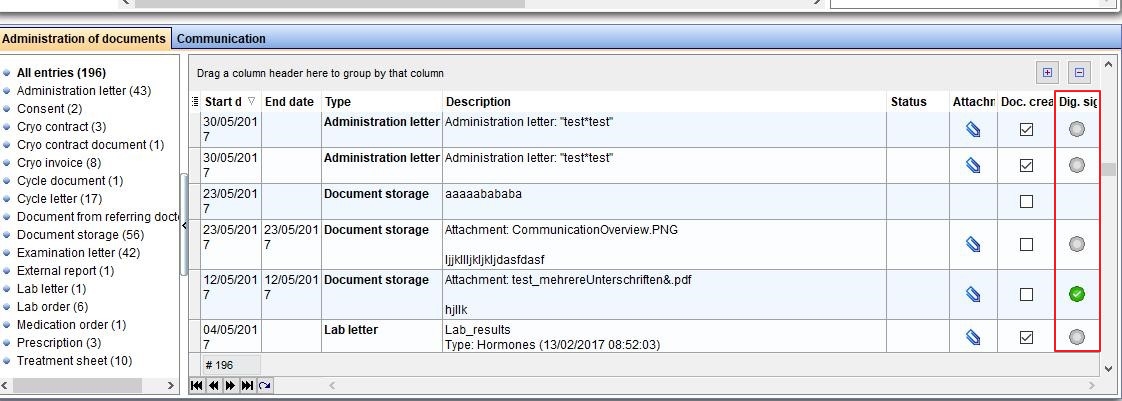
| + | <p>A document can be signed under <strong>Demographics</strong> when clicking on the round button in the <strong>Dig. Signature</strong> column.</p> | ||
| + | <table style="margin-left: auto; margin-right: auto;" border="0"> | ||
| + | <tbody> | ||
| + | <tr> | ||
| + | <td> | ||
| + | <p>[[Image:digital_signature_1.jpeg|none|740px|thumb|middle|link=http://wiki.meditex-software.com/images/digital_signature_1.jpeg|]]</p> | ||
| + | </td> | ||
| + | </tr> | ||
| + | </tbody> | ||
| + | </table> | ||
| + | <p style="text-align: left;"><br />Or when choosing <strong>Digital Signature</strong> after opening a record.</p> | ||
| + | <table border="0"> | ||
| + | <tbody> | ||
| + | <tr> | ||
| + | <td style="text-align: center;">[[Image:signing_process4.jpg|none|740px|thumb|middle|link=http://wiki.meditex-software.com/images/signing_process4.jpg|]]<br /></td> | ||
| + | </tr> | ||
| + | </tbody> | ||
| + | </table> | ||
| + | <p> </p> | ||
| + | <p>After this step, one of the following windows will pop up:</p> | ||
| + | <p><strong>a. If certificates are read from a smart card:</strong></p> | ||
| + | <p>- Choose the certificate</p> | ||
| + | <p>- Plug in the smart card and enter the card PIN</p> | ||
| + | <p>- Choose the signature type</p> | ||
| + | <table style="margin-left: auto; margin-right: auto;" border="0"> | ||
| + | <tbody> | ||
| + | <tr> | ||
| + | <td style="text-align: center;"><img src="/images/signing_process2.jpg" alt="" width="247" height="233" /></td> | ||
| + | </tr> | ||
| + | </tbody> | ||
| + | </table> | ||
| + | <p style="text-align: center;"> </p> | ||
| + | <p><strong>b. If certificates are created in personal settings:</strong></p> | ||
| + | <p>- Enter the personal password</p> | ||
| + | <p>- Choose the signature type</p> | ||
| + | <table style="margin-left: auto; margin-right: auto;" border="0"> | ||
| + | <tbody> | ||
| + | <tr> | ||
| + | <td><img src="/images/signing_process3.jpg" alt="" width="245" height="229" /></td> | ||
| + | </tr> | ||
| + | </tbody> | ||
| + | </table> | ||
| + | <p style="text-align: center;"> </p> | ||
| + | <p>If a file is signed, it can't be signed again.</p> | ||
Latest revision as of 14:48, 21 January 2019
A file can be signed if it's a PDF or a doc(x) file. If it's a doc(x) file, it will be converted to PDF and afterwards signed.
A document can be signed under Demographics when clicking on the round button in the Dig. Signature column.
Or when choosing Digital Signature after opening a record.
After this step, one of the following windows will pop up:
a. If certificates are read from a smart card:
- Choose the certificate
- Plug in the smart card and enter the card PIN
- Choose the signature type
| <img src="/images/signing_process2.jpg" alt="" width="247" height="233" /> |
b. If certificates are created in personal settings:
- Enter the personal password
- Choose the signature type
| <img src="/images/signing_process3.jpg" alt="" width="245" height="229" /> |
If a file is signed, it can't be signed again.

