How to set working times for appointments?
From MedITEX - Wiki
(Difference between revisions)
| (14 intermediate revisions by 3 users not shown) | |||
| Line 1: | Line 1: | ||
| − | <table border="0"> | + | <p>Working times can be changed in the <strong>settings</strong> or simply while <strong>displaying the working times.</strong></p> |
| + | <table style="margin-left: auto; margin-right: auto;" border="0"> | ||
<tbody> | <tbody> | ||
<tr> | <tr> | ||
| − | <td><img src="/images/ | + | <td><img src="/images/HowToWorkingTime.png" alt="" width="435" height="121" /></td> |
</tr> | </tr> | ||
</tbody> | </tbody> | ||
</table> | </table> | ||
| − | <p><span id="result_box" lang="en"> | + | <p> </p> |
| + | <p>You can go to <span id="result_box" lang="en"><span id="result_box" lang="en"><strong>System -> Display working times.</strong></span></span></p> | ||
| + | <p><span id="result_box" lang="en">Or g<span class="hps">o</span> to <strong><span class="hps">System -></span> <span class="hps">Settings</span> <span class="hps">-</span>> Working times and constraints</strong>.</span></p> | ||
<ul> | <ul> | ||
</ul> | </ul> | ||
<ul> | <ul> | ||
| − | <li> | + | <li>From this window, each resource can be adjusted in detail. Using <strong>appointment types</strong>, it is possible to restrict some parts of the day to only accept certain appointment types, for a given set of resources.</li> |
</ul> | </ul> | ||
<ul> | <ul> | ||
<li>Time sections that allow only certain types of appointments can be defined for each resource.</li> | <li>Time sections that allow only certain types of appointments can be defined for each resource.</li> | ||
</ul> | </ul> | ||
| − | < | + | <table style="margin-left: auto; margin-right: auto;" border="0"> |
| − | + | ||
| − | + | ||
| − | + | ||
| − | + | ||
| − | + | ||
| − | + | ||
| − | + | ||
| − | + | ||
| − | + | ||
| − | + | ||
| − | + | ||
| − | + | ||
<tbody> | <tbody> | ||
<tr> | <tr> | ||
<td> | <td> | ||
| − | <p>[[Image: | + | <p>[[Image:appointment_type.png|none|740px|thumb|left|link=http://wiki.meditex-software.com/images/appointment_type.png]]</p> |
</td> | </td> | ||
</tr> | </tr> | ||
</tbody> | </tbody> | ||
</table> | </table> | ||
| + | <p> </p> | ||
<ul> | <ul> | ||
| − | <li> | + | <li>On the table to the left, you can <strong>create and edit the appointment types</strong>. The first row of the table cannot be changed because it stands for all types of appointments (all kinds of appointments possible).</li> |
</ul> | </ul> | ||
<ul> | <ul> | ||
| − | <li>It | + | <li><strong>It is useful to choose short names</strong> (IVF, OP, ...). The next section under the picture explains how to display these names in the schedule directly. With long names the schedule will be confusing.</li> |
</ul> | </ul> | ||
| − | <table border="0"> | + | <p style="text-align: justify;"> </p> |
| + | <p style="text-align: justify;"><strong>For example:</strong></p> | ||
| + | <p style="text-align: justify;">On Monday from 08:00 AM to 10:00 AM the doctor John performs only first interviews with new patients:</p> | ||
| + | <ol> | ||
| + | <li>Define an appointment type<strong> Routine.</strong></li> | ||
| + | <li>Mark <strong>Doctor John</strong> and open the window to edit the resource settings.</li> | ||
| + | <li><strong>Add</strong> a new work time definition.</li> | ||
| + | <li>In the drop down list you can choose <strong>Routine</strong>.</li> | ||
| + | <li><strong>Assign it to the resource time:</strong> from 08:00 AM to 10:00 AM.</li> | ||
| + | <li>It will be shown in the schedule of Doctor John.</li> | ||
| + | </ol> | ||
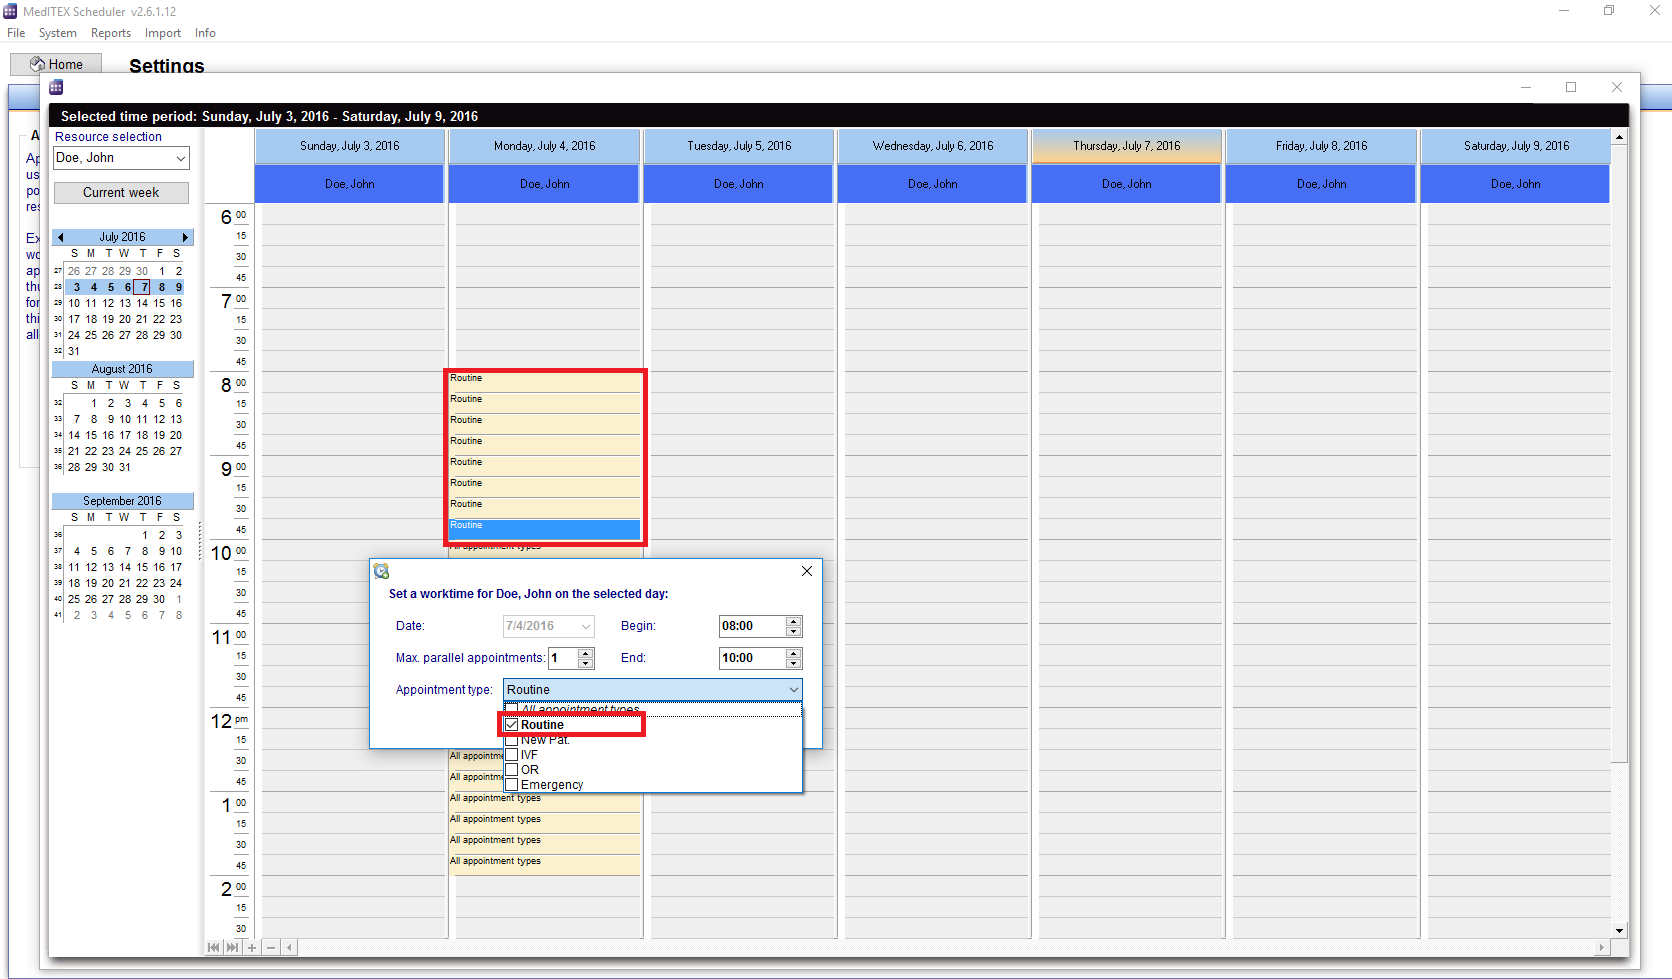
| + | <table style="margin-left: auto; margin-right: auto;" border="0"> | ||
<tbody> | <tbody> | ||
<tr> | <tr> | ||
| − | <td> | + | <td>[[Image:appointment_workingtime_setting.png|none|740px|thumb|left|link=http://wiki.meditex-software.com/images/appointment_workingtime_setting.png| ]]</td> |
| + | </tr> | ||
| + | </tbody> | ||
| + | </table> | ||
| + | <p style="text-align: justify;"> </p> | ||
| + | <p style="text-align: justify;">Or you may want to schedule on Thursday from 09:00 AM to 02:00 PM only appointments that will be held by<strong> Doctor Jane Doe</strong>? In this case you can define an appointment type <strong>New Patient</strong> which you should assign to the involved resources and the specific time.</p> | ||
| + | <table style="margin-left: auto; margin-right: auto;" border="0"> | ||
| + | <tbody> | ||
| + | <tr> | ||
| + | <td><img src="/images/AppointmentsWorkingTime.png" alt="" /></td> | ||
</tr> | </tr> | ||
</tbody> | </tbody> | ||
</table> | </table> | ||
<ul> | <ul> | ||
| − | <li>If the box | + | <li>If the box <strong>Show text for the appointment types in resource row</strong> is checked, the allocated possible appointment types will be displayed as text for each resource in the schedule. </li> |
| − | <li>It is also possible to | + | <li>It is also possible to<strong> provide these times with a special resource background colour</strong>. However, this colour is the same for all appointment types, so if you have several appointment types defined, it is advisable to only use text.</li> |
| − | <li>The most important rule | + | <li>The most important rule to display the appointment in the schedule is: each appointment must not overlap the time of <strong>All appointments</strong> set for this resource.</li> |
</ul> | </ul> | ||
| + | <table style="float: right;" border="0"> | ||
| + | <tbody> | ||
| + | <tr> | ||
| + | <td style="text-align: right;"><a href="/index.php?title=MedITEX_Scheduler_how_to">Back to How to</a></td> | ||
| + | <td style="text-align: right;"><a href="#top">Back to top</a></td> | ||
| + | </tr> | ||
| + | </tbody> | ||
| + | </table> | ||
| + | <p><span class="mw-headline"><br /></span></p> | ||
Latest revision as of 15:31, 14 July 2016
Working times can be changed in the settings or simply while displaying the working times.
| <img src="/images/HowToWorkingTime.png" alt="" width="435" height="121" /> |
You can go to System -> Display working times.
Or go to System -> Settings -> Working times and constraints.
- From this window, each resource can be adjusted in detail. Using appointment types, it is possible to restrict some parts of the day to only accept certain appointment types, for a given set of resources.
- Time sections that allow only certain types of appointments can be defined for each resource.
 |
- On the table to the left, you can create and edit the appointment types. The first row of the table cannot be changed because it stands for all types of appointments (all kinds of appointments possible).
- It is useful to choose short names (IVF, OP, ...). The next section under the picture explains how to display these names in the schedule directly. With long names the schedule will be confusing.
For example:
On Monday from 08:00 AM to 10:00 AM the doctor John performs only first interviews with new patients:
- Define an appointment type Routine.
- Mark Doctor John and open the window to edit the resource settings.
- Add a new work time definition.
- In the drop down list you can choose Routine.
- Assign it to the resource time: from 08:00 AM to 10:00 AM.
- It will be shown in the schedule of Doctor John.
 |
Or you may want to schedule on Thursday from 09:00 AM to 02:00 PM only appointments that will be held by Doctor Jane Doe? In this case you can define an appointment type New Patient which you should assign to the involved resources and the specific time.
| <img src="/images/AppointmentsWorkingTime.png" alt="" /> |
- If the box Show text for the appointment types in resource row is checked, the allocated possible appointment types will be displayed as text for each resource in the schedule.
- It is also possible to provide these times with a special resource background colour. However, this colour is the same for all appointment types, so if you have several appointment types defined, it is advisable to only use text.
- The most important rule to display the appointment in the schedule is: each appointment must not overlap the time of All appointments set for this resource.
| <a href="/index.php?title=MedITEX_Scheduler_how_to">Back to How to</a> | <a href="#top">Back to top</a> |