Creare una nuova voce in Anagrafica
From MedITEX - Wiki
| Line 4: | Line 4: | ||
<td style="text-align: center;"><img src="/images/adminListDemo.png" alt="" width="154" height="118" /><br /></td> | <td style="text-align: center;"><img src="/images/adminListDemo.png" alt="" width="154" height="118" /><br /></td> | ||
<td> | <td> | ||
| − | <p>Nella sezione <strong>Anagrafica</strong> del paziente, cliccando in <strong>Nuovo elemento</strong> è possibile aggiungere nuovi documenti al profilo del paziente. </p> | + | <p style="text-align: justify;">Nella sezione <strong>Anagrafica</strong> del paziente, cliccando in <strong>Nuovo elemento</strong> è possibile aggiungere nuovi documenti al profilo del paziente. </p> |
| − | <p>La lista di documenti può essere estesa all'infinito. E' possibile infatti inserire diversi tipi di documenti nelle Impostazioni nella sezione <a href="/index.php?title= | + | <p style="text-align: justify;">La lista di documenti può essere <strong>estesa all'infinito</strong>. E' possibile infatti inserire diversi tipi di documenti nelle Impostazioni nella sezione <a href="/index.php?title=MedITEX_IVF_Impostazioni#Tabelle_di_sistema">Tabelle di sistema</a>.</p> |
| − | <p> | + | <p style="text-align: justify;">Per modificare <strong>una voce </strong>nell'Anagrafica del paziente:<strong><br /></strong></p> |
| − | <ul> | + | <ul style="text-align: justify;"> |
| − | <li> | + | <li>cliccare sulla barra del menù su <strong>Sistema </strong>-> <strong>Configurazione/Amministrazione</strong> -> <strong>Impostazioni </strong>-> <strong>Sistema</strong> -> <strong>Tabelle di sistema</strong> o</li> |
</ul> | </ul> | ||
<ul> | <ul> | ||
| − | <li> | + | <li style="text-align: justify;">cliccare nella pagina principale del paziente/coppia su <strong>Anagrafica</strong> -> <strong>Nuovo elemento </strong>-> <strong>Gestione lista</strong>. </li> |
</ul> | </ul> | ||
</td> | </td> | ||
| Line 19: | Line 19: | ||
<p> </p> | <p> </p> | ||
<p>__TOC__</p> | <p>__TOC__</p> | ||
| − | <h2> | + | <h2>Contratti crio</h2> |
<table border="0"> | <table border="0"> | ||
<tbody> | <tbody> | ||
| Line 28: | Line 28: | ||
</table> | </table> | ||
<p> </p> | <p> </p> | ||
| − | <p><strong> | + | <p><strong>Spiegazione dei campi:</strong></p> |
<p><strong>Contract date:</strong> date of contract signature.</p> | <p><strong>Contract date:</strong> date of contract signature.</p> | ||
<p><strong>Contract start:</strong> <span id="result_box" class="short_text" lang="en"><span class="hps">date</span> <span class="hps">of the specified</span> <span class="hps">contract start</span><span>.</span></span></p> | <p><strong>Contract start:</strong> <span id="result_box" class="short_text" lang="en"><span class="hps">date</span> <span class="hps">of the specified</span> <span class="hps">contract start</span><span>.</span></span></p> | ||
| Line 73: | Line 73: | ||
<li><strong>Alternatively:</strong> Press the <a href="/index.php?title=Free_/_QM_fields"><strong>QM-button</strong></a> to add staff, material, times or free fields. (You need to <strong>define QM domains in the <a href="/index.php?title=MedITEX_IVF_Settings#Free_.2F_QM_fields">settings</a></strong> before you can use them.)</li> | <li><strong>Alternatively:</strong> Press the <a href="/index.php?title=Free_/_QM_fields"><strong>QM-button</strong></a> to add staff, material, times or free fields. (You need to <strong>define QM domains in the <a href="/index.php?title=MedITEX_IVF_Settings#Free_.2F_QM_fields">settings</a></strong> before you can use them.)</li> | ||
</ul> | </ul> | ||
| − | |||
| − | |||
| − | |||
| − | |||
| − | |||
| − | |||
| − | |||
| − | |||
| − | |||
| − | |||
| − | |||
| − | |||
| − | |||
| − | |||
| − | |||
| − | |||
| − | |||
| − | |||
<table style="float: right;" border="0"> | <table style="float: right;" border="0"> | ||
<tbody> | <tbody> | ||
Revision as of 08:29, 21 April 2016
| <img src="/images/adminListDemo.png" alt="" width="154" height="118" /> |
Nella sezione Anagrafica del paziente, cliccando in Nuovo elemento è possibile aggiungere nuovi documenti al profilo del paziente. La lista di documenti può essere estesa all'infinito. E' possibile infatti inserire diversi tipi di documenti nelle Impostazioni nella sezione <a href="/index.php?title=MedITEX_IVF_Impostazioni#Tabelle_di_sistema">Tabelle di sistema</a>. Per modificare una voce nell'Anagrafica del paziente:
|
Contents |
Contratti crio
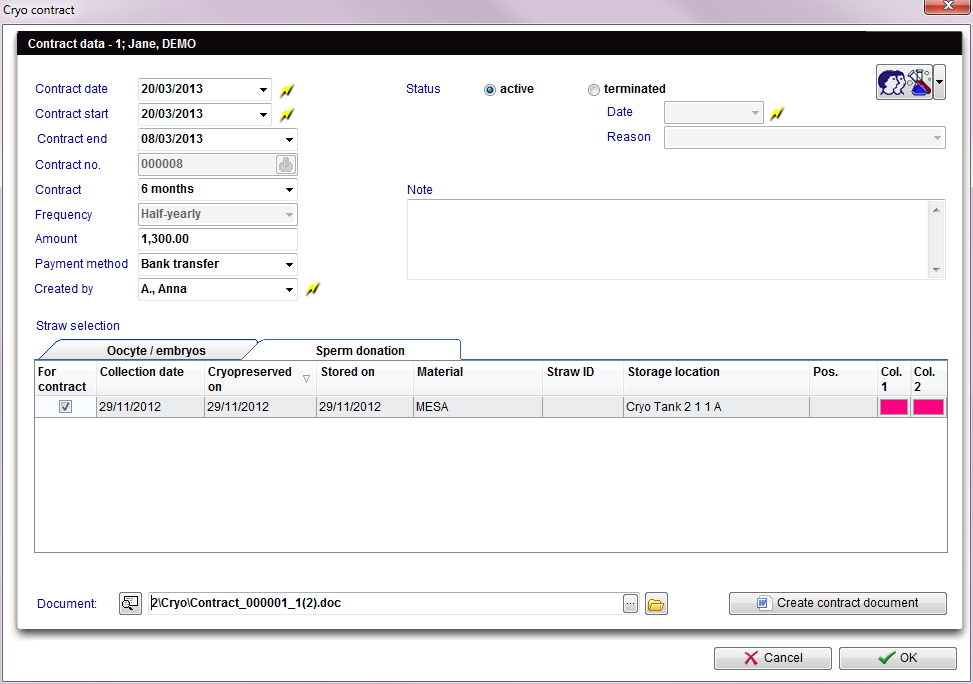 |
Spiegazione dei campi:
Contract date: date of contract signature.
Contract start: date of the specified contract start.
Contract no.: identification number of the contract.
Contract: duration of the contract.
Frequency: billing cycle.
Amount: predefined contract amount per billing cycle.
Payment method: choice of payment.
Created by: creator of the contract document.
Status: status of the contract. If it is current or already finished.
Note: space for notes.
Straw selection: list of available Straws of the selected patient. Put a check mark in the column "For contract" to assign this Straw to the contract.
Document: add an existing document.
Create contract document: creating a new contract document.
| <img src="/images/plus48.png" alt="" width="48" height="48" /> |
<a href="/index.php?title=How_to_create_a_new_cryo_contract%3F">Click here</a> to read more about adding new Cryo contracts. <a href="/index.php?title=MedITEX_IVF_Settings#Cryo_contracts_and_accounting">Click here</a> to know how to configure Cryo contracts and accounting. <a href="/index.php?title=Cryo_contracts_and_accounting">Click here </a>to get an overview about Cryo contracts and accounting. |
Document storage, Refferer, System table
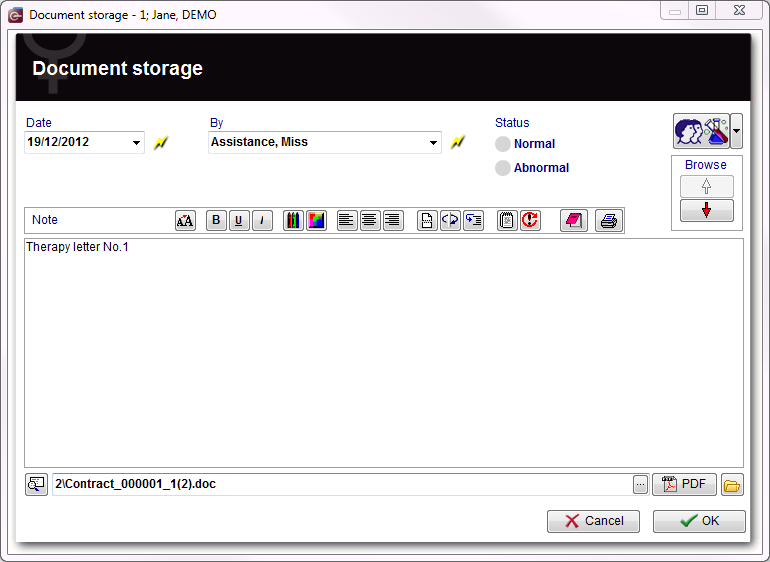 |
Create a new document. It will be saved with the type: document storage.
- After pressing the file symbol, the corresponding file will open in the accounting standard program.
- The selected fields will be copied in the standard file storage folder of MediTEX IVF and stored in a sub folder named after the patient ID.
- The path to the standard file storage folder can be changed in the settings in the section <a href="/index.php?title=MedITEX_IVF_Settings#General">System</a>.
- All created documents will be displayed on the <a href="/index.php?title=Demographics#Administration_of_documents">Demographics</a> screen in tabular form, sorted by entry date.
- Alternatively: Press the <a href="/index.php?title=Free_/_QM_fields">QM-button</a> to add staff, material, times or free fields. (You need to define QM domains in the <a href="/index.php?title=MedITEX_IVF_Settings#Free_.2F_QM_fields">settings</a> before you can use them.)
| <a href="/index.php?title=MedITEX_IVF_manual">Back to the MedITEX IVF menu </a> | <a href="#top">Back to top</a> |