How to stop security warning message?
From MedITEX - Wiki
(Difference between revisions)
| (4 intermediate revisions by one user not shown) | |||
| Line 14: | Line 14: | ||
<tbody> | <tbody> | ||
<tr> | <tr> | ||
| − | <td>1. Open <strong>Control Panel </strong>from the <strong>Start</strong> menu. | + | <td colspan="2">1. Open <strong>Control Panel </strong>from the <strong>Start</strong> menu. </td> |
| − | + | ||
</tr> | </tr> | ||
<tr> | <tr> | ||
| Line 22: | Line 21: | ||
<p><em>Note: if your <strong>Control Panel </strong>is not categorized, skip this step.</em></p> | <p><em>Note: if your <strong>Control Panel </strong>is not categorized, skip this step.</em></p> | ||
</td> | </td> | ||
| − | <td> </td> | + | <td> [[Image:SecurityWarning-4.png|none|300px|thumb|left|link=http://wiki.meditex-software.com/images/SecurityWarning-4.png]]</td> |
</tr> | </tr> | ||
<tr> | <tr> | ||
| Line 28: | Line 27: | ||
<p>3. Select <strong>Internet Options</strong>.</p> | <p>3. Select <strong>Internet Options</strong>.</p> | ||
</td> | </td> | ||
| − | <td> </td> | + | <td> [[Image:SecurityWarning-3.png|none|300px|thumb|left|link=http://wiki.meditex-software.com/images/SecurityWarning-3.png]]</td> |
</tr> | </tr> | ||
<tr> | <tr> | ||
| − | <td>4.</td> | + | <td>4. On this new window, change tabs to <strong>Security</strong>, then select <strong>Trusted sites</strong> and click on the <strong>Sites</strong> button.</td> |
| − | <td>[[Image:SecurityWarning-1.png|none| | + | <td>[[Image:SecurityWarning-1.png|none|300px|thumb|left|link=http://wiki.meditex-software.com/images/SecurityWarning-1.png]]</td> |
</tr> | </tr> | ||
<tr> | <tr> | ||
| − | <td> | + | <td>5. On the <strong>Add this website to the zone:</strong> insert the name of the server, for example: "\\MedITEXSrv".<br /></td> |
| − | <td> </td> | + | <td> [[Image:SecurityWarning-2.png|none|300px|thumb|left|link=http://wiki.meditex-software.com/images/SecurityWarning-2.png]]</td> |
</tr> | </tr> | ||
<tr> | <tr> | ||
| − | <td> | + | <td colspan="2">6. Click <strong>Add</strong>. </td> |
| − | < | + | |
</tr> | </tr> | ||
<tr> | <tr> | ||
| − | <td> | + | <td colspan="2">7. Click <strong>Close</strong>. </td> |
| − | < | + | |
</tr> | </tr> | ||
<tr> | <tr> | ||
| − | <td> | + | <td colspan="2">8. Click <strong>OK</strong>.</td> |
| − | < | + | |
</tr> | </tr> | ||
| + | </tbody> | ||
| + | </table> | ||
| + | <p> </p> | ||
| + | <table style="margin-left: auto; margin-right: auto;" border="0"> | ||
| + | <tbody> | ||
<tr> | <tr> | ||
| − | <td> | + | <td><img src="/images/hint129.png" alt="" width="129" height="129" /></td> |
| − | + | <td>All these steps need to be repeated in all clients.</td> | |
| − | + | ||
| − | + | ||
| − | + | ||
| − | <td> | + | |
</tr> | </tr> | ||
</tbody> | </tbody> | ||
</table> | </table> | ||
| − | |||
| − | |||
| − | |||
| − | |||
| − | |||
| − | |||
| − | |||
| − | |||
| − | |||
| − | |||
| − | |||
| − | |||
<table style="float: right;" border="0"> | <table style="float: right;" border="0"> | ||
<tbody> | <tbody> | ||
<tr> | <tr> | ||
| + | <td style="text-align: right;"><a href="/index.php?title=MedITEX_IVF_how_to"><span><a style="font-size: small;" href="/index.php?title=Administrators_Support">Back to Administrators Support</a></span></a></td> | ||
<td style="text-align: right;"><a href="/index.php?title=MedITEX_IVF_how_to">Back to How to</a></td> | <td style="text-align: right;"><a href="/index.php?title=MedITEX_IVF_how_to">Back to How to</a></td> | ||
<td style="text-align: right;"><a href="#top">Back to top</a></td> | <td style="text-align: right;"><a href="#top">Back to top</a></td> | ||
| Line 80: | Line 66: | ||
</tbody> | </tbody> | ||
</table> | </table> | ||
| + | <p> </p> | ||
Latest revision as of 11:26, 25 November 2014
The following security warning can be avoided by completing the steps below.
| <img src="/images/SecurityWarning.png" alt="" width="414" height="274" /> |
| Security warning when MedITEX is opened from the server by clients. |
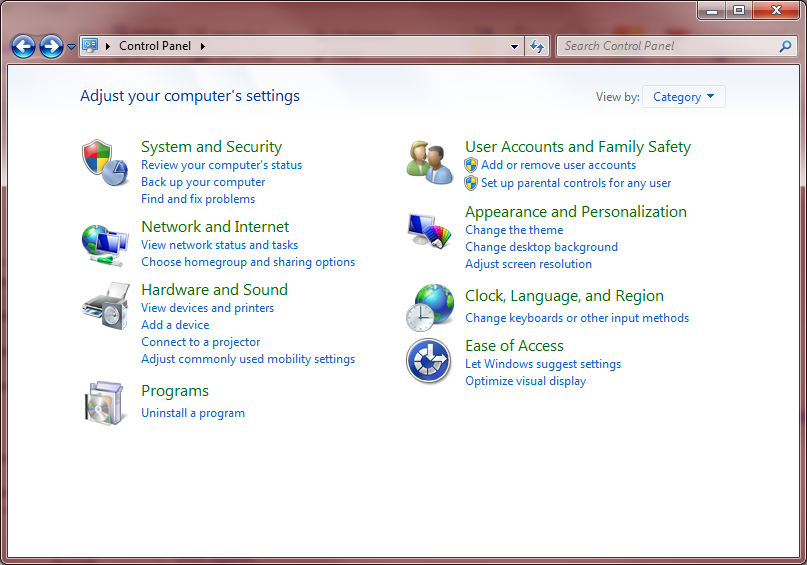
| 1. Open Control Panel from the Start menu. | |
|
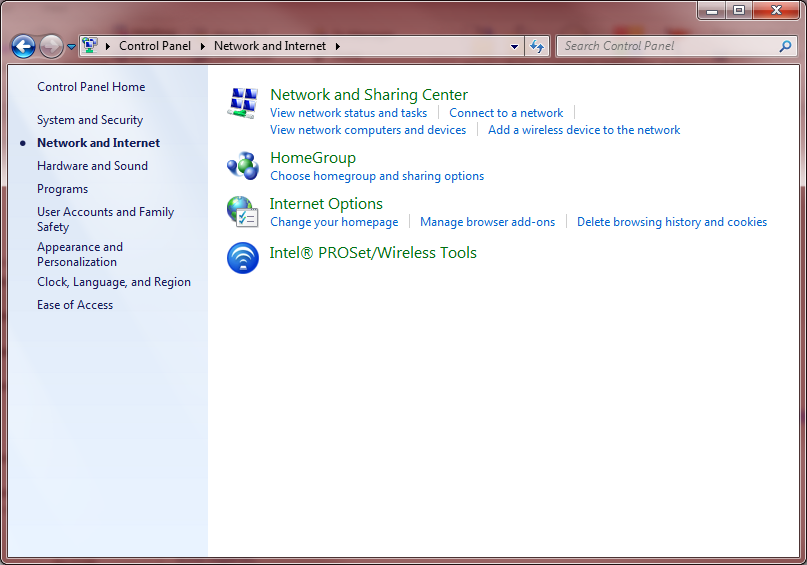
2. Click on Network and Internet. Note: if your Control Panel is not categorized, skip this step. |
|
|
3. Select Internet Options. |
|
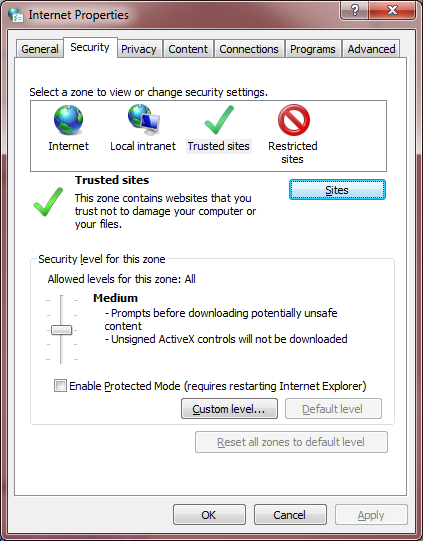
| 4. On this new window, change tabs to Security, then select Trusted sites and click on the Sites button. | |
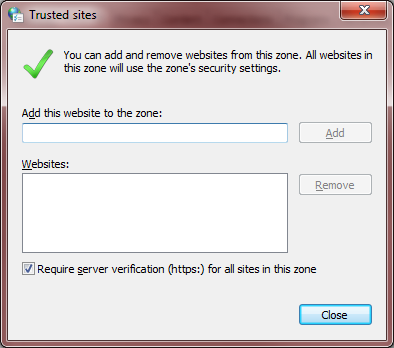
| 5. On the Add this website to the zone: insert the name of the server, for example: "\\MedITEXSrv". |
|
| 6. Click Add. | |
| 7. Click Close. | |
| 8. Click OK. | |
| <img src="/images/hint129.png" alt="" width="129" height="129" /> | All these steps need to be repeated in all clients. |
| <a href="/index.php?title=MedITEX_IVF_how_to"><a style="font-size: small;" href="/index.php?title=Administrators_Support">Back to Administrators Support</a></a> | <a href="/index.php?title=MedITEX_IVF_how_to">Back to How to</a> | <a href="#top">Back to top</a> |


