First Steps Before Installing MedITEX
From MedITEX - Wiki
| Line 14: | Line 14: | ||
</ul> | </ul> | ||
<p> </p> | <p> </p> | ||
| − | <h3>2. Installation and | + | <h3>2. Installation and configuration</h3> |
<p>In order to begin with the installation it is absolutely necessary that the requirements from the step 1 <strong>are completely fulfilled</strong>.</p> | <p>In order to begin with the installation it is absolutely necessary that the requirements from the step 1 <strong>are completely fulfilled</strong>.</p> | ||
<p>After the server is prepared, <strong>MedITEX </strong>support team will access it remotely and test if everything is ready for the installation.</p> | <p>After the server is prepared, <strong>MedITEX </strong>support team will access it remotely and test if everything is ready for the installation.</p> | ||
Revision as of 16:05, 14 November 2013
In order to install MedITEX, some system requirements need to be met.
Before the installation starts, an IT administrator needs to prepare all necessary hardware (servers and clients) and ensure fast and reliable network connections.
Contents |
Installation Process
Installing MedITEX requires the following three steps.
1. Preparation
The first step is the preparation of the server and clients:
- Physical or virtual server with Windows Server (2003 or latest) dedicated to MedITEX;
- Internal and VPN connections to the server should be ensured and prepared;
- Remote access over internet to the server should be possible;
- Server backups should be scheduled and performed automatically.
2. Installation and configuration
In order to begin with the installation it is absolutely necessary that the requirements from the step 1 are completely fulfilled.
After the server is prepared, MedITEX support team will access it remotely and test if everything is ready for the installation.
During this process, constant support from your IT team and a medical specialist is needed to resolve questions about staff and their roles, medical procedures performed, and other special details which our support member will have to configure during the installation of MedITEX.
The following information need to be provided prior or during installation:
- Definition of users;
| <a href="/images/User_first_definitions.xls"><img src="/images/plus48.png" alt="" width="48" height="48" /></a> | Please, use <a href="/images/User_first_definitions.xls">this excel sheet</a> to provide minimum user information and rights. |
- Definition of MedITEX Scheduler groups;
| <a href="/images/Scheduler_groups.xls"><img src="/images/plus48.png" alt="" width="48" height="48" /></a> | Please, use <a href="/images/Scheduler_groups.xls">this excel sheet</a> to provide groups. |
- Definition of MedITEX Scheduler resources;
| <a href="/images/Scheduler_resources.xls"><img src="/images/plus48.png" alt="" width="48" height="48" /></a> | Please, use <a href="/images/Scheduler_resources.xls">this excel sheet</a> to provide resources. |
- Definition of MedITEX Scheduler working times;
| <a href="/images/Scheduler_working_times.xls"><img src="/images/plus48.png" alt="" width="48" height="48" /></a> | Please, use <a href="/images/Scheduler_working_times.xls">this excel sheet</a> to provide working times for each resource. |
- Definition of MedITEX Scheduler treatments;
| <a href="/images/Scheduler_treatments.xls"><img src="/images/plus48.png" alt="" width="48" height="48" /></a> | Please, use <a href="/images/Scheduler_treatments.xls">this excel sheet</a> to provide types of treatments and resources attached to it. |
- Preparation of standard reports in Microsoft Word format.
3. Setup of satellite locations
- Setup of MedITEX access from satellite clinic to central data server.
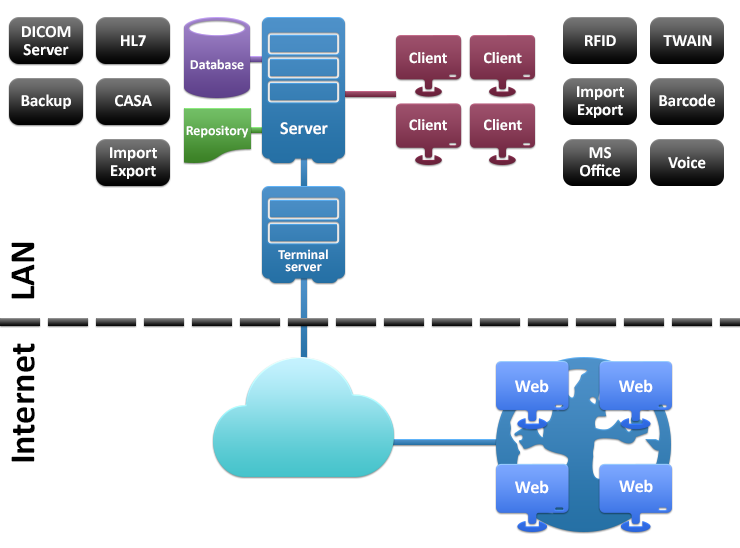
MedITEX Software Technical Specification - Overview
| <img src="/images/Tech2.png" alt="" width="156" height="243" /> |
Server (minimum requirements):
|
| <img style="display: block; margin-left: auto; margin-right: auto;" src="/images/Tech3.png" alt="" width="90" height="120" /> |
Database: Firebird SQL Server 2.5.
|
| <img style="display: block; margin-left: auto; margin-right: auto;" src="/images/Tech4.png" alt="" width="90" height="74" /> |
File based repository; Sharing of file space for all clients: All documents, pictures and common settings are stored in this location. Hard disk: Depends on the amount of data. |
| <img style="display: block; margin-left: auto; margin-right: auto;" src="/images/Tech5.png" alt="" width="88" height="60" /> |
Backup Service: Schedules and creates backup of database and repository. |
| <img style="display: block; margin-left: auto; margin-right: auto;" src="/images/Tech7.png" alt="" width="108" height="70" /> |
Minimum hardware requirements:
|
| <img style="display: block; margin-left: auto; margin-right: auto;" src="/images/Tech8.png" alt="" width="89" height="59" /> |
MS Office Integration: All letters based on MS Word templates. Minimum requirement: MS Office 2003. |
| <img style="display: block; margin-left: auto; margin-right: auto;" src="/images/Tech9.png" alt="" width="87" height="60" /> |
TWAIN: TWAIN is used for importing patient photos, ultrasound images (Frame Grabber), etc. |
| <img style="display: block; margin-left: auto; margin-right: auto;" src="/images/Tech10.png" alt="" width="88" height="59" /> |
Voice: Record and play voice messages. |
| <img style="display: block; margin-left: auto; margin-right: auto;" src="/images/Tech12.png" alt="" width="155" height="166" /> |
Terminal Server Connection (minimum requirements):
|
|
<a style="font-size: small;" href="/index.php?title=Main_Page">Back to MedITEX products</a> |
<a href="#top">Back to top</a> |
